
MLT4601 60cm Decorative Lift Door
Page 1
SPECIFICATION SHEETS 240609 Notes • All installations must be done in accordance with local codes. M 22 1/16" - 22 3/16" 23 7/16" Location Codes M - 110 Volt - 15 Amp - 3-wire device. (1 live / neutral / ground). NOTE: Drawing is not to scale. Product and Cut-out Dimensions Micro Housing MLT4601 17 11/16" 18 1/8" 16 3/4" min.
SPECIFICATION SHEETS 240609 Notes • All installations must be done in accordance with local codes. M 22 1/16" - 22 3/16" 23 7/16" Location Codes M - 110 Volt - 15 Amp - 3-wire device. (1 live / neutral / ground). NOTE: Drawing is not to scale. Product and Cut-out Dimensions Micro Housing MLT4601 17 11/16" 18 1/8" 16 3/4" min.

Operating and Installation manual
Page 1
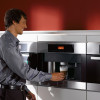
Operating and Installation Instructions Coffee System with convertible water connection CVA 4066 To prevent accidents and appliance damage read these instructions before installation or use. en - US, CA M.-Nr. 07 818 660
Operating and Installation Instructions Coffee System with convertible water connection CVA 4066 To prevent accidents and appliance damage read these instructions before installation or use. en - US, CA M.-Nr. 07 818 660

Operating and Installation manual
Page 3
Contents Water hardness 30 Display 31 Tone options 32 Water supply 32 Showroom program 33 Restoring factory default settings 33 Setting the serving sizes 34 User profiles 37 Selecting a user profile 37 Cleaning and care 40 Quick Guide 40 Descaling the appliance 53 Frequently asked questions 55 After sales service 66 Installation instructions 67 Caring for the environment 68 Plumbing 69 Lead free certificate 70 Electrical connection 71 Installation 72 Adjusting the door hinges 74 3
Contents Water hardness 30 Display 31 Tone options 32 Water supply 32 Showroom program 33 Restoring factory default settings 33 Setting the serving sizes 34 User profiles 37 Selecting a user profile 37 Cleaning and care 40 Quick Guide 40 Descaling the appliance 53 Frequently asked questions 55 After sales service 66 Installation instructions 67 Caring for the environment 68 Plumbing 69 Lead free certificate 70 Electrical connection 71 Installation 72 Adjusting the door hinges 74 3
Operating and Installation manual
Page 4
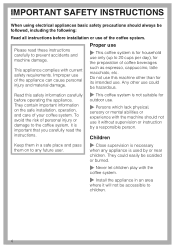
... children. Please read the instructions. ~ This coffee system is used by a responsible person. This appliance complies with the coffee system. ~ Install the appliance in a safe place and pass them in an area where it is important that you carefully read these instructions carefully to any... They could be scalded or burned. ~ Never let children play with current safety requirements. Do not use this safety information carefully before installation or use of coffee beverages such as espresso, cappuccino, latte macchiato, etc. To avoid the risk of personal injury or damage to ...
... children. Please read the instructions. ~ This coffee system is used by a responsible person. This appliance complies with the coffee system. ~ Install the appliance in a safe place and pass them in an area where it is important that you carefully read these instructions carefully to any... They could be scalded or burned. ~ Never let children play with current safety requirements. Do not use this safety information carefully before installation or use of coffee beverages such as espresso, cappuccino, latte macchiato, etc. To avoid the risk of personal injury or damage to ...
Operating and Installation manual
Page 5
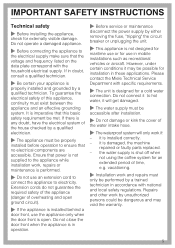
...installed behind a door front, use or for a cold water connection. Repairs and other work if: - the water supply is properly installed... and grounded by unauthorized persons could be dangerous and may be possible for installation... only be accessible after installation. ~ Do not damage...be properly installed before operation... front is installed correctly. -...installations such as recreational vehicles...vacationing. ~ Installation work , ...INSTRUCTIONS Technical safety ~ Before installing the appliance, check for ...installation work and repairs must be...
...installed behind a door front, use or for a cold water connection. Repairs and other work if: - the water supply is properly installed... and grounded by unauthorized persons could be dangerous and may be possible for installation... only be accessible after installation. ~ Do not damage...be properly installed before operation... front is installed correctly. -...installations such as recreational vehicles...vacationing. ~ Installation work , ...INSTRUCTIONS Technical safety ~ Before installing the appliance, check for ...installation work and repairs must be...
Operating and Installation manual
Page 6
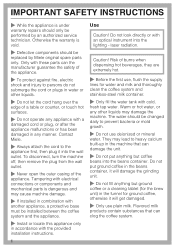
...the cord hang over the edge of a table or counter, or touch hot surfaces. ~ Do not operate any appliance with the provided installation instructions. 6 Use Caution! Contact Miele. ~ Always attach the cord to prevent bacteria or mold growth. ~ Do not use plain milk. Do not look directly or with ...the appliance. They may lead to persons do not submerge the cord or plugs in water or other liquids may cause machine damage. ~ If installed in any manner. Only with cold, fresh tap water. Do not put anything but coffee beans into the beans container. Otherwise the warranty ...
...the cord hang over the edge of a table or counter, or touch hot surfaces. ~ Do not operate any appliance with the provided installation instructions. 6 Use Caution! Contact Miele. ~ Always attach the cord to prevent bacteria or mold growth. ~ Do not use plain milk. Do not look directly or with ...the appliance. They may lead to persons do not submerge the cord or plugs in water or other liquids may cause machine damage. ~ If installed in any manner. Only with cold, fresh tap water. Do not put anything but coffee beans into the beans container. Otherwise the warranty ...
Operating and Installation manual
Page 11
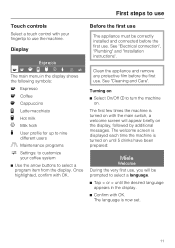
... first use The appliance must be prompted to use the machine. The language is turned on with the main switch, a welcome screen will be correctly installed and connected before the first use. Display Espresso qr H I J L n m C The main menu in the display. ^ Confirm with OK. ...select a program item from the display. The first few times the machine is now set. 11 See "Electrical connection", "Plumbing" and "Installation instructions". The welcome screen is displayed each time the machine is turned on until the desired language appears in the display shows the following ...
... first use The appliance must be prompted to use the machine. The language is turned on with the main switch, a welcome screen will be correctly installed and connected before the first use. Display Espresso qr H I J L n m C The main menu in the display. ^ Confirm with OK. ...select a program item from the display. The first few times the machine is now set. 11 See "Electrical connection", "Plumbing" and "Installation instructions". The welcome screen is displayed each time the machine is turned on until the desired language appears in the display shows the following ...
Operating and Installation manual
Page 30
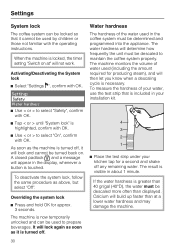
... as above, but select "Off". The machine is turned off any remaining water. It will appear in the display, whenever a button is visible in your installation kit. ^ Place the test strip under your water, use the test strip that it cannot be used by children or those not familiar with the...
... as above, but select "Off". The machine is turned off any remaining water. It will appear in the display, whenever a button is visible in your installation kit. ^ Place the test strip under your water, use the test strip that it cannot be used by children or those not familiar with the...
Operating and Installation manual
Page 58
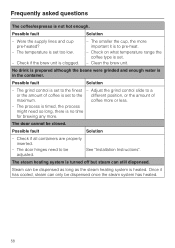
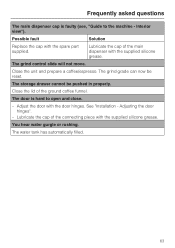
... type is turned off but steam can be dispensed once the steam system has heated. 58 The grind control is set to the finest - See "Installation Instructions". Frequently asked questions The coffee/espresso is set too low. - The door cannot be adjusted. Possible fault Solution - The temperature is not hot enough...
... type is turned off but steam can be dispensed once the steam system has heated. 58 The grind control is set to the finest - See "Installation Instructions". Frequently asked questions The coffee/espresso is set too low. - The door cannot be adjusted. Possible fault Solution - The temperature is not hot enough...
Operating and Installation manual
Page 62
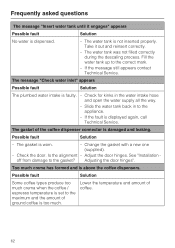
... in the water intake hose and open the water supply all the way. - The water tank was not filled correctly during the descaling process. See "Installation - The water tank is displayed again, call Technical Service. Lower the temperature and amount of ground coffee is set to the gasket?
... in the water intake hose and open the water supply all the way. - The water tank was not filled correctly during the descaling process. See "Installation - The water tank is displayed again, call Technical Service. Lower the temperature and amount of ground coffee is set to the gasket?
Operating and Installation manual
Page 63
... the supplied silicone grease. You hear water gurgle or rushing. The storage drawer cannot be reset. Lubricate the cap of the ground coffee funnel. See "Installation - Adjusting the door hinges". - Lubricate the cap of the main dispenser with the door hinges. The water tank has automatically filled. 63 Close the unit...
... the supplied silicone grease. You hear water gurgle or rushing. The storage drawer cannot be reset. Lubricate the cap of the ground coffee funnel. See "Installation - Adjusting the door hinges". - Lubricate the cap of the main dispenser with the door hinges. The water tank has automatically filled. 63 Close the unit...
Operating and Installation manual
Page 66
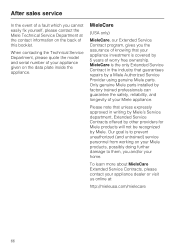
...the industry that unless expressly approved in writing by Miele's Service department, Extended Service Contracts offered by other providers for Miele products will not be recognized by a Miele Authorized Service Provider using genuine Miele parts. To learn more about MieleCare Extended Service Contracts... ownership. When contacting the Technical Service Department, please quote the model and serial number of this booklet. Only genuine Miele parts installed by 5 years of your appliance investment is to prevent unauthorized (and untrained) service personnel from working on the data...
...the industry that unless expressly approved in writing by Miele's Service department, Extended Service Contracts offered by other providers for Miele products will not be recognized by a Miele Authorized Service Provider using genuine Miele parts. To learn more about MieleCare Extended Service Contracts... ownership. When contacting the Technical Service Department, please quote the model and serial number of this booklet. Only genuine Miele parts installed by 5 years of your appliance investment is to prevent unauthorized (and untrained) service personnel from working on the data...
Operating and Installation manual
Page 67
Installation instructions Information is subject to obtain the most current product specification, technical & warranty information. Please refer to our website to change.
Installation instructions Information is subject to obtain the most current product specification, technical & warranty information. Please refer to our website to change.

Operating and Installation manual
Page 69
... remains in accordance with the requirements of the respective country. - The on -site: Minimum: 14.5 psi Maximum: 145 psi, if higher, install a pressure reduction valve. - To ensure the best coffee quality, the maximum length of the coffee machine. (Tighten the compression fitting by a ...licensed plumber. - All units and systems used . The machine can be accessible after installation. - If not present, have a water valve to the cold water supply. - Water pressure on -site water line must be connected without a...
... remains in accordance with the requirements of the respective country. - The on -site: Minimum: 14.5 psi Maximum: 145 psi, if higher, install a pressure reduction valve. - To ensure the best coffee quality, the maximum length of the coffee machine. (Tighten the compression fitting by a ...licensed plumber. - All units and systems used . The machine can be accessible after installation. - If not present, have a water valve to the cold water supply. - Water pressure on -site water line must be connected without a...
Operating and Installation manual
Page 71
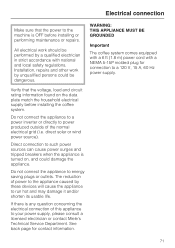
... supply, please consult a licensed electrician or contact Miele's Technical Service Department. If there is any question concerning the electrical connection of this appliance to such power sources can cause power surges and tripped breakers when the appliance is OFF before installing the coffee system. Installation, repairs and other work should be dangerous. All... energy saving plugs or outlets. See back page for connection to the machine is turned on the data plate match the household electrical supply before installing or performing maintenance or repairs.
... supply, please consult a licensed electrician or contact Miele's Technical Service Department. If there is any question concerning the electrical connection of this appliance to such power sources can cause power surges and tripped breakers when the appliance is OFF before installing the coffee system. Installation, repairs and other work should be dangerous. All... energy saving plugs or outlets. See back page for connection to the machine is turned on the data plate match the household electrical supply before installing or performing maintenance or repairs.
Operating and Installation manual
Page 72
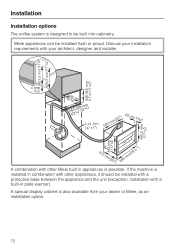
... combination with other appliances, it should be installed with a protective base between the appliance and the unit (exception: installation with other Miele built in plate warmer). Discuss your installation requirements with your dealer or Miele, as an installation option. 72 A special display cabinet is designed to be installed flush or proud. Miele appliances can be built into cabinetry.
... combination with other appliances, it should be installed with a protective base between the appliance and the unit (exception: installation with other Miele built in plate warmer). Discuss your installation requirements with your dealer or Miele, as an installation option. 72 A special display cabinet is designed to be installed flush or proud. Miele appliances can be built into cabinetry.
Operating and Installation manual
Page 73
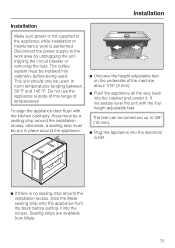
The coffee system must be a sealing strip around the installation recess; Do not use the appliance outside of this ...(10 mm). ^ Plug the appliance into cabinetry before putting it . otherwise, a sealing strip must be installed into the electrical outlet. ^ If there is performed. This unit should only be put in room temperatures ranging ...between 59 °F and 140 °F. Installation Installation Make sure power is not supplied to the appliance while installation or maintenance work area by unplugging the unit, tripping the circuit breaker or...
The coffee system must be a sealing strip around the installation recess; Do not use the appliance outside of this ...(10 mm). ^ Plug the appliance into cabinetry before putting it . otherwise, a sealing strip must be installed into the electrical outlet. ^ If there is performed. This unit should only be put in room temperatures ranging ...between 59 °F and 140 °F. Installation Installation Make sure power is not supplied to the appliance while installation or maintenance work area by unplugging the unit, tripping the circuit breaker or...
Operating and Installation manual
Page 74
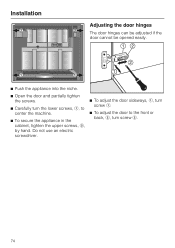
Installation Adjusting the door hinges The door hinges can be adjusted if the door cannot be opened easily. ^ Push the appliance into the niche. ^ Open the door and partially tighten the screws. ^ Carefully turn screw b. 74 Do not use an electric screwdriver. ^ To adjust the door sideways, a, turn screw a. ^ To adjust the door to the front or back, b, turn the lower screws, a, to center the machine. ^ To secure the appliance in the cabinet, tighten the upper screws, b, by hand.
Installation Adjusting the door hinges The door hinges can be adjusted if the door cannot be opened easily. ^ Push the appliance into the niche. ^ Open the door and partially tighten the screws. ^ Carefully turn screw b. 74 Do not use an electric screwdriver. ^ To adjust the door sideways, a, turn screw a. ^ To adjust the door to the front or back, b, turn the lower screws, a, to center the machine. ^ To secure the appliance in the cabinet, tighten the upper screws, b, by hand.
CVA4066 Coffee System
Page 1
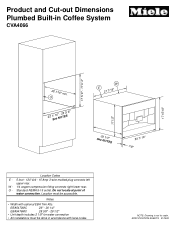
... to scale. Notes • Width with optional EBA Trim Kits: EBA5470MC 26" - 26 1/4" EBA5476MC 28 3/8" - 28 1/2" • Unit depth includes 2 1/8" for water connection • All installations must be done in Coffee System CVA4066 17 5/ 8" - 17 3/ 4" 17 1/2" 17 15/16" 22 1/16" min. W - 1/4 copper compression fitting connects right lower rear. Do not...
... to scale. Notes • Width with optional EBA Trim Kits: EBA5470MC 26" - 26 1/4" EBA5476MC 28 3/8" - 28 1/2" • Unit depth includes 2 1/8" for water connection • All installations must be done in Coffee System CVA4066 17 5/ 8" - 17 3/ 4" 17 1/2" 17 15/16" 22 1/16" min. W - 1/4 copper compression fitting connects right lower rear. Do not...

CVA4066 Coffee System
Page 3
...-in accordance with optional EBA Trim Kits: EBA5470MC 26" - 26 1/4" EBA5476MC 28 3/8" - 28 1/2" • Unit depth includes 2 1/8" for water connection • All installations must be done in Coffee System CVA 4066 over H4XXX Oven 22 1S/ e1e6"N-O2T2E3S/ 8" 22 1/16" min. O - W - 1/4 copper compression fitting connects right lower rear. Standard NEMA 5-15 outlet. Do...
...-in accordance with optional EBA Trim Kits: EBA5470MC 26" - 26 1/4" EBA5476MC 28 3/8" - 28 1/2" • Unit depth includes 2 1/8" for water connection • All installations must be done in Coffee System CVA 4066 over H4XXX Oven 22 1S/ e1e6"N-O2T2E3S/ 8" 22 1/16" min. O - W - 1/4 copper compression fitting connects right lower rear. Standard NEMA 5-15 outlet. Do...