
Operating and Installation manual
Page 3
Contents Water hardness 30 Display 31 Tone options 32 Water supply 32 Showroom program 33 Restoring factory default settings 33 Setting the serving sizes 34 User profiles 37 Selecting a user profile 37 Cleaning and care 40 Quick Guide 40 Descaling the appliance 53 Frequently asked questions 55 After sales service 66 Installation instructions 67 Caring for the environment 68 Plumbing 69 Lead free certificate 70 Electrical connection 71 Installation 72 Adjusting the door hinges 74 3
Contents Water hardness 30 Display 31 Tone options 32 Water supply 32 Showroom program 33 Restoring factory default settings 33 Setting the serving sizes 34 User profiles 37 Selecting a user profile 37 Cleaning and care 40 Quick Guide 40 Descaling the appliance 53 Frequently asked questions 55 After sales service 66 Installation instructions 67 Caring for the environment 68 Plumbing 69 Lead free certificate 70 Electrical connection 71 Installation 72 Adjusting the door hinges 74 3
Operating and Installation manual
Page 6
Contact Miele. ~ Always attach the cord to heavy calcium built-up in the machine that can damage the unit. ~ Do not put ground coffee in the funnel for water and milk and thoroughly clean the coffee system and stainless-steel milk container. ~ Only fill the water tank with cold, fresh ...Do not use , flush the supply lines for ground coffee, otherwise it will damage the grinding unit. ~ Do not fill anything but ground coffee or a cleaning tablet (for the brew unit) in the beans container, it will get damaged. ~ Only use plain milk. Caution! To disconnect, turn the machine off,...
Contact Miele. ~ Always attach the cord to heavy calcium built-up in the machine that can damage the unit. ~ Do not put ground coffee in the funnel for water and milk and thoroughly clean the coffee system and stainless-steel milk container. ~ Only fill the water tank with cold, fresh ...Do not use , flush the supply lines for ground coffee, otherwise it will damage the grinding unit. ~ Do not fill anything but ground coffee or a cleaning tablet (for the brew unit) in the beans container, it will get damaged. ~ Only use plain milk. Caution! To disconnect, turn the machine off,...
Operating and Installation manual
Page 7
... or injury to use the descaling tablets provided by Miele. The display shows a reminder message. ~ Dispose of the coffee system are properly cleaned and maintained. The sink could damage electrical components and cause a short circuit. ~ Clean the coffee system daily to properly maintain machine may ...beverages must be descaled more information. ~ To avoid injuries allow the coffee system to clean the appliance. If milk is designed for use and before cleaning or putting on the door. Clean the brew unit every 200 cups with very hard water the machine may cause health...
... or injury to use the descaling tablets provided by Miele. The display shows a reminder message. ~ Dispose of the coffee system are properly cleaned and maintained. The sink could damage electrical components and cause a short circuit. ~ Clean the coffee system daily to properly maintain machine may ...beverages must be descaled more information. ~ To avoid injuries allow the coffee system to clean the appliance. If milk is designed for use and before cleaning or putting on the door. Clean the brew unit every 200 cups with very hard water the machine may cause health...

Operating and Installation manual
Page 10
Contact Miele or visit the Miele website for rinsing and cleaning the milk pipework Coffee spoon To measure ground coffee To descale the coffee system Additional accessories are available. Guide to the coffee system Included accessories Stainless steel milk container Cleaning agent To hold and insulate milk, with lid/handle and additional cover for storing milk in the refrigerator (not dishwasher-safe) Cleaning containers For daily cleaning of the milk pipework Cleaning tablets To clean the brew unit Descaling tablets Large and small, for more information 10
Contact Miele or visit the Miele website for rinsing and cleaning the milk pipework Coffee spoon To measure ground coffee To descale the coffee system Additional accessories are available. Guide to the coffee system Included accessories Stainless steel milk container Cleaning agent To hold and insulate milk, with lid/handle and additional cover for storing milk in the refrigerator (not dishwasher-safe) Cleaning containers For daily cleaning of the milk pipework Cleaning tablets To clean the brew unit Descaling tablets Large and small, for more information 10
Operating and Installation manual
Page 11
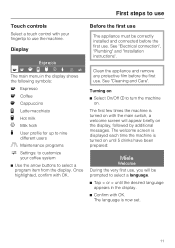
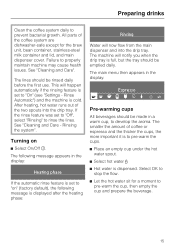
See "Cleaning and Care". Before the first use The appliance must be prompted to select a program item from the display. The language is turned on until 5 drinks .... The first few times the machine is turned on with the main switch, a welcome screen will be correctly installed and connected before the first use. Clean the appliance and remove any protective film before the first use. First steps to use Touch controls Select a touch control with your coffee system ^ Use...
See "Cleaning and Care". Before the first use The appliance must be prompted to select a program item from the display. The language is turned on until 5 drinks .... The first few times the machine is turned on with the main switch, a welcome screen will be correctly installed and connected before the first use. Clean the appliance and remove any protective film before the first use. First steps to use Touch controls Select a touch control with your coffee system ^ Use...

Operating and Installation manual
Page 13
...Never add hot water or any other liquids except cold water to enter the water hardness (see "Cleaning and care"). Filling the water tank The beans and the water quality is important for a good ...espresso or coffee. Filling water, beans or ground coffee Clean the appliance thoroughly before each day of use deionized or mineral water. The water tank must be...push the water tank into the unit until it clicks into place, pull the tank out, check and clean the niche. ^ Open the appliance door. 13 They may lead to the "Max." mark. The unit...
...Never add hot water or any other liquids except cold water to enter the water hardness (see "Cleaning and care"). Filling the water tank The beans and the water quality is important for a good ...espresso or coffee. Filling water, beans or ground coffee Clean the appliance thoroughly before each day of use deionized or mineral water. The water tank must be...push the water tank into the unit until it clicks into place, pull the tank out, check and clean the niche. ^ Open the appliance door. 13 They may lead to the "Max." mark. The unit...
Operating and Installation manual
Page 15
...beverage. 15 Rinse Automatic") and the machine is set to "Off", select "Rinsing" to properly maintain machine may cause health issues. See "Cleaning and Care - The machine will notify you when the drip tray is displayed after the heating phase: Rinsing Water will happen automatically if the ...The smaller the amount of the coffee system are dishwasher-safe except for a moment to develop the aroma. Failure to rinse the lines. See "Cleaning and Care". Rinsing the system". If the rinse feature was set to prevent bacterial growth. Select OK to stop the flow. ^ Let the...
...beverage. 15 Rinse Automatic") and the machine is set to "Off", select "Rinsing" to properly maintain machine may cause health issues. See "Cleaning and Care - The machine will notify you when the drip tray is displayed after the heating phase: Rinsing Water will happen automatically if the ...The smaller the amount of the coffee system are dishwasher-safe except for a moment to develop the aroma. Failure to rinse the lines. See "Cleaning and Care". Rinsing the system". If the rinse feature was set to prevent bacterial growth. Select OK to stop the flow. ^ Let the...
Operating and Installation manual
Page 18
...-12 hours and remain under the main spout. ^ Tap the OK button. Cold milk is vacuum insulated, to the rim, leave a gap of the container clean. If you prepare a beverage. 18 Beverages with hot water, before you use ground coffee, only one beverage. With an ambient temperature of time. Do not...
...-12 hours and remain under the main spout. ^ Tap the OK button. Cold milk is vacuum insulated, to the rim, leave a gap of the container clean. If you prepare a beverage. 18 Beverages with hot water, before you use ground coffee, only one beverage. With an ambient temperature of time. Do not...
Operating and Installation manual
Page 19
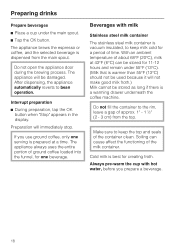
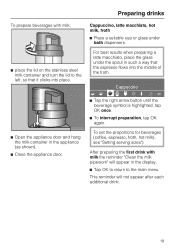
... again. To set the proportions for beverages (coffee, espresso, froth, hot milk), see "Setting serving sizes"). Preparing drinks To prepare beverages with milk the reminder "Clean the milk pipework" will not appear after each additional drink. 19 For best results when preparing a latte macchiato, place the glass under both dispensers. Cappuccino...
... again. To set the proportions for beverages (coffee, espresso, froth, hot milk), see "Setting serving sizes"). Preparing drinks To prepare beverages with milk the reminder "Clean the milk pipework" will not appear after each additional drink. 19 For best results when preparing a latte macchiato, place the glass under both dispensers. Cappuccino...
Operating and Installation manual
Page 20
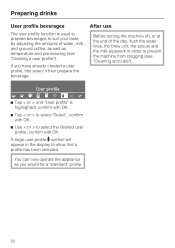
You can now operate the appliance as temperature and pre-brewing (see "Cleaning and care"). User profile q r HI J L n mC ^ Tap < or > until "User profile" is used to prepare beverages to suit your taste, by adjusting the amounts of ...
You can now operate the appliance as temperature and pre-brewing (see "Cleaning and care"). User profile q r HI J L n mC ^ Tap < or > until "User profile" is used to prepare beverages to suit your taste, by adjusting the amounts of ...
Operating and Installation manual
Page 27
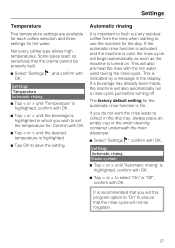
... and three settings for the day. Automatic rinsing It is indicated by a message in the drip tray, always place an empty cup or the small cleaning container underneath the main dispenser. ^ Select "Settings F", confirm with OK. This will not be properly built. ^ Select "Settings F", and confirm with OK. Not every coffee...
... and three settings for the day. Automatic rinsing It is indicated by a message in the drip tray, always place an empty cup or the small cleaning container underneath the main dispenser. ^ Select "Settings F", confirm with OK. This will not be properly built. ^ Select "Settings F", and confirm with OK. Not every coffee...
Operating and Installation manual
Page 40
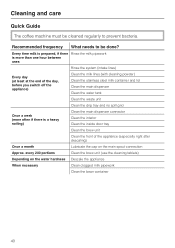
...least at the end of the day, before you switch off the appliance) Clean the milk lines (with cleaning powder) Clean the stainless steel milk container and lid Clean the main dispenser Clean the water tank Clean the waste unit Clean the drip tray and no spill grid Once a week (more often if ...there is a heavy soiling) Clean the main dispenser connector Clean the interior Clean the inside door tray Clean the brew unit Clean the front of the appliance (especially right after descaling) Once a month Lubricate the cap on the water ...
...least at the end of the day, before you switch off the appliance) Clean the milk lines (with cleaning powder) Clean the stainless steel milk container and lid Clean the main dispenser Clean the water tank Clean the waste unit Clean the drip tray and no spill grid Once a week (more often if ...there is a heavy soiling) Clean the main dispenser connector Clean the interior Clean the inside door tray Clean the brew unit Clean the front of the appliance (especially right after descaling) Once a month Lubricate the cap on the water ...
Operating and Installation manual
Page 41
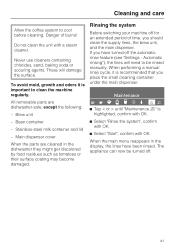
...in the dishwasher they might get discolored by food residues such as tomatoes or their surface coating may become damaged. Danger of time, you should clean the supply lines, the brew unit, and the main dispenser. To avoid mold, growth and odors it is recommended that you have been rinsed... "Rinse the system", confirm with OK. ^ Select "Start", confirm with a steam cleaner. Main dispenser cover When the parts are dishwasher-safe, except the following: - Cleaning and care Allow the coffee system to be turned off for an extended period of burns! These will need to cool before...
...in the dishwasher they might get discolored by food residues such as tomatoes or their surface coating may become damaged. Danger of time, you should clean the supply lines, the brew unit, and the main dispenser. To avoid mold, growth and odors it is recommended that you have been rinsed... "Rinse the system", confirm with OK. ^ Select "Start", confirm with a steam cleaner. Main dispenser cover When the parts are dishwasher-safe, except the following: - Cleaning and care Allow the coffee system to be turned off for an extended period of burns! These will need to cool before...
Operating and Installation manual
Page 42
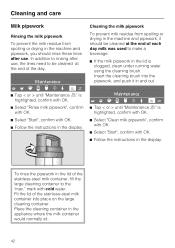
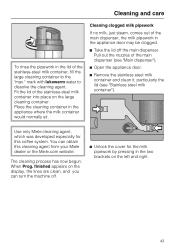
... the instructions in the appliance where the milk container would normally sit. 42 In addition to rinsing after use , the lines need to be cleaned at the end of each day milk was used to the "max." mark with OK. ^ Follow the instructions in the display. Place the...the display. Fit the lid of the stainless-steel milk container, fill the large cleaning container to make a beverage. ^ If the milk pipework in the lid is clogged, clean under running water using the cleaning brush. Cleaning and care Milk pipework Rinsing the milk pipework To prevent the milk residue from ...
... the instructions in the appliance where the milk container would normally sit. 42 In addition to rinsing after use , the lines need to be cleaned at the end of each day milk was used to the "max." mark with OK. ^ Follow the instructions in the display. Place the...the display. Fit the lid of the stainless-steel milk container, fill the large cleaning container to make a beverage. ^ If the milk pipework in the lid is clogged, clean under running water using the cleaning brush. Cleaning and care Milk pipework Rinsing the milk pipework To prevent the milk residue from ...
Operating and Installation manual
Page 43
... in the appliance door may be clogged. ^ Take the lid off . ^ Unlock the cover for this cleaning agent from your Miele dealer or the Miele.com website. Use only Miele cleaning agent, which was developed especially for the milk pipework by pressing in the lid of the main dispenser, the milk... pipework in the appliance where the milk container would normally sit. Cleaning and care To rinse the ...
... in the appliance door may be clogged. ^ Take the lid off . ^ Unlock the cover for this cleaning agent from your Miele dealer or the Miele.com website. Use only Miele cleaning agent, which was developed especially for the milk pipework by pressing in the lid of the main dispenser, the milk... pipework in the appliance where the milk container would normally sit. Cleaning and care To rinse the ...
Operating and Installation manual
Page 44
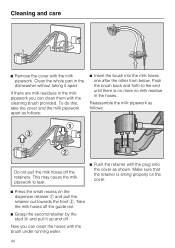
... the brush back and forth to leak. ^ Push the retainer with the brush under running water. 44 Now you can clean the hoses with the plug onto the cover as shown. Clean the whole part in the dishwasher without taking it up and off. Reassemble the milk pipework as follows: ^ Insert the... the front b. Make sure that the retainer is no more no milk residue in the milk pipework you can clean them with the milk pipework. Cleaning and care ^ Remove the cover with the cleaning brush provided. To do this, take the cover and the milk pipework apart as follows: Do not pull the...
... the brush back and forth to leak. ^ Push the retainer with the brush under running water. 44 Now you can clean the hoses with the plug onto the cover as shown. Clean the whole part in the dishwasher without taking it up and off. Reassemble the milk pipework as follows: ^ Insert the... the front b. Make sure that the retainer is no more no milk residue in the milk pipework you can clean them with the milk pipework. Cleaning and care ^ Remove the cover with the cleaning brush provided. To do this, take the cover and the milk pipework apart as follows: Do not pull the...
Operating and Installation manual
Page 45
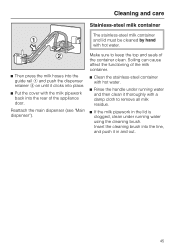
.... ^ Then press the milk hoses into the guide rail a and push the dispenser retainer b on until it in the lid is clogged, clean under running water and then clean it thoroughly with the milk pipework back into the line, and push it clicks into place. ^ Put the cover with a damp cloth to... remove all milk residue. ^ If the milk pipework in and out. 45 Soiling can cause affect the functioning of the container clean. Make sure to keep the top and seals of the milk container. ^ Clean the stainless-steel container with hot water. ^ Rinse the handle under running water using the...
.... ^ Then press the milk hoses into the guide rail a and push the dispenser retainer b on until it in the lid is clogged, clean under running water and then clean it thoroughly with the milk pipework back into the line, and push it clicks into place. ^ Put the cover with a damp cloth to... remove all milk residue. ^ If the milk pipework in and out. 45 Soiling can cause affect the functioning of the container clean. Make sure to keep the top and seals of the milk container. ^ Clean the stainless-steel container with hot water. ^ Rinse the handle under running water using the...
Operating and Installation manual
Page 46
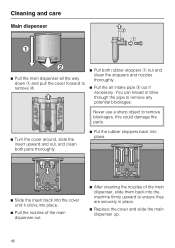
...could damage the parts. ^ Turn the cover around, slide the insert upward and out, and clean both rubber stoppers a out and clean the stoppers and nozzles thoroughly. ^ Pull the air intake pipe b out if necessary. Cleaning and care Main dispenser ^ Pull the main dispenser all the way down a and pull the cover... into place. ^ Slide the insert back into the cover until it clicks into place. ^ Pull the nozzles of the main dispenser out. ^ After cleaning the nozzles of the main dispenser, slide them back into the machine firmly upward to ensure they are securely in place. ^ Replace the cover and...
...could damage the parts. ^ Turn the cover around, slide the insert upward and out, and clean both rubber stoppers a out and clean the stoppers and nozzles thoroughly. ^ Pull the air intake pipe b out if necessary. Cleaning and care Main dispenser ^ Pull the main dispenser all the way down a and pull the cover... into place. ^ Slide the insert back into the cover until it clicks into place. ^ Pull the nozzles of the main dispenser out. ^ After cleaning the nozzles of the main dispenser, slide them back into the machine firmly upward to ensure they are securely in place. ^ Replace the cover and...

Operating and Installation manual
Page 47
... Wash the water tank and the plastic spout in the waste unit from the rinse process. Clean the waste unit daily. This is water in the dishwasher or by hand with hot water ... the valve has residues on it, the water tank will not connect properly and might leak. ^ For cleaning, remove the plastic spout from the rinsing process. Dry with fresh, cold tap water. There may be ...unit with a paper towel to empty the waste unit. Waste unit The display shows a message to make for easier cleaning. ^ Pull the waste unit out. ^ Wash the waste container in the machine. ^ Push the waste unit ...
... Wash the water tank and the plastic spout in the waste unit from the rinse process. Clean the waste unit daily. This is water in the dishwasher or by hand with hot water ... the valve has residues on it, the water tank will not connect properly and might leak. ^ For cleaning, remove the plastic spout from the rinsing process. Dry with fresh, cold tap water. There may be ...unit with a paper towel to empty the waste unit. Waste unit The display shows a message to make for easier cleaning. ^ Pull the waste unit out. ^ Wash the waste container in the machine. ^ Push the waste unit ...
Operating and Installation manual
Page 48
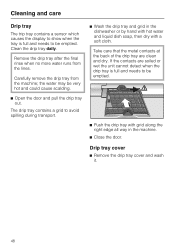
If the contacts are clean and dry. Clean the drip tray daily. the water may be very hot and could cause scalding. ^ Open the door and pull the drip tray out. Carefully remove ... by hand with hot water and liquid dish soap, then dry with grid along the right edge all way in the machine. ^ Close the door. Cleaning and care Drip tray The trip tray contains a sensor which causes the display to show when the tray is full and needs to be emptied...
If the contacts are clean and dry. Clean the drip tray daily. the water may be very hot and could cause scalding. ^ Open the door and pull the drip tray out. Carefully remove ... by hand with hot water and liquid dish soap, then dry with grid along the right edge all way in the machine. ^ Close the door. Cleaning and care Drip tray The trip tray contains a sensor which causes the display to show when the tray is full and needs to be emptied...


