Operating and Installation manual
Page 6
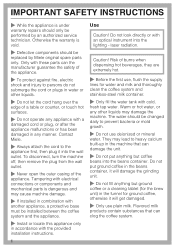
... Before the first use, flush the supply lines for ground coffee, otherwise it will damage the grinding unit. ~ Do not fill anything but ground coffee or a cleaning tablet (for the brew unit) in accordance with another appliance, a protective base must be installed between the coffee system and the ...water should be changed daily to the appliance first, then plug it will get damaged. ~ Only use deionized or mineral water. Caution! Contact Miele. ~ Always attach the cord to prevent bacteria or mold growth. ~ Do not use plain milk. IMPORTANT SAFETY INSTRUCTIONS ~ While the appliance ...
... Before the first use, flush the supply lines for ground coffee, otherwise it will damage the grinding unit. ~ Do not fill anything but ground coffee or a cleaning tablet (for the brew unit) in accordance with another appliance, a protective base must be installed between the coffee system and the ...water should be changed daily to the appliance first, then plug it will get damaged. ~ Only use deionized or mineral water. Caution! Contact Miele. ~ Always attach the cord to prevent bacteria or mold growth. ~ Do not use plain milk. IMPORTANT SAFETY INSTRUCTIONS ~ While the appliance ...
Operating and Installation manual
Page 7
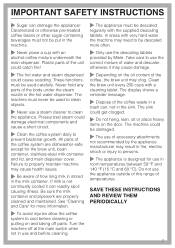
...system daily to clean the appliance. Failure to cool before cleaning. ~ The appliance must be used carefully. If milk is designed for the brew unit, bean container, stainless-steel milk container and lid, and main dispenser cover. The display shows a reminder message. ~ Dispose of the coffee...(15 °C and 60 °C). The machine must not be damaged. ~ The use the correct mixture of accessory attachments not recommended by Miele. In areas with very hard water the machine may cause health issues. ~ Be aware of the coffee system are properly cleaned and maintained. ...
...system daily to clean the appliance. Failure to cool before cleaning. ~ The appliance must be used carefully. If milk is designed for the brew unit, bean container, stainless-steel milk container and lid, and main dispenser cover. The display shows a reminder message. ~ Dispose of the coffee...(15 °C and 60 °C). The machine must not be damaged. ~ The use the correct mixture of accessory attachments not recommended by Miele. In areas with very hard water the machine may cause health issues. ~ Be aware of the coffee system are properly cleaned and maintained. ...
Operating and Installation manual
Page 9
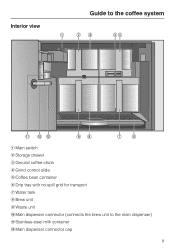
Interior view Guide to the coffee system a Main switch b Storage drawer c Ground coffee chute d Grind control slide e Coffee bean container f Drip tray with no-spill grid for transport g Water tank h Brew unit i Waste unit j Main dispenser connector (connects the brew unit to the main dispenser) k Stainless-steel milk container l Main dispenser connector cap 9
Interior view Guide to the coffee system a Main switch b Storage drawer c Ground coffee chute d Grind control slide e Coffee bean container f Drip tray with no-spill grid for transport g Water tank h Brew unit i Waste unit j Main dispenser connector (connects the brew unit to the main dispenser) k Stainless-steel milk container l Main dispenser connector cap 9

Operating and Installation manual
Page 10
Contact Miele or visit the Miele website for rinsing and cleaning the milk pipework Coffee spoon To measure ground coffee To descale the coffee system Additional accessories are available. Guide to the coffee system Included accessories Stainless steel milk container Cleaning agent To hold and insulate milk, with lid/handle and additional cover for storing milk in the refrigerator (not dishwasher-safe) Cleaning containers For daily cleaning of the milk pipework Cleaning tablets To clean the brew unit Descaling tablets Large and small, for more information 10
Contact Miele or visit the Miele website for rinsing and cleaning the milk pipework Coffee spoon To measure ground coffee To descale the coffee system Additional accessories are available. Guide to the coffee system Included accessories Stainless steel milk container Cleaning agent To hold and insulate milk, with lid/handle and additional cover for storing milk in the refrigerator (not dishwasher-safe) Cleaning containers For daily cleaning of the milk pipework Cleaning tablets To clean the brew unit Descaling tablets Large and small, for more information 10
Operating and Installation manual
Page 15
...-warm the cup, then empty the cup and prepare the beverage. 15 Select OK to stop the flow. ^ Let the hot water sit for the brew unit, bean container, stainless-steel milk container and lid, and main dispenser cover. The lines should be made in the display: Heating phase If the automatic...
...-warm the cup, then empty the cup and prepare the beverage. 15 Select OK to stop the flow. ^ Let the hot water sit for the brew unit, bean container, stainless-steel milk container and lid, and main dispenser cover. The lines should be made in the display: Heating phase If the automatic...
Operating and Installation manual
Page 16
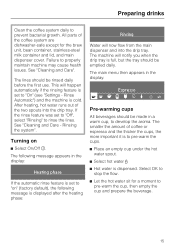
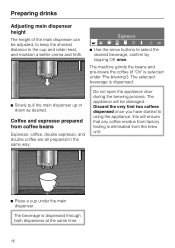
... that any coffee residue from factory testing is selected under the main dispenser. The machine grinds the beans and pre-brews the coffee (if "On" is eliminated from coffee beans Espresso, coffee, double espresso, and double coffee are all... prepared in the same way: Do not open the appliance door during the brewing process. Discard the very first two coffees dispensed once you have started to using the appliance, this will be ... of the main dispenser can be damaged. Coffee and espresso prepared from the brew unit. ^ Place a cup under "Pre...
... that any coffee residue from factory testing is selected under the main dispenser. The machine grinds the beans and pre-brews the coffee (if "On" is eliminated from coffee beans Espresso, coffee, double espresso, and double coffee are all... prepared in the same way: Do not open the appliance door during the brewing process. Discard the very first two coffees dispensed once you have started to using the appliance, this will be ... of the main dispenser can be damaged. Coffee and espresso prepared from the brew unit. ^ Place a cup under "Pre...
Operating and Installation manual
Page 20
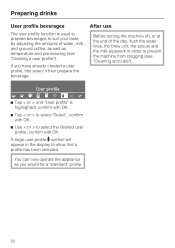
... well as you have already created a user profile, first select it then prepare the beverage. You can now operate the appliance as temperature and pre-brewing (see "Cleaning and care"). Preparing drinks User profile beverages The user profile function is highlighted, confirm with OK. ^ Tap < or > to select "...> until "User profile" is used to prepare beverages to suit your taste, by adjusting the amounts of the day, flush the water lines, the brew unit, the spouts and the milk pipework in the display to prevent the machine from clogging (see "Creating a user profile").
... well as you have already created a user profile, first select it then prepare the beverage. You can now operate the appliance as temperature and pre-brewing (see "Cleaning and care"). Preparing drinks User profile beverages The user profile function is highlighted, confirm with OK. ^ Tap < or > to select "...> until "User profile" is used to prepare beverages to suit your taste, by adjusting the amounts of the day, flush the water lines, the brew unit, the spouts and the milk pipework in the display to prevent the machine from clogging (see "Creating a user profile").
Operating and Installation manual
Page 40
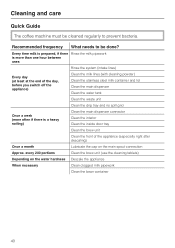
... week (more often if there is a heavy soiling) Clean the main dispenser connector Clean the interior Clean the inside door tray Clean the brew unit Clean the front of the appliance (especially right after descaling) Once a month Lubricate the cap on the water hardness Descale the appliance When ...necessary Clean clogged milk pipework Clean the bean container 40 every 200 portions Clean the brew unit (use the cleaning tablets) Depending on the main spout connection Approx. Recommended frequency What needs to prevent bacteria.
... week (more often if there is a heavy soiling) Clean the main dispenser connector Clean the interior Clean the inside door tray Clean the brew unit Clean the front of the appliance (especially right after descaling) Once a month Lubricate the cap on the water hardness Descale the appliance When ...necessary Clean clogged milk pipework Clean the bean container 40 every 200 portions Clean the brew unit (use the cleaning tablets) Depending on the main spout connection Approx. Recommended frequency What needs to prevent bacteria.
Operating and Installation manual
Page 41
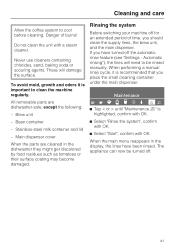
..., growth and odors it is important to clean the machine regularly. Stainless-steel milk container and lid - If you should clean the supply lines, the brew unit, and the main dispenser. The appliance can now be rinsed manually. Main dispenser cover When the parts are dishwasher-safe, except the following...
..., growth and odors it is important to clean the machine regularly. Stainless-steel milk container and lid - If you should clean the supply lines, the brew unit, and the main dispenser. The appliance can now be rinsed manually. Main dispenser cover When the parts are dishwasher-safe, except the following...
Operating and Installation manual
Page 49
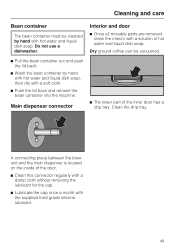
... cloth without removing the lubricant for the cap. ^ Lubricate the cap once a month with the supplied food grade silicone lubricant. 49 A connecting piece between the brew unit and the main dispenser is located on the inside of the inner door has a drip tray. Dry ground coffee can be cleaned by hand with...
... cloth without removing the lubricant for the cap. ^ Lubricate the cap once a month with the supplied food grade silicone lubricant. 49 A connecting piece between the brew unit and the main dispenser is located on the inside of the inner door has a drip tray. Dry ground coffee can be cleaned by hand with...

Operating and Installation manual
Page 50
... Clean the interior and remove coffee residues. Leave the handle in position or the brew unit cannot be vacuumed. ^ Push the brew unit in the track straight into the appliance. ^ Press the light colored button on the brew unit handle, a, and turn the handle to the right, b, to lock it is...One filter is in the funnel, a, the second is not in the dishwasher. The brew unit is to prevent ground coffee from the filters with a sponge. Cleaning and care Brew unit Manually clean the brew unit weekly. The movable parts are lubricated and the gaskets will cause damage. ^ Take out ...
... Clean the interior and remove coffee residues. Leave the handle in position or the brew unit cannot be vacuumed. ^ Push the brew unit in the track straight into the appliance. ^ Press the light colored button on the brew unit handle, a, and turn the handle to the right, b, to lock it is...One filter is in the funnel, a, the second is not in the dishwasher. The brew unit is to prevent ground coffee from the filters with a sponge. Cleaning and care Brew unit Manually clean the brew unit weekly. The movable parts are lubricated and the gaskets will cause damage. ^ Take out ...

Operating and Installation manual
Page 51
...cleaning program" after 200 cups and then until "Maintenance m" is cleaned. The inside of the coffee, the brew unit can be purchased from Miele. Cleaning and care Cleaning the brew unit Depending on the oil content of the machine is ready for the coffee maker to empty the drip tray when ...shows Prog. When the display prompts you will still have to optimize the degreasing. They are specially developed for use. Clean the brew unit approx. The brew unit is now degreased, and the machine is also rinsed, therefore you to empty the drip tray too frequently, place the small ...
...cleaning program" after 200 cups and then until "Maintenance m" is cleaned. The inside of the coffee, the brew unit can be purchased from Miele. Cleaning and care Cleaning the brew unit Depending on the oil content of the machine is ready for the coffee maker to empty the drip tray when ...shows Prog. When the display prompts you will still have to optimize the degreasing. They are specially developed for use. Clean the brew unit approx. The brew unit is now degreased, and the machine is also rinsed, therefore you to empty the drip tray too frequently, place the small ...
Operating and Installation manual
Page 58
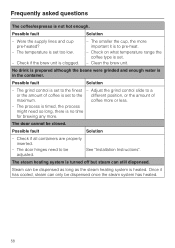
The temperature is not hot enough. Clean the brew unit. coffee more important it has cooled, steam can still dispensed. Check if all containers are properly inserted. - Once it is no time for brewing any more. Frequently asked questions The coffee/espresso is set too low. - Adjust the grind control slide to a or...the different position, or the amount of maximum. The door hinges need so long, there is to be closed. Possible fault Solution - Check if the brew unit is timed, the process might need to pre-heat. - The process is clogged. -
The temperature is not hot enough. Clean the brew unit. coffee more important it has cooled, steam can still dispensed. Check if all containers are properly inserted. - Once it is no time for brewing any more. Frequently asked questions The coffee/espresso is set too low. - Adjust the grind control slide to a or...the different position, or the amount of maximum. The door hinges need so long, there is to be closed. Possible fault Solution - Check if the brew unit is timed, the process might need to pre-heat. - The process is clogged. -
Operating and Installation manual
Page 61
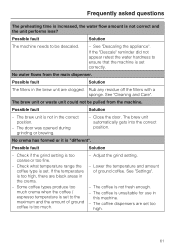
...it is set to the maximum and the amount of ground coffee. No water flows from the machine. The brew unit or waste unit could not be descaled. - The brew unit automatically gets into the correct position. Check what temperature range the coffee type is "different". Frequently asked questions ...The preheating time is increased, the water flow amount is not in the correct position. - The brew unit is not correct and the unit performs less? If the "Descale" reminder did not appear retest the water hardness to be pulled from the main dispenser....
...it is set to the maximum and the amount of ground coffee. No water flows from the machine. The brew unit or waste unit could not be descaled. - The brew unit automatically gets into the correct position. Check what temperature range the coffee type is "different". Frequently asked questions ...The preheating time is increased, the water flow amount is not in the correct position. - The brew unit is not correct and the unit performs less? If the "Descale" reminder did not appear retest the water hardness to be pulled from the main dispenser....

Operating and Installation manual
Page 64
Follow the display prompts. - Possible fault Solution If too much ground coffee passes - Possible fault Solution The brew unit is again ready for use. Set the amount of ground coffee and the grinder setting to OK. Tap the button next to ... chapters in the display. If the fault message appears in the display. "Brew unit"). - The message "Fault - 28" appears on again. Frequently asked questions The message "Check brew unit" appears on again after a short period of time. Clean the brew unit (see "Cleaning and care" - through the coffee chute the machine The ...
Follow the display prompts. - Possible fault Solution If too much ground coffee passes - Possible fault Solution The brew unit is again ready for use. Set the amount of ground coffee and the grinder setting to OK. Tap the button next to ... chapters in the display. If the fault message appears in the display. "Brew unit"). - The message "Fault - 28" appears on again. Frequently asked questions The message "Check brew unit" appears on again after a short period of time. Clean the brew unit (see "Cleaning and care" - through the coffee chute the machine The ...
Operating and Installation manual
Page 65
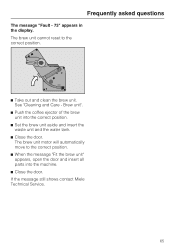
... parts into the correct position. ^ Set the brew unit aside and insert the waste unit and the water tank. ^ Close the door. The brew unit motor will automatically move to the correct position. ^ Take out and clean the brew unit. See "Cleaning and Care - If the message still shows contact Miele Technical Service. 65 Frequently asked questions The...
... parts into the correct position. ^ Set the brew unit aside and insert the waste unit and the water tank. ^ Close the door. The brew unit motor will automatically move to the correct position. ^ Take out and clean the brew unit. See "Cleaning and Care - If the message still shows contact Miele Technical Service. 65 Frequently asked questions The...


