Operating and Installation manual
Page 2
...Preparing your appliance for an extended vacaion 12 Filling water, beans or ground coffee 13 Filling the water tank 13 Filling the bean container 14 Filling ground coffee 14 Preparing drinks 15 Turning on 15 Pre-warming cups 15 Adjusting main dispenser height 16 Coffee and espresso prepared... from coffee beans 16 Coffee and espresso prepared from ground coffee 17 Beverages with milk 18 User profile beverages 20 Adjusting the coffee grinder 21 Settings 22 Language 22 Time of day 23 Timer 24 Coffee jug (dispensing...
...Preparing your appliance for an extended vacaion 12 Filling water, beans or ground coffee 13 Filling the water tank 13 Filling the bean container 14 Filling ground coffee 14 Preparing drinks 15 Turning on 15 Pre-warming cups 15 Adjusting main dispenser height 16 Coffee and espresso prepared... from coffee beans 16 Coffee and espresso prepared from ground coffee 17 Beverages with milk 18 User profile beverages 20 Adjusting the coffee grinder 21 Settings 22 Language 22 Time of day 23 Timer 24 Coffee jug (dispensing...
Operating and Installation manual
Page 6
... but ground coffee or a cleaning tablet (for the brew unit) in the funnel for water and milk and thoroughly clean the coffee system and stainless-steel milk container. ~ Only fill the water tank with a damaged cord or plug, or after the appliance malfunctions ...or has been damaged in accordance with an optical instrument into the wall outlet. They may lead to the appliance first, then plug it will get damaged. ~ Only use deionized or mineral water. Caution! Contact Miele...
... but ground coffee or a cleaning tablet (for the brew unit) in the funnel for water and milk and thoroughly clean the coffee system and stainless-steel milk container. ~ Only fill the water tank with a damaged cord or plug, or after the appliance malfunctions ...or has been damaged in accordance with an optical instrument into the wall outlet. They may lead to the appliance first, then plug it will get damaged. ~ Only use deionized or mineral water. Caution! Contact Miele...
Operating and Installation manual
Page 7
... to clean the appliance. The sink could cause scalding. Caramelized or otherwise pre-treated coffee beans or other sugar containing beverages must be put in the milk container. These functions must not be used to cool before cleaning. ~ The appliance must never be descaled regularly with very...to clean objects. ~ Never use of the coffee system are properly cleaned and maintained. All parts of accessory attachments not recommended by Miele. See "Cleaning and Care" for use the correct mixture of water and descaler, otherwise it can damage the appliance! Clean the brew...
... to clean the appliance. The sink could cause scalding. Caramelized or otherwise pre-treated coffee beans or other sugar containing beverages must be put in the milk container. These functions must not be used to cool before cleaning. ~ The appliance must never be descaled regularly with very...to clean objects. ~ Never use of the coffee system are properly cleaned and maintained. All parts of accessory attachments not recommended by Miele. See "Cleaning and Care" for use the correct mixture of water and descaler, otherwise it can damage the appliance! Clean the brew...
Operating and Installation manual
Page 8
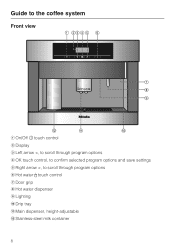
touch control g Door grip h Hot water dispenser i Lighting j Drip tray k Main dispenser, height-adjustable l Stainless-steel milk container 8 Guide to the coffee system Front view a On/Off s touch control b Display c Left arrow , to scroll through program options f Hot water -
touch control g Door grip h Hot water dispenser i Lighting j Drip tray k Main dispenser, height-adjustable l Stainless-steel milk container 8 Guide to the coffee system Front view a On/Off s touch control b Display c Left arrow , to scroll through program options f Hot water -
Operating and Installation manual
Page 9
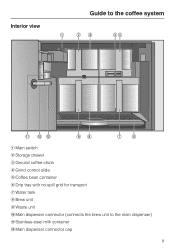
Interior view Guide to the coffee system a Main switch b Storage drawer c Ground coffee chute d Grind control slide e Coffee bean container f Drip tray with no-spill grid for transport g Water tank h Brew unit i Waste unit j Main dispenser connector (connects the brew unit to the main dispenser) k Stainless-steel milk container l Main dispenser connector cap 9
Interior view Guide to the coffee system a Main switch b Storage drawer c Ground coffee chute d Grind control slide e Coffee bean container f Drip tray with no-spill grid for transport g Water tank h Brew unit i Waste unit j Main dispenser connector (connects the brew unit to the main dispenser) k Stainless-steel milk container l Main dispenser connector cap 9

Operating and Installation manual
Page 10
Contact Miele or visit the Miele website for rinsing and cleaning the milk pipework Coffee spoon To measure ground coffee To descale the coffee system Additional accessories are available. Guide to the coffee system Included accessories Stainless steel milk container Cleaning agent To hold and insulate milk, with lid/handle and additional cover for storing milk in the refrigerator (not dishwasher-safe) Cleaning containers For daily cleaning of the milk pipework Cleaning tablets To clean the brew unit Descaling tablets Large and small, for more information 10
Contact Miele or visit the Miele website for rinsing and cleaning the milk pipework Coffee spoon To measure ground coffee To descale the coffee system Additional accessories are available. Guide to the coffee system Included accessories Stainless steel milk container Cleaning agent To hold and insulate milk, with lid/handle and additional cover for storing milk in the refrigerator (not dishwasher-safe) Cleaning containers For daily cleaning of the milk pipework Cleaning tablets To clean the brew unit Descaling tablets Large and small, for more information 10
Operating and Installation manual
Page 15
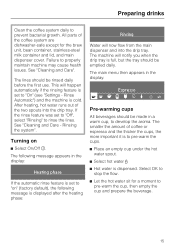
.... See "Cleaning and Care". Preparing drinks Clean the coffee system daily to stop the flow. ^ Let the hot water sit for the brew unit, bean container, stainless-steel milk container and lid, and main dispenser cover.
.... See "Cleaning and Care". Preparing drinks Clean the coffee system daily to stop the flow. ^ Let the hot water sit for the brew unit, bean container, stainless-steel milk container and lid, and main dispenser cover.
Operating and Installation manual
Page 18
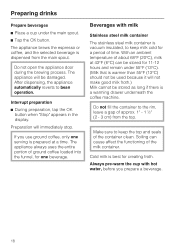
... button when "Stop" appears in the display. Preparation will be damaged. Always pre-warm the cup with milk Stainless steel milk container The stainless steel milk container is vacuum insulated, to the rim, leave a gap of the milk container. Do not open the appliance door during the brewing process. The appliance will immediately stop. After dispensing, the...
... button when "Stop" appears in the display. Preparation will be damaged. Always pre-warm the cup with milk Stainless steel milk container The stainless steel milk container is vacuum insulated, to the rim, leave a gap of the milk container. Do not open the appliance door during the brewing process. The appliance will immediately stop. After dispensing, the...
Operating and Installation manual
Page 19
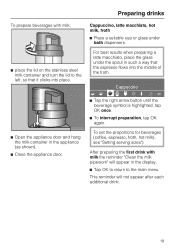
... macchiato, place the glass under both dispensers. After preparing the first drink with milk, ^ place the lid on the stainless steel milk container and turn the lid to the main menu. To set the proportions for beverages (coffee, espresso, froth, hot milk), see "Setting serving sizes"). Cappuccino q r HI J L n m C ^ Tap the right arrow button... in the display. ^ Tap OK to return to the left, so that the espresso flows into place. ^ Open the appliance door and hang the milk container in such a way that it clicks into the middle of the froth. Preparing drinks To prepare beverages with...
... macchiato, place the glass under both dispensers. After preparing the first drink with milk, ^ place the lid on the stainless steel milk container and turn the lid to the main menu. To set the proportions for beverages (coffee, espresso, froth, hot milk), see "Setting serving sizes"). Cappuccino q r HI J L n m C ^ Tap the right arrow button... in the display. ^ Tap OK to return to the left, so that the espresso flows into place. ^ Open the appliance door and hang the milk container in such a way that it clicks into the middle of the froth. Preparing drinks To prepare beverages with...
Operating and Installation manual
Page 34
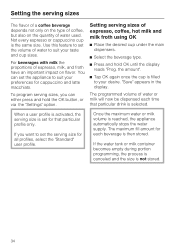
... or cappuccino cup is not stored. 34 Setting serving sizes of water used. The programmed volume of water to set the volume of water or milk will now be dispensed each beverage is set for all profiles, select the "Standard" user profile. The maximum fill amount for cappuccino and latte... feature to suit your taste and cup sizes. When a user profile is activated, the serving size is then stored. If the water tank or milk container becomes empty during portion programming, the process is canceled and the size is the same size. To program serving sizes, you want to set the...
... or cappuccino cup is not stored. 34 Setting serving sizes of water used. The programmed volume of water to set the volume of water or milk will now be dispensed each beverage is set for all profiles, select the "Standard" user profile. The maximum fill amount for cappuccino and latte... feature to suit your taste and cup sizes. When a user profile is activated, the serving size is then stored. If the water tank or milk container becomes empty during portion programming, the process is canceled and the size is the same size. To program serving sizes, you want to set the...
Operating and Installation manual
Page 35
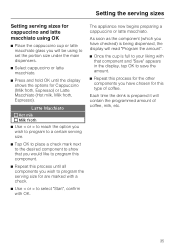
Setting the serving sizes Setting serving sizes for cappuccino and latte macchiato using OK ^ Place the cappuccino cup or latte macchiato glass you will contain the programmed amount of coffee. Each time the drink is full to your liking with that you would like to program this component. ^ Repeat ..., the display will read "Program the amount". ^ Once the cup is prepared it will be using to select "Start", confirm with OK. Latte Macchiato 8 Hot milk 8 Milk froth ^ Use < or > to reach the option you wish to program to a certain serving size. ^ Tap OK to place a check mark next to the...
Setting the serving sizes Setting serving sizes for cappuccino and latte macchiato using OK ^ Place the cappuccino cup or latte macchiato glass you will contain the programmed amount of coffee. Each time the drink is full to your liking with that you would like to program this component. ^ Repeat ..., the display will read "Program the amount". ^ Once the cup is prepared it will be using to select "Start", confirm with OK. Latte Macchiato 8 Hot milk 8 Milk froth ^ Use < or > to reach the option you wish to program to a certain serving size. ^ Tap OK to place a check mark next to the...
Operating and Installation manual
Page 40
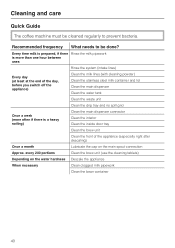
... Every day (at least at the end of the day, before you switch off the appliance) Clean the milk lines (with cleaning powder) Clean the stainless steel milk container and lid Clean the main dispenser Clean the water tank Clean the waste unit Clean the drip tray and no ... (especially right after descaling) Once a month Lubricate the cap on the water hardness Descale the appliance When necessary Clean clogged milk pipework Clean the bean container 40 Recommended frequency What needs to prevent bacteria. every 200 portions Clean the brew unit (use the cleaning tablets) Depending on...
... Every day (at least at the end of the day, before you switch off the appliance) Clean the milk lines (with cleaning powder) Clean the stainless steel milk container and lid Clean the main dispenser Clean the water tank Clean the waste unit Clean the drip tray and no ... (especially right after descaling) Once a month Lubricate the cap on the water hardness Descale the appliance When necessary Clean clogged milk pipework Clean the bean container 40 Recommended frequency What needs to prevent bacteria. every 200 portions Clean the brew unit (use the cleaning tablets) Depending on...
Operating and Installation manual
Page 41
These will need to be turned off. 41 When performing a manual rinse cycle, it is recommended that you place the small cleaning container under the main dispenser. Bean container - Main dispenser cover When the parts are dishwasher-safe, except the following: - Maintenance q r HI J L n mC ^ Tap < or ... main dispenser. The appliance can now be rinsed manually. Danger of time, you have been rinsed. Brew unit - Stainless-steel milk container and lid - All removable parts are cleaned in the display, the lines have turned off for an extended period of burns! To...
These will need to be turned off. 41 When performing a manual rinse cycle, it is recommended that you place the small cleaning container under the main dispenser. Bean container - Main dispenser cover When the parts are dishwasher-safe, except the following: - Maintenance q r HI J L n mC ^ Tap < or ... main dispenser. The appliance can now be rinsed manually. Danger of time, you have been rinsed. Brew unit - Stainless-steel milk container and lid - All removable parts are cleaned in the display, the lines have turned off for an extended period of burns! To...
Operating and Installation manual
Page 42
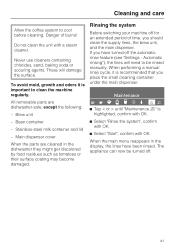
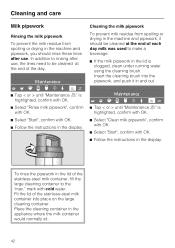
... addition to rinsing after use , the lines need to be cleaned at the end of the stainless-steel milk container into the pipework, and push it should rinse these lines after use . Place the cleaning container in the display. Maintenance q r HI J L n mC ^ Tap < or > until "Maintenance m" is highlighted, ...you should be cleaned at the end of the stainless-steel milk container, fill the large cleaning container to make a beverage. ^ If the milk pipework in and out. To rinse the pipework in the lid of each day milk was used to the "max." Insert the cleaning brush into ...
... addition to rinsing after use , the lines need to be cleaned at the end of the stainless-steel milk container into the pipework, and push it should rinse these lines after use . Place the cleaning container in the display. Maintenance q r HI J L n mC ^ Tap < or > until "Maintenance m" is highlighted, ...you should be cleaned at the end of the stainless-steel milk container, fill the large cleaning container to make a beverage. ^ If the milk pipework in and out. To rinse the pipework in the lid of each day milk was used to the "max." Insert the cleaning brush into ...
Operating and Installation manual
Page 43
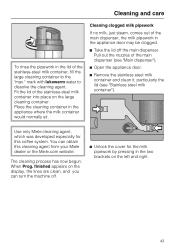
.... 43 Cleaning clogged milk pipework If no milk, just steam, comes out of the stainless-steel milk container into place on the display, the lines are clean, and you can obtain this coffee system. finished appears on the large cleaning container. Use only Miele cleaning agent, which ... ^ Unlock the cover for this cleaning agent from your Miele dealer or the Miele.com website. When Prog. Cleaning and care To rinse the pipework in the appliance where the milk container would normally sit. Place the cleaning container in the lid of the main dispenser (see "Main ...
.... 43 Cleaning clogged milk pipework If no milk, just steam, comes out of the stainless-steel milk container into place on the display, the lines are clean, and you can obtain this coffee system. finished appears on the large cleaning container. Use only Miele cleaning agent, which ... ^ Unlock the cover for this cleaning agent from your Miele dealer or the Miele.com website. When Prog. Cleaning and care To rinse the pipework in the appliance where the milk container would normally sit. Place the cleaning container in the lid of the main dispenser (see "Main ...
Operating and Installation manual
Page 45
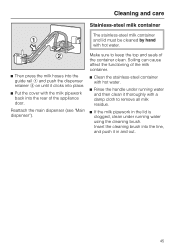
...clean under running water using the cleaning brush. Make sure to remove all milk residue. ^ If the milk pipework in and out. 45 Soiling can cause affect the functioning of the milk container. ^ Clean the stainless-steel container with hot water. ^ Rinse the handle under running water and then clean... it thoroughly with the milk pipework back into the line, and push it clicks into place. ^ Put ...
...clean under running water using the cleaning brush. Make sure to remove all milk residue. ^ If the milk pipework in and out. 45 Soiling can cause affect the functioning of the milk container. ^ Clean the stainless-steel container with hot water. ^ Rinse the handle under running water and then clean... it thoroughly with the milk pipework back into the line, and push it clicks into place. ^ Put ...
Operating and Installation manual
Page 57
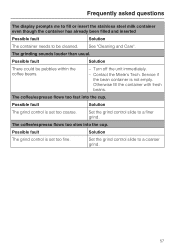
...the stainless steel milk container even though the container has already been filled and inserted Possible fault Solution The container needs to be pebbles within the coffee beans. - Possible fault Solution There could be cleaned. Contact the Miele's Tech. Service if the bean container is set too ...coarse. The grinding sounds louder than usual. Otherwise fill the container with fresh beans. Set the grind control slide to a coarser grind....
...the stainless steel milk container even though the container has already been filled and inserted Possible fault Solution The container needs to be pebbles within the coffee beans. - Possible fault Solution There could be cleaned. Contact the Miele's Tech. Service if the bean container is set too ...coarse. The grinding sounds louder than usual. Otherwise fill the container with fresh beans. Set the grind control slide to a coarser grind....
Operating and Installation manual
Page 60
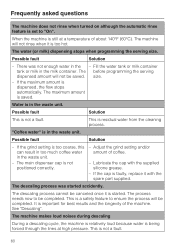
...cap is not a fault. The descaling process was not enough water in the waste unit. See "Descaling". Fill the water tank or milk container tank or milk in the waste unit. Adjust the grind setting and/or amount of coffee. - There was started . size. - If the cap ... programming the serving size. This is not a fault. 60 The descaling process cannot be completed. If the maximum amount is in the milk container. This is started accidently. Water is dispensed, the flow stops automatically. The machine makes loud noises during descaling During a descaling cycle, ...
...cap is not a fault. The descaling process was not enough water in the waste unit. See "Descaling". Fill the water tank or milk container tank or milk in the waste unit. Adjust the grind setting and/or amount of coffee. - There was started . size. - If the cap ... programming the serving size. This is not a fault. 60 The descaling process cannot be completed. If the maximum amount is in the milk container. This is started accidently. Water is dispensed, the flow stops automatically. The machine makes loud noises during descaling During a descaling cycle, ...


