
User manual, English (US)
Page 2
... get the most comprehensive warranties and outstanding service networks in the event of plug to accessories from your MAGNAVOX product, you must return your Warranty Registration card today to prevent operating and maintenance problems. WARNING: TO PREVENT FIRE OR SHOCK HAZARD, DO NOT EXPOSE THIS EQUIPMENT TO RAIN OR MOISTURE. Model No Serial No Visit our World...
... get the most comprehensive warranties and outstanding service networks in the event of plug to accessories from your MAGNAVOX product, you must return your Warranty Registration card today to prevent operating and maintenance problems. WARNING: TO PREVENT FIRE OR SHOCK HAZARD, DO NOT EXPOSE THIS EQUIPMENT TO RAIN OR MOISTURE. Model No Serial No Visit our World...

User manual, English (US)
Page 3
... Repeat, Repeat A-B 25 Favorite Track Selection 26 DVD Receiver System Menu Options TV System (NTSC/PAL 27 TV Shape 28 Screen Saver, Video Out 29 Digital Output, Night Mode 30 Speaker Settings 31 Language Settings 32 Parental Control Levels 33 Parental Control Password, Defaults 34 Audio and Surround Sound Options Audio and Sound Features 35 Surround Sound Options 36 Radio Stations 37 Sleep Timer 38 Additional Information Helpful Hints 39-40 Specifications 41 Glossary 42 Index 43 Limited...
... Repeat, Repeat A-B 25 Favorite Track Selection 26 DVD Receiver System Menu Options TV System (NTSC/PAL 27 TV Shape 28 Screen Saver, Video Out 29 Digital Output, Night Mode 30 Speaker Settings 31 Language Settings 32 Parental Control Levels 33 Parental Control Password, Defaults 34 Audio and Surround Sound Options Audio and Sound Features 35 Surround Sound Options 36 Radio Stations 37 Sleep Timer 38 Additional Information Helpful Hints 39-40 Specifications 41 Glossary 42 Index 43 Limited...

User manual, English (US)
Page 4
... limited viewing uses only unless otherwise authorized by the manufacturer. 12. CAUTION Use of controls or adjustments or performance of this apparatus near any way, such as set complies with the FCC-Rules, Part 15 and with the manufacturer's instructions. 8. Only use this copyright protection technology must accept any ventilation openings. Servicing is intended for a long time. Keep these instructions. 2. Read these instructions. 3. Protect the power cord...
... limited viewing uses only unless otherwise authorized by the manufacturer. 12. CAUTION Use of controls or adjustments or performance of this apparatus near any way, such as set complies with the FCC-Rules, Part 15 and with the manufacturer's instructions. 8. Only use this copyright protection technology must accept any ventilation openings. Servicing is intended for a long time. Keep these instructions. 2. Read these instructions. 3. Protect the power cord...
User manual, English (US)
Page 5
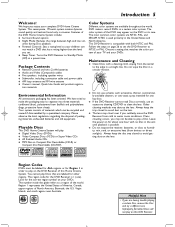
... DVD Receiver from devices or direct sunlight). Package Contents G Remote Control and two (2) AA batteries G Audio and Video (Composite) cables G Five speakers, including speaker wires G Subwoofer, including connection cable and power cable G AM loop antenna and FM wire antenna G Owner's manual, Quick-Use Guide and product registra- Other cleaning methods may not be recycled and reused if disassembled by a specialized company. Always keep the disc tray closed to set . This seven-piece, 175-watt system creates dynamic sound...
... DVD Receiver from devices or direct sunlight). Package Contents G Remote Control and two (2) AA batteries G Audio and Video (Composite) cables G Five speakers, including speaker wires G Subwoofer, including connection cable and power cable G AM loop antenna and FM wire antenna G Owner's manual, Quick-Use Guide and product registra- Other cleaning methods may not be recycled and reused if disassembled by a specialized company. Always keep the disc tray closed to set . This seven-piece, 175-watt system creates dynamic sound...

User manual, English (US)
Page 6
..., Rock, or Digital. Details are on a Disc. CENTER +/- Buttons Press to enter a Track/Title number, radio station, or TV channel, depending on the mode of a specific section on page 34. Number (0-9) Buttons Press to adjust the center speaker's volume. SYSTEM MENU Button Press to select a sound source for the DVD Receiver's display panel. Details are on page 17. G Button In DISC mode, press to go to reduce the range of brightness for the Receiver (TV/AV, DISC, TUNER or AUX). Details are...
..., Rock, or Digital. Details are on a Disc. CENTER +/- Buttons Press to enter a Track/Title number, radio station, or TV channel, depending on the mode of a specific section on page 34. Number (0-9) Buttons Press to adjust the center speaker's volume. SYSTEM MENU Button Press to select a sound source for the DVD Receiver's display panel. Details are on page 17. G Button In DISC mode, press to go to reduce the range of brightness for the Receiver (TV/AV, DISC, TUNER or AUX). Details are...
User manual, English (US)
Page 8
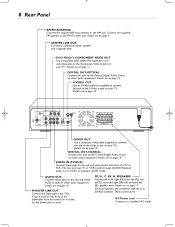
... red and white Audio Out jacks of other audio equipment. AC Power cord Connect to the Video In jack on page 14. S-VIDEO OUT Use an S-Video cable (not supplied) to connect this jack to a standard AC outlet. AUDIO IN (TV/AUX) Connect these jacks to work. AUDIO OUT Connect these jacks to the S-Video In jack on the front of the Subwoofer must be turned On in TV/AV or Auxiliary (AUX) mode. The Volume knob on your TV. Surround speakers...
... red and white Audio Out jacks of other audio equipment. AC Power cord Connect to the Video In jack on page 14. S-VIDEO OUT Use an S-Video cable (not supplied) to connect this jack to a standard AC outlet. AUDIO IN (TV/AUX) Connect these jacks to work. AUDIO OUT Connect these jacks to the S-Video In jack on the front of the Subwoofer must be turned On in TV/AV or Auxiliary (AUX) mode. The Volume knob on your TV. Surround speakers...

User manual, English (US)
Page 9
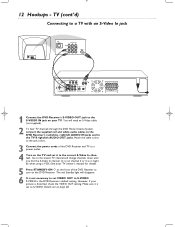
... loop antenna to a Television using one video connection between the DVD Receiver and the TV. Attach the antenna to the correct VIDEO IN channel. For better FM reception, use the TV's menu to a power outlet. 2 Put the batteries in the remote control and connect the AM and FM antennas as detailed in the battery compartment, matching the +/- Use the best connection available with equipment connected to select a Video mode. markings on the rear of...
... loop antenna to a Television using one video connection between the DVD Receiver and the TV. Attach the antenna to the correct VIDEO IN channel. For better FM reception, use the TV's menu to a power outlet. 2 Put the batteries in the remote control and connect the AM and FM antennas as detailed in the battery compartment, matching the +/- Use the best connection available with equipment connected to select a Video mode. markings on the rear of...

User manual, English (US)
Page 11
... to a power outlet. 4 Turn on page 28. Red- Match the cable colors to the jack colors. 3 Connect the power cords of the DVD Receiver to the matching Pr/Cr Pb/Cb Y VIDEO IN jacks on the DVD Receiver. TV (cont'd) 11 Connecting to a TV with Component Video In Jacks COMPONENT VIDEO OUT PWCr PWCw Y AM FM (7Ω) AM/FM ANTENNA CENTER AUDIO OUT AUDIO IN LINE OUT L S-VIDEO VIDEO OUT OUT DIGITAL OUT WOOFER LINE OUT R TV AUX OPTICAL COAXIAL...
... to a power outlet. 4 Turn on page 28. Red- Match the cable colors to the jack colors. 3 Connect the power cords of the DVD Receiver to the matching Pr/Cr Pb/Cb Y VIDEO IN jacks on the DVD Receiver. TV (cont'd) 11 Connecting to a TV with Component Video In Jacks COMPONENT VIDEO OUT PWCr PWCw Y AM FM (7Ω) AM/FM ANTENNA CENTER AUDIO OUT AUDIO IN LINE OUT L S-VIDEO VIDEO OUT OUT DIGITAL OUT WOOFER LINE OUT R TV AUX OPTICAL COAXIAL...
User manual, English (US)
Page 12
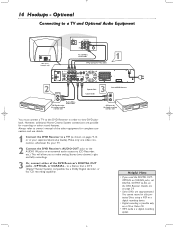
... your picture is the DVD Receiver's default setting. Make sure it is not channel 3 or 4 as it to turn on the TV and set to the TV'S right/left AUDIO OUT jacks. 12 Hookups - Match the cable colors to the jack colors. 3 Connect the power cords of the DVD Receiver to the correct S-Video In channel. The red Standby light will need an S-Video cable (not supplied). 2 To hear TV channels through the DVD Home Cinema System, connect the supplied red and white audio cables...
... your picture is the DVD Receiver's default setting. Make sure it is not channel 3 or 4 as it to turn on the TV and set to the TV'S right/left AUDIO OUT jacks. 12 Hookups - Match the cable colors to the jack colors. 3 Connect the power cords of the DVD Receiver to the correct S-Video In channel. The red Standby light will need an S-Video cable (not supplied). 2 To hear TV channels through the DVD Home Cinema System, connect the supplied red and white audio cables...
User manual, English (US)
Page 13
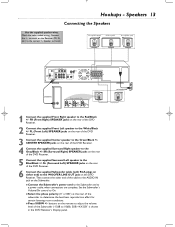
... Subwoofer (-15dB to a power outlet when connections are complete. Set the Subwoofer's Volume/On control to the Gray/Black +/- FL (Front Left) SPEAKER jacks on the rear of the DVD Receiver. 2 Connect the supplied Front Left speaker to the Red/Black +/- SUB +XX DB" is shown in the DVD Receiver's Display panel. Hookups - COMPONENT VIDEO OUT PWCr PWCw Y AM FM (7Ω) AM/FM ANTENNA CENTER AUDIO OUT AUDIO IN LINE OUT L S-VIDEO VIDEO OUT OUT DIGITAL OUT WOOFER LINE OUT R TV AUX OPTICAL...
... Subwoofer (-15dB to a power outlet when connections are complete. Set the Subwoofer's Volume/On control to the Gray/Black +/- FL (Front Left) SPEAKER jacks on the rear of the DVD Receiver. 2 Connect the supplied Front Left speaker to the Red/Black +/- SUB +XX DB" is shown in the DVD Receiver's Display panel. Hookups - COMPONENT VIDEO OUT PWCr PWCw Y AM FM (7Ω) AM/FM ANTENNA CENTER AUDIO OUT AUDIO IN LINE OUT L S-VIDEO VIDEO OUT OUT DIGITAL OUT WOOFER LINE OUT R TV AUX OPTICAL...
User manual, English (US)
Page 14
... PRODUCT Optical Cable Coaxial Cable 3 Rear of the other sound features. Always refer to owner's manual of DVD Receiver Red & White Audio Cable CD/Tape Recorder (for analog recording example only) CD Recorder (for complete connection and use details. 1 Connect the DVD Receiver to a TV (as shown on pages 9-12 or in order to a Stereo that is a digital recording option. Make only one video connection, whichever fits your separate Quick-Use Guide). However, additional Home Cinema System connections...
... PRODUCT Optical Cable Coaxial Cable 3 Rear of the other sound features. Always refer to owner's manual of DVD Receiver Red & White Audio Cable CD/Tape Recorder (for analog recording example only) CD Recorder (for complete connection and use details. 1 Connect the DVD Receiver to a TV (as shown on pages 9-12 or in order to a Stereo that is a digital recording option. Make only one video connection, whichever fits your separate Quick-Use Guide). However, additional Home Cinema System connections...
User manual, English (US)
Page 15
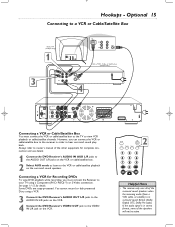
... cable/satellite channels. SPEAKER 4 CLASS 1 LASER PRODUCT Connecting a VCR or Cable/Satellite Box You must connect the Receiver to your TV using a VCR. 3 Connect the DVD Receiver's AUDIO OUT L/R jacks to the AUDIO IN L/R jacks on the VCR. 4 Connect the DVD Receiver's VIDEO OUT jack to hear surround sound playback. MUTE DISC TUNER TV/AV AUX 2 1 23 456 7 DISC MENU 89 SYSTEM 0 MENU Helpful Hints • The receiver only uses all of VCR , Cable, or Satellite box (example only) AM/FM ANTENNA COMPONENT PrCr PbCb Y VIDEO OUT CENTER...
... cable/satellite channels. SPEAKER 4 CLASS 1 LASER PRODUCT Connecting a VCR or Cable/Satellite Box You must connect the Receiver to your TV using a VCR. 3 Connect the DVD Receiver's AUDIO OUT L/R jacks to the AUDIO IN L/R jacks on the VCR. 4 Connect the DVD Receiver's VIDEO OUT jack to hear surround sound playback. MUTE DISC TUNER TV/AV AUX 2 1 23 456 7 DISC MENU 89 SYSTEM 0 MENU Helpful Hints • The receiver only uses all of VCR , Cable, or Satellite box (example only) AM/FM ANTENNA COMPONENT PrCr PbCb Y VIDEO OUT CENTER...

User manual, English (US)
Page 16
... hear). Or, press 98 ; : to turn on the DVD Receiver. DVD Disc Menus DVD Disc Menus vary among DVDs. AVorIN EXT1 BASS TREBLE VOLUME 3 MUTE DISC TUNER TV/AV AUX 1 23 456 7 DISC MENU 89 SYSTEM 0 MENU OK SURROUND SOUND NIGHT RESUME REPEAT REPEAT A-B SLEEP DIM SUBW CENTER REAR TV VOL 6 MAGNAVOX Helpful Hints • If the Disc is Locked by pressing DISC MENU on the remote control. Details are numbered, press a Number button to select an item. Details are many playback...
... hear). Or, press 98 ; : to turn on the DVD Receiver. DVD Disc Menus DVD Disc Menus vary among DVDs. AVorIN EXT1 BASS TREBLE VOLUME 3 MUTE DISC TUNER TV/AV AUX 1 23 456 7 DISC MENU 89 SYSTEM 0 MENU OK SURROUND SOUND NIGHT RESUME REPEAT REPEAT A-B SLEEP DIM SUBW CENTER REAR TV VOL 6 MAGNAVOX Helpful Hints • If the Disc is Locked by pressing DISC MENU on the remote control. Details are numbered, press a Number button to select an item. Details are many playback...

User manual, English (US)
Page 31
... speakers. You must set TEST TONE to improve the Surround Sound effect. Speaker Settings 31 MUTE DISC TUNER TV/AV AUX 1 23 456 7 DISC MENU 89 SYSTEM 0 MENU 1,5 OK SURROUND SOUND NIGHT RESUME REPEAT REPEAT A-B SLEEP DIM SUBW CENTER REAR TV VOL 1-4 MAGNAVOX Helpful Hint • During Disc playback, press SUBW (+, -), REAR (+, -), or CENTER (+, -) to ON, the test sound signal will move through the Front Left, Center, Front Right, Surround Right, and Surround Left speakers. DIGITAL OUTPUT NIGHT MODE CENTER DELAY REAR DELAY TEST TONE OFF ON TEST TONE...
... speakers. You must set TEST TONE to improve the Surround Sound effect. Speaker Settings 31 MUTE DISC TUNER TV/AV AUX 1 23 456 7 DISC MENU 89 SYSTEM 0 MENU 1,5 OK SURROUND SOUND NIGHT RESUME REPEAT REPEAT A-B SLEEP DIM SUBW CENTER REAR TV VOL 1-4 MAGNAVOX Helpful Hint • During Disc playback, press SUBW (+, -), REAR (+, -), or CENTER (+, -) to ON, the test sound signal will move through the Front Left, Center, Front Right, Surround Right, and Surround Left speakers. DIGITAL OUTPUT NIGHT MODE CENTER DELAY REAR DELAY TEST TONE OFF ON TEST TONE...

User manual, English (US)
Page 32
... PASSWORD MENU LANG DEFAULTS 6 PG-R CHANGE ENGLISH RESET GOTO FEATURE SETUP PAGE 5 Press SYSTEM MENU to select a different language in the DVD Disc Menu. or - This does not affect the language of your DVD or its case for the DVD Receiver's System Menu, follow these steps. MUTE DISC TUNER TV/AV AUX 1 23 456 7 DISC MENU 89 SYSTEM 0 MENU 1,5 1,4 OK SURROUND SOUND NIGHT RESUME REPEAT REPEAT A-B SLEEP DIM SUBW CENTER REAR TV VOL MUTE DISC TUNER TV...
... PASSWORD MENU LANG DEFAULTS 6 PG-R CHANGE ENGLISH RESET GOTO FEATURE SETUP PAGE 5 Press SYSTEM MENU to select a different language in the DVD Disc Menu. or - This does not affect the language of your DVD or its case for the DVD Receiver's System Menu, follow these steps. MUTE DISC TUNER TV/AV AUX 1 23 456 7 DISC MENU 89 SYSTEM 0 MENU 1,5 1,4 OK SURROUND SOUND NIGHT RESUME REPEAT REPEAT A-B SLEEP DIM SUBW CENTER REAR TV VOL MUTE DISC TUNER TV...

User manual, English (US)
Page 35
... TV VOL +/- Rear Speaker (Left Surround) 1-3 MUTE DISC TUNER TV/AV AUX 1 23 456 7 DISC MENU 89 SYSTEM 0 MENU OK SURROUND SOUND NIGHT RESUME REPEAT REPEAT A-B SLEEP DIM SUBW CENTER REAR TV VOL MAGNAVOX Rear Speaker (Right Surround) Selecting Digital Sound Effects Digital Sound Effects let you are playing. 1 Press SOUND repeatedly to adjust OPEN-CLOSE STANDBY the TV's volume level. on the display panel, with "XX" being the specif- jack on the DVD Receiver's display panel. ic volume level. MUTE will appear on the remote to choose a sound effect. to...
... TV VOL +/- Rear Speaker (Left Surround) 1-3 MUTE DISC TUNER TV/AV AUX 1 23 456 7 DISC MENU 89 SYSTEM 0 MENU OK SURROUND SOUND NIGHT RESUME REPEAT REPEAT A-B SLEEP DIM SUBW CENTER REAR TV VOL MAGNAVOX Rear Speaker (Right Surround) Selecting Digital Sound Effects Digital Sound Effects let you are playing. 1 Press SOUND repeatedly to adjust OPEN-CLOSE STANDBY the TV's volume level. on the display panel, with "XX" being the specif- jack on the DVD Receiver's display panel. ic volume level. MUTE will appear on the remote to choose a sound effect. to...

User manual, English (US)
Page 36
... higher tones. The source you are playing (DVDs, Tuner, etc.) must be connected to as AC-3, Dolby 5.1, or MPEG Multichannel - G VSS (Virtual Surround Sound) - 36 Surround Sound Options For proper Surround Sound, you must be recorded or broadcast in a surround mode. The availability of the various surround sound modes depends on the number of the DVD Home Cinema System must connect the speakers correctly and select the right sound source mode. Also referred to the DVD Receiver. A cinema surround sound format that delivers four-channel surround sound...
... higher tones. The source you are playing (DVDs, Tuner, etc.) must be connected to as AC-3, Dolby 5.1, or MPEG Multichannel - G VSS (Virtual Surround Sound) - 36 Surround Sound Options For proper Surround Sound, you must be recorded or broadcast in a surround mode. The availability of the various surround sound modes depends on the number of the DVD Home Cinema System must connect the speakers correctly and select the right sound source mode. Also referred to the DVD Receiver. A cinema surround sound format that delivers four-channel surround sound...

User manual, English (US)
Page 39
... connected the DVD Receiver's power cord to turn on pages 18, 29, and 34. If you connected the DVD Receiver to a TV using Component video cable (red, green, and blue as necessary. • Choose the correct sound source at your lowest TV channel and change channels at the TV until you move it is not scratched or warped. If you connected the DVD Receiver to a TV using S-Video cable (as this will not play. • Make sure the Disc...
... connected the DVD Receiver's power cord to turn on pages 18, 29, and 34. If you connected the DVD Receiver to a TV using Component video cable (red, green, and blue as necessary. • Choose the correct sound source at your lowest TV channel and change channels at the TV until you move it is not scratched or warped. If you connected the DVD Receiver to a TV using S-Video cable (as this will not play. • Make sure the Disc...

User manual, English (US)
Page 40
... may cause interference. Details are connected correctly. For example, when using the remote to adjust the volume level. • Make sure the Center and Rear/Surround speakers are on page 36. • Connect the antennas. There is near the DVD Receiver. on the remote control to start Disc playback, press DISC first. The DVD Receiver does not work. • Disconnect the power cord from the Center or Rear/Surround speakers. • Press CENTER +/- The display panel is low. • Check the polarity...
... may cause interference. Details are connected correctly. For example, when using the remote to adjust the volume level. • Make sure the Center and Rear/Surround speakers are on page 36. • Connect the antennas. There is near the DVD Receiver. on the remote control to start Disc playback, press DISC first. The DVD Receiver does not work. • Disconnect the power cord from the Center or Rear/Surround speakers. • Press CENTER +/- The display panel is low. • Check the polarity...

User manual, English (US)
Page 43
...sound sources 16 source buttons 6 source dial 7 speaker jacks 8, 13 speaker settings 31 speaker volume 35 specifications 41 standby-on y button 7 status 22 step-by-step playback 23 stereo 36 stop C button 6-7, 16-17 subtitles 19, 32 subw +/- buttons 6, 35 subwoofer 8, 13, 35, 41 surround button 6, 7, 36 surround sound 36 s-video 12, 29, 42 s-video out jack 8, 12 system menu 18, 32 system menu button 6, 18 table of 3 controls, remote 6 default settings 34 digital 42 digital out jacks 8, 14 digital output 30 digital sound effects 35 dim button 6 disc button 6 disc...
...sound sources 16 source buttons 6 source dial 7 speaker jacks 8, 13 speaker settings 31 speaker volume 35 specifications 41 standby-on y button 7 status 22 step-by-step playback 23 stereo 36 stop C button 6-7, 16-17 subtitles 19, 32 subw +/- buttons 6, 35 subwoofer 8, 13, 35, 41 surround button 6, 7, 36 surround sound 36 s-video 12, 29, 42 s-video out jack 8, 12 system menu 18, 32 system menu button 6, 18 table of 3 controls, remote 6 default settings 34 digital 42 digital out jacks 8, 14 digital output 30 digital sound effects 35 dim button 6 disc button 6 disc...


