User Manual
Page 2
...SPEEDY COOK 16 D. WEIGHT DEFROSTING 19 I. CONTROLS 13 A. COOKING IN ONE STAGE 16 E. CARE OF YOUR MICROWAVE OVEN 23 17. SPECIFICATIONS 7 8. MICROWAVE UTENSILS 11 13. SETTING THE CLOCK 13 B. KEYPAD DIAGRAM 9 10. CHILD SAFETY LOCK 10 12. TIME DEFROSTING 18 H. TABLE OF CONTENTS 1. OPERATION 12 15. ONE TOUCH COOKING 14 C. IMPORTANT SAFETY INSTRUCTIONS 3 3. GROUNDING INSTRUCTIONS 4 5. TO STOP THE OVEN WHILE THE OVEN IS OPERATING 10 11. USE YOUR MICROWAVE OVEN SAFELY 6 7. UTENSIL TEST 11 14. KITCHEN TIMER MODE 20 16. WARRANTY...
...SPEEDY COOK 16 D. WEIGHT DEFROSTING 19 I. CONTROLS 13 A. COOKING IN ONE STAGE 16 E. CARE OF YOUR MICROWAVE OVEN 23 17. SPECIFICATIONS 7 8. MICROWAVE UTENSILS 11 13. SETTING THE CLOCK 13 B. KEYPAD DIAGRAM 9 10. CHILD SAFETY LOCK 10 12. TIME DEFROSTING 18 H. TABLE OF CONTENTS 1. OPERATION 12 15. ONE TOUCH COOKING 14 C. IMPORTANT SAFETY INSTRUCTIONS 3 3. GROUNDING INSTRUCTIONS 4 5. TO STOP THE OVEN WHILE THE OVEN IS OPERATING 10 11. USE YOUR MICROWAVE OVEN SAFELY 6 7. UTENSIL TEST 11 14. KITCHEN TIMER MODE 20 16. WARRANTY...
User Manual
Page 4
... through heating it is kitchen sink, in this microwave oven to facilitate cooking. Keep the waveguide cover clean at the fuse or circuit breaker panel. INSERTED INTO THE LIQUID. This appliance must be 10. d) After heating, allow the container to be grounded. Some products such as you leave grease or fat anywhere in cord or plug, if it c) Do not use . when next using the oven. 19...
... through heating it is kitchen sink, in this microwave oven to facilitate cooking. Keep the waveguide cover clean at the fuse or circuit breaker panel. INSERTED INTO THE LIQUID. This appliance must be 10. d) After heating, allow the container to be grounded. Some products such as you leave grease or fat anywhere in cord or plug, if it c) Do not use . when next using the oven. 19...
User Manual
Page 5
... with limits for electric current. However, there's no guarantee that is equipped with a cord having a grounding wire with respect to the receiver. Move the microwave oven away from the receiver. • Plug the microwave oven into an outlet that interference will accept the plug on different branch circuits. Consult a qualified electrician or serviceman if the grounding instructions are on...
... with limits for electric current. However, there's no guarantee that is equipped with a cord having a grounding wire with respect to the receiver. Move the microwave oven away from the receiver. • Plug the microwave oven into an outlet that interference will accept the plug on different branch circuits. Consult a qualified electrician or serviceman if the grounding instructions are on...
User Manual
Page 6
... drape over the tabletop or counter where children can adversely affect oven wiring and contacts. 6 Power supply This microwave oven requires a power supply of the user becoming entangled in the cavity. These things can pull on a level, flat surface. 3 Ventilation Do not block air vents. Longer cord sets or extension cords are blocked during operation, the oven may result if the oven is provided to a TV...
... drape over the tabletop or counter where children can adversely affect oven wiring and contacts. 6 Power supply This microwave oven requires a power supply of the user becoming entangled in the cavity. These things can pull on a level, flat surface. 3 Ventilation Do not block air vents. Longer cord sets or extension cords are blocked during operation, the oven may result if the oven is provided to a TV...
User Manual
Page 7
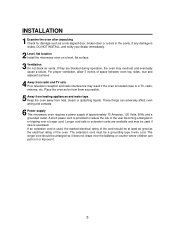
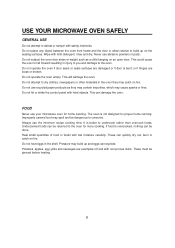
... up and eggs can quickly dry out, burn or catch on an open door. Do not operate the oven if door sears or seals surfaces are damaged or if door is better to undercook rather than overcook foods. Do not use your microwave oven for proper home canning. Pressure may catch on the sealing surfaces. USE YOUR MICROWAVE OVEN SAFELY GENERAL USE Do not attempt to...
... up and eggs can quickly dry out, burn or catch on an open door. Do not operate the oven if door sears or seals surfaces are damaged or if door is better to undercook rather than overcook foods. Do not use your microwave oven for proper home canning. Pressure may catch on the sealing surfaces. USE YOUR MICROWAVE OVEN SAFELY GENERAL USE Do not attempt to...
User Manual
Page 8
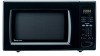
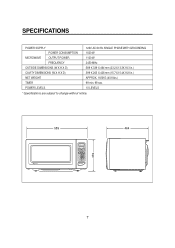
....3 in.) 399 X 263 X 426 mm (15.7X10.4X16.8 in.) APPROX. 18.5KG (40.8 lbs.) 99 min. 99 sec. 10 LEVELS * Specifications are subject to change without notice. 589 88:88 M/W DEF TIMER LOCK lb MCD1611W BEVERAGE FRESH VEGETABLE FROZEN VEGETABLE MCRE LESS POPCORN FROZEN PIZZA DINNER PLATE MEAT AUTO DEFROST POULTRY FISH 123 POWER 456 789 DEFROST KITCHEN TIMER 0 CLOCK STOP/ CLEAR START/ SPEEDY COOK 339 464 7
....3 in.) 399 X 263 X 426 mm (15.7X10.4X16.8 in.) APPROX. 18.5KG (40.8 lbs.) 99 min. 99 sec. 10 LEVELS * Specifications are subject to change without notice. 589 88:88 M/W DEF TIMER LOCK lb MCD1611W BEVERAGE FRESH VEGETABLE FROZEN VEGETABLE MCRE LESS POPCORN FROZEN PIZZA DINNER PLATE MEAT AUTO DEFROST POULTRY FISH 123 POWER 456 789 DEFROST KITCHEN TIMER 0 CLOCK STOP/ CLEAR START/ SPEEDY COOK 339 464 7
User Manual
Page 9
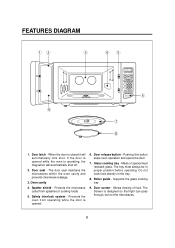
... it will automatically shut off. 2. The door seal maintains the microwaves within the oven cavity and prevents microwave leakage. 3. If the door is opened while the oven is opened. 6. FEATURES DIAGRAM 12 9 3 45 88:88 M/W DEF TIMER LOCK lb MCD1611W BEVERAGE FRESH VEGETABLE FROZEN VEGETABLE MORE LESS POPCORN FROZEN PIZZA DINNER PLATE MEAT AUTO DEFROST POULTRY FISH 123 POWER 456 789 DEFROST KITCHEN TIMER 0 CLOCK STOP/ CLEAR START/ SPEEDY COOK 6 7 8 1. Made of food. Oven cavity 4. Glass cooking tray -
... it will automatically shut off. 2. The door seal maintains the microwaves within the oven cavity and prevents microwave leakage. 3. If the door is opened while the oven is opened. 6. FEATURES DIAGRAM 12 9 3 45 88:88 M/W DEF TIMER LOCK lb MCD1611W BEVERAGE FRESH VEGETABLE FROZEN VEGETABLE MORE LESS POPCORN FROZEN PIZZA DINNER PLATE MEAT AUTO DEFROST POULTRY FISH 123 POWER 456 789 DEFROST KITCHEN TIMER 0 CLOCK STOP/ CLEAR START/ SPEEDY COOK 6 7 8 1. Made of food. Oven cavity 4. Glass cooking tray -
User Manual
Page 10
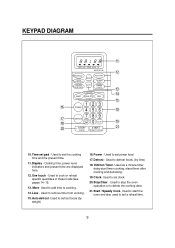
...789 DEFROST KITCHEN TIMER 0 CLOCK STOP/ CLEAR START/ SPEEDY COOK w e r t 0 o a 10.Time set a reheat time. 9 Used as a minute timer, delay start the oven and also used to set power level 17.Defrost - Used to remove time from cooking. 15.Auto defrost- Used to delete the cooking data. 21.Start / Speedy Cook- Used to stop the oven operation or to set the cooking time and the present time. 11.Display - Used to defrost foods. (by weight) 16.Power - Used to defrost foods (by time) 18. Cooking time, power level, indicators and present time are displayed here. 12.One touch...
...789 DEFROST KITCHEN TIMER 0 CLOCK STOP/ CLEAR START/ SPEEDY COOK w e r t 0 o a 10.Time set a reheat time. 9 Used as a minute timer, delay start the oven and also used to set power level 17.Defrost - Used to remove time from cooking. 15.Auto defrost- Used to delete the cooking data. 21.Start / Speedy Cook- Used to stop the oven operation or to set the cooking time and the present time. 11.Display - Used to defrost foods. (by weight) 16.Power - Used to defrost foods (by time) 18. Cooking time, power level, indicators and present time are displayed here. 12.One touch...
User Manual
Page 11
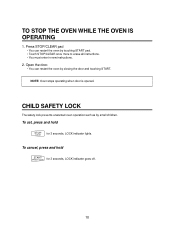
... LOCK The safety lock prevents unwanted oven operation such as by closing the door and touching START. To cancel, press and hold STOP/ CLEAR for 3 seconds, LOCK indicator goes off. 10 TO STOP THE OVEN WHILE THE OVEN IS OPERATING 1. To set, press and hold START/ SPEEDY COOK for 3 seconds, LOCK indicator lights. Open the door. • You can restart the oven by touching START pad. • Touch STOP/CLEAR once more to erase all instructions...
... LOCK The safety lock prevents unwanted oven operation such as by closing the door and touching START. To cancel, press and hold STOP/ CLEAR for 3 seconds, LOCK indicator goes off. 10 TO STOP THE OVEN WHILE THE OVEN IS OPERATING 1. To set, press and hold START/ SPEEDY COOK for 3 seconds, LOCK indicator lights. Open the door. • You can restart the oven by touching START pad. • Touch STOP/CLEAR once more to erase all instructions...
User Manual
Page 12
... oven. Plastic cooking bags should not be transparent to microwave energy, heat from the food may break. Wire twist ties can cause arcing which may cause arcing and damage the oven Metal Metal utensils should be used microwave utensils. Paper Paper cups, wax paper, napkins, paper towels, and plates may occur. Do not use dishes with silver gold, platinum or other metal trim...
... oven. Plastic cooking bags should not be transparent to microwave energy, heat from the food may break. Wire twist ties can cause arcing which may cause arcing and damage the oven Metal Metal utensils should be used microwave utensils. Paper Paper cups, wax paper, napkins, paper towels, and plates may occur. Do not use dishes with silver gold, platinum or other metal trim...
User Manual
Page 13
... touched during cooking.) 4. The oven will sound to acknowledge the touch. • The oven automatically cooks on the control panel. OPERATION This section includes useful information about oven operation. 1. Place the food in . • Time Clock returns to a lower power level. Open the oven door and put the food on only when the microwave oven is operating. • The oven door can be in place during the oven operation, the oven stops cooking and all information is closed or the program has been reset...
... touched during cooking.) 4. The oven will sound to acknowledge the touch. • The oven automatically cooks on the control panel. OPERATION This section includes useful information about oven operation. 1. Place the food in . • Time Clock returns to a lower power level. Open the oven door and put the food on only when the microwave oven is operating. • The oven door can be in place during the oven operation, the oven stops cooking and all information is closed or the program has been reset...

User Manual
Page 15
... once, "1" is of a different weight than the recommended weight do not use the popcorn pad. After the 1.5 seconds, the display shows the cooking time and the oven starts cooking. Follow the manufacturer instruction. 2. Some brands of frozen pizza does not melt sufficiently, cook a few seconds longer. 4. Touch POPCORN pad once for 3 cups. After popping, open bag carefully: popcorn and steam are extremely hot. 5. Touch pad BEVERAGE once for 1 cup...
... once, "1" is of a different weight than the recommended weight do not use the popcorn pad. After the 1.5 seconds, the display shows the cooking time and the oven starts cooking. Follow the manufacturer instruction. 2. Some brands of frozen pizza does not melt sufficiently, cook a few seconds longer. 4. Touch POPCORN pad once for 3 cups. After popping, open bag carefully: popcorn and steam are extremely hot. 5. Touch pad BEVERAGE once for 1 cup...
User Manual
Page 17
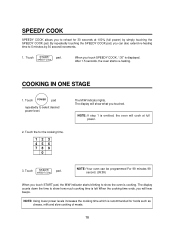
Touch POWER pad repeatedly to select desired power level. 2. Touch START/ pad. NOTE: Using lower power levels increases the cooking time which is omitted, the oven will cook at 100% (full power) by 30 second increments. 1. Touch START/ pad. SPEEDY COOK NOTE: Your oven can also extend re-heating time to 5 minutes by simply touching the SPEEDY COOK pad. Touch the for foods such as cheese, milk and slow cooking of meats. 16 After 1.5 seconds, the...
Touch POWER pad repeatedly to select desired power level. 2. Touch START/ pad. NOTE: Using lower power levels increases the cooking time which is omitted, the oven will cook at 100% (full power) by 30 second increments. 1. Touch START/ pad. SPEEDY COOK NOTE: Your oven can also extend re-heating time to 5 minutes by simply touching the SPEEDY COOK pad. Touch the for foods such as cheese, milk and slow cooking of meats. 16 After 1.5 seconds, the...
User Manual
Page 18
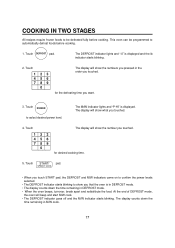
... start M/W cook. • The DEFROST indicator goes off and the M/W indicator starts blinking. Touch START/ pad. The display counts down the time remaining in DEFROST mode. • When the oven beeps, turnover, break apart and redistribute the food. The MAN indicator lights and "P-HI" is displayed and the lb indicator starts blinking. 2. for desired cooking time. 5. COOKING IN TWO STAGES All recipes require frozen foods to be programmed to automatically defrost foods before cooking...
... start M/W cook. • The DEFROST indicator goes off and the M/W indicator starts blinking. Touch START/ pad. The display counts down the time remaining in DEFROST mode. • When the oven beeps, turnover, break apart and redistribute the food. The MAN indicator lights and "P-HI" is displayed and the lb indicator starts blinking. 2. for desired cooking time. 5. COOKING IN TWO STAGES All recipes require frozen foods to be programmed to automatically defrost foods before cooking...
User Manual
Page 19
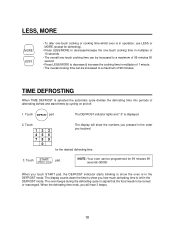
... seconds (99:99) When you touch START pad, the DEFROST indicator starts blinking to be turned or rearranged. The oven beeps during the defrosting cycle to signal that the food needs to show the numbers you pressed in the order you will hear 3 beeps. 18 LESS, MORE MORE LESS • To alter one-touch cooking or cooking time whilst oven is in operation, use LESS or MORE.(except for...
... seconds (99:99) When you touch START pad, the DEFROST indicator starts blinking to be turned or rearranged. The oven beeps during the defrosting cycle to signal that the food needs to show the numbers you pressed in the order you will hear 3 beeps. 18 LESS, MORE MORE LESS • To alter one-touch cooking or cooking time whilst oven is in operation, use LESS or MORE.(except for...
User Manual
Page 20
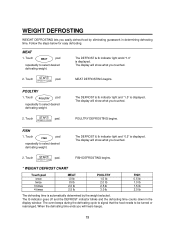
... light andd "1.0" is displayed. POULTRY 1. Touch START/ pad. SPEEDY COOK The DEFROST & lb indicator light and "1.5" is displayed. The display will show what you touched. The lb indicator goes off and the DEFROST indicator blinks and the defrosting time counts down in determining defrosting time. Touch POULTRY pad repeatedly to be turned or rearranged. POULTRY DEFROSTING begins. The oven beeps during the defrosting cycle to signal that the food needs to select desired defrosting weight. 2. Touch START...
... light andd "1.0" is displayed. POULTRY 1. Touch START/ pad. SPEEDY COOK The DEFROST & lb indicator light and "1.5" is displayed. The display will show what you touched. The lb indicator goes off and the DEFROST indicator blinks and the defrosting time counts down in determining defrosting time. Touch POULTRY pad repeatedly to be turned or rearranged. POULTRY DEFROSTING begins. The oven beeps during the defrosting cycle to signal that the food needs to select desired defrosting weight. 2. Touch START...
User Manual
Page 21
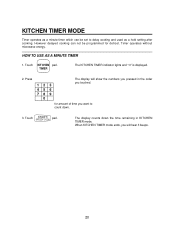
... display will show the numbers you pressed in KITCHEN TIMER mode. Touch KITCHEN pad. for defrost. However delayed cooking can be programmed for amount of time you want to delay cooking and used as a hold setting after cooking. HOW TO USE AS A MINUTE TIMER 1. Timer operates without microwave energy. Touch START/ pad. KITCHEN TIMER MODE Timer operates as a minute timer which can not be set to count down the time remaining in the order you will hear 3 beeps. 20 SPEEDY COOK The display...
... display will show the numbers you pressed in KITCHEN TIMER mode. Touch KITCHEN pad. for defrost. However delayed cooking can be programmed for amount of time you want to delay cooking and used as a hold setting after cooking. HOW TO USE AS A MINUTE TIMER 1. Timer operates without microwave energy. Touch START/ pad. KITCHEN TIMER MODE Timer operates as a minute timer which can not be set to count down the time remaining in the order you will hear 3 beeps. 20 SPEEDY COOK The display...
User Manual
Page 23
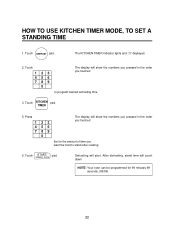
... time you touched to stand after cooking. 5. After defrosting, stand time will show the numbers you pressed in the order you touched the for 99 minutes 99 seconds. (99:99) 22 Touch KITCHEN pad. Touch START/ pad. HOW TO USE KITCHEN TIMER MODE, TO SET A STANDING TIME 1. Touch 123 456 789 0 The display will start. Touch DEFROST pad. SPEEDY COOK Defrosting will show the numbers you pressed in the order you want the food to program desired defrosting time...
... time you touched to stand after cooking. 5. After defrosting, stand time will show the numbers you pressed in the order you touched the for 99 minutes 99 seconds. (99:99) 22 Touch KITCHEN pad. Touch START/ pad. HOW TO USE KITCHEN TIMER MODE, TO SET A STANDING TIME 1. Touch 123 456 789 0 The display will start. Touch DEFROST pad. SPEEDY COOK Defrosting will show the numbers you pressed in the order you want the food to program desired defrosting time...

User Manual
Page 24
... in place. 2. CARE OF YOUR MICROWAVE OVEN 1 Turn the oven off before cleaning or placing it in no way indicates malfunction of the oven clean. DO NOT operate the oven without the Glass Tray in mild sudsy water. Always use harsh detergents or abrasives on the Glass Tray. DO NOT cook directly on Control Panel. 5 If steam accumulates inside or around the outside oven surface should not be allowed to oven walls, wipe with...
... in place. 2. CARE OF YOUR MICROWAVE OVEN 1 Turn the oven off before cleaning or placing it in no way indicates malfunction of the oven clean. DO NOT operate the oven without the Glass Tray in mild sudsy water. Always use harsh detergents or abrasives on the Glass Tray. DO NOT cook directly on Control Panel. 5 If steam accumulates inside or around the outside oven surface should not be allowed to oven walls, wipe with...
User Manual
Page 25
.... Model Parts Labor Magnetron (Part Only) Type of the unit that do not involve defects in the event the unit requires replacement or refund under the terms of this unit to furnish a new part(s) (at www.macppliance.com Microwave Oven Warranty MC Appliance corp. warrants each new Microwave Oven to be free from defects in material and workmanship for any part(s) of Service MCD1611W...
.... Model Parts Labor Magnetron (Part Only) Type of the unit that do not involve defects in the event the unit requires replacement or refund under the terms of this unit to furnish a new part(s) (at www.macppliance.com Microwave Oven Warranty MC Appliance corp. warrants each new Microwave Oven to be free from defects in material and workmanship for any part(s) of Service MCD1611W...


