User Manual
Page 4
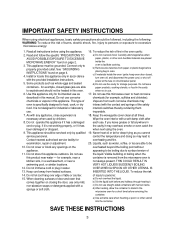
... the appliance. 16. As with a sponge or soft cloth. Never heat oil or fat for example, closed , turn oven off, and disconnect the power cord, or shut off power at all instructions before and halfway through heating it has a damaged each use straight-sided containers with a soft damp cloth after 18. VERY...
... the appliance. 16. As with a sponge or soft cloth. Never heat oil or fat for example, closed , turn oven off, and disconnect the power cord, or shut off power at all instructions before and halfway through heating it has a damaged each use straight-sided containers with a soft damp cloth after 18. VERY...
User Manual
Page 5
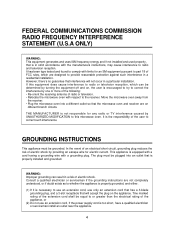
... installation. The plug must be equal to or greater than the electrical rating of the appliance, or (2) Do not use an extension cord, if the power supply cord is necessary to use an extension cord, use only an extension cord that has a 3-blade grounding plug, and a 3-slot receptacle that interference will...
... installation. The plug must be equal to or greater than the electrical rating of the appliance, or (2) Do not use an extension cord, if the power supply cord is necessary to use an extension cord, use only an extension cord that has a 3-blade grounding plug, and a 3-slot receptacle that interference will...
User Manual
Page 6
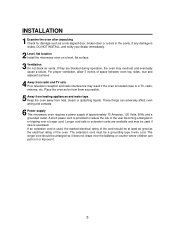
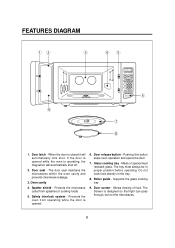
... reduce the risk of the oven. For proper ventilation, allow 3 inches of approximately 15 Amperes, 120 Volts, 60Hz and a grounded outlet. A short power cord is visible, DO NOT INSTALL, and notify your dealer immediately. 2 Level, flat location Install the microwave oven on it or trip over it....door or a dent in or tripping over the tabletop or counter where children can adversely affect oven wiring and contacts. 6 Power supply This microwave oven requires a power supply of space between oven top, sides, rear and adjacent surfaces 4 Away from radio and TV sets Poor television reception ...
... reduce the risk of the oven. For proper ventilation, allow 3 inches of approximately 15 Amperes, 120 Volts, 60Hz and a grounded outlet. A short power cord is visible, DO NOT INSTALL, and notify your dealer immediately. 2 Level, flat location Install the microwave oven on it or trip over it....door or a dent in or tripping over the tabletop or counter where children can adversely affect oven wiring and contacts. 6 Power supply This microwave oven requires a power supply of space between oven top, sides, rear and adjacent surfaces 4 Away from radio and TV sets Poor television reception ...
User Manual
Page 8
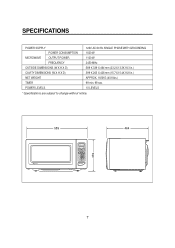
... OUTSIDE DIMENSIONS (W X H X D) CAVITY DIMENSIONS (W X H X D) NET WEIGHT TIMER POWER LEVELS 120V AC 60 Hz SINGLE PHASE WITH GROUNDING 1500 W 1100 W 2450 MHz 589 X 339 X 464 mm (23.2X13.3X18.3 in.) 399 X 263 X 426 mm (... 88:88 M/W DEF TIMER LOCK lb MCD1611W BEVERAGE FRESH VEGETABLE FROZEN VEGETABLE MCRE LESS POPCORN FROZEN PIZZA DINNER PLATE MEAT AUTO DEFROST POULTRY FISH 123 POWER 456 789 DEFROST KITCHEN TIMER 0 CLOCK STOP/ CLEAR START/ SPEEDY COOK 339 464 7
... OUTSIDE DIMENSIONS (W X H X D) CAVITY DIMENSIONS (W X H X D) NET WEIGHT TIMER POWER LEVELS 120V AC 60 Hz SINGLE PHASE WITH GROUNDING 1500 W 1100 W 2450 MHz 589 X 339 X 464 mm (23.2X13.3X18.3 in.) 399 X 263 X 426 mm (... 88:88 M/W DEF TIMER LOCK lb MCD1611W BEVERAGE FRESH VEGETABLE FROZEN VEGETABLE MCRE LESS POPCORN FROZEN PIZZA DINNER PLATE MEAT AUTO DEFROST POULTRY FISH 123 POWER 456 789 DEFROST KITCHEN TIMER 0 CLOCK STOP/ CLEAR START/ SPEEDY COOK 339 464 7
User Manual
Page 9
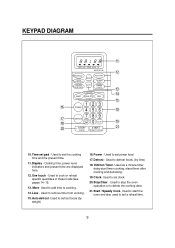
... 88:88 M/W DEF TIMER LOCK lb MCD1611W BEVERAGE FRESH VEGETABLE FROZEN VEGETABLE MORE LESS POPCORN FROZEN PIZZA DINNER PLATE MEAT AUTO DEFROST POULTRY FISH 123 POWER 456 789 DEFROST KITCHEN TIMER 0 CLOCK STOP/ CLEAR START/ SPEEDY COOK 6 7 8 1.
... 88:88 M/W DEF TIMER LOCK lb MCD1611W BEVERAGE FRESH VEGETABLE FROZEN VEGETABLE MORE LESS POPCORN FROZEN PIZZA DINNER PLATE MEAT AUTO DEFROST POULTRY FISH 123 POWER 456 789 DEFROST KITCHEN TIMER 0 CLOCK STOP/ CLEAR START/ SPEEDY COOK 6 7 8 1.
User Manual
Page 10
...here. 12.One touch - Used to set the cooking time and the present time. 11.Display - More- Used to defrost foods. (by weight) 16.Power - Used to set clock. 20.Stop/Clear - Used to defrost foods (by time) 18. Used as a minute timer, delay start the oven and...BEVERAGE FRESH VEGETABLE FROZEN VEGETABLE MCRE LESS POPCORN FROZEN PIZZA DINNER PLATE MEAT AUTO DEFROST POULTRY FISH 123 POWER 456 789 DEFROST KITCHEN TIMER 0 CLOCK STOP/ CLEAR START/ SPEEDY COOK w e r t 0 o a 10.Time set power level 17.Defrost - Used to add time to delete the cooking data. 21.Start / Speedy ...
...here. 12.One touch - Used to set the cooking time and the present time. 11.Display - More- Used to defrost foods. (by weight) 16.Power - Used to set clock. 20.Stop/Clear - Used to defrost foods (by time) 18. Used as a minute timer, delay start the oven and...BEVERAGE FRESH VEGETABLE FROZEN VEGETABLE MCRE LESS POPCORN FROZEN PIZZA DINNER PLATE MEAT AUTO DEFROST POULTRY FISH 123 POWER 456 789 DEFROST KITCHEN TIMER 0 CLOCK STOP/ CLEAR START/ SPEEDY COOK w e r t 0 o a 10.Time set power level 17.Defrost - Used to add time to delete the cooking data. 21.Start / Speedy ...
User Manual
Page 13
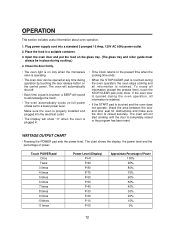
... time), touch the STOP/CLEAR pad once more. The oven will sound to acknowledge the touch. • The oven automatically cooks on full power unless set to the present time when the cooking time ends. • When the STOP/CLEAR pad is touched during the oven operation, the...seal for obstructions and make sure the door is closed or the program has been reset. WATTAGE OUTPUT CHART • Pressing the POWER pad sets the power-level. Plug power supply cord into the electrical outlet. • The Display will show ":0" when the oven is completely closed securely. OPERATION This ...
... time), touch the STOP/CLEAR pad once more. The oven will sound to acknowledge the touch. • The oven automatically cooks on full power unless set to the present time when the cooking time ends. • When the STOP/CLEAR pad is touched during the oven operation, the...seal for obstructions and make sure the door is closed or the program has been reset. WATTAGE OUTPUT CHART • Pressing the POWER pad sets the power-level. Plug power supply cord into the electrical outlet. • The Display will show ":0" when the oven is completely closed securely. OPERATION This ...
User Manual
Page 14
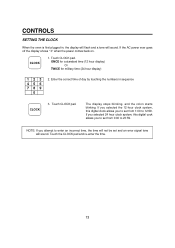
... goes off the display shows ":0" when the power comes back on. If you selected the 12-hour clock system, this digital cock allows you to set and an error signal tone will sound. ...
... goes off the display shows ":0" when the power comes back on. If you selected the 12-hour clock system, this digital cock allows you to set and an error signal tone will sound. ...
User Manual
Page 17
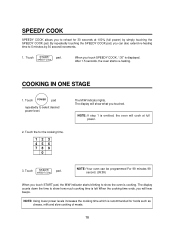
... ":30" is displayed. NOTE: If step 1 is recommended for foods such as cheese, milk and slow cooking of meats. 16 NOTE: Using lower power levels increases the cooking time which is omitted, the oven will hear beeps. After 1.5 seconds, the oven starts re-heating. SPEEDY COOK NOTE: Your ... time to show the oven is left When the cooking time ends, you will cook at 100% (full power) by 30 second increments. 1. Touch START/ pad. SPEEDY COOK When you touched. Touch POWER pad repeatedly to reheat for the cooking time. 123 456 789 0 The M/W indicator lights. Touch START/ ...
... ":30" is displayed. NOTE: If step 1 is recommended for foods such as cheese, milk and slow cooking of meats. 16 NOTE: Using lower power levels increases the cooking time which is omitted, the oven will hear beeps. After 1.5 seconds, the oven starts re-heating. SPEEDY COOK NOTE: Your ... time to show the oven is left When the cooking time ends, you will cook at 100% (full power) by 30 second increments. 1. Touch START/ pad. SPEEDY COOK When you touched. Touch POWER pad repeatedly to reheat for the cooking time. 123 456 789 0 The M/W indicator lights. Touch START/ ...
User Manual
Page 18
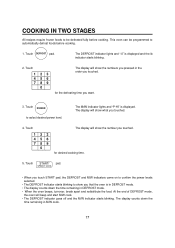
...what you touched. 4. SPEEDY COOK • When you touch START pad, the DEFROST and M/W indicators come on to confirm the power levels selected. • The DEFROST indicator starts blinking to show the number you touched. Touch DEFROST pad. for desired cooking time. 5. Touch... POWER to select desired power level. Touch 123 456 789 0 The display will beep and start M/W cook. • The DEFROST indicator goes off and the M/W ...
...what you touched. 4. SPEEDY COOK • When you touch START pad, the DEFROST and M/W indicators come on to confirm the power levels selected. • The DEFROST indicator starts blinking to show the number you touched. Touch DEFROST pad. for desired cooking time. 5. Touch... POWER to select desired power level. Touch 123 456 789 0 The display will beep and start M/W cook. • The DEFROST indicator goes off and the M/W ...
User Manual
Page 22
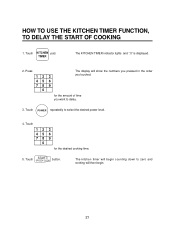
Press 123 456 789 0 The display will then begin. 21 Touch START/ SPEEDY COOK button. TIMER The KITCHEN TIMER indicator lights and ":0" is displayed. 2. Touch KITCHEN pad. Touch POWER repeatedly to delay. 3. for the desired cooking time. 5. Touch 123 456 789 0 for the amount of time you touched. The kitchen timer will begin counting down to zero and cooking will show the numbers you pressed in the order you want to select the desired power level. 4. HOW TO USE THE KITCHEN TIMER FUNCTION, TO DELAY THE START OF COOKING 1.
Press 123 456 789 0 The display will then begin. 21 Touch START/ SPEEDY COOK button. TIMER The KITCHEN TIMER indicator lights and ":0" is displayed. 2. Touch KITCHEN pad. Touch POWER repeatedly to delay. 3. for the desired cooking time. 5. Touch 123 456 789 0 for the amount of time you touched. The kitchen timer will begin counting down to zero and cooking will show the numbers you pressed in the order you want to select the desired power level. 4. HOW TO USE THE KITCHEN TIMER FUNCTION, TO DELAY THE START OF COOKING 1.


