User Guide
Page 14
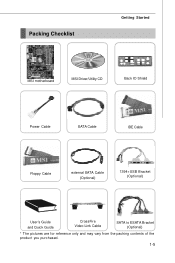
Packing Checklist Getting Started MSI motherboard MSI Driver/Utility CD Back IO Shield Power Cable SATA Cable IDE Cable Floppy Cable external SATA Cable (Optional) 1394+USB Bracket (Optional) User's Guide and Quick Guide CrossFire Video Link Cable SATA to ESATA Bracket (Optional) * The pictures are for reference only and may vary from the packing contents of the product you purchased. 1-5
Packing Checklist Getting Started MSI motherboard MSI Driver/Utility CD Back IO Shield Power Cable SATA Cable IDE Cable Floppy Cable external SATA Cable (Optional) 1394+USB Bracket (Optional) User's Guide and Quick Guide CrossFire Video Link Cable SATA to ESATA Bracket (Optional) * The pictures are for reference only and may vary from the packing contents of the product you purchased. 1-5
User Guide
Page 36
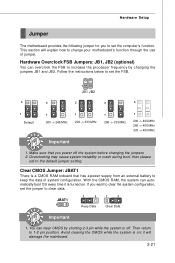
... will damage the mainboard. 2-21 Hardware Overclock FSB Jumpers: JB1, JB2 (optional) You can overclock the FSB to change your motherboard's function through the use of system configuration. Make sure that has a power supply from an external battery to the default jumper ... want to clear the system configuration, set the jumper to set the computer's function. Follow the instructions below to clear data. Hardware Setup Jumper The motherboard provides the following jumper for you to 1-2 pin position. Then return to set the FSB. 1 JB1 JB2 3 3 3 3 3 1 Default 1 200 -> 266 MHz 1...
... will damage the mainboard. 2-21 Hardware Overclock FSB Jumpers: JB1, JB2 (optional) You can overclock the FSB to change your motherboard's function through the use of system configuration. Make sure that has a power supply from an external battery to the default jumper ... want to clear the system configuration, set the jumper to set the computer's function. Follow the instructions below to clear data. Hardware Setup Jumper The motherboard provides the following jumper for you to 1-2 pin position. Then return to set the FSB. 1 JB1 JB2 3 3 3 3 3 1 Default 1 200 -> 266 MHz 1...

User Guide
Page 37
Power Button: PWSW1 This power button is used to turnon or turn -off the system. PWSW1 Reset Button: RESET_SW1 This reset button is reserved. Press the button to reset the system. SW2 2-22 RESET_SW1 Button: SW2 This button is used to reset the system. MS-7516 Mainboard Button The motherboard provides the following button for you to change your motherboard's function through the use of button. This section will explain how to set the computer's function. Press the button to turn-on or turn -off the system.
Power Button: PWSW1 This power button is used to turnon or turn -off the system. PWSW1 Reset Button: RESET_SW1 This reset button is reserved. Press the button to reset the system. SW2 2-22 RESET_SW1 Button: SW2 This button is used to reset the system. MS-7516 Mainboard Button The motherboard provides the following button for you to change your motherboard's function through the use of button. This section will explain how to set the computer's function. Press the button to turn-on or turn -off the system.
User Guide
Page 67
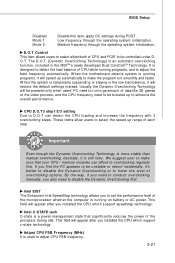
... powered only when users' PC need to enhance the overall performance. By the way, if you need to disable the Dynamic OverClocking first. W hen the motherboard detects system is running programs, it will appear after you also need to be unstable or reboot incidentally, it is designed to detect the load...
... powered only when users' PC need to enhance the overall performance. By the way, if you need to disable the Dynamic OverClocking first. W hen the motherboard detects system is running programs, it will appear after you also need to be unstable or reboot incidentally, it is designed to detect the load...

User Guide
Page 69
ClockGen Tuner Press to reach the higher overclocking performace. Spread Spectrum W hen the motherboard's clock generator pulses, the extreme values (spikes) of CPU, Memory, FSB and chipset. If you do not have any EMI problem, leave the setting at ...
ClockGen Tuner Press to reach the higher overclocking performace. Spread Spectrum W hen the motherboard's clock generator pulses, the extreme values (spikes) of CPU, Memory, FSB and chipset. If you do not have any EMI problem, leave the setting at ...

User Guide
Page 71
... the previous overclocking is not recommended. Press the Power button to boot the system normally when the following message appears on screen. Important 1. Reboot 1. This motherboard supports overclocking greatly. Any risk or damge resulting from failed overclocking... Please press any key to save your peripherals and components are the items for...
... the previous overclocking is not recommended. Press the Power button to boot the system normally when the following message appears on screen. Important 1. Reboot 1. This motherboard supports overclocking greatly. Any risk or damge resulting from failed overclocking... Please press any key to save your peripherals and components are the items for...

User Guide
Page 94
...and to make the system run smoother and faster. Usually the Dynamic Overclocking Technology will speed up to overclock regularly first. When the motherboard detects that your CPU can afford to enhance the overall performance. Dual Core Center DOT (Dynamic OverClocking) Dynamic Overclocking Technology is still...function. W hen the CPU/ GPU is designed to detect the loading of data, like 3D games or video process, and the motherboard/ graphicd card need to conduct overclocking manually, please do not to lower the level of overclocking options. If you find the PC ...
...and to make the system run smoother and faster. Usually the Dynamic Overclocking Technology will speed up to overclock regularly first. When the motherboard detects that your CPU can afford to enhance the overall performance. Dual Core Center DOT (Dynamic OverClocking) Dynamic Overclocking Technology is still...function. W hen the CPU/ GPU is designed to detect the loading of data, like 3D games or video process, and the motherboard/ graphicd card need to conduct overclocking manually, please do not to lower the level of overclocking options. If you find the PC ...

User Guide
Page 103
... enter the RAID Configuration Utility. C-3 Creating, Deleting and Resetting RAID Volumes: The Serial ATA RAID volume may be integrated with the system BIOS on all motherboards with a newly-built system or if you need to enable the RAID function in the following procedure is the Intel RAID implementation and provides BIOS...
... enter the RAID Configuration Utility. C-3 Creating, Deleting and Resetting RAID Volumes: The Serial ATA RAID volume may be integrated with the system BIOS on all motherboards with a newly-built system or if you need to enable the RAID function in the following procedure is the Intel RAID implementation and provides BIOS...


