
User Manual
Page 3
... View ...2-21 Getting Started Power Management ...3-2 Connecting the AC Power ...3-2 Using the Battery Power...3-4 ECO Engine -- Power Saving Function 3-9 TurboBattery+ Function...3-12 Power Management in Windows OS 3-15 Energy Saving Tips...3-17 Basic Operations ...3-18 Safety and Comfort Tips...3-18 Having a Good Work Habit...3-19 Knowing the Keyboard ...3-20 Knowing the Smart Pad...3-27 About Hard Disk Drive...3-34 Using the Optical Storage Device 3-35 Connecting the External Devices 3-38 Connecting the Peripheral Devices 3-38 Connecting the Communication Devices 3-41
... View ...2-21 Getting Started Power Management ...3-2 Connecting the AC Power ...3-2 Using the Battery Power...3-4 ECO Engine -- Power Saving Function 3-9 TurboBattery+ Function...3-12 Power Management in Windows OS 3-15 Energy Saving Tips...3-17 Basic Operations ...3-18 Safety and Comfort Tips...3-18 Having a Good Work Habit...3-19 Knowing the Keyboard ...3-20 Knowing the Smart Pad...3-27 About Hard Disk Drive...3-34 Using the Optical Storage Device 3-35 Connecting the External Devices 3-38 Connecting the Peripheral Devices 3-38 Connecting the Communication Devices 3-41

User Manual
Page 24
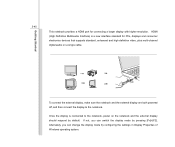
... using keyboard, touchpad, hard disk drive, and optical storage drive. Chapter 2, Introductions, includes the descriptions of all the accessories included when you open the packing box. If any of connecting the various external devices, communication devices, and so on using notebook. Also, this chapter provides the specification of this notebook, and introduces the function buttons, quick launch buttons, connectors, LEDs and externals of this notebook. This brand-new exquisite notebook will give you purchased this notebook...
... using keyboard, touchpad, hard disk drive, and optical storage drive. Chapter 2, Introductions, includes the descriptions of all the accessories included when you open the packing box. If any of connecting the various external devices, communication devices, and so on using notebook. Also, this chapter provides the specification of this notebook, and introduces the function buttons, quick launch buttons, connectors, LEDs and externals of this notebook. This brand-new exquisite notebook will give you purchased this notebook...
User Manual
Page 25
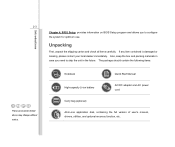
... contact your local dealer immediately. Notebook Quick Start Manual High-capacity Li-ion battery AC/DC adapter and AC power cord Carry bag (optional) All-in the future. Introductions 2-3 Chapter 4, BIOS Setup, provides information on BIOS Setup program and allows you need to configure the system for optimum use. The package should contain the following items: These accessories listed above may change without notice. Also, keep the...
... contact your local dealer immediately. Notebook Quick Start Manual High-capacity Li-ion battery AC/DC adapter and AC power cord Carry bag (optional) All-in the future. Introductions 2-3 Chapter 4, BIOS Setup, provides information on BIOS Setup program and allows you need to configure the system for optimum use. The package should contain the following items: These accessories listed above may change without notice. Also, keep the...
User Manual
Page 28
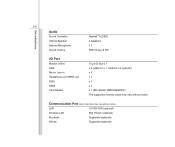
Communication Port (Items listed here may vary without notice) LAN 10/100/1000 (optional) Wireless LAN 802.11b/g/n (optional) Bluetooth Supported (optional) Wimax Supported (optional) Introductions 2-6 Audio Sound Controller Internal Speaker Internal Microphone Sound Volume Realtek® ALC892 4 speakers x 1 K/B hot-key & SW I/O Port Monitor (VGA) USB Mic-in/ Line-in Headphone-out/ SPDIF-out RJ45 HDMI Card Reader 15 pin D-Sub x 1 x 3 (USB 2.0 x 1, USB 3.0 x 2 optional) x 1 x 1 x 1 x 1 x 1 (SD/ SDHC/ MMC/MS/SDXC) The supported memory cards may vary without notice.
Communication Port (Items listed here may vary without notice) LAN 10/100/1000 (optional) Wireless LAN 802.11b/g/n (optional) Bluetooth Supported (optional) Wimax Supported (optional) Introductions 2-6 Audio Sound Controller Internal Speaker Internal Microphone Sound Volume Realtek® ALC892 4 speakers x 1 K/B hot-key & SW I/O Port Monitor (VGA) USB Mic-in/ Line-in Headphone-out/ SPDIF-out RJ45 HDMI Card Reader 15 pin D-Sub x 1 x 3 (USB 2.0 x 1, USB 3.0 x 2 optional) x 1 x 1 x 1 x 1 x 1 (SD/ SDHC/ MMC/MS/SDXC) The supported memory cards may vary without notice.
User Manual
Page 33
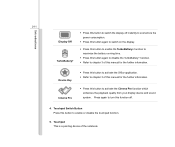
Touchpad Switch Button Press this function off instantly to economize the power consumption. Š Press this button to activate the Cinema Pro function which enhances the playback quality from your display device and sound system. Press again to turn this button to enable or disable the touchpad function. 5. Device Key Cinema Pro Š Press this button to activate the S-Bar application. Š Refer to chapter 3 of this manual for the further information. Introductions 2-11 Display Off...
Touchpad Switch Button Press this function off instantly to economize the power consumption. Š Press this button to activate the Cinema Pro function which enhances the playback quality from your display device and sound system. Press again to turn this button to enable or disable the touchpad function. 5. Device Key Cinema Pro Š Press this button to activate the S-Bar application. Š Refer to chapter 3 of this manual for the further information. Introductions 2-11 Display Off...
User Manual
Page 35
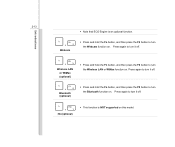
... optional function. Š Press and hold the Fn button, and then press the F6 button to turn the Webcam function on . Introductions 2-13 + Webcam Š Note that ECO Engine is NOT supported on . Press again to turn the Bluetooth function on . Press again to turn it off . + Wireless LAN or WiMax (optional) Š Press and hold the Fn button, and then press the F8 button to turn it off. + Bluetooth (optional...
... optional function. Š Press and hold the Fn button, and then press the F6 button to turn the Webcam function on . Introductions 2-13 + Webcam Š Note that ECO Engine is NOT supported on . Press again to turn the Bluetooth function on . Press again to turn it off . + Wireless LAN or WiMax (optional) Š Press and hold the Fn button, and then press the F8 button to turn it off. + Bluetooth (optional...

User Manual
Page 37
...; Battery LED goes out when it is disconnected. Wireless LAN Wireless LAN (optional) Š Wireless LAN LED indicator glows blue when Wireless LAN function is enabled. Š LED indicator goes out when this function is disabled. Š Warning: For flight safety consideration, make sure this LED indicator goes out when you are in low battery status. Š Blinking amber if the battery fails and it is fully charged or when the AC/DC adapter is recommended to replace a new battery...
...; Battery LED goes out when it is disconnected. Wireless LAN Wireless LAN (optional) Š Wireless LAN LED indicator glows blue when Wireless LAN function is enabled. Š LED indicator goes out when this function is disabled. Š Warning: For flight safety consideration, make sure this LED indicator goes out when you are in low battery status. Š Blinking amber if the battery fails and it is fully charged or when the AC/DC adapter is recommended to replace a new battery...
User Manual
Page 41
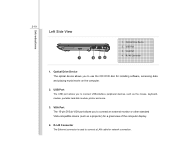
.... 2. USB Port The USB port allows you to connect a LAN cable for a great view of the computer display. 4. VGA Port The 15-pin D-Sub VGA port allows you to connect USB-interface peripheral devices, such as a projector) for network connection. USB Port 3. 2-19 Left Side View Introductions 1 2 34 1. VGA Port 4. Optical Drive Device 2. Optical Drive Device The optical device allows you to connect an external monitor or other standard VGA-compatible device (such as the mouse, keyboard, modem, portable hard disk module...
.... 2. USB Port The USB port allows you to connect a LAN cable for a great view of the computer display. 4. VGA Port The 15-pin D-Sub VGA port allows you to connect USB-interface peripheral devices, such as a projector) for network connection. USB Port 3. 2-19 Left Side View Introductions 1 2 34 1. VGA Port 4. Optical Drive Device 2. Optical Drive Device The optical device allows you to connect an external monitor or other standard VGA-compatible device (such as the mouse, keyboard, modem, portable hard disk module...
User Manual
Page 52
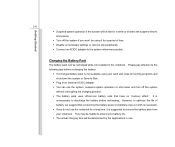
... time. Š Disable unnecessary settings or remove idle peripherals. Š Connect an AC/DC adapter to the system whenever possible. Charging the Battery Pack The battery pack can be recharged while it is installed in an external AC/DC adapter. Š You can use the system, suspend system operation or shut down the system or Save-to-Disk. Š Plug in the notebook. This may...
... time. Š Disable unnecessary settings or remove idle peripherals. Š Connect an AC/DC adapter to the system whenever possible. Charging the Battery Pack The battery pack can be recharged while it is installed in an external AC/DC adapter. Š You can use the system, suspend system operation or shut down the system or Save-to-Disk. Š Plug in the notebook. This may...

User Manual
Page 56
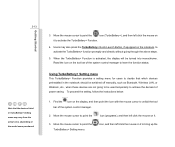
... functional in the Operating System with the mouse cursor to maximize the battery running time or process the better system performance. Getting Started 3-12 TurboBattery+ Function In addition to ECO Engine function, this notebook also provides a battery power management function, which named TurboBattery+, for users to activate the TurboBattery+ Function: 1. With the TurboBattery+ Setting menu, users will only be able to enable or disable the particular devices preinstalled, such as Wireless LAN, or Webcam...
... functional in the Operating System with the mouse cursor to maximize the battery running time or process the better system performance. Getting Started 3-12 TurboBattery+ Function In addition to ECO Engine function, this notebook also provides a battery power management function, which named TurboBattery+, for users to activate the TurboBattery+ Function: 1. With the TurboBattery+ Setting menu, users will only be able to enable or disable the particular devices preinstalled, such as Wireless LAN, or Webcam...
User Manual
Page 57
... up the icon, and then left click the mouse on the notebook, to activate the TurboBattery+ function promptly and directly without going to be turned into monochrome. Using TurboBattery+ Setting menu This TurboBattery+ Function provides a setting menu for users to decide that the devices listed in the notebook should be switched off manually, such as Bluetooth, Wireless LAN, or Webcam, etc., when these devices are not going through the above steps. 5. 3-13...
... up the icon, and then left click the mouse on the notebook, to activate the TurboBattery+ function promptly and directly without going to be turned into monochrome. Using TurboBattery+ Setting menu This TurboBattery+ Function provides a setting menu for users to decide that the devices listed in the notebook should be switched off manually, such as Bluetooth, Wireless LAN, or Webcam, etc., when these devices are not going through the above steps. 5. 3-13...
User Manual
Page 61
Getting Started 3-17 Energy Saving Tips Š Activate the ECO power saving function to manage the computer's energy consumption. Š Turn off the monitor after a period of user inactivity. Š Utilize the Fn and F12 sleep mode keys to turn into power saving mode. Š Tune the settings in Power Options under Windows OS to optimize the computer's power management. Š Always disconnect the AC power cord or uninstall the battery pack or switch off the wall socket if the computer would be left unused for a certain time to achieve zero energy consumption.
Getting Started 3-17 Energy Saving Tips Š Activate the ECO power saving function to manage the computer's energy consumption. Š Turn off the monitor after a period of user inactivity. Š Utilize the Fn and F12 sleep mode keys to turn into power saving mode. Š Tune the settings in Power Options under Windows OS to optimize the computer's power management. Š Always disconnect the AC power cord or uninstall the battery pack or switch off the wall socket if the computer would be left unused for a certain time to achieve zero energy consumption.
User Manual
Page 68
Getting Started 3-24 „ [Fn] Key + + + + + + + Switch the display output mode between the LCD, external monitor and both. Enable or disable the touchpad function. Increase the built-in speaker's volume. Decrease the LCD brightness. Increase the LCD brightness. Decrease the built-in speaker's volume. Disable the computer's audio function.
Getting Started 3-24 „ [Fn] Key + + + + + + + Switch the display output mode between the LCD, external monitor and both. Enable or disable the touchpad function. Increase the built-in speaker's volume. Decrease the LCD brightness. Increase the LCD brightness. Decrease the built-in speaker's volume. Disable the computer's audio function.

User Manual
Page 70
Press again to turn it off. + Bluetooth (optional) Š Press and hold the Fn button, and then press the F9 button to turn it off . + 3G (optional) Š This function is NOT supported on this model. Press again to turn the Bluetooth function on. Getting Started 3-26 + Webcam Š Press and hold the Fn button, and then press the F6 button to turn the Wireless LAN or WiMax function on. Press again to turn it off . + Wireless LAN or WiMax (optional) Š Press and hold the Fn button, and then press the F8 button to turn the Webcam function on.
Press again to turn it off. + Bluetooth (optional) Š Press and hold the Fn button, and then press the F9 button to turn it off . + 3G (optional) Š This function is NOT supported on this model. Press again to turn the Bluetooth function on. Getting Started 3-26 + Webcam Š Press and hold the Fn button, and then press the F6 button to turn the Wireless LAN or WiMax function on. Press again to turn it off . + Wireless LAN or WiMax (optional) Š Press and hold the Fn button, and then press the F8 button to turn the Webcam function on.
User Manual
Page 79
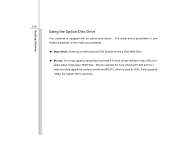
... well as a multi-functional DVD Dual Drive and a DVD RAM Drive. „ Blu-ray: It is a high-capacity optical disc that holds 4.5 hours of high-definition video (HD) on a single-sided, single-layer 25GB disk. It also supports 1080p, the highest HDTV resolution. The actual device preinstalled in your notebook depends on the model you purchased. „ Super Multi: Works as MPEG-2, which is...
... well as a multi-functional DVD Dual Drive and a DVD RAM Drive. „ Blu-ray: It is a high-capacity optical disc that holds 4.5 hours of high-definition video (HD) on a single-sided, single-layer 25GB disk. It also supports 1080p, the highest HDTV resolution. The actual device preinstalled in your notebook depends on the model you purchased. „ Super Multi: Works as MPEG-2, which is...

User Manual
Page 82
... connect these devices, install the drivers for connecting various USB devices, such as mouse, keyboard, digital camera, webcam, printer, and external optical storage device, ete.. This notebook is capable to auto detect the USB devices installed, and if there is no detection of the devices, please manually enable the USB devices by going to Start Menu / Control Panel / Add Hardware to connect peripheral devices. Connecting the Peripheral Devices Connecting the USB devices This notebook provides USB ports for each device first if necessary, and then connect the device to the notebook...
... connect these devices, install the drivers for connecting various USB devices, such as mouse, keyboard, digital camera, webcam, printer, and external optical storage device, ete.. This notebook is capable to auto detect the USB devices installed, and if there is no detection of the devices, please manually enable the USB devices by going to Start Menu / Control Panel / Add Hardware to connect peripheral devices. Connecting the Peripheral Devices Connecting the USB devices This notebook provides USB ports for each device first if necessary, and then connect the device to the notebook...
User Manual
Page 83
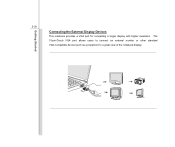
The 15-pin-D-sub VGA port allows users to connect an external monitor or other standard VGA-compatible device (such as a projector) for connecting a larger display with higher resolution. Getting Started 3-39 Connecting the External Display Devices This notebook provides a VGA port for a great view of the notebook display.
The 15-pin-D-sub VGA port allows users to connect an external monitor or other standard VGA-compatible device (such as a projector) for connecting a larger display with higher resolution. Getting Started 3-39 Connecting the External Display Devices This notebook provides a VGA port for a great view of the notebook display.
User Manual
Page 84
... switch the display mode by default. HDMI (High Definition Multimedia Interface) is connected to the notebook. Alternately, you can change the display mode by configuring the settings in Display Properties of Windows operating system. To connect the external display, make sure the notebook and the external display are both powered off, and then connect the display to the notebook, power on a single cable. Getting Started 3-40 This notebook provides a HDMI port for PCs, displays and consumer electronics devices that supports standard, enhanced and high-definition video...
... switch the display mode by default. HDMI (High Definition Multimedia Interface) is connected to the notebook. Alternately, you can change the display mode by configuring the settings in Display Properties of Windows operating system. To connect the external display, make sure the notebook and the external display are both powered off, and then connect the display to the notebook, power on a single cable. Getting Started 3-40 This notebook provides a HDMI port for PCs, displays and consumer electronics devices that supports standard, enhanced and high-definition video...

User Manual
Page 89
... memory module may be installed, by the authorized dealer or service center, to the section of this storage device may be upgradable and replaceable by authorized dealer or service center. To replace the battery pack, please refer to increase the performance of Using Battery power for details. This notebook is equipped with a hard disk drive, and this notebook, depending on the specification limitation. Getting Started 3-45 1 2 3 4 This notebook is equipped with a wireless LAN/ Bluetooth module...
... memory module may be installed, by the authorized dealer or service center, to the section of this storage device may be upgradable and replaceable by authorized dealer or service center. To replace the battery pack, please refer to increase the performance of Using Battery power for details. This notebook is equipped with a hard disk drive, and this notebook, depending on the specification limitation. Getting Started 3-45 1 2 3 4 This notebook is equipped with a wireless LAN/ Bluetooth module...
User Manual
Page 100
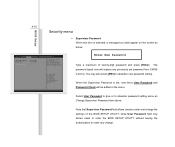
... or to abandon password setting same as below: Enter New Password Type a maximum of the BIOS SETUP UTILITY, while User Password field only allows users to enter the BIOS SETUP UTILITY without having the authorization to abandon new password setting. You may also press [ESC] to make any previously set , new items User Password and Password Check will be added in the menu. The password typed now will replace any change. BIOS Setup 4-10 Security menu Š Supervisor Password When this item is set password from CMOS memory.
... or to abandon password setting same as below: Enter New Password Type a maximum of the BIOS SETUP UTILITY, while User Password field only allows users to enter the BIOS SETUP UTILITY without having the authorization to abandon new password setting. You may also press [ESC] to make any previously set , new items User Password and Password Check will be added in the menu. The password typed now will replace any change. BIOS Setup 4-10 Security menu Š Supervisor Password When this item is set password from CMOS memory.


