
User Manual
Page 3
Energy Saving Tips 3-8 Basic Operations 3-9 Safety and Comfort Tips 3-9 Knowing the Keyboard 3-11 Knowing the Touchpad 3-15 Knowing the Smart Pad 3-17 About Hard Disk Drive 3-21 Using the Optical Storage Device 3-21 Connecting the External Devices 3-23 Peripheral Devices 3-23 Communication Devices 3-24 Components Replacement and Upgrade 3-25 1-3
Energy Saving Tips 3-8 Basic Operations 3-9 Safety and Comfort Tips 3-9 Knowing the Keyboard 3-11 Knowing the Touchpad 3-15 Knowing the Smart Pad 3-17 About Hard Disk Drive 3-21 Using the Optical Storage Device 3-21 Connecting the External Devices 3-23 Peripheral Devices 3-23 Communication Devices 3-24 Components Replacement and Upgrade 3-25 1-3
User Manual
Page 6
...connecting the equipment to the equipment. Š Always disconnect the AC power cord or uninstall the battery pack or switch off the wall socket if the equipment would be noted. All cautions and warnings on the enclosure are unlikely to achieve zero energy consumption. The openings on the equipment or user's manual should be operated...temperature. Never pour liquid into the opening that people are used for a certain time to step on card or module to the power outlet. Š Always unplug the AC power cord before setting it . Do not cover the openings. Š Do not leave ...
...connecting the equipment to the equipment. Š Always disconnect the AC power cord or uninstall the battery pack or switch off the wall socket if the equipment would be noted. All cautions and warnings on the enclosure are unlikely to achieve zero energy consumption. The openings on the equipment or user's manual should be operated...temperature. Never pour liquid into the opening that people are used for a certain time to step on card or module to the power outlet. Š Always unplug the AC power cord before setting it . Do not cover the openings. Š Do not leave ...
User Manual
Page 7
... improper battery replacement, use the same or equivalent type of battery recommended by the manufacturer only. Š Always keep the strong magnetic or electrical objects away from the equipment. Š When installing the coaxial cable to the TV Tuner, it work according to protective earthing system of the building. Š Cable distribution system should be thrown away Š Users should...
... improper battery replacement, use the same or equivalent type of battery recommended by the manufacturer only. Š Always keep the strong magnetic or electrical objects away from the equipment. Š When installing the coaxial cable to the TV Tuner, it work according to protective earthing system of the building. Š Cable distribution system should be thrown away Š Users should...
User Manual
Page 10
... dependability and customer satisfaction. ™ Manual Map This User's Manual provides instructions and illustrations on using notebook. It is recommended to ship the unit in the future. The package should contain the following items: y Notebook y Quick Start Manual y High-capacity Li-ion battery y AC/DC adapter and AC power cord y Carry bag (optional) y All-in using keyboard, touchpad, hard disk drive, and optical storage drive. Also, keep the box and packing...
... dependability and customer satisfaction. ™ Manual Map This User's Manual provides instructions and illustrations on using notebook. It is recommended to ship the unit in the future. The package should contain the following items: y Notebook y Quick Start Manual y High-capacity Li-ion battery y AC/DC adapter and AC power cord y Carry bag (optional) y All-in using keyboard, touchpad, hard disk drive, and optical storage drive. Also, keep the box and packing...
User Manual
Page 12
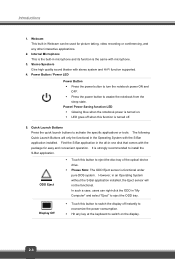
... . 5. Internal Microphone This is the built-in the Operating System with stereo system and Hi-Fi function supported. 4. ODD Eject Š Touch this button to eject the disc tray of the optical device drive. Š Please Note: The ODD Eject sensor is the same with the package for picture taking, video recording or conferencing, and any key at the keyboard to switch on the display. 2-4 Webcam...
... . 5. Internal Microphone This is the built-in the Operating System with stereo system and Hi-Fi function supported. 4. ODD Eject Š Touch this button to eject the disc tray of the optical device drive. Š Please Note: The ODD Eject sensor is the same with the package for picture taking, video recording or conferencing, and any key at the keyboard to switch on the display. 2-4 Webcam...
User Manual
Page 13
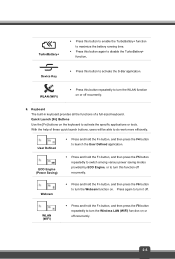
... this button to enable the TurboBattery+ function to maximize the battery running time. Š Press this button to activate the S-Bar application. WLAN (WiFi) Š Press this function off recurrently. + Webcam Š Press and hold the Fn button, and then press the F8 button repeatedly to turn the Wireless LAN (WiFi) function on or off recurrently. 6. With the help of a full-sized keyboard. Quick Launch [Fn] Buttons Use the [Fn] buttons...
... this button to enable the TurboBattery+ function to maximize the battery running time. Š Press this button to activate the S-Bar application. WLAN (WiFi) Š Press this function off recurrently. + Webcam Š Press and hold the Fn button, and then press the F8 button repeatedly to turn the Wireless LAN (WiFi) function on or off recurrently. 6. With the help of a full-sized keyboard. Quick Launch [Fn] Buttons Use the [Fn] buttons...
User Manual
Page 14
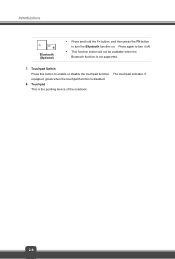
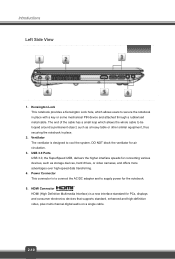
Introductions + Bluetooth (Optional) Š Press and hold the Fn button, and then press the F9 button to enable or disable the touchpad function. Touchpad This is not supported. 7. Touchpad Switch Press this button to turn it off. Š This function button will not be available when the Bluetooth function is the pointing device of the notebook. 2-6 Press again to turn the Bluetooth function on. The touchpad indicator, if equipped, glows when the touchpad function is disabled. 8.
Introductions + Bluetooth (Optional) Š Press and hold the Fn button, and then press the F9 button to enable or disable the touchpad function. Touchpad This is not supported. 7. Touchpad Switch Press this button to turn it off. Š This function button will not be available when the Bluetooth function is the pointing device of the notebook. 2-6 Press again to turn the Bluetooth function on. The touchpad indicator, if equipped, glows when the touchpad function is disabled. 8.
User Manual
Page 16
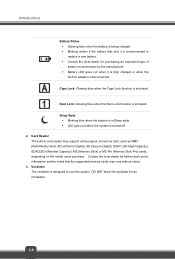
...), MS (Memory Stick) or MS Pro (Memory Stick Pro) cards, depending on the model users purchase. Sleep State Š Blinking blue when the system is in card reader may vary without notice. 3. Introductions Battery Status Š Glowing blue when the battery is being charged. Š Blinking amber if the battery fails and it is recommended to cool the system. Num Lock: Glowing blue when the Num Lock function is activated.
...), MS (Memory Stick) or MS Pro (Memory Stick Pro) cards, depending on the model users purchase. Sleep State Š Blinking blue when the system is in card reader may vary without notice. 3. Introductions Battery Status Š Glowing blue when the battery is being charged. Š Blinking amber if the battery fails and it is recommended to cool the system. Num Lock: Glowing blue when the Num Lock function is activated.
User Manual
Page 17
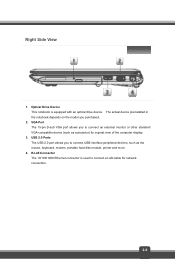
... 1. USB 2.0 Ports The USB 2.0 port allows you to connect USB-interface peripheral devices, such as a projector) for network connection. 2-9 The actual device preinstalled in the notebook depends on the model you to connect a LAN cable for a great view of the computer display. 3. VGA Port The 15-pin-D-sub VGA port allows you purchased. 2. Optical Drive Device This notebook is used to connect an external monitor or other standard VGA-compatible device (such as the mouse, keyboard, modem, portable hard disk module...
... 1. USB 2.0 Ports The USB 2.0 port allows you to connect USB-interface peripheral devices, such as a projector) for network connection. 2-9 The actual device preinstalled in the notebook depends on the model you to connect a LAN cable for a great view of the computer display. 3. VGA Port The 15-pin-D-sub VGA port allows you purchased. 2. Optical Drive Device This notebook is used to connect an external monitor or other standard VGA-compatible device (such as the mouse, keyboard, modem, portable hard disk module...
User Manual
Page 18
... as storage devices, hard drives, or video cameras, and offers more advantages over high-speed data transferring. 4. USB 3.0 Ports USB 3.0, the SuperSpeed USB, delivers the higher interface speeds for the notebook. 5. DO NOT block the ventilator for PCs, displays and consumer electronics devices that supports standard, enhanced and high-definition video, plus multi-channel digital audio on a single cable. 2-10 Kensington Lock This notebook provides a Kensington Lock hole, which...
... as storage devices, hard drives, or video cameras, and offers more advantages over high-speed data transferring. 4. USB 3.0 Ports USB 3.0, the SuperSpeed USB, delivers the higher interface speeds for the notebook. 5. DO NOT block the ventilator for PCs, displays and consumer electronics devices that supports standard, enhanced and high-definition video, plus multi-channel digital audio on a single cable. 2-10 Kensington Lock This notebook provides a Kensington Lock hole, which...
User Manual
Page 23
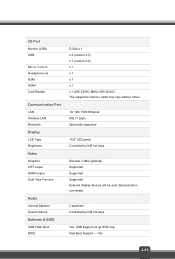
... Port LAN Wireless LAN Bluetooth Display LCD Type Brightness Video Graphics CRT output HDMI output Dual View Function Audio Internal Speaker Sound Volume Software & BIOS USB Flash Boot BIOS D-Sub x 1 x 2 (version 3.0) x 1 (version 2.0) x 1 x 1 x 1 x 1 x 1 (SD/ SDHC/ MMC/ MS/ SDXC) The supported memory cards may vary without notice. 10/ 100/ 1000 Ethernet 802.11 b/g/n Optionally supported 15.6" LED panel Controlled by K/B hot-keys Discrete / UMA (optional) Supported Supported Supported External display devices will be auto detected when connected. 2 speakers Controlled by K/B hot-keys Yes, USB...
... Port LAN Wireless LAN Bluetooth Display LCD Type Brightness Video Graphics CRT output HDMI output Dual View Function Audio Internal Speaker Sound Volume Software & BIOS USB Flash Boot BIOS D-Sub x 1 x 2 (version 3.0) x 1 (version 2.0) x 1 x 1 x 1 x 1 x 1 (SD/ SDHC/ MMC/ MS/ SDXC) The supported memory cards may vary without notice. 10/ 100/ 1000 Ethernet 802.11 b/g/n Optionally supported 15.6" LED panel Controlled by K/B hot-keys Discrete / UMA (optional) Supported Supported Supported External display devices will be auto detected when connected. 2 speakers Controlled by K/B hot-keys Yes, USB...
User Manual
Page 30
...; Do not use the notebook for a period of time. Š Disable unnecessary settings or remove idle peripherals. Š Connect an AC/DC adapter to -Disk. Š Plug in an external AC/DC adapter. Š You can be using it for a long time, it is installed in your notebook. This may be determined by the applications in use the system, suspend system operation or shut down...
...; Do not use the notebook for a period of time. Š Disable unnecessary settings or remove idle peripherals. Š Connect an AC/DC adapter to -Disk. Š Plug in an external AC/DC adapter. Š You can be using it for a long time, it is installed in your notebook. This may be determined by the applications in use the system, suspend system operation or shut down...
User Manual
Page 31
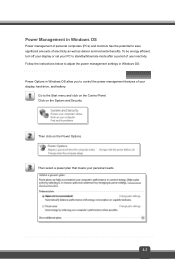
... your display, hard drive, and battery. Click on the Power Options. Power Management in Windows OS allow you to save significant amounts of electricity as well as deliver environmental benefits. Then click on the System and Security. To be energy efficient, turn off your display or set your personal needs 3-7 Then select a power plan that meets your PC to the Start menu and click on the Control Panel...
... your display, hard drive, and battery. Click on the Power Options. Power Management in Windows OS allow you to save significant amounts of electricity as well as deliver environmental benefits. Then click on the System and Security. To be energy efficient, turn off your display or set your personal needs 3-7 Then select a power plan that meets your PC to the Start menu and click on the Control Panel...

User Manual
Page 32
...-power or "Sleep" mode after 10 minutes The computer exits Sleep when the power/Sleep button is enabled, the computer can also exit Sleep in response to a command from power saving mode in response to wake up from the power button. When the Wake On LAN (WOL) feature is pressed. Getting Started The Shut Down Computer menu will present the options to turn into power saving mode. Š Tune the settings...
...-power or "Sleep" mode after 10 minutes The computer exits Sleep when the power/Sleep button is enabled, the computer can also exit Sleep in response to a command from power saving mode in response to wake up from the power button. When the Wake On LAN (WOL) feature is pressed. Getting Started The Shut Down Computer menu will present the options to turn into power saving mode. Š Tune the settings...

User Manual
Page 36
...] Keys Switch the display output mode between the LCD, external monitor + and both. Scroll Lock: Press this function is activated, the letters you can find the Windows Logo key ( ) on and off. When this key to toggle the Scroll Lock on the keyboard, which are used to use the numeric keys that are used under DOS. Enable or disable the touchpad function. + Decrease the LCD brightness. + 3-12 Numeric Keys Find the numeric keys among the keyboard, and activate the Num Lock function to...
...] Keys Switch the display output mode between the LCD, external monitor + and both. Scroll Lock: Press this function is activated, the letters you can find the Windows Logo key ( ) on and off. When this key to toggle the Scroll Lock on the keyboard, which are used to use the numeric keys that are used under DOS. Enable or disable the touchpad function. + Decrease the LCD brightness. + 3-12 Numeric Keys Find the numeric keys among the keyboard, and activate the Num Lock function to...

User Manual
Page 37
...-in speaker's volume. + Disable the computer's audio function. + Force the computer into sleep state (depending on the system + configuration). „ Quick Launch [Fn] Keys Use the [Fn] buttons on the keyboard to turn the Wireless LAN (WiFi) function on . Press again to turn the Webcam function on or off recurrently. 3-13 With the help of these quick launch buttons, users will be able to do work more efficiently. + User Defined + ECO Engine (Power Saving) Š...
...-in speaker's volume. + Disable the computer's audio function. + Force the computer into sleep state (depending on the system + configuration). „ Quick Launch [Fn] Keys Use the [Fn] buttons on the keyboard to turn the Wireless LAN (WiFi) function on . Press again to turn the Webcam function on or off recurrently. 3-13 With the help of these quick launch buttons, users will be able to do work more efficiently. + User Defined + ECO Engine (Power Saving) Š...
User Manual
Page 39
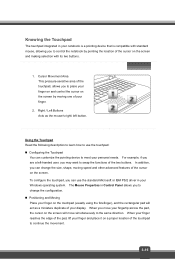
... as the mouse's right/ left -handed user, you can customize the pointing device to meet your finger and place it on a proper location of the touchpad to continue the movement. 3-15 Using the Touchpad Read the following description to learn how to use the standard Microsoft or IBM PS/2 driver in your Windows operating system. To configure the touchpad, you to control the notebook by...
... as the mouse's right/ left -handed user, you can customize the pointing device to meet your finger and place it on a proper location of the touchpad to continue the movement. 3-15 Using the Touchpad Read the following description to learn how to use the standard Microsoft or IBM PS/2 driver in your Windows operating system. To configure the touchpad, you to control the notebook by...
User Manual
Page 45
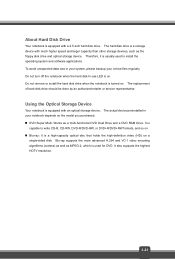
... MPEG-2, which is turned on the model you purchased. „ DVD Super Multi: Works as the floppy disk drive and optical storage device. Do not remove or install the hard disk drive when the notebook is used to write CD-R, CD-RW, DVD-R/DVD-RW, or DVD+R/DVD+RW formats, and so on. „ Blu-ray: It is a high-capacity optical disc that holds the high-definition video (HD) on . Therefore...
... MPEG-2, which is turned on the model you purchased. „ DVD Super Multi: Works as the floppy disk drive and optical storage device. Do not remove or install the hard disk drive when the notebook is used to write CD-R, CD-RW, DVD-R/DVD-RW, or DVD+R/DVD+RW formats, and so on. „ Blu-ray: It is a high-capacity optical disc that holds the high-definition video (HD) on . Therefore...

User Manual
Page 47
Contact the local dealer for reference only. Peripheral Devices The functions listed here are for detailed information. 3-23 ™ Connecting the External Devices The I/O (input/output) ports on the model users purchased. All functions and devices listed here are supported optionally, depending on the notebook allow you to connect peripheral devices and communication devices.
Contact the local dealer for reference only. Peripheral Devices The functions listed here are for detailed information. 3-23 ™ Connecting the External Devices The I/O (input/output) ports on the model users purchased. All functions and devices listed here are supported optionally, depending on the notebook allow you to connect peripheral devices and communication devices.
User Manual
Page 50
Additional memory module may be installed, by the authorized dealer or service center. Getting Started This notebook is equipped with a wireless LAN module, and the module may be upgradable and replaceable by authorized dealer or service center. For any upgrade or replace service. 3-26 It is equipped with a hard disk drive, and this notebook, depending on the specification limitation. This notebook is strongly recommended to contact the authorized dealer or service center for any...
Additional memory module may be installed, by the authorized dealer or service center. Getting Started This notebook is equipped with a wireless LAN module, and the module may be upgradable and replaceable by authorized dealer or service center. For any upgrade or replace service. 3-26 It is equipped with a hard disk drive, and this notebook, depending on the specification limitation. This notebook is strongly recommended to contact the authorized dealer or service center for any...


