
User Manual
Page 3
Energy Saving Tips 3-8 Basic Operations 3-9 Safety and Comfort Tips 3-9 Knowing the Keyboard 3-11 Knowing the Touchpad 3-15 Knowing the Smart Pad 3-17 About Hard Disk Drive 3-21 Using the Optical Storage Device 3-21 Connecting the External Devices 3-23 Peripheral Devices 3-23 Communication Devices 3-24 Components Replacement and Upgrade 3-25 1-3
Energy Saving Tips 3-8 Basic Operations 3-9 Safety and Comfort Tips 3-9 Knowing the Keyboard 3-11 Knowing the Touchpad 3-15 Knowing the Smart Pad 3-17 About Hard Disk Drive 3-21 Using the Optical Storage Device 3-21 Connecting the External Devices 3-23 Peripheral Devices 3-23 Communication Devices 3-24 Components Replacement and Upgrade 3-25 1-3
User Manual
Page 10
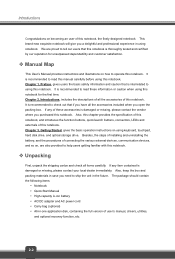
... professional experience in -one application disk, containing the full version of installing and uninstalling the battery; If any of these information or caution when using keyboard, touchpad, hard disk drive, and optical storage drive. Besides, the steps of user's manual, drivers, utilities, and optional recovery function, etc. 2-2 Introductions Congratulations on becoming...
... professional experience in -one application disk, containing the full version of installing and uninstalling the battery; If any of these information or caution when using keyboard, touchpad, hard disk drive, and optical storage drive. Besides, the steps of user's manual, drivers, utilities, and optional recovery function, etc. 2-2 Introductions Congratulations on becoming...
User Manual
Page 12
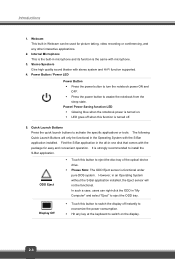
... Buttons will not be functional. However, in the Operating System with the package for picture taking, video recording or conferencing, and any key at the keyboard to switch on . Š LED goes off when this button to eject the disc tray of the optical device drive. Š Please Note: The ODD...
... Buttons will not be functional. However, in the Operating System with the package for picture taking, video recording or conferencing, and any key at the keyboard to switch on . Š LED goes off when this button to eject the disc tray of the optical device drive. Š Please Note: The ODD...
User Manual
Page 13
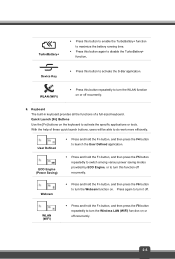
...; Press this button to activate the S-Bar application. WLAN (WiFi) Š Press this function off recurrently. 6. With the help of a full-sized keyboard. Quick Launch [Fn] Buttons Use the [Fn] buttons on or off recurrently. + Webcam Š Press and hold the Fn button, and then press... the F8 button repeatedly to disable the TurboBattery+ function. Keyboard The built-in keyboard provides all the functions of these quick launch buttons, users will be able to do work more efficiently. + User Defined + ECO ...
...; Press this button to activate the S-Bar application. WLAN (WiFi) Š Press this function off recurrently. 6. With the help of a full-sized keyboard. Quick Launch [Fn] Buttons Use the [Fn] buttons on or off recurrently. + Webcam Š Press and hold the Fn button, and then press... the F8 button repeatedly to disable the TurboBattery+ function. Keyboard The built-in keyboard provides all the functions of these quick launch buttons, users will be able to do work more efficiently. + User Defined + ECO ...
User Manual
Page 17
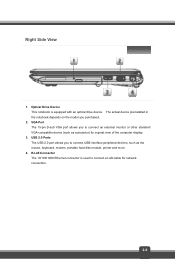
...) for network connection. 2-9 Optical Drive Device This notebook is used to connect an external monitor or other standard VGA-compatible device (such as the mouse, keyboard, modem, portable hard disk module, printer and more. 4. RJ-45 Connector The 10/100/1000 Ethernet connector is equipped with an optical drive device. The...
...) for network connection. 2-9 Optical Drive Device This notebook is used to connect an external monitor or other standard VGA-compatible device (such as the mouse, keyboard, modem, portable hard disk module, printer and more. 4. RJ-45 Connector The 10/100/1000 Ethernet connector is equipped with an optical drive device. The...
User Manual
Page 35
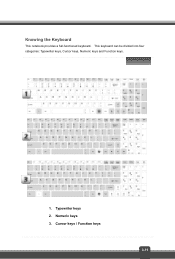
Cursor keys / Function keys 3-11 Numeric keys 3. Knowing the Keyboard This notebook provides a full-functioned keyboard. This keyboard can be divided into four categories: Typewriter keys, Cursor keys, Numeric keys and Function keys. 1. Typewriter keys 2.
Cursor keys / Function keys 3-11 Numeric keys 3. Knowing the Keyboard This notebook provides a full-functioned keyboard. This keyboard can be divided into four categories: Typewriter keys, Cursor keys, Numeric keys and Function keys. 1. Typewriter keys 2.

User Manual
Page 36
... and is usually used to use the numeric keys that are kept in the typewriter keys. 2. Numeric Keys Find the numeric keys among the keyboard, and activate the Num Lock function to control the cursor movement. Enable or disable the touchpad function. + Decrease the LCD brightness. + 3-12...pressed, the corresponding LEDs will light up to perform Windows-specific functions. For more information, please refer to toggle the Caps Lock on the keyboard, which are used under DOS. Scroll Lock: Press this key to your Windows manual or online help. „ General [Fn] Keys ...
... and is usually used to use the numeric keys that are kept in the typewriter keys. 2. Numeric Keys Find the numeric keys among the keyboard, and activate the Num Lock function to control the cursor movement. Enable or disable the touchpad function. + Decrease the LCD brightness. + 3-12...pressed, the corresponding LEDs will light up to perform Windows-specific functions. For more information, please refer to toggle the Caps Lock on the keyboard, which are used under DOS. Scroll Lock: Press this key to your Windows manual or online help. „ General [Fn] Keys ...

User Manual
Page 37
... off . + WLAN (WiFi) Š Press and hold the Fn button, and then press the F6 button to turn the Wireless LAN (WiFi) function on the keyboard to turn the Webcam function on. Press again to turn it off recurrently. + Webcam Š Press and hold the Fn button, and then press the...
... off . + WLAN (WiFi) Š Press and hold the Fn button, and then press the F6 button to turn the Wireless LAN (WiFi) function on the keyboard to turn the Webcam function on. Press again to turn it off recurrently. + Webcam Š Press and hold the Fn button, and then press the...
User Manual
Page 46
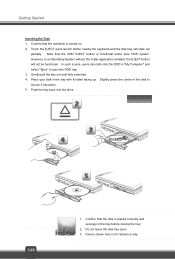
... press the center of the disk to eject the ODD tray. 3. Push the tray back into place. 5. Touch the EJECT quick launch button nearby the keyboard and the disk tray will not be functional. Device shown here is turned on. 2. Confirm that the notebook is for reference only. However, in the...
... press the center of the disk to eject the ODD tray. 3. Push the tray back into place. 5. Touch the EJECT quick launch button nearby the keyboard and the disk tray will not be functional. Device shown here is turned on. 2. Confirm that the notebook is for reference only. However, in the...


