User Guide
Page 3
... 3: Getting to Know the Compact Wireless-G Internet Video Camera 6 Camera LED 6 Camera Head 6 Camera Reset Button 6 Camera Ports 7 Camera Stand 7 Chapter 4: Connecting the Compact Wireless-G Internet Video Camera for Setup 8 Overview 8 Connection to a Wired Network for Setup 8 Moving the Camera to a Different Network 9 Chapter 5: Setting up and Mounting the Compact Wireless-G Internet Video Camera 10 Setup Wizard 10 Placement Options 19 Chapter 6: Installing and Using the Compact Wireless-G Internet Video Camera Multi-Camera Viewer & Recorder Utility 21 Overview...
... 3: Getting to Know the Compact Wireless-G Internet Video Camera 6 Camera LED 6 Camera Head 6 Camera Reset Button 6 Camera Ports 7 Camera Stand 7 Chapter 4: Connecting the Compact Wireless-G Internet Video Camera for Setup 8 Overview 8 Connection to a Wired Network for Setup 8 Moving the Camera to a Different Network 9 Chapter 5: Setting up and Mounting the Compact Wireless-G Internet Video Camera 10 Setup Wizard 10 Placement Options 19 Chapter 6: Installing and Using the Compact Wireless-G Internet Video Camera Multi-Camera Viewer & Recorder Utility 21 Overview...
User Guide
Page 7
...: Administrator Screen 52 Figure 8-13: Upgrade Firmware Screen 52 Figure 8-14: Users Screen 53 LAN and Wireless Settings Screen 48 Figure 8-9: Wireless Security - Compact Wireless-G Internet Video Camera Figure 7-10: Welcome to the SoloLink DDNS Service Screen 37 Figure 7-11: Sign Up Screen 38 Figure...Links Screen 41 Figure 7-18: Successful Registration Screen 41 Figure 7-19: Account Confirmation of Camera Screen 42 Figure 7-20: Successful Setup Screen 42 Figure 7-21: Port Forwarding Information 43 Figure 7-22: Web-based Utility Welcome 43 Figure 7-23: Web Utility...
...: Administrator Screen 52 Figure 8-13: Upgrade Firmware Screen 52 Figure 8-14: Users Screen 53 LAN and Wireless Settings Screen 48 Figure 8-9: Wireless Security - Compact Wireless-G Internet Video Camera Figure 7-10: Welcome to the SoloLink DDNS Service Screen 37 Figure 7-11: Sign Up Screen 38 Figure...Links Screen 41 Figure 7-18: Successful Registration Screen 41 Figure 7-19: Account Confirmation of Camera Screen 42 Figure 7-20: Successful Setup Screen 42 Figure 7-21: Port Forwarding Information 43 Figure 7-22: Web-based Utility Welcome 43 Figure 7-23: Web Utility...

User Guide
Page 8
Compact Wireless-G Internet Video Camera Figure 8-15: SoloLink DDNS Screen 54 Figure 8-16: New User Registration Screen 54 Figure 8-17: Password Request Screen 54 Figure 8-18: SoloLink Screen, continued 55 Figure 8-19: Manage Your SoloLink DDNS Account 55 Figure 8-20: Device Removal Screen 55 Figure 8-21: Find Available Port Screen 56 Figure 8-22: Options Screen 57 Figure...
Compact Wireless-G Internet Video Camera Figure 8-15: SoloLink DDNS Screen 54 Figure 8-16: New User Registration Screen 54 Figure 8-17: Password Request Screen 54 Figure 8-18: SoloLink Screen, continued 55 Figure 8-19: Manage Your SoloLink DDNS Account 55 Figure 8-20: Device Removal Screen 55 Figure 8-21: Find Available Port Screen 56 Figure 8-22: Options Screen 57 Figure...
User Guide
Page 9
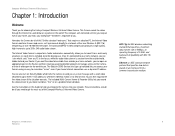
... port on the Router, and then create password-protected accounts to manage access to the Camera, or leave it detects motion in the house, while the audio/video stream is placed on Security Mode, which tells the Camera to send you want the video...the most out of the Compact Wireless-G Internet Video Camera. 802.11g: An IEEE wireless networking standard that require an attached PC, the Internet Video Camera contains its included stand for choosing the Linksys Compact Wireless-G Internet Video Camera. How does the Camera do all you need to you integrate the Camera into its own web ...
... port on the Router, and then create password-protected accounts to manage access to the Camera, or leave it detects motion in the house, while the audio/video stream is placed on Security Mode, which tells the Camera to send you want the video...the most out of the Compact Wireless-G Internet Video Camera. 802.11g: An IEEE wireless networking standard that require an attached PC, the Internet Video Camera contains its included stand for choosing the Linksys Compact Wireless-G Internet Video Camera. How does the Camera do all you need to you integrate the Camera into its own web ...

User Guide
Page 15
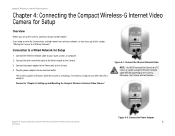
... screw end and then the gray thumbscrew. Compact Wireless-G Internet Video Camera Camera Ports The Camera features two ports on its stand at two different points. POWER ETHERNET The POWER port is where you will connect the Ethernet network cable. If you want to Know the Compact Wireless-G Internet Video Camera Camera Ports Figure 3-5: Camera in Standing Position Chapter 3: Getting to mount the Camera on a wall, insert the screw end...
... screw end and then the gray thumbscrew. Compact Wireless-G Internet Video Camera Camera Ports The Camera features two ports on its stand at two different points. POWER ETHERNET The POWER port is where you will connect the Ethernet network cable. If you want to Know the Compact Wireless-G Internet Video Camera Camera Ports Figure 3-5: Camera in Standing Position Chapter 3: Getting to mount the Camera on a wall, insert the screw end...
User Guide
Page 16
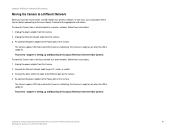
... the Compact Wireless-G Internet Video Camera for Setup 1. Otherwise, the Camera will not function. Plug the power adapter into an electrical outlet. Proceed to the Power port on the Camera. 4. Figure 4-1: Connect the Ethernet Network Cable NOTE: You MUST connect the Camera to a Different Network." The Camera is ready for Setup Overview Before you need to move the Camera from a wired network to a wireless network, or...
... the Compact Wireless-G Internet Video Camera for Setup 1. Otherwise, the Camera will not function. Plug the power adapter into an electrical outlet. Proceed to the Power port on the Camera. 4. Figure 4-1: Connect the Ethernet Network Cable NOTE: You MUST connect the Camera to a Different Network." The Camera is ready for Setup Overview Before you need to move the Camera from a wired network to a wireless network, or...
User Guide
Page 17
... to the new network. To move the Camera from a wired network to a wireless network, follow these instructions: 1. Compact Wireless-G Internet Video Camera Moving the Camera to a Different Network When you move the Camera from the Camera. 2. Re-connect the power adapter to the Ethernet port on the Camera. Connect the other end of the cable to the Power port on the Camera. 4. Chapter 4: Connecting the Compact Wireless-G Internet Video Camera for use when...
... to the new network. To move the Camera from a wired network to a wireless network, follow these instructions: 1. Compact Wireless-G Internet Video Camera Moving the Camera to a Different Network When you move the Camera from the Camera. 2. Re-connect the power adapter to the Ethernet port on the Camera. Connect the other end of the cable to the Power port on the Camera. 4. Chapter 4: Connecting the Compact Wireless-G Internet Video Camera for use when...
User Guide
Page 19
Connect the included network cable to the Camera Screen 11 Figure 5-3: Connect the Network Cable to the Router or Switch Screen Chapter 5: Setting up and Mounting the Compact Wireless-G Internet Video Camera Setup Wizard Figure 5-4: Connect the Network Cable to your network router or switch. Connect the other end of the network cable to the Camera's ETHERNET port. Click the Next button. 5. Click the Next button. Compact Wireless-G Internet Video Camera 4.
Connect the included network cable to the Camera Screen 11 Figure 5-3: Connect the Network Cable to the Router or Switch Screen Chapter 5: Setting up and Mounting the Compact Wireless-G Internet Video Camera Setup Wizard Figure 5-4: Connect the Network Cable to your network router or switch. Connect the other end of the network cable to the Camera's ETHERNET port. Click the Next button. 5. Click the Next button. Compact Wireless-G Internet Video Camera 4.

User Guide
Page 20
Make sure the LED is not lit, make sure the cables are properly connected to the Camera. Click the Next button. Click the Next button. 7. If it is lit on the Camera Screen Chapter 5: Setting up and Mounting the Compact Wireless-G Internet Video Camera Setup Wizard Figure 5-6: Check the LED Screen 12 Plug the included power adapter into an electrical outlet. Plug the other end into the Camera's Power port. Compact Wireless-G Internet Video Camera 6. Figure 5-5: Power on the Camera's front panel.
Make sure the LED is not lit, make sure the cables are properly connected to the Camera. Click the Next button. Click the Next button. 7. If it is lit on the Camera Screen Chapter 5: Setting up and Mounting the Compact Wireless-G Internet Video Camera Setup Wizard Figure 5-6: Check the LED Screen 12 Plug the included power adapter into an electrical outlet. Plug the other end into the Camera's Power port. Compact Wireless-G Internet Video Camera 6. Figure 5-5: Power on the Camera's front panel.

User Guide
Page 32
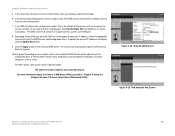
..., click the Search button. For the Camera whose name is the port number the Camera uses for communication. Compact Wireless-G Internet Video Camera Add Camera To add a Camera on your local area network, along with a name and password, then you will be notified when the Camera has been added. The Add Camera screen will search for each Camera. Cameras on LAN box, the following information...
..., click the Search button. For the Camera whose name is the port number the Camera uses for communication. Compact Wireless-G Internet Video Camera Add Camera To add a Camera on your local area network, along with a name and password, then you will be notified when the Camera has been added. The Add Camera screen will search for each Camera. Cameras on LAN box, the following information...

User Guide
Page 33
... displayed: Camera Data Camera Name. Description. To add the Camera to the Camera. Figure 6-9: Add Camera - Internet Screen Chapter 6: Installing and Using the Compact Wireless-G Internet Video Camera Multi-Camera Viewer & Recorder Utility 25 Using the Multi-Camera Viewer & Recorder Utility This is the port number the Camera uses for it. If you set up the Camera with the status information for communication. Login. Compact Wireless-G Internet Video Camera Internet The Internet screen...
... displayed: Camera Data Camera Name. Description. To add the Camera to the Camera. Figure 6-9: Add Camera - Internet Screen Chapter 6: Installing and Using the Compact Wireless-G Internet Video Camera Multi-Camera Viewer & Recorder Utility 25 Using the Multi-Camera Viewer & Recorder Utility This is the port number the Camera uses for it. If you set up the Camera with the status information for communication. Login. Compact Wireless-G Internet Video Camera Internet The Internet screen...

User Guide
Page 35
... the Camera. Port Number. Login. The results will be displayed. Camera Settings To modify a Camera's settings, select its name in the Camera List box, and click Change Settings. Click the Save button to check the connection. Description. Camera Data Camera Name. If you set up the Camera with a name and password, then you entered. Compact Wireless-G Internet Video Camera Delete Camera To delete a Camera, select...
... the Camera. Port Number. Login. The results will be displayed. Camera Settings To modify a Camera's settings, select its name in the Camera List box, and click Change Settings. Click the Save button to check the connection. Description. Camera Data Camera Name. If you set up the Camera with a name and password, then you entered. Compact Wireless-G Internet Video Camera Delete Camera To delete a Camera, select...
User Guide
Page 41
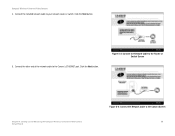
... (for use the Linksys SoloLink DDNS Service if one SoloLink account. Many Internet service providers (ISPs) assign a new IP address to your network's address, even when it changes, so you can "find the Camera on the Internet. For example, you...port number for the SoloLink DDNS Service 1. Also, some DDNS services require your PC to register additional Cameras on when your SoloLink account, use the SoloLink service to type an entire IP address. For the most current information about the SoloLink DDNS Service, visit www.linksys.com/sololink. Compact Wireless-G Internet Video Camera...
... (for use the Linksys SoloLink DDNS Service if one SoloLink account. Many Internet service providers (ISPs) assign a new IP address to your network's address, even when it changes, so you can "find the Camera on the Internet. For example, you...port number for the SoloLink DDNS Service 1. Also, some DDNS services require your PC to register additional Cameras on when your SoloLink account, use the SoloLink service to type an entire IP address. For the most current information about the SoloLink DDNS Service, visit www.linksys.com/sololink. Compact Wireless-G Internet Video Camera...
User Guide
Page 50
... up the SoloLink DDNS Service for the SoloLink DDNS Service NOTE: Make sure you have successfully set up the port forwarding feature on your network router, so the SoloLink DDNS Service will inform you that you set up the Linksys SoloLink™ DDNS Service 42 Setup Wizard for the Camera. Click Continue. 19. Compact Wireless-G Internet Video Camera 18.
... up the SoloLink DDNS Service for the SoloLink DDNS Service NOTE: Make sure you have successfully set up the port forwarding feature on your network router, so the SoloLink DDNS Service will inform you that you set up the Linksys SoloLink™ DDNS Service 42 Setup Wizard for the Camera. Click Continue. 19. Compact Wireless-G Internet Video Camera 18.
User Guide
Page 51
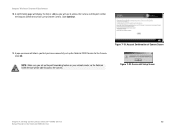
... is 192.168.1.115.) Then press Enter. 2. Click the Setup tab. Click the SoloLink DDNS tab. Compact Wireless-G Internet Video Camera 20. Set up port forwarding on how to your SoloLink account, you add: 1. A login screen will appear. (Windows XP ... Port Forwarding Information 3. SoloLink Registration of Additional Cameras Figure 7-23: Web Utility Login Screen 43 Go to www.linksys.com/portfwd for each Camera's Web-based Utility. For other routers, refer to track the Compact Wireless-G Internet Video Camera. Follow these instructions for instructions on your network ...
... is 192.168.1.115.) Then press Enter. 2. Click the Setup tab. Click the SoloLink DDNS tab. Compact Wireless-G Internet Video Camera 20. Set up port forwarding on how to your SoloLink account, you add: 1. A login screen will appear. (Windows XP ... Port Forwarding Information 3. SoloLink Registration of Additional Cameras Figure 7-23: Web Utility Login Screen 43 Go to www.linksys.com/portfwd for each Camera's Web-based Utility. For other routers, refer to track the Compact Wireless-G Internet Video Camera. Follow these instructions for instructions on your network ...
User Guide
Page 52
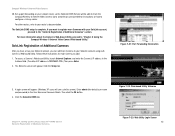
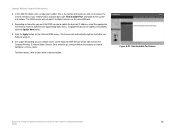
... you need to find an available port, click Find Available Port and follow the on how to configure a Linksys router. Depending on the SoloLink DDNS screen. For other routers, refer to your router's documentation. The Camera has been added to your SoloLink account. Compact Wireless-G Internet Video Camera 5. In the WAN Port field, enter a unique port number. Go to update the...
... you need to find an available port, click Find Available Port and follow the on how to configure a Linksys router. Depending on the SoloLink DDNS screen. For other routers, refer to your router's documentation. The Camera has been added to your SoloLink account. Compact Wireless-G Internet Video Camera 5. In the WAN Port field, enter a unique port number. Go to update the...
User Guide
Page 55
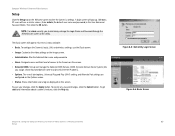
...Web Utility Login Screen Figure 8-6: Basic Screen Chapter 8: Using the Compact Wireless-G Internet Video Camera's Web-based Utility 47 Setup NOTE: For added security, you assign a fixed host and domain name to alter the Camera's settings. To save your changes, click the Apply button. ... will appear. The e-mail alert options, Universal Plug and Play (UPnP) setting, and Alternate Port settings are displayed on this screen. • SoloLink DDNS. Compact Wireless-G Internet Video Camera Setup Click the Setup tab on the Options screen. • Status. Status information and a ...
...Web Utility Login Screen Figure 8-6: Basic Screen Chapter 8: Using the Compact Wireless-G Internet Video Camera's Web-based Utility 47 Setup NOTE: For added security, you assign a fixed host and domain name to alter the Camera's settings. To save your changes, click the Apply button. ... will appear. The e-mail alert options, Universal Plug and Play (UPnP) setting, and Alternate Port settings are displayed on this screen. • SoloLink DDNS. Compact Wireless-G Internet Video Camera Setup Click the Setup tab on the Options screen. • Status. Status information and a ...

User Guide
Page 62
NOTE: If you use this format: .ourlinksys.com. If you must also configure the port forwarding feature on your network router. Click the Continue button, or click the Back screen to return to the e-mail address registered with your SoloLink ...Name. Figure 8-15: SoloLink DDNS Screen Figure 8-16: New User Registration Screen Chapter 8: Using the Compact Wireless-G Internet Video Camera's Web-based Utility Setup Figure 8-17: Password Request Screen 54 Go to www.linksys.com/portfwd for instructions on the following page. For more information, refer to your Password? It should ...
NOTE: If you use this format: .ourlinksys.com. If you must also configure the port forwarding feature on your network router. Click the Continue button, or click the Back screen to return to the e-mail address registered with your SoloLink ...Name. Figure 8-15: SoloLink DDNS Screen Figure 8-16: New User Registration Screen Chapter 8: Using the Compact Wireless-G Internet Video Camera's Web-based Utility Setup Figure 8-17: Password Request Screen 54 Go to www.linksys.com/portfwd for instructions on the following page. For more information, refer to your Password? It should ...

User Guide
Page 63
... the screen's features, click the Help tab. On the SoloLink DDNS screen of the Camera's registration is displayed here. The Device Removal screen will appear. Compact Wireless-G Internet Video Camera WAN Port. If you want to the previous screen. The status of the Camera's Web-based Utility, enter your account, one at a time. Last Successful Update. If you...
... the screen's features, click the Help tab. On the SoloLink DDNS screen of the Camera's registration is displayed here. The Device Removal screen will appear. Compact Wireless-G Internet Video Camera WAN Port. If you want to the previous screen. The status of the Camera's Web-based Utility, enter your account, one at a time. Last Successful Update. If you...
User Guide
Page 64
... want the DDNS service to find an available port, click Find Available Port and follow the on how to your network router, so the SoloLink DDNS Service will not work if multiple Cameras use to track the Compact Wireless-G Internet Video Camera. The Camera will use the same WAN port. 4. Go to www.linksys.com/portfwd for instructions on -screen instructions. In...
... want the DDNS service to find an available port, click Find Available Port and follow the on how to your network router, so the SoloLink DDNS Service will not work if multiple Cameras use to track the Compact Wireless-G Internet Video Camera. The Camera will use the same WAN port. 4. Go to www.linksys.com/portfwd for instructions on -screen instructions. In...


