User Guide
Page 3
... Network for Setup 8 Moving the Camera to a Different Network 9 Chapter 5: Setting up and Mounting the Compact Wireless-G Internet Video Camera 10 Setup Wizard 10 Placement Options 19 Chapter 6: Installing and Using the Compact Wireless-G Internet Video Camera Multi-Camera Viewer & Recorder Utility 21 Overview 21 Installing the Multi-Camera Viewer & Recorder Utility 21 Using the Multi-Camera Viewer & Recorder Utility 23 Chapter 7: Setting up the Linksys SoloLink...
... Network for Setup 8 Moving the Camera to a Different Network 9 Chapter 5: Setting up and Mounting the Compact Wireless-G Internet Video Camera 10 Setup Wizard 10 Placement Options 19 Chapter 6: Installing and Using the Compact Wireless-G Internet Video Camera Multi-Camera Viewer & Recorder Utility 21 Overview 21 Installing the Multi-Camera Viewer & Recorder Utility 21 Using the Multi-Camera Viewer & Recorder Utility 23 Chapter 7: Setting up the Linksys SoloLink...

User Guide
Page 4
... Registration of Additional Cameras 43 Chapter 8: Using the Compact Wireless-G Internet Video Camera's Web-based Utility 45 Overview 45 How to Access the Web-based Utility 45 View Video 46 Setup 47 Help 60 Appendix A: Troubleshooting 61 Common Problems and Solutions 61 Frequently Asked Questions 63 Appendix B: Wireless Security 66 Security Precautions 66 Security Threats Facing Wireless Networks 66 Appendix...
... Registration of Additional Cameras 43 Chapter 8: Using the Compact Wireless-G Internet Video Camera's Web-based Utility 45 Overview 45 How to Access the Web-based Utility 45 View Video 46 Setup 47 Help 60 Appendix A: Troubleshooting 61 Common Problems and Solutions 61 Frequently Asked Questions 63 Appendix B: Wireless Security 66 Security Precautions 66 Security Threats Facing Wireless Networks 66 Appendix...

User Guide
Page 5
... 18 Figure 5-19: Stand Option 19 Figure 5-20: Camera in Wall-Mounting Position 7 Figure 4-1: Connect the Ethernet Network Cable 8 Figure 4-2: Connect the Power Adapter 8 Figure 5-1: Setup Wizard - Compact Wireless-G Internet Video Camera List of Figures Figure 3-1: Camera LED 6 Figure 3-2: Camera Tilting Feature 6 Figure 3-3: Reset Button 6 Figure 3-4: Camera in Standing Position 7 Figure 3-5: Camera in Standing Position 19 Figure 5-21: Wall Mount Option...
... 18 Figure 5-19: Stand Option 19 Figure 5-20: Camera in Wall-Mounting Position 7 Figure 4-1: Connect the Ethernet Network Cable 8 Figure 4-2: Connect the Power Adapter 8 Figure 5-1: Setup Wizard - Compact Wireless-G Internet Video Camera List of Figures Figure 3-1: Camera LED 6 Figure 3-2: Camera Tilting Feature 6 Figure 3-3: Reset Button 6 Figure 3-4: Camera in Standing Position 7 Figure 3-5: Camera in Standing Position 19 Figure 5-21: Wall Mount Option...
User Guide
Page 7
... Screen 52 Figure 8-13: Upgrade Firmware Screen 52 Figure 8-14: Users Screen 53 Device Settings Screen 48 Figure 8-8: Basic - Compact Wireless-G Internet Video Camera Figure 7-10: Welcome to the SoloLink DDNS Service Screen 37 Figure 7-11: Sign Up Screen 38 Figure 7-12: Confirmation of New...40 Figure 7-17: Create Links Screen 41 Figure 7-18: Successful Registration Screen 41 Figure 7-19: Account Confirmation of Camera Screen 42 Figure 7-20: Successful Setup Screen 42 Figure 7-21: Port Forwarding Information 43 Figure 7-22: Web-based Utility Welcome 43 Figure 7-23: Web...
... Screen 52 Figure 8-13: Upgrade Firmware Screen 52 Figure 8-14: Users Screen 53 Device Settings Screen 48 Figure 8-8: Basic - Compact Wireless-G Internet Video Camera Figure 7-10: Welcome to the SoloLink DDNS Service Screen 37 Figure 7-11: Sign Up Screen 38 Figure 7-12: Confirmation of New...40 Figure 7-17: Create Links Screen 41 Figure 7-18: Successful Registration Screen 41 Figure 7-19: Account Confirmation of Camera Screen 42 Figure 7-20: Successful Setup Screen 42 Figure 7-21: Port Forwarding Information 43 Figure 7-22: Web-based Utility Welcome 43 Figure 7-23: Web...

User Guide
Page 10
... the basics about wireless networking. • Chapter 3: Getting to Know the Compact Wireless-G Internet Video Camera This chapter describes the physical features of the Camera. • Chapter 4: Connecting the Compact Wireless-G Internet Video Camera This chapter instructs you on how to connect the Camera to your network before you run the Setup Wizard. • Chapter 5: Setting up and Mounting the Compact Wireless-G Internet Video Camera This chapter instructs...
... the basics about wireless networking. • Chapter 3: Getting to Know the Compact Wireless-G Internet Video Camera This chapter describes the physical features of the Camera. • Chapter 4: Connecting the Compact Wireless-G Internet Video Camera This chapter instructs you on how to connect the Camera to your network before you run the Setup Wizard. • Chapter 5: Setting up and Mounting the Compact Wireless-G Internet Video Camera This chapter instructs...
User Guide
Page 16
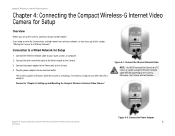
... the Camera. 4. The Camera is ready for Setup Overview Before you need to move the Camera from a wired network to a wireless network, or vice versa, go to this section, "Moving the Camera to your router, switch, or computer. 2. Proceed to "Chapter 5: Setting up the Camera, connect it to a Different Network." Otherwise, the Camera will not function. Compact Wireless-G Internet Video Camera Chapter 4: Connecting the Compact Wireless-G Internet Video Camera...
... the Camera. 4. The Camera is ready for Setup Overview Before you need to move the Camera from a wired network to a wireless network, or vice versa, go to this section, "Moving the Camera to your router, switch, or computer. 2. Proceed to "Chapter 5: Setting up the Camera, connect it to a Different Network." Otherwise, the Camera will not function. Compact Wireless-G Internet Video Camera Chapter 4: Connecting the Compact Wireless-G Internet Video Camera...
User Guide
Page 17
... cable to a Different Network Chapter 4: Connecting the Compact Wireless-G Internet Video Camera for use when the LED is ready for Setup 9 Moving the Camera to the Ethernet port on the Camera. Proceed to the new network. The Camera's power LED flashes while the Camera is initializing. Compact Wireless-G Internet Video Camera Moving the Camera to a Different Network When you move the Camera from a wired network to a wireless network, or vice versa...
... cable to a Different Network Chapter 4: Connecting the Compact Wireless-G Internet Video Camera for use when the LED is ready for Setup 9 Moving the Camera to the Ethernet port on the Camera. Proceed to the new network. The Camera's power LED flashes while the Camera is initializing. Compact Wireless-G Internet Video Camera Moving the Camera to a Different Network When you move the Camera from a wired network to a wireless network, or vice versa...

User Guide
Page 18
... the Exit button to configure and use Linksys's Dynamic Domain Name System (DDNS) service. After reading the License Agreement, click Next if you through the installation and configuration procedure. 1. Click this button. Welcome Screen Chapter 5: Setting up and Mounting the Compact Wireless-G Internet Video Camera Setup Wizard The Compact Wireless-G Internet Video Camera Setup Wizard will guide you agree and want...
... the Exit button to configure and use Linksys's Dynamic Domain Name System (DDNS) service. After reading the License Agreement, click Next if you through the installation and configuration procedure. 1. Click this button. Welcome Screen Chapter 5: Setting up and Mounting the Compact Wireless-G Internet Video Camera Setup Wizard The Compact Wireless-G Internet Video Camera Setup Wizard will guide you agree and want...
User Guide
Page 19
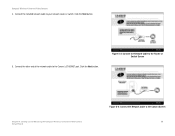
Click the Next button. 5. Figure 5-3: Connect the Network Cable to the Router or Switch Screen Chapter 5: Setting up and Mounting the Compact Wireless-G Internet Video Camera Setup Wizard Figure 5-4: Connect the Network Cable to the Camera's ETHERNET port. Click the Next button. Connect the other end of the network cable to the Camera Screen 11 Connect the included network cable to your network router or switch. Compact Wireless-G Internet Video Camera 4.
Click the Next button. 5. Figure 5-3: Connect the Network Cable to the Router or Switch Screen Chapter 5: Setting up and Mounting the Compact Wireless-G Internet Video Camera Setup Wizard Figure 5-4: Connect the Network Cable to the Camera's ETHERNET port. Click the Next button. Connect the other end of the network cable to the Camera Screen 11 Connect the included network cable to your network router or switch. Compact Wireless-G Internet Video Camera 4.

User Guide
Page 20
Make sure the LED is not lit, make sure the cables are properly connected to the Camera. If it is lit on the Camera Screen Chapter 5: Setting up and Mounting the Compact Wireless-G Internet Video Camera Setup Wizard Figure 5-6: Check the LED Screen 12 Click the Next button. Figure 5-5: Power on the Camera's front panel. Click the Next button. 7. Compact Wireless-G Internet Video Camera 6. Plug the included power adapter into an electrical outlet. Plug the other end into the Camera's Power port.
Make sure the LED is not lit, make sure the cables are properly connected to the Camera. If it is lit on the Camera Screen Chapter 5: Setting up and Mounting the Compact Wireless-G Internet Video Camera Setup Wizard Figure 5-6: Check the LED Screen 12 Click the Next button. Figure 5-5: Power on the Camera's front panel. Click the Next button. 7. Compact Wireless-G Internet Video Camera 6. Plug the included power adapter into an electrical outlet. Plug the other end into the Camera's Power port.
User Guide
Page 21
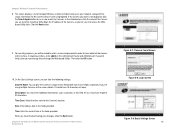
... provided. Chapter 5: Setting up and Mounting the Compact Wireless-G Internet Video Camera Setup Wizard Figure 5-8: Login Screen Figure 5-9: Basic Settings Screen 13 The screen displays a list of the Camera you want is highlighted. Memorable names are helpful, especially...Camera whose name is not displayed, click the Search Again button to access the Webbased Utility later. When you can give the Camera a unique name. In the Selection box, click the name of Compact Wireless-G Internet Video Cameras on the same network. Date. Compact Wireless-G Internet Video Camera...
... provided. Chapter 5: Setting up and Mounting the Compact Wireless-G Internet Video Camera Setup Wizard Figure 5-8: Login Screen Figure 5-9: Basic Settings Screen 13 The screen displays a list of the Camera you want is highlighted. Memorable names are helpful, especially...Camera whose name is not displayed, click the Search Again button to access the Webbased Utility later. When you can give the Camera a unique name. In the Selection box, click the name of Compact Wireless-G Internet Video Cameras on the same network. Date. Compact Wireless-G Internet Video Camera...

User Guide
Page 22
... appear. You must enter at least one DNS address, which can be obtained from your network. Subnet Mask. If you are not sure, leave this screen. Chapter 5: Setting up and Mounting the Compact Wireless-G Internet Video Camera Setup Wizard Figure 5-10: Network Settings Screen Figure 5-11: IP Settings Screen 14 Static IP address. If you are unsure...
... appear. You must enter at least one DNS address, which can be obtained from your network. Subnet Mask. If you are not sure, leave this screen. Chapter 5: Setting up and Mounting the Compact Wireless-G Internet Video Camera Setup Wizard Figure 5-10: Network Settings Screen Figure 5-11: IP Settings Screen 14 Static IP address. If you are unsure...
User Guide
Page 23
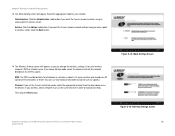
...devices in order to Ad-Hoc mode, select the appropriate channel from the drop-down menu. The Wireless Settings screen will appear. Enter your network. The SSID must use any spaces.) Channel. Click the Infrastructure radio button if you chose Ad... or fewer. (You can change the wireless settings. Figure 5-12: Mode Settings Screen Figure 5-13: Wireless Settings Screen Chapter 5: Setting up and Mounting the Compact Wireless-G Internet Video Camera 15 Setup Wizard Then click the Next button. Compact Wireless-G Internet Video Camera 13. Click the Ad-Hoc radio button...
...devices in order to Ad-Hoc mode, select the appropriate channel from the drop-down menu. The Wireless Settings screen will appear. Enter your network. The SSID must use any spaces.) Channel. Click the Infrastructure radio button if you chose Ad... or fewer. (You can change the wireless settings. Figure 5-12: Mode Settings Screen Figure 5-13: Wireless Settings Screen Chapter 5: Setting up and Mounting the Compact Wireless-G Internet Video Camera 15 Setup Wizard Then click the Next button. Compact Wireless-G Internet Video Camera 13. Click the Ad-Hoc radio button...
User Guide
Page 24
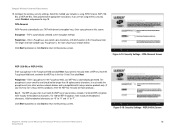
... Mounting the Compact Wireless-G Internet Video Camera 16 Setup Wizard TKIP is automatically generated. Then click Next. Figure 5-15: Security Settings - Enter a passphrase on those products.) Key 1 - For 64-bit WEP encryption, enter exactly 10 hexadecimal characters. Then proceed to the previous screen. Enter a Passphrase, also called a pre-shared key, of your network is case-sensitive...
... Mounting the Compact Wireless-G Internet Video Camera 16 Setup Wizard TKIP is automatically generated. Then click Next. Figure 5-15: Security Settings - Enter a passphrase on those products.) Key 1 - For 64-bit WEP encryption, enter exactly 10 hexadecimal characters. Then proceed to the previous screen. Enter a Passphrase, also called a pre-shared key, of your network is case-sensitive...

User Guide
Page 25
If you save the new settings. Figure 5-16: Review New Settings Screen 17. Chapter 5: Setting up and Mounting the Compact Wireless-G Internet Video Camera Setup Wizard Figure 5-17: Confirm New Settings Screen 17 Compact Wireless-G Internet Video Camera 16. Click the Next button to save your changes, click Cancel. Review your settings before you want to continue. Click OK to confirm that you want to cancel your new settings.
If you save the new settings. Figure 5-16: Review New Settings Screen 17. Chapter 5: Setting up and Mounting the Compact Wireless-G Internet Video Camera Setup Wizard Figure 5-17: Confirm New Settings Screen 17 Compact Wireless-G Internet Video Camera 16. Click the Next button to save your changes, click Cancel. Review your settings before you want to continue. Click OK to confirm that you want to cancel your new settings.
User Guide
Page 26
... Chapter 5: Setting up and configure the Linksys Dynamic Domain Name System (DDNS) service. Click the Setup SoloLink DDNS Service button to install the Camera's Utility on your PC. Click this button to open the PDF file of this button to set up and Mounting the Compact Wireless-G Internet Video Camera 18 Setup Wizard User Guide. Install Viewer & Recorder...
... Chapter 5: Setting up and configure the Linksys Dynamic Domain Name System (DDNS) service. Click the Setup SoloLink DDNS Service button to install the Camera's Utility on your PC. Click this button to open the PDF file of this button to set up and Mounting the Compact Wireless-G Internet Video Camera 18 Setup Wizard User Guide. Install Viewer & Recorder...
User Guide
Page 29
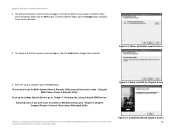
... the Setup Wizard, click the Install Viewer & Recorder Utility button. 2. If the Wireless-B or G Internet Video Camera Viewer & Recorder Utility has already been installed on your PC, Linksys recommends that you uninstall it before you install the Compact Wireless-G Internet Video Camera MultiCamera Viewer & Recorder Utility (this Utility will instruct you must use the Multi-Camera Viewer & Recorder Utility instead. Compact Wireless-G Internet Video Camera...
... the Setup Wizard, click the Install Viewer & Recorder Utility button. 2. If the Wireless-B or G Internet Video Camera Viewer & Recorder Utility has already been installed on your PC, Linksys recommends that you uninstall it before you install the Compact Wireless-G Internet Video Camera MultiCamera Viewer & Recorder Utility (this Utility will instruct you must use the Multi-Camera Viewer & Recorder Utility instead. Compact Wireless-G Internet Video Camera...
User Guide
Page 30
... will appear. Compact Wireless-G Internet Video Camera 3. When the setup is complete, click the Finish button. To set up the Linksys SoloLink Service, go to the next section, "Using the Multi-Camera Viewer & Recorder Utility." Advanced users: If you want to use the Multi-Camera Viewer & Recorder Utility, proceed to "Chapter 8: Using the Compact Wireless-G Internet Video Camera Web-based Utility." The...
... will appear. Compact Wireless-G Internet Video Camera 3. When the setup is complete, click the Finish button. To set up the Linksys SoloLink Service, go to the next section, "Using the Multi-Camera Viewer & Recorder Utility." Advanced users: If you want to use the Multi-Camera Viewer & Recorder Utility, proceed to "Chapter 8: Using the Compact Wireless-G Internet Video Camera Web-based Utility." The...
User Guide
Page 41
... Camera is. Chapter 7: Setting up your network's address, even when it changes, so you can "find the Camera on when your SoloLink account. Many Internet service providers (ISPs) assign a new IP address to use the Linksys SoloLink DDNS Service if one SoloLink account. If your PC isn't powered on the Internet. Compact Wireless-G Internet Video Camera Chapter 7: Setting up the Linksys...
... Camera is. Chapter 7: Setting up your network's address, even when it changes, so you can "find the Camera on when your SoloLink account. Many Internet service providers (ISPs) assign a new IP address to use the Linksys SoloLink DDNS Service if one SoloLink account. If your PC isn't powered on the Internet. Compact Wireless-G Internet Video Camera Chapter 7: Setting up the Linksys...
User Guide
Page 42
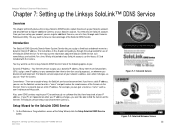
...Wireless-G Internet Video Camera 2. Click the Next button. This screen explains why you would find the SoloLink DDNS Service convenient if you would prefer to use the SoloLink DDNS Service if your network is using a name rather than a series of numbers (its IP address). Figure 7-3: SoloLink for Convenience Screen 34 Chapter 7: Setting up the Linksys... SoloLink™ DDNS Service Setup Wizard for the ...
...Wireless-G Internet Video Camera 2. Click the Next button. This screen explains why you would find the SoloLink DDNS Service convenient if you would prefer to use the SoloLink DDNS Service if your network is using a name rather than a series of numbers (its IP address). Figure 7-3: SoloLink for Convenience Screen 34 Chapter 7: Setting up the Linksys... SoloLink™ DDNS Service Setup Wizard for the ...


