
User Guide
Page 3
...Video Camera 6 Camera LEDs 6 Camera Head 6 Camera Ports 7 Chapter 4: Connecting the Wireless-B Internet Video Camera for Setup 8 Overview 8 Connection to a Wired Network for Setup 8 Connection to a Wireless Ad-Hoc Network for Setup 8 Moving the Camera to a Different Network 9 Chapter 5: Setting up and Mounting the Wireless-B Internet Video Camera 10 Setup Wizard 10 Placement Options 16 Chapter 6: Installing and Using the Wireless-B Internet Video Camera Viewer & Recorder Utility 17 Overview 17 Installing the Viewer & Recorder Utility 17 Using the Viewer & Recorder...
...Video Camera 6 Camera LEDs 6 Camera Head 6 Camera Ports 7 Chapter 4: Connecting the Wireless-B Internet Video Camera for Setup 8 Overview 8 Connection to a Wired Network for Setup 8 Connection to a Wireless Ad-Hoc Network for Setup 8 Moving the Camera to a Different Network 9 Chapter 5: Setting up and Mounting the Wireless-B Internet Video Camera 10 Setup Wizard 10 Placement Options 16 Chapter 6: Installing and Using the Wireless-B Internet Video Camera Viewer & Recorder Utility 17 Overview 17 Installing the Viewer & Recorder Utility 17 Using the Viewer & Recorder...
User Guide
Page 6
...: Add to Recording Schedule 26 Figure 6-20: Modify Scheduled Recording 26 Figure 6-21: Stop Scheduled Recording 27 Figure 6-22: View Video 27 Figure 7-1: SoloLink Service 28 Figure 7-2: Welcome 28 Figure 7-3: SoloLink for Dynamic IP Address 29 Figure 7-4: SoloLink for Convenience 29 Figure 7-5: Check Connections 30 Figure 7-6: Cameras Found 30 Figure 7-7: User Name and Password Login 31 Figure 7-8: SoloLink DDNS 31 Figure 7-9: Confirm Active Internet Connection 32...
...: Add to Recording Schedule 26 Figure 6-20: Modify Scheduled Recording 26 Figure 6-21: Stop Scheduled Recording 27 Figure 6-22: View Video 27 Figure 7-1: SoloLink Service 28 Figure 7-2: Welcome 28 Figure 7-3: SoloLink for Dynamic IP Address 29 Figure 7-4: SoloLink for Convenience 29 Figure 7-5: Check Connections 30 Figure 7-6: Cameras Found 30 Figure 7-7: User Name and Password Login 31 Figure 7-8: SoloLink DDNS 31 Figure 7-9: Confirm Active Internet Connection 32...
User Guide
Page 7
Wireless-B Internet Video Camera Figure 7-17: Create Links 36 Figure 7-18: Successful Registration 36 Figure 7-19: Account Confirmation of Camera 37 Figure 7-20: Successful Setup 37 Figure 7-21: Port Forwarding Information 38 Figure 7-22: Web-based Utility Welcome 38 Figure 7-23: User Name and Password 38 Figure 7-24: SoloLink DDNS 39 Figure 8-1: Camera's Default IP Address 40 Figure 8-2: Web-based Utility Welcome 40 Figure 8-3: Security Warning 41 Figure 8-4: User Name and Password 41...
Wireless-B Internet Video Camera Figure 7-17: Create Links 36 Figure 7-18: Successful Registration 36 Figure 7-19: Account Confirmation of Camera 37 Figure 7-20: Successful Setup 37 Figure 7-21: Port Forwarding Information 38 Figure 7-22: Web-based Utility Welcome 38 Figure 7-23: User Name and Password 38 Figure 7-24: SoloLink DDNS 39 Figure 8-1: Camera's Default IP Address 40 Figure 8-2: Web-based Utility Welcome 40 Figure 8-3: Security Warning 41 Figure 8-4: User Name and Password 41...

User Guide
Page 8
... 11Mbps and an operating frequency of this Guide to help you to your home network, you for choosing the Linksys Wireless-B Internet Video Camera. If you want the video to -remember "name", even if your local hard drive, "live" or on a predetermined schedule. You can then log onto the live video through the Internet to your home Internet connection uses a dynamic IP address. This Camera sends live video stream if the situation warrants. The SoloLink DDNS Service (trial sign...
... 11Mbps and an operating frequency of this Guide to help you to your home network, you for choosing the Linksys Wireless-B Internet Video Camera. If you want the video to -remember "name", even if your local hard drive, "live" or on a predetermined schedule. You can then log onto the live video through the Internet to your home Internet connection uses a dynamic IP address. This Camera sends live video stream if the situation warrants. The SoloLink DDNS Service (trial sign...

User Guide
Page 9
... how to connect the Camera to your network before you run the Setup Wizard. • Chapter 5: Setting up and Mounting the Wireless-B Internet Video Camera This chapter instructs you on how to use of the Adapter. • Appendix B: Wireless Security This appendix discusses security issues regarding wireless networking and measures you can take to help protect your PC, so you can view and record video. • Chapter 7: Setting up the Linksys SoloLink™ DDNS Service This...
... how to connect the Camera to your network before you run the Setup Wizard. • Chapter 5: Setting up and Mounting the Wireless-B Internet Video Camera This chapter instructs you on how to use of the Adapter. • Appendix B: Wireless Security This appendix discusses security issues regarding wireless networking and measures you can take to help protect your PC, so you can view and record video. • Chapter 7: Setting up the Linksys SoloLink™ DDNS Service This...
User Guide
Page 10
Wireless-B Internet Video Camera • Appendix C: Upgrading Firmware This appendix explains how you can upgrade the Camera's firmware. • Appendix D: Windows Help This appendix describes how you can use Windows Help for instructions about networking, such as installing the TCP/IP protocol. • Appendix E: Glossary This appendix gives a brief glossary of terms frequently used in this Guide? Chapter 1: Introduction 3 What's in networking. • Appendix F: Specifications This appendix provides the technical specifications for the...
Wireless-B Internet Video Camera • Appendix C: Upgrading Firmware This appendix explains how you can upgrade the Camera's firmware. • Appendix D: Windows Help This appendix describes how you can use Windows Help for instructions about networking, such as installing the TCP/IP protocol. • Appendix E: Glossary This appendix gives a brief glossary of terms frequently used in this Guide? Chapter 1: Introduction 3 What's in networking. • Appendix F: Specifications This appendix provides the technical specifications for the...

User Guide
Page 15
... LAN LEDs are solidly lit. Proceed to a PC, router, or switch using the Ethernet network cable BEFORE powering on the Camera. 4. Connect the Ethernet network cable to the LAN port on the Camera. Connect the other end of the cable to your computer has the following wireless settings: • SSID - Wireless-B Internet Video Camera Chapter 4: Connecting the Wireless-B Internet Video Camera for Setup Overview Before you set up and Mounting the Wireless-B Internet Video Camera." Connection to a wired or wireless network. Plug the power adapter...
... LAN LEDs are solidly lit. Proceed to a PC, router, or switch using the Ethernet network cable BEFORE powering on the Camera. 4. Connect the Ethernet network cable to the LAN port on the Camera. Connect the other end of the cable to your computer has the following wireless settings: • SSID - Wireless-B Internet Video Camera Chapter 4: Connecting the Wireless-B Internet Video Camera for Setup Overview Before you set up and Mounting the Wireless-B Internet Video Camera." Connection to a wired or wireless network. Plug the power adapter...

User Guide
Page 17
...installation process. • Install Viewer & Recorder Utility. Click this button to exit the Setup Wizard. 2. Click the Exit button to open the PDF file of your CD-ROM drive. Then click the Next button to configure and use Linksys's Dynamic Domain Name System (DDNS) service. • User Guide. If it does not, click the Start button and choose Run. Click the Setup SoloLink DDNS Service button to continue. Wireless-B Internet Video Camera Chapter 5: Setting up and Mounting the Wireless-B Internet Video Camera Setup Wizard Figure 5-2: Connection for Setup 10 Click the Setup button...
...installation process. • Install Viewer & Recorder Utility. Click this button to exit the Setup Wizard. 2. Click the Exit button to open the PDF file of your CD-ROM drive. Then click the Next button to configure and use Linksys's Dynamic Domain Name System (DDNS) service. • User Guide. If it does not, click the Start button and choose Run. Click the Setup SoloLink DDNS Service button to continue. Wireless-B Internet Video Camera Chapter 5: Setting up and Mounting the Wireless-B Internet Video Camera Setup Wizard Figure 5-2: Connection for Setup 10 Click the Setup button...
User Guide
Page 22
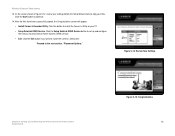
...the Save button to install the Camera's Utility later. After the files have been successfully copied, the Congratulations screen will appear. • Install Viewer & Recorder Utility. Click this button to set up and Mounting the Wireless-B Internet Video Camera Setup Wizard Figure 5-13: Congratulations 15 Figure 5-12: Review New Settings Chapter 5: Setting up and configure the Linksys Dynamic Domain Name System (DDNS) service. • Exit. Click the Setup SoloLink DDNS Service button to install the Camera's Utility on your PC. • Setup SoloLink DDNS Service. Wireless...
...the Save button to install the Camera's Utility later. After the files have been successfully copied, the Congratulations screen will appear. • Install Viewer & Recorder Utility. Click this button to set up and Mounting the Wireless-B Internet Video Camera Setup Wizard Figure 5-13: Congratulations 15 Figure 5-12: Review New Settings Chapter 5: Setting up and configure the Linksys Dynamic Domain Name System (DDNS) service. • Exit. Click the Setup SoloLink DDNS Service button to install the Camera's Utility on your PC. • Setup SoloLink DDNS Service. Wireless...
User Guide
Page 35
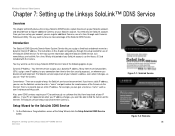
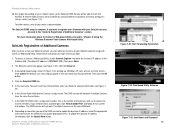
... Internet service providers (ISPs) assign a new IP address to register additional Cameras on the Internet. There are a couple of the SoloLink DDNS Service. Also, some DDNS services require your PC to type an entire IP address. Setup Wizard for use the Access ID Card included with the Camera. Once you have a static IP address, you disconnect and reconnect. The SoloLink service keeps track of the Setup Wizard, click the Setup SoloLink DDNS Service button. You need...
... Internet service providers (ISPs) assign a new IP address to register additional Cameras on the Internet. There are a couple of the SoloLink DDNS Service. Also, some DDNS services require your PC to type an entire IP address. Setup Wizard for use the Access ID Card included with the Camera. Once you have a static IP address, you disconnect and reconnect. The SoloLink service keeps track of the Setup Wizard, click the Setup SoloLink DDNS Service button. You need...
User Guide
Page 39
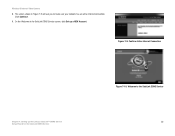
Wireless-B Internet Video Camera 8. On the Welcome to make sure your network has an active Internet connection. The screen shown in Figure 7-9 will ask you to the SoloLink DDNS Service screen, click Set up the Linksys SoloLink™ DDNS Service Setup Wizard for the SoloLink DDNS Service Figure 7-10: Welcome to the SoloLink DDNS Service 32 Figure 7-9: Confirm Active Internet Connection Chapter 7: Setting up a NEW Account. Click Continue. 9.
Wireless-B Internet Video Camera 8. On the Welcome to make sure your network has an active Internet connection. The screen shown in Figure 7-9 will ask you to the SoloLink DDNS Service screen, click Set up the Linksys SoloLink™ DDNS Service Setup Wizard for the SoloLink DDNS Service Figure 7-10: Welcome to the SoloLink DDNS Service 32 Figure 7-9: Confirm Active Internet Connection Chapter 7: Setting up a NEW Account. Click Continue. 9.

User Guide
Page 44
Wireless-B Internet Video Camera 18. Click Continue. 19. Figure 7-19: Account Confirmation of Camera Chapter 7: Setting up the Linksys SoloLink™ DDNS Service Setup Wizard for the Camera. Click OK. Note: Make sure you will use to access the Camera and the port number the SoloLink DDNS Service will use to access the Camera. A pop-up the SoloLink DDNS Service for the SoloLink DDNS Service Figure 7-20: Successful Setup 37 A confirmation page will display the link or address you set up...
Wireless-B Internet Video Camera 18. Click Continue. 19. Figure 7-19: Account Confirmation of Camera Chapter 7: Setting up the Linksys SoloLink™ DDNS Service Setup Wizard for the Camera. Click OK. Note: Make sure you will use to access the Camera and the port number the SoloLink DDNS Service will use to access the Camera. A pop-up the SoloLink DDNS Service for the SoloLink DDNS Service Figure 7-20: Successful Setup 37 A confirmation page will display the link or address you set up...
User Guide
Page 45
... and password) in the Address field. (The default IP address is complete. For more Cameras to track the Wireless-B Internet Video Camera. If you can add more information about the Camera's Web-based Utility, proceed to update the dynamic IP address, select the appropriate time interval from the DDNS Service Update drop-down menu. To update the dynamic IP address immediately, click the Update Now button. Set up . (Windows XP users will be able to your network router...
... and password) in the Address field. (The default IP address is complete. For more Cameras to track the Wireless-B Internet Video Camera. If you can add more information about the Camera's Web-based Utility, proceed to update the dynamic IP address, select the appropriate time interval from the DDNS Service Update drop-down menu. To update the dynamic IP address immediately, click the Update Now button. Set up . (Windows XP users will be able to your network router...
User Guide
Page 47
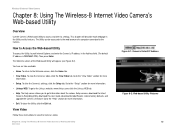
... Setup screens, download the latest Viewer & Recording Utility, download this User Guide, download Acrobat Reader, restore factory defaults, and upgrade the Camera's firmware. How to the Linksys website, www.linksys.com, click the Linksys WEB tab. • Help. You have six tabs available: • Home. To go to Access the Web-based Utility To access the Utility, launch Internet Explorer, and enter the Camera's IP address in the Utility and its settings. Go to the "Help" section for more information. • Setup. Chapter 8: Using The Wireless-B Internet Video Camera's Web...
... Setup screens, download the latest Viewer & Recording Utility, download this User Guide, download Acrobat Reader, restore factory defaults, and upgrade the Camera's firmware. How to the Linksys website, www.linksys.com, click the Linksys WEB tab. • Help. You have six tabs available: • Home. To go to Access the Web-based Utility To access the Utility, launch Internet Explorer, and enter the Camera's IP address in the Utility and its settings. Go to the "Help" section for more information. • Setup. Chapter 8: Using The Wireless-B Internet Video Camera's Web...
User Guide
Page 48
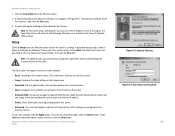
...: To view video using a web browser, you should use the Viewer & Recorder Utility instead. To configure the Camera's basic, LAN, and wireless settings, use Internet Explorer version 5.5 or higher. To get additional information about an OCX plug-in Figure 8-4 will see the Camera's video, click the Yes button. 3. Netscape users should always change the Login Name and Password through the Password screen of access to alter the Camera's settings. To save your computer to a dynamic Internet IP address. • Status. A password request...
...: To view video using a web browser, you should use the Viewer & Recorder Utility instead. To configure the Camera's basic, LAN, and wireless settings, use Internet Explorer version 5.5 or higher. To get additional information about an OCX plug-in Figure 8-4 will see the Camera's video, click the Yes button. 3. Netscape users should always change the Login Name and Password through the Password screen of access to alter the Camera's settings. To save your computer to a dynamic Internet IP address. • Status. A password request...

User Guide
Page 49
... these fields if the Camera will obtain an IP address automatically from the Help screen if you experience problems with the Camera. Wireless-B Internet Video Camera Basic The Basic screen, as shown in this field. Device Settings Firmware Version. MAC Address. Date. If you are using multiple Cameras on the Internet, click the second checkbox. The version number of the Camera is displayed here. Chapter 8: Using The Wireless-B Internet Video Camera's Web-based Utility Setup Figure 8-5: Basic 42 Displayed...
... these fields if the Camera will obtain an IP address automatically from the Help screen if you experience problems with the Camera. Wireless-B Internet Video Camera Basic The Basic screen, as shown in this field. Device Settings Firmware Version. MAC Address. Date. If you are using multiple Cameras on the Internet, click the second checkbox. The version number of the Camera is displayed here. Chapter 8: Using The Wireless-B Internet Video Camera's Web-based Utility Setup Figure 8-5: Basic 42 Displayed...

User Guide
Page 50
.... Wireless-B Internet Video Camera Wireless Settings SSID. Select the network's mode, Infrastructure or Ad-hoc. Select which the sender and the recipient do NOT use a Passphrase to create WEP key(s). Network Type. If you are used when your changes, click the Apply button. For more information, go to ad-hoc mode, select its channel setting from the drop-down menu. Default Transmit Key. Chapter 8: Using The Wireless-B Internet Video Camera's Web-based Utility Setup Figure...
.... Wireless-B Internet Video Camera Wireless Settings SSID. Select the network's mode, Infrastructure or Ad-hoc. Select which the sender and the recipient do NOT use a Passphrase to create WEP key(s). Network Type. If you are used when your changes, click the Apply button. For more information, go to ad-hoc mode, select its channel setting from the drop-down menu. Default Transmit Key. Chapter 8: Using The Wireless-B Internet Video Camera's Web-based Utility Setup Figure...

User Guide
Page 53
... a user's settings, click the Modify button. Delete. To get additional information about the screen's features, click the Help button. Modify. Complete the User Name, User Password, and Confirm Password fields. 2. The default is All users. User Database Users are listed in the User Database box, and then click the Delete button. Add. Figure 8-9: Users Figure 8-10: Add/Modify User Chapter 8: Using The Wireless-B Internet Video Camera's Web-based Utility 46 Setup To add or modify a user, follow these instructions: 1. To save your changes...
... a user's settings, click the Modify button. Delete. To get additional information about the screen's features, click the Help button. Modify. Complete the User Name, User Password, and Confirm Password fields. 2. The default is All users. User Database Users are listed in the User Database box, and then click the Delete button. Add. Figure 8-9: Users Figure 8-10: Add/Modify User Chapter 8: Using The Wireless-B Internet Video Camera's Web-based Utility 46 Setup To add or modify a user, follow these instructions: 1. To save your changes...

User Guide
Page 54
... configure your network router. WAN Port. Enter the host and domain name you will be e-mailed to the e-mail address registered with your change. Chapter 8: Using The Wireless-B Internet Video Camera's Web-based Utility Setup Figure 8-11: SoloLink DDNS Figure 8-12: New User Registration 47 Go to www.linksys.com/portfwd for instructions on how to cancel your SoloLink DDNS account. If you to set up on your Password? Device Name. Wireless-B Internet Video Camera...
... configure your network router. WAN Port. Enter the host and domain name you will be e-mailed to the e-mail address registered with your change. Chapter 8: Using The Wireless-B Internet Video Camera's Web-based Utility Setup Figure 8-11: SoloLink DDNS Figure 8-12: New User Registration 47 Go to www.linksys.com/portfwd for instructions on how to cancel your SoloLink DDNS account. If you to set up on your Password? Device Name. Wireless-B Internet Video Camera...
User Guide
Page 62
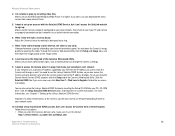
... DDNS Service, so you use the port forwarding feature on your PC's CD-ROM drive. For more information, see if your PC and Camera are a new user, click New User? - When I can 't access the Camera from www.microsoft.com. 5. Click the Setup SoloLink DDNS Service button, and follow the on -screen instructions. Follow these instructions: • When you will change the Camera's settings. 9. Wireless-B Internet Video Camera 4. I can 't access the SoloLink website to access the Camera when I'm away from home...
... DDNS Service, so you use the port forwarding feature on your PC's CD-ROM drive. For more information, see if your PC and Camera are a new user, click New User? - When I can 't access the Camera from www.microsoft.com. 5. Click the Setup SoloLink DDNS Service button, and follow the on -screen instructions. Follow these instructions: • When you will change the Camera's settings. 9. Wireless-B Internet Video Camera 4. I can 't access the SoloLink website to access the Camera when I'm away from home...


