User Guide
Page 3
... 6 The Recess for the Power Plate 7 Chapter 4: Connecting the Wireless-G Range Expander 8 Overview 8 Connection to a Wired Network for Setup 8 Connection to a Wireless Network for Setup 9 Connection for Auto Configuration 9 Chapter 5: Setting Up the Wireless-G Range Expander 10 Overview 10 Running the Setup Wizard 10 Moving the Range Expander 16 Chapter 6: Configuring the Wireless-G Range Expander 17 Overview 17 Accessing the Web-based Utility 17 The...
... 6 The Recess for the Power Plate 7 Chapter 4: Connecting the Wireless-G Range Expander 8 Overview 8 Connection to a Wired Network for Setup 8 Connection to a Wireless Network for Setup 9 Connection for Auto Configuration 9 Chapter 5: Setting Up the Wireless-G Range Expander 10 Overview 10 Running the Setup Wizard 10 Moving the Range Expander 16 Chapter 6: Configuring the Wireless-G Range Expander 17 Overview 17 Accessing the Web-based Utility 17 The...
User Guide
Page 5
Basic Setup 18 Figure 6-3: WPA Security 19 Wireless-G Range Expander List of Figures Figure 3-1: Front Panel 6 Figure 3-1: Front Panel with Ethernet Network Cable Connected 6 Figure 3-2: Recess for the Power Plate 7 Figure 4-1: ... WEP Security Settings 12 Figure 5-8: WPA Security Settings 12 Figure 5-9: Choose the Range Expander 13 Figure 5-10: Enter the Password 13 Figure 5-11: Configure Network Address Settings 14 Figure 5-12: MAC Address of Access Point or Wireless Router (WRE54G v1 Only) 14 Figure 5-13: Confirmation Screen 15 Figure 5-14: Congratulations Screen...
Basic Setup 18 Figure 6-3: WPA Security 19 Wireless-G Range Expander List of Figures Figure 3-1: Front Panel 6 Figure 3-1: Front Panel with Ethernet Network Cable Connected 6 Figure 3-2: Recess for the Power Plate 7 Figure 4-1: ... WEP Security Settings 12 Figure 5-8: WPA Security Settings 12 Figure 5-9: Choose the Range Expander 13 Figure 5-10: Enter the Password 13 Figure 5-11: Configure Network Address Settings 14 Figure 5-12: MAC Address of Access Point or Wireless Router (WRE54G v1 Only) 14 Figure 5-13: Confirmation Screen 15 Figure 5-14: Congratulations Screen...
User Guide
Page 8
... user guide covers the steps for setting up the Wireless-G Range Expander This chapter instructs you on how to use the Range Expander's Setup Wizard and configure the Range Expander. • Chapter 6: Configuring the Wireless-G Range Expander This chapter shows you can use Windows Help for connecting the Range Expander to your wired or wireless network. • Chapter 5: Setting up and using the Web...
... user guide covers the steps for setting up the Wireless-G Range Expander This chapter instructs you on how to use the Range Expander's Setup Wizard and configure the Range Expander. • Chapter 6: Configuring the Wireless-G Range Expander This chapter shows you can use Windows Help for connecting the Range Expander to your wired or wireless network. • Chapter 5: Setting up and using the Web...
User Guide
Page 12
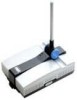
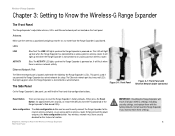
... settings. 6 Auto configuration The Auto configuration button can be used if you connect the Range Expander to a wired network for setup. Simply connect the power and press the Auto configuration button. Wireless-G Range Expander Chapter 3: Getting to Know the Wireless-G Range Expander The Front Panel The Range Expander's adjustable antenna, LEDs, and Ethernet network port are two ways to reset the...
... settings. 6 Auto configuration The Auto configuration button can be used if you connect the Range Expander to a wired network for setup. Simply connect the power and press the Auto configuration button. Wireless-G Range Expander Chapter 3: Getting to Know the Wireless-G Range Expander The Front Panel The Range Expander's adjustable antenna, LEDs, and Ethernet network port are two ways to reset the...
User Guide
Page 14
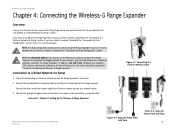
..." section if you have security disabled on your wired network for Setup" section if you have security enabled. Wireless-G Range Expander Chapter 4: Connecting the Wireless-G Range Expander Overview Linksys recommends that you connect the Range Expander to your network router. 3. Connect the other end of a networked computer, and enter the Range Expander's IP address, 192.168.1.240. Proceed to an Ethernet network...
..." section if you have security disabled on your wired network for Setup" section if you have security enabled. Wireless-G Range Expander Chapter 4: Connecting the Wireless-G Range Expander Overview Linksys recommends that you connect the Range Expander to your network router. 3. Connect the other end of a networked computer, and enter the Range Expander's IP address, 192.168.1.240. Proceed to an Ethernet network...
User Guide
Page 15
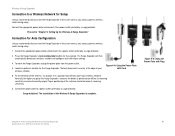
Wireless-G Range Expander Connection to a Wireless Network for Setup Linksys recommends that you have the Range Expander in the same room as your wireless network. Connection for Setup Figure 4-4: Using the Power Plate with those settings. 4. Normally, the higher you have the Range Expander in a position that will be enhanced by proper Proper positioning of the antenna. The installation of your access point...
Wireless-G Range Expander Connection to a Wireless Network for Setup Linksys recommends that you have the Range Expander in the same room as your wireless network. Connection for Setup Figure 4-4: Using the Power Plate with those settings. 4. Normally, the higher you have the Range Expander in a position that will be enhanced by proper Proper positioning of the antenna. The installation of your access point...
User Guide
Page 16
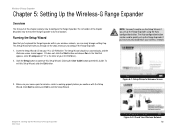
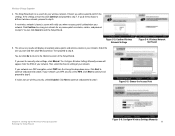
... to configure the Range Expander. 1. The Setup Wizard should run automatically, and the Welcome screen should appear. Wireless-G Range Expander Chapter 5: Setting Up the Wireless-G Range Expander Overview The first part of this Setup Wizard, click the Exit button. The remainder of the chapter describes how to move the Range Expander to exit the Setup Wizard. If it up the Range Expander if you continue...
... to configure the Range Expander. 1. The Setup Wizard should run automatically, and the Welcome screen should appear. Wireless-G Range Expander Chapter 5: Setting Up the Wireless-G Range Expander Overview The first part of this Setup Wizard, click the Exit button. The remainder of the chapter describes how to move the Range Expander to exit the Setup Wizard. If it up the Range Expander if you continue...
User Guide
Page 17
.... Click Next to continue and proceed to step 7. Figure 5-5: Choose the Access Point Chapter 5: Setting Up the Wireless-G Range Expander Running the Setup Wizard Figure 5-6: Configure Wireless Settings Manually 11 The Setup Wizard will be asked to exit the Setup Wizard. Click Next to continue and proceed to step 6. If the settings are correct, click Continue and...
.... Click Next to continue and proceed to step 7. Figure 5-5: Choose the Access Point Chapter 5: Setting Up the Wireless-G Range Expander Running the Setup Wizard Figure 5-6: Configure Wireless Settings Manually 11 The Setup Wizard will be asked to exit the Setup Wizard. Click Next to continue and proceed to step 6. If the settings are correct, click Continue and...
User Guide
Page 18
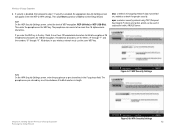
... characters. WPA On the WPA Security Settings screen, enter the passphrase or pre-shared key in your wireless network must use the same WEP key. Figure 5-7: WEP Security Settings Chapter 5: Setting Up the Wireless-G Range Expander Running the Setup Wizard Figure 5-8: WPA Security Settings 12 The passphrase can be used in length. The passphrase or...
... characters. WPA On the WPA Security Settings screen, enter the passphrase or pre-shared key in your wireless network must use the same WEP key. Figure 5-7: WEP Security Settings Chapter 5: Setting Up the Wireless-G Range Expander Running the Setup Wizard Figure 5-8: WPA Security Settings 12 The passphrase can be used in length. The passphrase or...
User Guide
Page 19
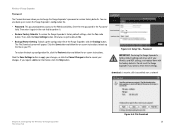
... Yes to continue, or click No to return to communicate, it will be asked to continue. You will now search for the Range Expander. Select the one you want. Then, click Enter to enter its password. Wireless-G Range Expander 7. Figure 5-9: Choose the Range Expander Figure 5-10: Enter the Password Chapter 5: Setting Up the Wireless-G Range Expander 13 Running the Setup Wizard
... Yes to continue, or click No to return to communicate, it will be asked to continue. You will now search for the Range Expander. Select the one you want. Then, click Enter to enter its password. Wireless-G Range Expander 7. Figure 5-9: Choose the Range Expander Figure 5-10: Enter the Password Chapter 5: Setting Up the Wireless-G Range Expander 13 Running the Setup Wizard
User Guide
Page 20
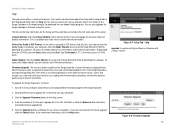
...screen. subnet mask: an address code that interconnects networks with different, incompatible communications protocols. 10. If you have the WRE54G v1, enter the MAC address of your network router). Then, click Next to continue or Back to return to step... for the Range Expander. If you are not sure about what to each networking device. 14 Enter an IP Address and appropriate Subnet Mask for the Range Expander. Chapter 5: Setting Up the Wireless-G Range Expander Running the Setup Wizard Figure 5-12: MAC Address of the network. Wireless-G Range Expander 9. The ...
...screen. subnet mask: an address code that interconnects networks with different, incompatible communications protocols. 10. If you have the WRE54G v1, enter the MAC address of your network router). Then, click Next to continue or Back to return to step... for the Range Expander. If you are not sure about what to each networking device. 14 Enter an IP Address and appropriate Subnet Mask for the Range Expander. Chapter 5: Setting Up the Wireless-G Range Expander Running the Setup Wizard Figure 5-12: MAC Address of the network. Wireless-G Range Expander 9. The ...
User Guide
Page 21
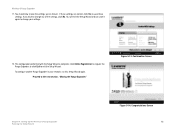
... to the next section, "Moving the Range Expander." You will exit the Setup Wizard and can start it again to exit the Setup Wizard. Click Online Registration to register the Range Expander, or click Exit to change any of the settings, click No. To configure another Range Expander in your settings. 12. Wireless-G Range Expander 11. You should now review the...
... to the next section, "Moving the Range Expander." You will exit the Setup Wizard and can start it again to exit the Setup Wizard. Click Online Registration to register the Range Expander, or click Exit to change any of the settings, click No. To configure another Range Expander in your settings. 12. Wireless-G Range Expander 11. You should now review the...
User Guide
Page 23
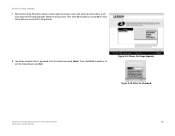
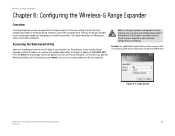
...all the information on the World Wide Web. Wireless-G Range Expander Chapter 6: Configuring the Wireless-G Range Expander Overview The Range Expander has been designed to be configured through your web browser and enter the IP address you entered in the Setup Wizard. (If you kept the Range Expander's default IP address or used the Auto configuration ...appear. This chapter is provided solely for those who wish to function properly after using the Auto configuration button or Setup Wizard. Figure 6-1: Login Screen Chapter 5: Configuring the Wireless-G Range Expander 17 Overview
...all the information on the World Wide Web. Wireless-G Range Expander Chapter 6: Configuring the Wireless-G Range Expander Overview The Range Expander has been designed to be configured through your web browser and enter the IP address you entered in the Setup Wizard. (If you kept the Range Expander's default IP address or used the Auto configuration ...appear. This chapter is provided solely for those who wish to function properly after using the Auto configuration button or Setup Wizard. Figure 6-1: Login Screen Chapter 5: Configuring the Wireless-G Range Expander 17 Overview
User Guide
Page 24
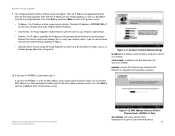
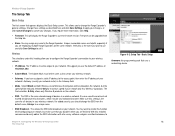
...linksys, to change the SSID from the Help tab. • Name. If you have assigned a static IP address to your network. For added security, you to a unique name. • SSID Broadcast. Basic Setup firmware: the programming code that appears displays the Basic Setup screen. This allows you should change the Range Expander's general settings. Wireless...network only has Wireless-G products. Wireless-G Range Expander The Setup Tab Basic Setup The first screen that runs a networking device Chapter 5: Configuring the Wireless-G Range Expander 18 The Setup Tab Unique, ...
...linksys, to change the SSID from the Help tab. • Name. If you have assigned a static IP address to your network. For added security, you to a unique name. • SSID Broadcast. Basic Setup firmware: the programming code that appears displays the Basic Setup screen. This allows you should change the Range Expander's general settings. Wireless...network only has Wireless-G products. Wireless-G Range Expander The Setup Tab Basic Setup The first screen that runs a networking device Chapter 5: Configuring the Wireless-G Range Expander 18 The Setup Tab Unique, ...
User Guide
Page 25
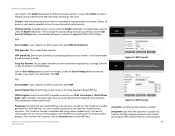
... the list provided to correspond with your network. WPA Algorithm. Enter the pre-shared key (also called passphrase) for Linksys products. 19 Figure 6-3: WPA Security Group Key Renewal. If your network. Instead of seconds in the field provided.... information, click Help. WEP Encryption. Click Enable to broadcast the SSID to all wireless devices in a network passphrase: used to use the same channel to change . Wireless-G Range Expander your network settings. Chapter 5: Configuring the Wireless-G Range Expander The Setup Tab encryption: encoding data transmitted in...
... the list provided to correspond with your network. WPA Algorithm. Enter the pre-shared key (also called passphrase) for Linksys products. 19 Figure 6-3: WPA Security Group Key Renewal. If your network. Instead of seconds in the field provided.... information, click Help. WEP Encryption. Click Enable to broadcast the SSID to all wireless devices in a network passphrase: used to use the same channel to change . Wireless-G Range Expander your network settings. Chapter 5: Configuring the Wireless-G Range Expander The Setup Tab encryption: encoding data transmitted in...
User Guide
Page 26
... key for authentication. For Shared key authentication, both the sender and recipient share a WEP key for wireless transmissions. If you to undo your changes. WEP keys enable you require additional information, click the Help...create an encryption scheme for authentication. Chapter 5: Configuring the Wireless-G Range Expander 20 The Setup Tab If you have finished making your changes on the Basic Setup screen, click the Save Settings button to save these changes...the authentication method you require more information, click Help. Wireless-G Range Expander Keys 1-4.
... key for authentication. For Shared key authentication, both the sender and recipient share a WEP key for wireless transmissions. If you to undo your changes. WEP keys enable you require additional information, click the Help...create an encryption scheme for authentication. Chapter 5: Configuring the Wireless-G Range Expander 20 The Setup Tab If you have finished making your changes on the Basic Setup screen, click the Save Settings button to save these changes...the authentication method you require more information, click Help. Wireless-G Range Expander Keys 1-4.
User Guide
Page 27
... click the Cancel Changes button to change the Range Expander's password or restore factory defaults. Then, click the Save Settings button. Wireless-G Range Expander Password The Password screen allows you to cancel your changes. This password protects access to receive a file transmitted over a network Chapter 5: Configuring the Wireless-G Range Expander The Setup Tab Figure 6-6: File Download 21 download: to...
... click the Cancel Changes button to change the Range Expander's password or restore factory defaults. Then, click the Save Settings button. Wireless-G Range Expander Password The Password screen allows you to cancel your changes. This password protects access to receive a file transmitted over a network Chapter 5: Configuring the Wireless-G Range Expander The Setup Tab Figure 6-6: File Download 21 download: to...
User Guide
Page 28
... active Internet connection.) Firmware Upgrade. Figure 6-8: Firmware Upgrade Chapter 5: Configuring the Wireless-G Range Expander 22 The Setup Tab To upgrade the Range Expander's firmware: 1. Help upgrade: to the help information for the Setup and Password tabs are posted at www.linksys.com and can also upgrade the Range Expander's firmware using this link. Adobe Website. If you want to use...
... active Internet connection.) Firmware Upgrade. Figure 6-8: Firmware Upgrade Chapter 5: Configuring the Wireless-G Range Expander 22 The Setup Tab To upgrade the Range Expander's firmware: 1. Help upgrade: to the help information for the Setup and Password tabs are posted at www.linksys.com and can also upgrade the Range Expander's firmware using this link. Adobe Website. If you want to use...
User Guide
Page 29
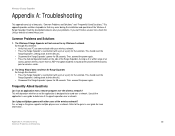
... The Setup Wizard does not detect the Range Expander. Refer to solve your wireless network. • Press the Range Expander's reset button (with a pin or a pen) for five seconds. This should reset the Range Expander's settings back to their defaults. • Disconnect the Range Expander's power for 30 seconds. Wireless-G Range Expander Appendix A: Troubleshooting This appendix consists of the Range Expander. This should reset the Range Expander...
... The Setup Wizard does not detect the Range Expander. Refer to solve your wireless network. • Press the Range Expander's reset button (with a pin or a pen) for five seconds. This should reset the Range Expander's settings back to their defaults. • Disconnect the Range Expander's power for 30 seconds. Wireless-G Range Expander Appendix A: Troubleshooting This appendix consists of the Range Expander. This should reset the Range Expander...


