User Guide
Page 3
... Disabling Protocols 20 Attaching Bi-Admin to a Remote PrintServer 20 Resetting the PrintServer 20 Restoring Factory Default 20 EtherFast 10/100 PrintServers Chapter 7: Configuring the PrintServer Using the Web-based Utility 22 Accessing the Web-based Utility 22 The Server Page 23 The Printer Page 23 The TCP/IP... Page 29 The NetWare Page 30 The SNMP Page 32 Chapter 9: Internet Printing Protocol (IPP) 34 Windows IPP Client Setup 34 Chapter 10: NetWare Services Setup 40 Overview 40 Print Server Mode and Remote Printer Mode in NetWare 40 Pure IP NetWare 5.x Setup ...
... Disabling Protocols 20 Attaching Bi-Admin to a Remote PrintServer 20 Resetting the PrintServer 20 Restoring Factory Default 20 EtherFast 10/100 PrintServers Chapter 7: Configuring the PrintServer Using the Web-based Utility 22 Accessing the Web-based Utility 22 The Server Page 23 The Printer Page 23 The TCP/IP... Page 29 The NetWare Page 30 The SNMP Page 32 Chapter 9: Internet Printing Protocol (IPP) 34 Windows IPP Client Setup 34 Chapter 10: NetWare Services Setup 40 Overview 40 Print Server Mode and Remote Printer Mode in NetWare 40 Pure IP NetWare 5.x Setup ...
User Guide
Page 6
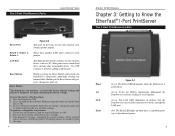
...or better cabling with this page. 4 EtherFast 10/100 PrintServers Chapter 3: Getting to print this port. Press and hold it in the Reset button will be printed, unless you have a PostScript printer. While pressing the button, switch the Print Server ON. 3. The diagnostic test page, ...Port PrintServer's Ports Instant EtherFast® Series Power Port Figure 2-2 This port on . Printer 1, Printer 2, Printer 3 These three parallel (LPT) ports connect to print a diagnostic test page containing all current settings. This button has two functions: to restore the factory default ...
...or better cabling with this page. 4 EtherFast 10/100 PrintServers Chapter 3: Getting to print this port. Press and hold it in the Reset button will be printed, unless you have a PostScript printer. While pressing the button, switch the Print Server ON. 3. The diagnostic test page, ...Port PrintServer's Ports Instant EtherFast® Series Power Port Figure 2-2 This port on . Printer 1, Printer 2, Printer 3 These three parallel (LPT) ports connect to print a diagnostic test page containing all current settings. This button has two functions: to restore the factory default ...

User Guide
Page 7
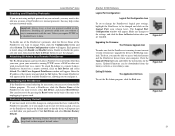
...(s). 7 You can be printed, unless you have an ON/OFF power switch. Connecting Printer(s) to your network device, such as numbers. Printer Port This parallel (LPT) port connects to your network. To reset the factory default settings: 1. Holding in your Switch's power adapter. Consult your printer. The 1-Port PrintServer's Ports Instant EtherFast® Series Figure...
...(s). 7 You can be printed, unless you have an ON/OFF power switch. Connecting Printer(s) to your network device, such as numbers. Printer Port This parallel (LPT) port connects to your network. To reset the factory default settings: 1. Holding in your Switch's power adapter. Consult your printer. The 1-Port PrintServer's Ports Instant EtherFast® Series Figure...
User Guide
Page 14
...shown here). Updated Firmware can also reset it from the Linksys website as it did when you purchased it . Figure 6-7 Figure 6-8 Figure 6-9 21 Enter the IP address of the PrintServer you want to be downloaded from the BiAdmin program. Restoring Factory Default If you have made irreversible ...Name of available PrintServers, allowing you to save the changes. To reset a PrintServer, click the Device Name of the remote unit and click the Set button. Exiting Bi-Admin: The Application Exit Icon To exit the Bi-Admin program, click the Exit icon. Instant EtherFast® Series...
...shown here). Updated Firmware can also reset it from the Linksys website as it did when you purchased it . Figure 6-7 Figure 6-8 Figure 6-9 21 Enter the IP address of the PrintServer you want to be downloaded from the BiAdmin program. Restoring Factory Default If you have made irreversible ...Name of available PrintServers, allowing you to save the changes. To reset a PrintServer, click the Device Name of the remote unit and click the Set button. Exiting Bi-Admin: The Application Exit Icon To exit the Bi-Admin program, click the Exit icon. Instant EtherFast® Series...

User Guide
Page 16
... click the Retrieve Defaults button to return to view information about your PrintServer. If you want to reset the settings for this screen, you to the factory default settings. If you want the PrintServer to delay between attempting connections to exit the screen without making any mistakes...connected to assign IP addresses, select DHCP Client. The TCP/IP Page Instant EtherFast® Series EtherFast 10/100 PrintServers The Status Page Figure 7-5 Click the TCP/IP tab to view or change the PrintServer's IP address, make sure that you need to update this information again. ...
... click the Retrieve Defaults button to return to view information about your PrintServer. If you want to reset the settings for this screen, you to the factory default settings. If you want the PrintServer to delay between attempting connections to exit the screen without making any mistakes...connected to assign IP addresses, select DHCP Client. The TCP/IP Page Instant EtherFast® Series EtherFast 10/100 PrintServers The Status Page Figure 7-5 Click the TCP/IP tab to view or change the PrintServer's IP address, make sure that you need to update this information again. ...