
Owners Manual
Page 2
...OF CONTENTS Introduction 2-5 Safety symbol and signal word review 2 Preparing your garage door 3 Tools needed 3 Planning 4 Carton inventory 5 Hardware inventory 5 Assembly 6 Fasten rail to the motor unit 6 Installation 7-22 Installation safety instructions 7 Determine the header bracket location 8 Install the header bracket 9 Attach the... requirements 18 Complete safety reversing sensor installation 18 Fasten the door bracket 19-20 Connect the door arm to the trolley 21-22 Adjustment 23-25 Adjust the UP and DOWN travel limits 23 Adjust the force 24 Test the safety ...
...OF CONTENTS Introduction 2-5 Safety symbol and signal word review 2 Preparing your garage door 3 Tools needed 3 Planning 4 Carton inventory 5 Hardware inventory 5 Assembly 6 Fasten rail to the motor unit 6 Installation 7-22 Installation safety instructions 7 Determine the header bracket location 8 Install the header bracket 9 Attach the... requirements 18 Complete safety reversing sensor installation 18 Fasten the door bracket 19-20 Connect the door arm to the trolley 21-22 Adjustment 23-25 Adjust the UP and DOWN travel limits 23 Adjust the force 24 Test the safety ...

Owners Manual
Page 5
... Curved Door Arm Section Sprocket Coupling Motor Unit with Light Lens Model 3130M Motor Unit with 2 Light Lenses Model 3240M Trolley Door Bracket Safety Reversing Sensor Brackets (2) The Protector System® (2) Safety Reversing Sensors (1 Sending Eye and 1 Receiving... Eye) with 2-Conductor White & White/Black Bell Wire attached Safety Labels and Literature Straight Door Arm Section RAIL ASSEMBLY Coupling Sleeve (1) Hex Bolt 1/4"-20 x 5/8" (4) Nut 1/4" - 20 (4) INSTALLATION HARDWARE Hex Bolt 5/16"-18x7/8" (4) Lag Screw 5/16"-9x1-5/8"...
... Curved Door Arm Section Sprocket Coupling Motor Unit with Light Lens Model 3130M Motor Unit with 2 Light Lenses Model 3240M Trolley Door Bracket Safety Reversing Sensor Brackets (2) The Protector System® (2) Safety Reversing Sensors (1 Sending Eye and 1 Receiving... Eye) with 2-Conductor White & White/Black Bell Wire attached Safety Labels and Literature Straight Door Arm Section RAIL ASSEMBLY Coupling Sleeve (1) Hex Bolt 1/4"-20 x 5/8" (4) Nut 1/4" - 20 (4) INSTALLATION HARDWARE Hex Bolt 5/16"-18x7/8" (4) Lag Screw 5/16"-9x1-5/8"...
Owners Manual
Page 6
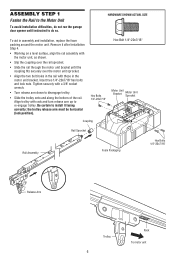
... release arm down to disengage trolley. • Slide the trolley onto and along the bottom of the rail. Insert two 1/4"-20x7/16" hex bolts and lock nuts. Be certain to install it after Installation Step 4. • Working on a level surface, align the rail assembly with the motor unit, as...1/4"-20x7/16" Hex Bolt 1/4"-20x7/16" Motor Unit Bracket Motor Unit Sprocket Coupling Rail Sprocket Rail Assembly Foam Packaging Hex Bolts 1/4"-20x7/16" Release Arm Trolley 6 Rack To motor unit ASSEMBLY STEP 1 Fasten the Rail to the Motor Unit To avoid installation difficulties, do not ...
... release arm down to disengage trolley. • Slide the trolley onto and along the bottom of the rail. Insert two 1/4"-20x7/16" hex bolts and lock nuts. Be certain to install it after Installation Step 4. • Working on a level surface, align the rail assembly with the motor unit, as...1/4"-20x7/16" Hex Bolt 1/4"-20x7/16" Motor Unit Bracket Motor Unit Sprocket Coupling Rail Sprocket Rail Assembly Foam Packaging Hex Bolts 1/4"-20x7/16" Release Arm Trolley 6 Rack To motor unit ASSEMBLY STEP 1 Fasten the Rail to the Motor Unit To avoid installation difficulties, do not ...
Owners Manual
Page 22
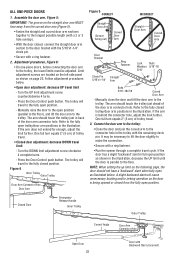
...behind the connector hole, adjust the limit further. One full turn equals 2" (5 cm) of trolley travel. • Closed door adjustment: decrease DOWN travel limit - Refer to the trolley. Assemble the door arm, Figure 5: IMPORTANT: The groove on the left side panel as illustrated below .... • Open door adjustment: decrease UP travel limit - The trolley will cause unnecessary bucking and/or jerking operation as ...
...behind the connector hole, adjust the limit further. One full turn equals 2" (5 cm) of trolley travel. • Closed door adjustment: decrease DOWN travel limit - Refer to the trolley. Assemble the door arm, Figure 5: IMPORTANT: The groove on the left side panel as illustrated below .... • Open door adjustment: decrease UP travel limit - The trolley will cause unnecessary bucking and/or jerking operation as ...
Owners Manual
Page 26
...the door will reverse. If the door has been stopped in ; ALWAYS keep garage door in sight until the door starts to cables, spring assemblies and other control may be made , the safety reversal system MUST be tested every month. ALWAYS keep remote controls out of reach of the ...ONLY activate garage door when it is A19. NO ONE SHOULD GO UNDER A STOPPED, PARTIALLY OPEN DOOR. 6. If possible, use handle to disengage trolley ONLY when garage door is adjusted, the other hardware, ALL of SEVERE INJURY or DEATH: 1. NEVER use emergency release handle to pull garage door ...
...the door will reverse. If the door has been stopped in ; ALWAYS keep garage door in sight until the door starts to cables, spring assemblies and other control may be made , the safety reversal system MUST be tested every month. ALWAYS keep remote controls out of reach of the ...ONLY activate garage door when it is A19. NO ONE SHOULD GO UNDER A STOPPED, PARTIALLY OPEN DOOR. 6. If possible, use handle to disengage trolley ONLY when garage door is adjusted, the other hardware, ALL of SEVERE INJURY or DEATH: 1. NEVER use emergency release handle to pull garage door ...

Owners Manual
Page 33
... NOT SHOWN Installation hardware bag (see page 3) Owner's manual Owner's manual-Spanish 33 NO. DESCRIPTION 1 41A6353 Hardware bag (includes sprocket coupling) 2 81C275 Rack 3 41A6262 Complete trolley assembly 4 3077SD Screw Drive one-piece rail 7' (2.1 m) 5 3088SD Screw Drive one-piece rail 8' (2.4 m) 6 41A4836 Drive sprocket kit 7 25C20 Coupling 8 41A6312 Rail end bracket NOT SHOWN 28A143...
... NOT SHOWN Installation hardware bag (see page 3) Owner's manual Owner's manual-Spanish 33 NO. DESCRIPTION 1 41A6353 Hardware bag (includes sprocket coupling) 2 81C275 Rack 3 41A6262 Complete trolley assembly 4 3077SD Screw Drive one-piece rail 7' (2.1 m) 5 3088SD Screw Drive one-piece rail 8' (2.4 m) 6 41A4836 Drive sprocket kit 7 25C20 Coupling 8 41A6312 Rail end bracket NOT SHOWN 28A143...

