Owners Manual
Page 1
® GARAGE DOOR OPENER Models The Chamberlain Group, Inc. 845 Larch Avenue Elmhurst, Illinois 60126-1196 www.liftmaster.com 3130M 1/3 HP For Residential Use Only 3240M 1/2 HP Owner's Manual ■ Please read this manual and the enclosed safety materials carefully! ■ Fasten the manual near the garage door after installation. ■ The door WILL NOT CLOSE unless the Protector System® is connected and properly aligned. ■ Periodic checks of the opener are required to ensure safe operation. ■ The model number label is located on the front panel of your opener.
® GARAGE DOOR OPENER Models The Chamberlain Group, Inc. 845 Larch Avenue Elmhurst, Illinois 60126-1196 www.liftmaster.com 3130M 1/3 HP For Residential Use Only 3240M 1/2 HP Owner's Manual ■ Please read this manual and the enclosed safety materials carefully! ■ Fasten the manual near the garage door after installation. ■ The door WILL NOT CLOSE unless the Protector System® is connected and properly aligned. ■ Periodic checks of the opener are required to ensure safe operation. ■ The model number label is located on the front panel of your opener.
Owners Manual
Page 2
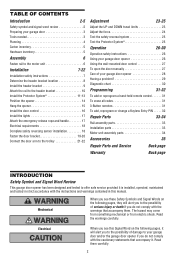
... tested in this Signal Word on the following pages, it will alert you to the possibility of serious injury or death if you see this manual. Read the warnings carefully. Read them . Electrical When you see these Safety Symbols and Signal Words on the following pages, they will alert you ...25 Operation 26-30 Operation safety instructions 26 Using your garage door opener 26 Using the wall-mounted door control 27 To open the door manually 27 Care of your garage door and/or the garage door opener if you do not comply with the instructions and warnings contained in strict...
... tested in this Signal Word on the following pages, it will alert you to the possibility of serious injury or death if you see this manual. Read the warnings carefully. Read them . Electrical When you see these Safety Symbols and Signal Words on the following pages, they will alert you ...25 Operation 26-30 Operation safety instructions 26 Using your garage door opener 26 Using the wall-mounted door control 27 To open the door manually 27 Care of your garage door and/or the garage door opener if you do not comply with the instructions and warnings contained in strict...
Owners Manual
Page 7
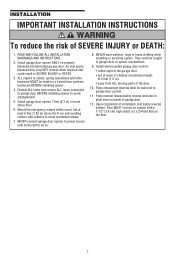
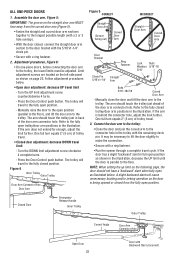
... contact with a 1-1/2" (3.8 cm) high object (or a 2x4 laid flat minimum height of 5 feet (1.5 m). • away from ALL moving parts of garage door. 12. Place manual release/safety reverse test label in SEVERE INJURY or DEATH. 3. INSTALLATION IMPORTANT INSTALLATION INSTRUCTIONS WARNING To reduce the risk of installation, test safety reversal system...
... contact with a 1-1/2" (3.8 cm) high object (or a 2x4 laid flat minimum height of 5 feet (1.5 m). • away from ALL moving parts of garage door. 12. Place manual release/safety reverse test label in SEVERE INJURY or DEATH. 3. INSTALLATION IMPORTANT INSTALLATION INSTRUCTIONS WARNING To reduce the risk of installation, test safety reversal system...
Owners Manual
Page 15
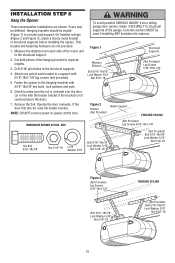
... structural supports. 4. Fasten the opener to structural supports of the garage. Cut both pieces of the motor unit to provide rigid support. Operate the door manually. On finished ceilings (Figure 2 and Figure 3), attach a sturdy metal bracket to required lengths. 3. Remove the 2x4. INSTALLATION STEP 6 Hang the Opener Three representative installations...
... structural supports. 4. Fasten the opener to structural supports of the garage. Cut both pieces of the motor unit to provide rigid support. Operate the door manually. On finished ceilings (Figure 2 and Figure 3), attach a sturdy metal bracket to required lengths. 3. Remove the 2x4. INSTALLATION STEP 6 Hang the Opener Three representative installations...
Owners Manual
Page 16
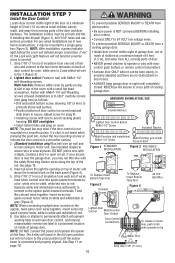
... and Drywall Anchors slide down to protrude above the terminal block on inside of garage door. If your access door is near door control, and manual release/safety reverse test label in sight until the sensor beam is properly adjusted and there are no obstructions to wall near the garage door...
... and Drywall Anchors slide down to protrude above the terminal block on inside of garage door. If your access door is near door control, and manual release/safety reverse test label in sight until the sensor beam is properly adjusted and there are no obstructions to wall near the garage door...
Owners Manual
Page 22
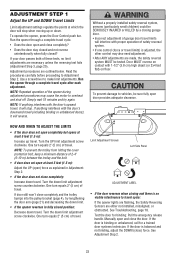
...floor. The trolley will cause unnecessary bucking and/or jerking operation as shown in the trolley with Backward Slant (Incorrect) Manually close the door and lift the door arm to the connector hole in the illustration, decrease the UP limit until the door ...equals 2" (5 cm) of trolley travel limit - A slight backward slant will travel cycle. Turn the UP limit adjustment screw counterclockwise 4 turns. - Manually raise the door to the trolley. Limit adjustment screws are located on the left side panel as illustrated below . • Open door adjustment: decrease ...
...floor. The trolley will cause unnecessary bucking and/or jerking operation as shown in the trolley with Backward Slant (Incorrect) Manually close the door and lift the door arm to the connector hole in the illustration, decrease the UP limit until the door ...equals 2" (5 cm) of trolley travel limit - A slight backward slant will travel cycle. Turn the UP limit adjustment screw counterclockwise 4 turns. - Manually raise the door to the trolley. Limit adjustment screws are located on the left side panel as illustrated below . • Open door adjustment: decrease ...
Owners Manual
Page 23
... obstructed. NOTE: To prevent the trolley from hitting the cover protection bolt, keep a minimum distance of travel cycle after each adjustment. See Troubleshooting, page 18. Manually open and close completely and the trolley bumps into the pulley bracket (page 4), try again. See Adjustment Step 2. 23 ADJUSTMENT STEP 1 Adjust the UP and...
... obstructed. NOTE: To prevent the trolley from hitting the cover protection bolt, keep a minimum distance of travel cycle after each adjustment. See Troubleshooting, page 18. Manually open and close completely and the trolley bumps into the pulley bracket (page 4), try again. See Adjustment Step 2. 23 ADJUSTMENT STEP 1 Adjust the UP and...
Owners Manual
Page 27
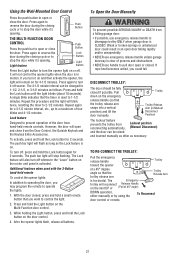
.... • NEVER use emergency release handle unless garage doorway is clear of the door from reconnecting automatically, Disconnect Position) NOTICE Lockout position (Manual Disconnect) and the door can be fully closed , press and hold the Lock button until the light blinks (about 10 seconds). However, ...down on for 2 seconds. To activate, press and hold the Lock button on the Multi-Function door control. 3. To Open the Door Manually To prevent possible SERIOUS INJURY or DEATH from the Door Control, the Outside Keylock and the Keyless Entry Accessories. Press and hold the Lock...
.... • NEVER use emergency release handle unless garage doorway is clear of the door from reconnecting automatically, Disconnect Position) NOTICE Lockout position (Manual Disconnect) and the door can be fully closed , press and hold the Lock button until the light blinks (about 10 seconds). However, ...down on for 2 seconds. To activate, press and hold the Lock button on the Multi-Function door control. 3. To Open the Door Manually To prevent possible SERIOUS INJURY or DEATH from the Door Control, the Outside Keylock and the Keyless Entry Accessories. Press and hold the Lock...
Owners Manual
Page 28
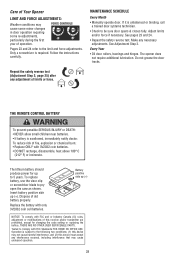
... (IC) rules, adjustment or modifications of this device must accept any necessary adjustments. The opener does not require additional lubrication. MAINTENANCE SCHEDULE Every Month • Manually operate door. Dispose of limits or force. Adjust limits and/or force if necessary.
... (IC) rules, adjustment or modifications of this device must accept any necessary adjustments. The opener does not require additional lubrication. MAINTENANCE SCHEDULE Every Month • Manually operate door. Dispose of limits or force. Adjust limits and/or force if necessary.
Owners Manual
Page 29
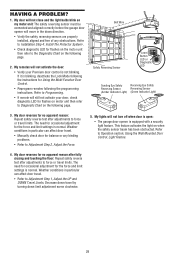
The need for occasional adjustment for balance or any obstructions. Using the Wall Mounted Door Control, Light Feature. 4. Decrease down travel . • Manually check door for the force and limit settings is normal. Refer to Programming. • If remote will not activate the door: • Verify your door, ...
The need for occasional adjustment for balance or any obstructions. Using the Wall Mounted Door Control, Light Feature. 4. Decrease down travel . • Manually check door for the force and limit settings is normal. Refer to Programming. • If remote will not activate the door: • Verify your door, ...

Owners Manual
Page 33
... bell wire attached Safety reversing sensor bracket 2-conductor bell wire: white & white/red Curved door arm section NOT SHOWN Installation hardware bag (see page 3) Owner's manual Owner's manual-Spanish 33 NO.
... bell wire attached Safety reversing sensor bracket 2-conductor bell wire: white & white/red Curved door arm section NOT SHOWN Installation hardware bag (see page 3) Owner's manual Owner's manual-Spanish 33 NO.
Owners Manual
Page 35
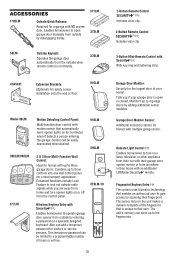
...64258;oor. 915LM CLOSED OPEN Model 98LM LOCK LIGHT 902LM/903LM 377LM Motion Detecting Control Panel: Multi-function door control with an additional LiftMaster Security✚® remote. CLOSED OPEN Remote Light Control : Enables homeowner to turn opener lights on or off from the control panel... or other appliance from their car with their garage door opener remote or from the outside when remote control is open garage door manually from outside radio signals while you if your home! Enhanced functions include Lock Feature to three controls into one wall control panel for...
...64258;oor. 915LM CLOSED OPEN Model 98LM LOCK LIGHT 902LM/903LM 377LM Motion Detecting Control Panel: Multi-function door control with an additional LiftMaster Security✚® remote. CLOSED OPEN Remote Light Control : Enables homeowner to turn opener lights on or off from the control panel... or other appliance from their car with their garage door opener remote or from the outside when remote control is open garage door manually from outside radio signals while you if your home! Enhanced functions include Lock Feature to three controls into one wall control panel for...


