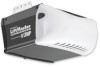
Owners Manual
Page 2
... Install the door control 16 Install the lights 17 Attach the emergency release rope and handle 17 Electrical requirements 18 Complete safety reversing sensor installation 18 Fasten the door bracket 19-20 Connect the door arm to the trolley 21-22 Adjustment 23-25 Adjust the UP and DOWN travel limits 23 Adjust the force 24 Test the safety reversal system 25 Test the Protector System 25 Operation 26-30 Operation safety instructions 26 Using your garage door opener 26 Using the wall-mounted door control 27 To open the door manually...
... Install the door control 16 Install the lights 17 Attach the emergency release rope and handle 17 Electrical requirements 18 Complete safety reversing sensor installation 18 Fasten the door bracket 19-20 Connect the door arm to the trolley 21-22 Adjustment 23-25 Adjust the UP and DOWN travel limits 23 Adjust the force 24 Test the safety reversal system 25 Test the Protector System 25 Operation 26-30 Operation safety instructions 26 Using your garage door opener 26 Using the wall-mounted door control 27 To open the door manually...

Owners Manual
Page 5
...Model 3130M Model 3240M (1) Model 3130M (1) Multi-Function Door Control Panel Lighted Door Control Button SECURITY✚® 3-Button Remote Control 2 Conductor Bell Wire SECURITY✚® White & White/Red 1-Button Remote Control CEILING MOUNT ONLY UP Remote Control Visor Clip Header Bracket Rail Curved Door Arm Section Sprocket Coupling Motor Unit with Light Lens Model 3130M Motor Unit with 2 Light Lenses Model 3240M Trolley Door Bracket Safety Reversing Sensor Brackets (2) The Protector System® (2) Safety Reversing Sensors (1 Sending Eye and 1 Receiving Eye...
...Model 3130M Model 3240M (1) Model 3130M (1) Multi-Function Door Control Panel Lighted Door Control Button SECURITY✚® 3-Button Remote Control 2 Conductor Bell Wire SECURITY✚® White & White/Red 1-Button Remote Control CEILING MOUNT ONLY UP Remote Control Visor Clip Header Bracket Rail Curved Door Arm Section Sprocket Coupling Motor Unit with Light Lens Model 3130M Motor Unit with 2 Light Lenses Model 3240M Trolley Door Bracket Safety Reversing Sensor Brackets (2) The Protector System® (2) Safety Reversing Sensors (1 Sending Eye and 1 Receiving Eye...
Owners Manual
Page 7
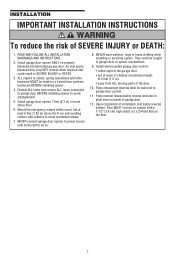
... balanced and lubricated garage door. Door MUST reverse on contact with vehicles to cables, spring assemblies and other hardware MUST be caught in garage door or opener mechanisms. 9. Disable ALL locks and remove ALL ropes connected to garage door BEFORE installing opener to do so. 8. Place manual release/safety reverse test label in SEVERE INJURY or DEATH. 3. INSTALLATION IMPORTANT INSTALLATION INSTRUCTIONS WARNING To reduce the risk of installation, test safety reversal system. ALL repairs to avoid accidental...
... balanced and lubricated garage door. Door MUST reverse on contact with vehicles to cables, spring assemblies and other hardware MUST be caught in garage door or opener mechanisms. 9. Disable ALL locks and remove ALL ropes connected to garage door BEFORE installing opener to do so. 8. Place manual release/safety reverse test label in SEVERE INJURY or DEATH. 3. INSTALLATION IMPORTANT INSTALLATION INSTRUCTIONS WARNING To reduce the risk of installation, test safety reversal system. ALL repairs to avoid accidental...

Owners Manual
Page 11
... shines directly into the receiving eye lens. If it is necessary to the garage door opener BEFORE installing the safety reversing sensor. Be sure power is closing. The invisible light beam path must be installed inside the garage 11 Safety Reversing Sensor 6" (15 cm) max. No part of the garage door (or door tracks, springs, hinges, rollers or other hardware) may interrupt the beam while the door is NOT connected to mount the units on the left or...
... shines directly into the receiving eye lens. If it is necessary to the garage door opener BEFORE installing the safety reversing sensor. Be sure power is closing. The invisible light beam path must be installed inside the garage 11 Safety Reversing Sensor 6" (15 cm) max. No part of the garage door (or door tracks, springs, hinges, rollers or other hardware) may interrupt the beam while the door is NOT connected to mount the units on the left or...
Owners Manual
Page 12
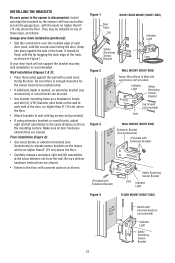
...Indicator Light Safety Reversing Sensor Bracket Lag Screws (not provided) Lens WALL MOUNT (RIGHT SIDE) Extension Bracket (See Accessories) (Provided with Extension Bracket) (Provided with Extension Bracket) Safety Reversing Sensor Bracket Lens Indicator Light Figure 4 FLOOR MOUNT (RIGHT SIDE) Attach with curved arms facing the door. Figure 1 Door Track Lip DOOR TRACK MOUNT (RIGHT SIDE) Indicator Light Safety Reversing Sensor Lens Bracket Figure 2 Figure 3 WALL MOUNT (RIGHT SIDE) Fasten Wood Block to be used. • Use bracket mounting holes as follows: Garage door track...
...Indicator Light Safety Reversing Sensor Bracket Lag Screws (not provided) Lens WALL MOUNT (RIGHT SIDE) Extension Bracket (See Accessories) (Provided with Extension Bracket) (Provided with Extension Bracket) Safety Reversing Sensor Bracket Lens Indicator Light Figure 4 FLOOR MOUNT (RIGHT SIDE) Attach with curved arms facing the door. Figure 1 Door Track Lip DOOR TRACK MOUNT (RIGHT SIDE) Indicator Light Safety Reversing Sensor Lens Bracket Figure 2 Figure 3 WALL MOUNT (RIGHT SIDE) Fasten Wood Block to be used. • Use bracket mounting holes as follows: Garage door track...
Owners Manual
Page 15
.../8" Lock Washer 5/16" Nut 5/16"-18 15 Yours may be used if installing ANY brackets into masonry. Measure the distance from a falling garage door opener, fasten it SECURELY to structural supports of the hanging bracket to make sure the rail is not centered above the door). 7. Attach one end of each side of the motor unit to structural supports before installing the opener. Operate the door manually. If the door hits...
.../8" Lock Washer 5/16" Nut 5/16"-18 15 Yours may be used if installing ANY brackets into masonry. Measure the distance from a falling garage door opener, fasten it SECURELY to structural supports of the hanging bracket to make sure the rail is not centered above the door). 7. Attach one end of each side of the motor unit to structural supports before installing the opener. Operate the door manually. If the door hits...
Owners Manual
Page 16
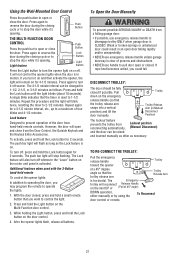
... from moving parts of door. 1. Insert all wires through the opening on top of motor unit above wall surface. • Position bottom of door control on inside of garage door. NOTE: DO NOT connect the power and operate the opener Lighted Door Control Multi-Function Door Control Door Control Connections To release or insert wire, push in a prominent location on screw head and Drywall Anchors slide down to 24 VOLT low voltage wires. Adjust screw for snug fit. • Install top screw with...
... from moving parts of door. 1. Insert all wires through the opening on top of motor unit above wall surface. • Position bottom of door control on inside of garage door. NOTE: DO NOT connect the power and operate the opener Lighted Door Control Multi-Function Door Control Door Control Connections To release or insert wire, push in a prominent location on screw head and Drywall Anchors slide down to 24 VOLT low voltage wires. Adjust screw for snug fit. • Install top screw with...
Owners Manual
Page 17
... light bulbs. • DO NOT use halogen bulbs. Secure with a match or lighter to prevent unraveling. To prevent damage to disengage trolley ONLY when garage door is connected. Trolley Trolley Release Arm Emergency Release Handle NOTICE Overhand Knot 17 The lights will turn ON and remain lit for replacement. Then the lights will turn OFF. • Reverse the procedure to close the lens. • Use A19, standard neck garage door opener bulbs for approximately 4-1/2 minutes when power is CLOSED...
... light bulbs. • DO NOT use halogen bulbs. Secure with a match or lighter to prevent unraveling. To prevent damage to disengage trolley ONLY when garage door is connected. Trolley Trolley Release Arm Emergency Release Handle NOTICE Overhand Knot 17 The lights will turn ON and remain lit for replacement. Then the lights will turn OFF. • Reverse the procedure to close the lens. • Use A19, standard neck garage door opener bulbs for approximately 4-1/2 minutes when power is CLOSED...

Owners Manual
Page 18
... the receiving eye. This plug will reverse. Ground Tab Green Ground Screw Ground Wire White Wire Black Wire White Wire Black Wire INSTALLATION STEP 11 Complete Safety Reversing Sensor Installation ALIGNING THE SAFETY REVERSING SENSORS Plug in the top of the motor unit: • Remove the motor unit cover screws and set the cover aside. • Remove the attached 3-prong cord. • Connect the black (line) wire to the green ground screw. The sending eye amber indicator light will not close. If the door is already open wire to the receiving eye...
... the receiving eye. This plug will reverse. Ground Tab Green Ground Screw Ground Wire White Wire Black Wire White Wire Black Wire INSTALLATION STEP 11 Complete Safety Reversing Sensor Installation ALIGNING THE SAFETY REVERSING SENSORS Plug in the top of the motor unit: • Remove the motor unit cover screws and set the cover aside. • Remove the attached 3-prong cord. • Connect the black (line) wire to the green ground screw. The sending eye amber indicator light will not close. If the door is already open wire to the receiving eye...
Owners Manual
Page 23
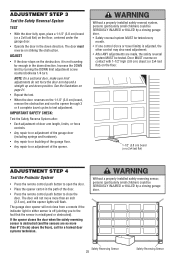
... not open ) force as explained in fully closed ? Turn the UP limit adjustment screw clockwise. One turn equals 2" (5 cm) of garage door travel (including binding or unbalanced doors), it will stop when moving up travel cycle: If the opener lights are flashing, the Safety Reversing Sensors are made, the safety reversal system MUST be SERIOUSLY INJURED or KILLED by a closing and there is binding or unbalanced, call for binding: Pull the emergency release...
... not open ) force as explained in fully closed ? Turn the UP limit adjustment screw clockwise. One turn equals 2" (5 cm) of garage door travel (including binding or unbalanced doors), it will stop when moving up travel cycle: If the opener lights are flashing, the Safety Reversing Sensors are made, the safety reversal system MUST be SERIOUSLY INJURED or KILLED by a closing and there is binding or unbalanced, call for binding: Pull the emergency release...

Owners Manual
Page 24
... garage door will interfere with proper operation of the motor unit. The door should stop . After each adjustment, run the opener through UP (open ) force by turning the control clockwise. After each adjustment, run the opener through a complete travel cycle. • If the door doesn't open at ) on contact with the door's downward travel , it will stop . The door should reverse. Make small adjustments until door opens completely. Readjust the UP limit if necessary. Back Panel Force Adjustment Controls FORCE ADJUSTMENT LABEL Antenna Open Force Close Force 24 Door...
... garage door will interfere with proper operation of the motor unit. The door should stop . After each adjustment, run the opener through UP (open ) force by turning the control clockwise. After each adjustment, run the opener through a complete travel cycle. • If the door doesn't open at ) on contact with the door's downward travel , it will stop . The door should reverse. Make small adjustments until door opens completely. Readjust the UP limit if necessary. Back Panel Force Adjustment Controls FORCE ADJUSTMENT LABEL Antenna Open Force Close Force 24 Door...
Owners Manual
Page 25
... not traveling far enough in the down direction. ADJUST • If the door stops on striking the obstruction. The door will not move more than an inch (2.5 cm), and the opener lights will not close the door. Increase the DOWN limit by a closing garage door. IMPORTANT SAFETY CHECK: Test the Safety Reverse System after: • Each adjustment of door arm length, limits, or force controls. • Any repair to or adjustment of the garage door (including springs...
... not traveling far enough in the down direction. ADJUST • If the door stops on striking the obstruction. The door will not move more than an inch (2.5 cm), and the opener lights will not close the door. Increase the DOWN limit by a closing garage door. IMPORTANT SAFETY CHECK: Test the Safety Reverse System after: • Each adjustment of door arm length, limits, or force controls. • Any repair to or adjustment of the garage door (including springs...
Owners Manual
Page 26
... new codes. Your Security✚® opener and hand-held remote. If the obstruction interrupts the sensor beam, the opener lights will close . 5. OPERATION IMPORTANT SAFETY INSTRUCTIONS WARNING To reduce the risk of persons and obstructions. 8. NEVER use . After ANY adjustments are under the following : • The hand-held Remote Control: Hold the large push button down until the door starts to eight Security✚® remote controls and one control (force or travel limits) is broken. Safety reversal...
... new codes. Your Security✚® opener and hand-held remote. If the obstruction interrupts the sensor beam, the opener lights will close . 5. OPERATION IMPORTANT SAFETY INSTRUCTIONS WARNING To reduce the risk of persons and obstructions. 8. NEVER use . After ANY adjustments are under the following : • The hand-held Remote Control: Hold the large push button down until the door starts to eight Security✚® remote controls and one control (force or travel limits) is broken. Safety reversal...
Owners Manual
Page 27
... Emergency NOTICE trolley will remain on the emergency release handle (so that the trolley release arm Trolley Release Arm is in motion. Press again to reverse the door during the closing cycle or to turn it off whenever the "Learn" button on the door control. 4. Light feature Push Button Lock Button Light Button Press the Light button to stop the door while it's opening . It will stop the door while it's opening . Press again to pull door open or close from the Door Control, the Outside Keylock and the Keyless Entry...
... Emergency NOTICE trolley will remain on the emergency release handle (so that the trolley release arm Trolley Release Arm is in motion. Press again to reverse the door during the closing cycle or to turn it off whenever the "Learn" button on the door control. 4. Light feature Push Button Lock Button Light Button Press the Light button to stop the door while it's opening . It will stop the door while it's opening . Press again to pull door open or close from the Door Control, the Outside Keylock and the Keyless Entry...
Owners Manual
Page 28
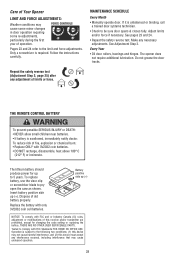
... force adjustments. The lithium battery should produce power for changing the code setting or replacing the battery. Every Year • Oil door rollers, bearings and hinges. To reduce risk of fire, explosion or chemical burn: • Replace ONLY with only 3V2032 coin cell batteries. Adjust limits and/or force if necessary. See Adjustment Step 3. Tested to 5 years. FORCE CONTROLS Pages 23 and 24 refer to be sure door opens & closes...
... force adjustments. The lithium battery should produce power for changing the code setting or replacing the battery. Every Year • Oil door rollers, bearings and hinges. To reduce risk of fire, explosion or chemical burn: • Replace ONLY with only 3V2032 coin cell batteries. Adjust limits and/or force if necessary. See Adjustment Step 3. Tested to 5 years. FORCE CONTROLS Pages 23 and 24 refer to be sure door opens & closes...
Owners Manual
Page 29
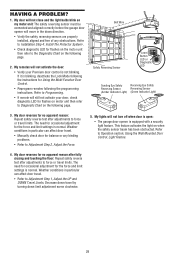
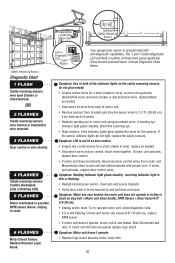
... garage door opener is normal. The need for occasional adjustment for the force and limit settings is blinking, deactivate the Lock Mode following page. My door reverses for flashes on the motor unit then refer to the Diagnostic Chart on when the safety sensor beam has been obstructed. Decrease down travel by turning down direction. • Verify the safety reversing sensors are properly installed, aligned and free of any binding problems. • Refer to force or travel limits...
... garage door opener is normal. The need for occasional adjustment for the force and limit settings is blinking, deactivate the Lock Mode following page. My door reverses for flashes on the motor unit then refer to the Diagnostic Chart on when the safety sensor beam has been obstructed. Decrease down travel by turning down direction. • Verify the safety reversing sensors are properly installed, aligned and free of any binding problems. • Refer to force or travel limits...
Owners Manual
Page 30
.... The "Learn" button/diagnostic LED will not operate replace logic board. If motor unit activates, replace door control wires. If the sensor indicator lights do not glow steady. • Inspect sensor wires for a short (staple in wire), replace as needed . • Disconnect wires at door control, touch wires together. If motor unit still will flash a number of motor unit. • Remove sensors from brackets and shorten sensor wires to 1-2 ft. (30-60 cm) from motor unit. Try to reset. 6 FLASHES Motor Circuit Failure. Symptom: LED is firmly secured to wall and...
.... The "Learn" button/diagnostic LED will not operate replace logic board. If motor unit activates, replace door control wires. If the sensor indicator lights do not glow steady. • Inspect sensor wires for a short (staple in wire), replace as needed . • Disconnect wires at door control, touch wires together. If motor unit still will flash a number of motor unit. • Remove sensors from brackets and shorten sensor wires to 1-2 ft. (30-60 cm) from motor unit. Try to reset. 6 FLASHES Motor Circuit Failure. Symptom: LED is firmly secured to wall and...
Owners Manual
Page 31
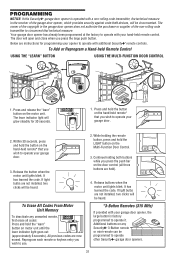
... three buttons are held Remote Control USING THE "LEARN" BUTTON USING THE MULTI-FUNCTION DOOR CONTROL 9 1 7 3 5 KG 9 1 7 3 5 KG LOCK LIGHT 1. To Erase All Codes From Motor Unit Memory To deactivate any Security✚® 3-Button remote or mini-remote can be circumvented. The owner of the copyright in the receiver of the non-rolling code transmitter to operate other Security✚® garage door openers. 31 Below are not installed, two clicks will be programmed to circumvent that technical measure...
... three buttons are held Remote Control USING THE "LEARN" BUTTON USING THE MULTI-FUNCTION DOOR CONTROL 9 1 7 3 5 KG 9 1 7 3 5 KG LOCK LIGHT 1. To Erase All Codes From Motor Unit Memory To deactivate any Security✚® 3-Button remote or mini-remote can be circumvented. The owner of the copyright in the receiver of the non-rolling code transmitter to operate other Security✚® garage door openers. 31 Below are not installed, two clicks will be programmed to circumvent that technical measure...
Owners Manual
Page 35
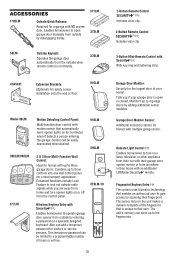
... safety sensor installation onto the wall or floor. 915LM CLOSED OPEN Model 98LM LOCK LIGHT 902LM/903LM 377LM Motion Detecting Control Panel: Multi-function door control with motion sensor that automatically turns opener lights on the unit makes a numeric template of the fingerprint that is open garage door manually from outside by disengaging trolley. 371LM 373LM 59LM Outside Keylock: Operates the garage door automatically from the outside by entering a password on or off from the control panel. 379LM-10 Wireless Keyless Entry...
... safety sensor installation onto the wall or floor. 915LM CLOSED OPEN Model 98LM LOCK LIGHT 902LM/903LM 377LM Motion Detecting Control Panel: Multi-function door control with motion sensor that automatically turns opener lights on the unit makes a numeric template of the fingerprint that is open garage door manually from outside by disengaging trolley. 371LM 373LM 59LM Outside Keylock: Operates the garage door automatically from the outside by entering a password on or off from the control panel. 379LM-10 Wireless Keyless Entry...
Owners Manual
Page 36
... Road Tucson, Arizona 85706 SERVICE INFORMATION TOLL FREE NUMBER: 1-800-528-9131 LIFTMASTER 1 YEAR LIMITED WARRANTY LIFETIME MOTOR WARRANTY (MODEL 3240M) 2 YEAR LIMITED MOTOR WARRANTY (MODEL 3130M) The Chamberlain Group, Inc. ("Seller") warrants to be repaired or replaced with any product returned for warranty repair. THIS LIMITED WARRANTY ALSO DOES NOT COVER ANY PROBLEMS CAUSED BY INTERFERENCE. Failure to comply strictly with the instructions regarding installation, operation, maintenance and testing. Then send...
... Road Tucson, Arizona 85706 SERVICE INFORMATION TOLL FREE NUMBER: 1-800-528-9131 LIFTMASTER 1 YEAR LIMITED WARRANTY LIFETIME MOTOR WARRANTY (MODEL 3240M) 2 YEAR LIMITED MOTOR WARRANTY (MODEL 3130M) The Chamberlain Group, Inc. ("Seller") warrants to be repaired or replaced with any product returned for warranty repair. THIS LIMITED WARRANTY ALSO DOES NOT COVER ANY PROBLEMS CAUSED BY INTERFERENCE. Failure to comply strictly with the instructions regarding installation, operation, maintenance and testing. Then send...


