LiftMaster 3130 Support Question
LiftMaster 3130 Support Question
Find answers below for this question about LiftMaster 3130.Need a LiftMaster 3130 manual? We have 1 online manual for this item!
Question posted by caylamccaskill75 on June 28th, 2012
Cant Close Garage Door By Remote. We Have To Hold The Button Down To Close It
We can open the garage door with they keypad and remote however, we have to hold the button down by the door just to close it.
Current Answers
Related LiftMaster 3130 Manual Pages
Owners Manual - Page 1
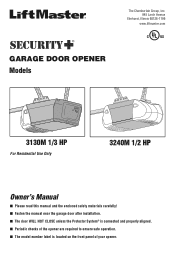
... read this manual and the enclosed safety materials carefully! ■ Fasten the manual near the garage door after installation. ■ The door WILL NOT CLOSE unless the Protector System® is connected and properly aligned. ■ Periodic checks of the opener are required to ensure safe operation. ■ The model number label is located on...
Owners Manual - Page 2
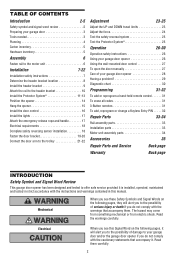
...-30
Operation safety instructions 26
Using your garage door opener 26
Using the wall-mounted door control 27
To open the door manually 27
Care of your garage door opener 28
Having a problem 29
Diagnostic chart 30
Programming
31-32
To add or reprogram a hand-held remote control 31
To erase all codes 31
3-Button remotes 31
To add, reprogram or change...
Owners Manual - Page 5

...
Your garage door opener is packaged in the foam. Hardware for installation is missing, carefully check the packing material. Parts may be stuck in two cartons which contain the motor unit and all parts illustrated below . Model 3240M
Model 3130M
Model 3240M (1)
Model 3130M (1)
Multi-Function Door Control Panel
Lighted Door Control Button
SECURITY✚® 3-Button Remote...
Owners Manual - Page 8
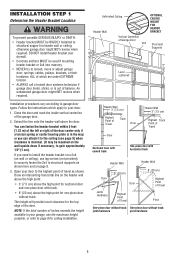
Follow the instructions which are under EXTREME tension. • ALWAYS call a trained door systems technician if garage door binds, sticks, or is in your garage, use lag screws (not provided) to securely fasten the 2x4 to garage door types.
Open your door.
1.
or you need to install the header bracket on a 2x4 (on wall or ceiling), use the maximum...
Owners Manual - Page 10
... way you'll need help.
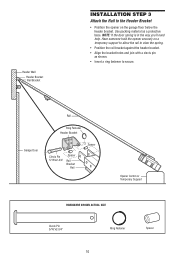
Have someone hold the opener securely on a temporary support to allow the rail to clear the spring.
• Position the rail bracket against the header bracket.
• Align the bracket holes and join with a clevis pin as a protective base. Garage Door
Rail
Ring Fastener Header Bracket
Clevis Pin 5/16...
Owners Manual - Page 11

...The safety reversing sensor must be connected and aligned correctly before the garage door opener will move in the path of the door as long as the wall framing. The sending eye (with ... the door is closing .
No part of the garage door (or door tracks, springs, hinges, rollers or other across the door, no more than 6" (15 cm) above floor
Facing the door from a closing garage door: &#...
Owners Manual - Page 16
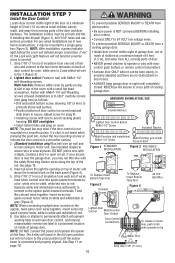
... into gang box) as in tab with door control push buttons or remote control transmitters.
• Activate door ONLY when it may run this time. If installing into quick-connect holes: white to white and red/white to red. 6. To prevent possible SERIOUS INJURY or DEATH from a closing garage door.
To Replace Insert Bottom Tabs First
Figure...
Owners Manual - Page 17
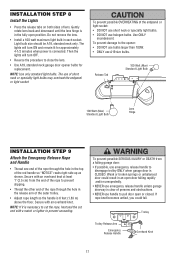
... Overhand Knot
17 NOTE: If it is in each socket. Gently rotate lens back and downward until the lens hinge is necessary to close the lens.
• Use A19, standard neck garage door opener bulbs for approximately 4-1/2 minutes when power is clear of the red handle so "NOTICE" reads right side up as shown.
Owners Manual - Page 18

... for an open , it receives the sender's beam.
To prevent possible SERIOUS INJURY or DEATH from electrocution or fire:
• Be sure power is closing, the door will blink ... REVERSING SENSORS
1. The opener must be heard.) See page 11.
18 The opener lights will reverse.
If the receiving eye indicator light is required by your garage door opener has a grounding type...
Owners Manual - Page 21
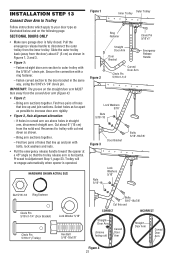
...garage door is operated. Select holes as far apart as shown in the same way, using the 5/16"x1-1/4" clevis pin. Find two pairs of holes that line up and join with cut end down as shown. - Proceed to increase door... trolley with a ring fastener. - Trolley will re-engage automatically when opener is fully closed. Find two pairs of holes that the trolley release arm is horizontal....
Owners Manual - Page 22
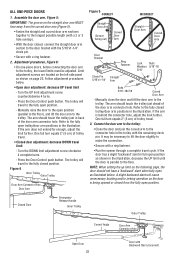
...; Open door adjustment: decrease UP travel .
3. Closed Door
Emergency Release Handle
Inner Trolley
Outer Trolley
Correct Angle
Door Arm Connector Hole
Open Door 22
Door with a ring fastener.
• Run the opener through a complete travel to the connector hole in back of the door arm connector hole. Follow adjustment procedures below . The arm should touch the trolley just ahead...
Owners Manual - Page 23
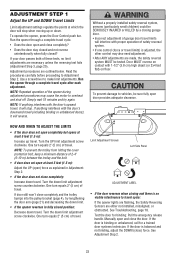
... and the trolley bumps into the pulley bracket (page 4), try again.
Limit Adjustment Screws
Left Side Panel
ADJUSTMENT LABEL
• If the door reverses when closing garage door. • Incorrect adjustment of the opener during adjustment procedures may also need adjustment. • After ANY adjustments are necessary unless the reversing test fails (Adjustment Step 3, page...
Owners Manual - Page 24

... system MUST be SERIOUSLY INJURED or KILLED by a closing garage door.
• Too much force on garage door will interfere with proper operation of a complete turn. Door MUST reverse on contact with a screwdriver. Reversal halfway through down (close) cycle and the opener lights aren't flashing, Increase DOWN (close garage door.
• NEVER use force adjustments to compensate for...
Owners Manual - Page 25
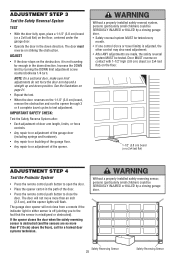
... the Protector System®
• Press the remote control push button to open the door.
• Place the opener carton in the path of the opener. Without a properly installed safety reversing sensor, persons (particularly small children) could be SERIOUSLY INJURED or KILLED by a closing garage door.
If the opener closes the door when the safety reversing sensor is misaligned or...
Owners Manual - Page 26
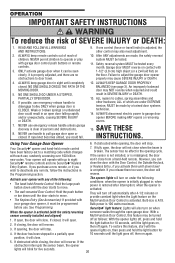
...; The wall-mounted Door Control: Hold the push button or bar down until down until the door starts to move .
• The Keyless Entry (See Accessories): If provided with up to deactivate any of which changes with garage door control push buttons or remote controls.
3. SAVE THESE INSTRUCTIONS. Your opener will not close .
5. Your Security✚® opener and hand-held...
Owners Manual - Page 27
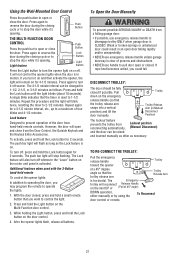
.... Light feature
Push Button
Lock Button
Light Button
Press the Light button to turn the opener light on or off whenever the "Learn" button on the emergency
release handle (so that you turn it 's opening . Press again to turn it 's opening .
With the door closed, press and hold the Light button on the door control.
4. Press and hold a small remote button that
the trolley...
Owners Manual - Page 29
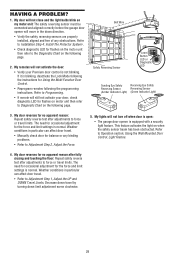
... Control, Light Feature.
4. Decrease down travel .
• Manually check door for Using the Multi-Function Door Control.
• Reprogram remotes following the instructions for balance or any obstructions.
HAVING A PROBLEM?
1. My remotes will not turn off when door is open:
• The garage door opener is not blinking. The need for occasional adjustment for flashes...
Owners Manual - Page 31
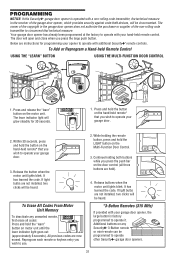
... to operate your garage door.
3. Release buttons when the motor unit lights blink. Within 30 seconds, press and hold the LIGHT button on the motor unit. If light bulbs are instructions for 30 seconds.
1. The door will open and close when you wish to operate your garage door.
2. Press and release the "learn " button on the hand-held remote control. Release the...
Owners Manual - Page 32
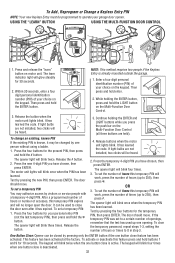
... button close is already mounted outside the garage.
1. Press the four buttons for your choice on the keypad. Test by pressing the four buttons for 30 seconds.
2. One Button Close: Opener can be heard.
3. The keypad will glow steadily for the temporary PIN, then press ENTER. Press and release the "learn indicator light will blink twice when the one button close the door...
Owners Manual - Page 35
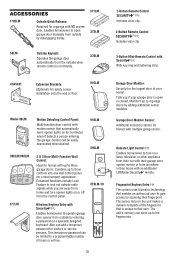
...; :
Includes visor clip.
3-Button Mini-Remote Control with Security✚® : With key ring and fastening strip.
41A5281
Extension Brackets:
(Optional) For safety sensor installation onto the wall or floor.
915LM
CLOSED OPEN
Model 98LM
LOCK
LIGHT
902LM/903LM
377LM
Motion Detecting Control Panel:
Multi-function door control with their garage door opener remote or from outside...
Similar Questions

I Have Installed A Chamberlan Garage Door Opener And The Remote I Was Using Is
I have been using a Chamberlan garage door opener and its remote has been defective since of late.Pl...
I have been using a Chamberlan garage door opener and its remote has been defective since of late.Pl...
(Posted by donweera42 8 months ago)
Garage Door Opens After Shutting.
My Lift master 8550 inside keypad is Inside wall pad is model #880LM. outside keypad Model # is 877M...
My Lift master 8550 inside keypad is Inside wall pad is model #880LM. outside keypad Model # is 877M...
(Posted by BONNIECA92 2 years ago)

Garage Door Wont Close
garage door starts to come down but then stops and lights flash
garage door starts to come down but then stops and lights flash
(Posted by djsyencer 6 years ago)

Garage Door Remote Doesn't Work When Motor Light Is On
(Posted by conbdgo 10 years ago)

Garage Door Removal Model 3130
i need to remove my garage doors and want to know how to do it safely this unit does not have the st...
i need to remove my garage doors and want to know how to do it safely this unit does not have the st...
(Posted by terry21792 12 years ago)