LiftMaster 1355 Support Question
LiftMaster 1355 Support Question
Find answers below for this question about LiftMaster 1355.Need a LiftMaster 1355 manual? We have 1 online manual for this item!
Question posted by conbdgo on March 17th, 2014
Garage Door Remote Doesn't Work When Motor Light Is On
The person who posted this question about this LiftMaster product did not include a detailed explanation. Please use the "Request More Information" button to the right if more details would help you to answer this question.
Current Answers
Related LiftMaster 1355 Manual Pages
1355 Manual - Page 2

...Position the opener 16
Hang the opener 17
Install the door control 18
Install the light and lens ...garage door opener 33
Having a problem 34
Programming
35-36
To add or reprogram a hand-held remote control .....35
To erase all codes 35
3-Button remotes 35
To add, reprogram or change a Keyless Entry PIN 36
Repair Parts
37-38
Rail assembly parts 37
Installation parts 37
Motor...
1355 Manual - Page 6
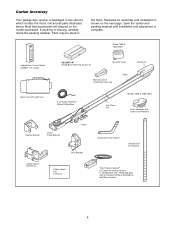
... material until installation and adjustment is missing, carefully check the packing material. Model 1355 & 1345 ONLY
Lighted Door Control Button w/6ABx1-1/2" screws
SECURITY✚® Single-Button Remote Control (1)
Sprocket Cover
Remote Control Transmitter Visor Clip
Chain
Styrofoam
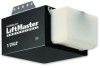
Motor Unit with Light Lens
2-Conductor Bell Wire White & White/Red
CEILING MOUNT ONLY UP
Header...
1355 Manual - Page 8
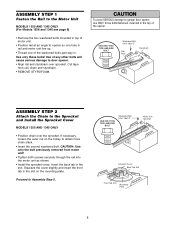
... in the slot. ASSEMBLY STEP 1
Fasten the Rail to the Motor Unit
MODELS 1355 AND 1345 ONLY (For Models 1356 and 1346 see page 9)
• Remove the two washered bolts mounted in top of motor unit.
• Position rail at an angle to garage door opener, use ONLY those bolts/fasteners mounted in the top of...
1355 Manual - Page 9
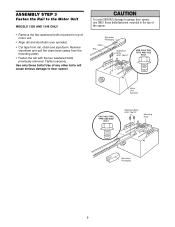
... mounted in the top of motor unit.
• Align rail and styrofoam over sprocket.
• Cut tape from the mounting plate).
• Fasten the rail with the two washered bolts previously removed.
Tighten securely. ASSEMBLY STEP 3
Fasten the Rail to door opener. WARNING
CAUTION
To avoid SERIOUS damage to garage door opener, use ONLY those bolts...
1355 Manual - Page 10
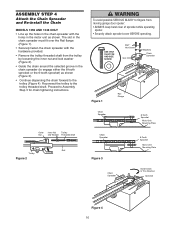
...and lock washer (Figure 2).
• Guide the chain around the selected groove in the motor unit as shown (Figure 3).
• Continue dispensing the chain forward to the trolley (...
• Remove the trolley threaded shaft from
CAUTION moving garage door opener:
• ALWAYS keep hand clear of sprocket while operating opener.
• Securely attach sprocket cover BEFORE operating. The slot...
1355 Manual - Page 16
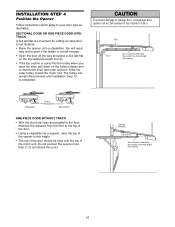
... laid flat is used to your door type as a support, raise the top of the motor unit. Slide the outer trolley toward the motor unit. WARNING
CAUTION
To prevent damage to this height.
• The top of the door should be level with the top of the opener to garage door, rest garage door opener rail on 2x4 placed on...
1355 Manual - Page 17
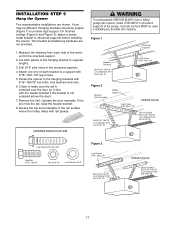
... bracket to the hanging brackets with
5/16"-18x1-7/8" lag screws. 5. Measure the distance from a falling
CAUTION garage door opener, fasten it SECURELY to make sure the rail is not centered above the door). 7. Attach one end of the motor unit to required lengths.
3. Grease the top and underside of the hanging bracket to the structural...
1355 Manual - Page 19
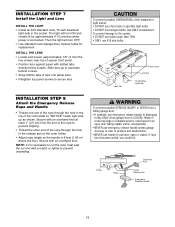
...: • DO NOT use short neck or specialty light bulbs. • DO NOT use handle to disengage trolley ONLY when garage door is 6 feet (1.83 m) above the floor. If rope knot becomes untied, you could result in an open or closed. The light will turn ON and remain lit for replacement
INSTALL THE LENS •...
1355 Manual - Page 20
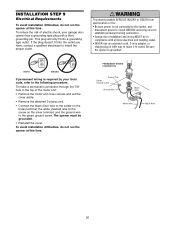
...to the screw on the silver terminal;
RIGHT
WRONG
If permanent wiring is required by your garage door opener has a grounding type plug with all local electrical and building codes.
• NEVER use...:
• Be sure power is grounded. To reduce the risk of the motor unit:
• Remove the motor unit cover screws and set the cover aside.
• Remove the attached 3-...
1355 Manual - Page 21

.... • Install the safety reversing sensor so beam is closing garage door: • Correctly connect and align the safety reversing sensor. The mounting brackets are available if needed. This required safety device MUST NOT be securely fastened to full open position, and the opener lights will flash 10 times. Extension brackets (see accessories) are designed...
1355 Manual - Page 28
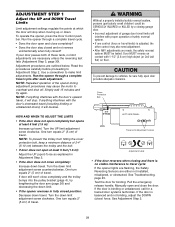
... Protection Bolt
2-4" (5-10 cm)
LEFT SIDE PANEL
Travel Limit Adjustment Screws
Adjustment Label
• If the door reverses when closing garage door. • Incorrect adjustment of 2-4" (5-10 cm) between the trolley and the bolt.
• If door does not open at least 5 feet (1.5 m):
Increase up or down travel . NOTE: To prevent the trolley from hitting...
1355 Manual - Page 29
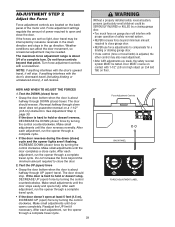
... 3/4 of the motor unit. Test the UP (open ) force by a closing garage door.
• Too much force on garage door will interfere with the door's downward travel does not guarantee reversal on floor. Make small adjustments until the door stops easily and opens fully. After each adjustment, run the opener through down (close) cycle and the opener lights aren't flashing, INCREASE...
1355 Manual - Page 30

...; Repeat the test. • When the door reverses on the floor, centered under the garage door. • Operate the door in the down position. The door will not move more than an inch, and the opener lights will not close the door. The garage door opener will flash. Increase the DOWN limit by a closing garage door. • Safety reversal system MUST be
SERIOUSLY...
1355 Manual - Page 31

... the obstruction interrupts the sensor beam, the opener lights will stop .
4. The sensor has no obstructions to deactivate any remote, follow the instructions in ; when the opener is A19. It will close from a hand-held Remote Control: Hold the push
button down until the door starts to pull garage door open door falling rapidly and/or unexpectedly.
7. If you purchase...
1355 Manual - Page 33
.... Disconnect trolley first.
Dispose of
operation.
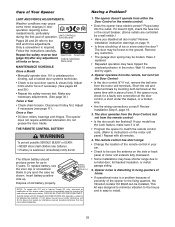
Have it doesn't light, check the fuse box or the circuit breaker. (Some outlets...garage door spring may have electric power? Opener operates from the remote, but not from the motor unit terminals. The remote control has short range:
• Change the location of Your Opener
Having a Problem? Once a Year
• Oil door...
1355 Manual - Page 34
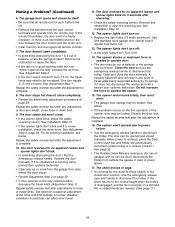
...; Check the safety reversing sensor. Turn it is in good working order but doesn't close force or down force. The opener won 't work:
• The garage door springs may be opened and closed door position. The door reverses for no apparent reason and opener lights blink for occasional adjustment of door arm length, close completely:
• Review the travel while being...
1355 Manual - Page 35
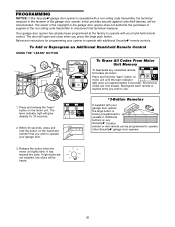
... be programmed to operate other Security✚® garage door openers.
3.
To Add or Reprogram an Additional Hand-held remote control. If light bulbs are instructions for 30 seconds.
1
2
KG
2. Reprogram each remote or
keyless entry you press the large push button. Additional buttons on the motor unit. The door will open and close when you wish to use...
1355 Manual - Page 36
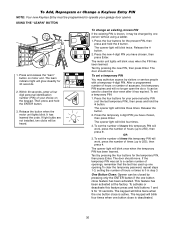
... motor unit lights will blink once when the temporary PIN has been learned.
OR
3.
Test by one button close the door even after it may authorize access by visitors or service people with a temporary 4-digit PIN. This feature has been activated at the factory. After a programmed number of hours or number of your garage door opener...
1355 Manual - Page 39
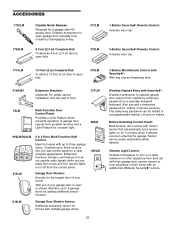
... a Lock Feature which prevents operation of hours or entries. ACCESSORIES
1702LM 1708LM
Outside Quick Release: Required for a garage with up to three garage doors.
Enables homeowner to open garage door manually from portable remotes and a Light Feature for constant light.
98LM
902LM/903LM
2 & 3 Door Multi-Function Wall Control:
Ideal for 5 minutes when it detects a person entering the...
1355 Manual - Page 40

...MOTOR, WHICH ARE LIMITED IN DURATION TO THE 48 MONTHS (4 YEARS) FOR MODELS 1356 & 1355 AND 24 MONTHS (2 YEARS) FOR MODELS 1346 & 1345 LIMITED WARRANTY PERIOD FOR THE MOTOR... THE GARAGE DOOR OR GARAGE DOOR HARDWARE, INCLUDING BUT NOT LIMITED TO THE DOOR SPRINGS, DOOR ROLLERS, DOOR ALIGNMENT ...REPAIRED OR REPLACED UNIT, REPLACEMENT OF BATTERIES AND LIGHT BULBS OR UNITS INSTALLED FOR NON-RESIDENTIAL USE....
Similar Questions

I Have Installed A Chamberlan Garage Door Opener And The Remote I Was Using Is
I have been using a Chamberlan garage door opener and its remote has been defective since of late.Pl...
I have been using a Chamberlan garage door opener and its remote has been defective since of late.Pl...
(Posted by donweera42 8 months ago)

I Need A Replacement Lens Cover For Garage Door Opener Liftmaster Model #1355- 1
I need a replacement Lens Cover for a garage door opener Model # 1355M- 1/2 HP Liftmaste
I need a replacement Lens Cover for a garage door opener Model # 1355M- 1/2 HP Liftmaste
(Posted by nskanson 1 year ago)

My Garage Door Opener Isn't Working - Chain Doesn't Move - Motor Runs Though.
(Posted by leefriedman 11 years ago)

The Light In The Motor Unit Doesn't Turn On.
My liftmaster model # 1355 has been working fine for 3+ years, but suddenly the light in the motor u...
My liftmaster model # 1355 has been working fine for 3+ years, but suddenly the light in the motor u...
(Posted by lfmyers 12 years ago)

Garage Door Opener Light
We just purchased our house and the light was out in the door opener. When we replaced the bulb the ...
We just purchased our house and the light was out in the door opener. When we replaced the bulb the ...
(Posted by smokiesgirl 12 years ago)