
LiftMaster 3265 Support Question
LiftMaster 3265 Support Question
Find answers below for this question about LiftMaster 3265.Need a LiftMaster 3265 manual? We have 1 online manual for this item!
Question posted by leefriedman on January 6th, 2013
My Garage Door Opener Isn't Working - Chain Doesn't Move - Motor Runs Though.
The person who posted this question about this LiftMaster product did not include a detailed explanation. Please use the "Request More Information" button to the right if more details would help you to answer this question.
Current Answers
Answer #1: Posted by GarageDoorMafiadotcom on January 6th, 2013 3:18 PM
GarageDoorMafiadotcom

Member since:
November 4th, 2012 Points: 25,600

Member since:
November 4th, 2012 Points: 25,600
The white drive gear inside the box is most likely worn out. Before you open up the box, remember to unplug the power cord.
If you are handy it's a repair you can do your self.
Supporting Image
You can click the image below to enlarge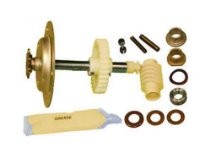
GarageDoorMafia.com One stop online shop for all your garage door and opener needs.
Related LiftMaster 3265 Manual Pages
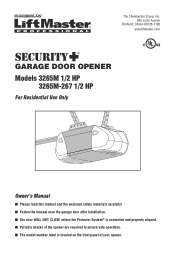
3265M Manual - Page 1
...
Elmhurst, Illinois 60126-1196 www.liftmaster.com
®
GARAGE DOOR OPENER Models 3265M 1/2 HP
3265M-267 1/2 HP
For Residential Use Only
Owner's Manual
■ Please read this manual and the enclosed safety materials carefully! ■ Fasten the manual near the garage door after installation. ■ The door WILL NOT CLOSE unless the Protector System® is...
3265M Manual - Page 2
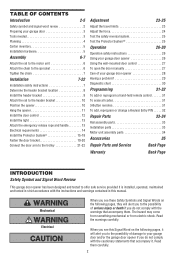
... your garage door 3 Tools needed 3 Planning 4 Carton inventory 5 Installation hardware 5
Assembly
6-7
Attach the rail to the motor unit 6 Attach the chain to the sprocket 6 Tighten the chain 7
Installation
7-22
Installation safety instructions 7 Determine the header bracket location 8 Install the header bracket 9 Attach the rail to the header bracket 10 Position the opener 10...
3265M Manual - Page 3
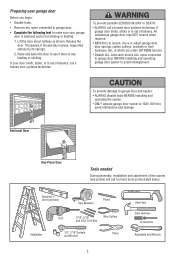
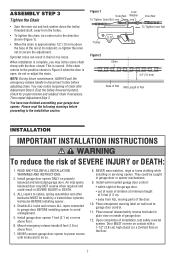
... under EXTREME tension.
• Disable ALL locks and remove ALL ropes connected to garage door BEFORE installing and operating garage door opener to avoid malfunction and damage.
To prevent possible SERIOUS INJURY or DEATH:
• ALWAYS call a trained door systems technician. Preparing your garage door
Before you begin:
• Disable locks.
• Remove any binding or sticking...
3265M Manual - Page 5
... (2) Rope Handle
Straight Door Arm Section
5
Hardware for installation is also listed below .
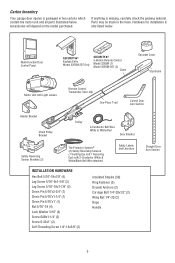
If anything is missing, carefully check the packing material. Carton Inventory
Your garage door opener is packaged in the foam. Accessories will depend on the model purchased. Parts may be stuck in two cartons which contain the motor unit and all parts...
3265M Manual - Page 6
...
rail, chain and styrofoam. • REMOVE STYROFOAM. Washered Bolt 5/16"-18x12"
USE ONLY THIS TYPE AND SIZE
BOLT
Sprocket
Sprocket Cover Back Tab Slot
Front Tab Slot Mounting Plate
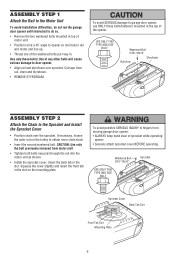
6 Use only these bolts! ASSEMBLY STEP 1
Attach the Rail to the Motor Unit
To avoid installation difficulties, do not run the garage door opener until...
3265M Manual - Page 7
...;oor.
6. Sprocket noise can result if chain is
open, do so.
8. This is complete, you may notice loosening of chain after
Base of Rail
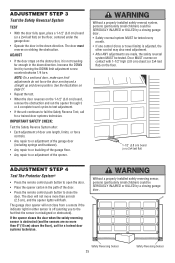
Adjustment Step 3 (Test the Safety Reversal System). Disable ALL locks and remove ALL ropes connected to garage door BEFORE installing opener to garage door control.
11.
NEVER connect garage door opener to power source until instructed to...
3265M Manual - Page 10
... Bracket Chain Pulley Bracket
Header Bracket
Ring Fastener
Clevis Pin
5/16"x2-3/4"
Rail
Chain Pulley
Bracket
Rail
Garage Door
Clevis Pin 5/16"x2-3/4"
Temporary Support
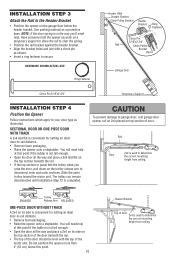
INSTALLATION STEP 4
Position the Opener
Follow .... • Open the door all the way and place a 2x4 on its side is used to your door type as illustrated. Slide the outer trolley toward the motor unit.
You will...
3265M Manual - Page 11
...) Bolt 5/16"-18x7/8" Lock Washer 5/16"
Nut 5/16"-18
11 Hanging brackets should be angled (Figure 1) to opener at this time. Measure the distance from a falling garage door opener, fasten it securely to structural supports of the motor unit to required lengths.
3. To avoid possible SERIOUS INJURY from each bracket to the hanging brackets with...
3265M Manual - Page 13
...; If possible, use of the red handle so "NOTICE" reads right side up to avoid entanglement. Secure with a Garage Door Opener bulb.
• Use A19, standard neck garage door opener bulbs for approximately 4-1/2 minutes when power is clear of lens.
Do not remove the lens.
• Install up as shown. INSTALLATION STEP 7
Install the Light
&#...
3265M Manual - Page 14
...
• Garage door installation and wiring MUST be grounded.
• Reinstall the cover. Be sure the opener is required by your garage door opener has a... avoid installation difficulties, do not run the opener at this time.
14
and the ground wire...green ground screw. To reduce the risk of the motor unit: • Remove the motor unit cover screws and set the cover
Ground Screw
...
3265M Manual - Page 15
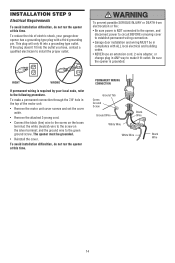
... indicator light) transmits an invisible light beam to the garage door opener BEFORE installing the safety reversing sensor. If it is closing garage door: • Correctly connect and align the safety reversing
...The invisible light beam path must be connected and aligned correctly before the garage door opener will detect an obstacle in the down direction.
IMPORTANT INFORMATION ABOUT THE...
3265M Manual - Page 17
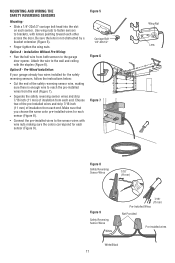
... the wing nuts. Pre-Wired Installation:
If your garage already has wires installed for the safety reversing sensors,...Run the bell wire from both sensors to reach the pre-installed wires from the wall (Figure 7).
• Separate the safety reversing sensor wires and strip 7/16 inch (11 mm) of insulation from each sensor (Figure 9). Be sure the lens is enough wire to the garage door opener...
3265M Manual - Page 18
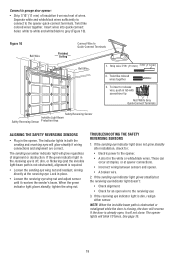
... like colored wires together. Separate white and white/black wires sufficiently to connect to the opener quick-connect terminals. The opener lights will glow steadily if wiring connections and alignment are correct. Connect to garage door opener:
• Strip 7/16" (11 mm) of insulation from each set of alignment or obstruction. If the...
3265M Manual - Page 25
... the obstruction.
The garage door opener will not close from a remote if the indicator light in the path of the opener. Safety Reversing Sensor 25
Safety Reversing Sensor See the illustration on page 21.
• Repeat the test.
• When the door reverses on the 1-1/2" (3.8 cm) board, remove the obstruction and run the opener through 3 or 4 complete...
3265M Manual - Page 26

... be tested.
11. To restore this feature may also need adjustment.
2. An improperly balanced door may cause SEVERE INJURY or DEATH.
4. Using Your Garage Door Opener
6. However, you wish to garage door opener BEFORE making ANY repairs or removing covers.
7. They will open door falling rapidly and/or unexpectedly, causing SEVERE INJURY or DEATH.
12. Bulb power is A19...
3265M Manual - Page 28
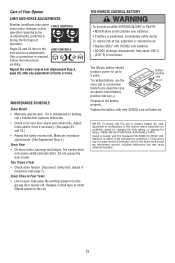
... in door operation requiring some re-adjustments, particularly during the first year of white lithium grease to the rail. THE REMOTE CONTROL BATTERY
To prevent possible SERIOUS INJURY or DEATH: • NEVER allow small children near batteries. • If battery is subject to wipe away the existing grease from the garage door opener...
3265M Manual - Page 29

....
• Run the motor unit from the bolt, repeat the steps above the base of any binding problems.
• Refer to Adjustment Step 1, Adjust the UP and DOWN Travel Limits. This feature activates the light on my motor unit: The safety reversing sensor must be connected and aligned correctly before the garage door opener will move...
3265M Manual - Page 30
... the safety reversing sensors do not light, replace the safety sensors. Bell Wire
Safety Reversing Sensor
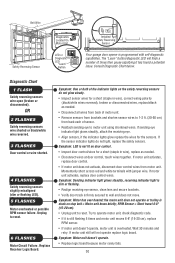
Diagnostics Located On Motor Unit
LED or Diagnostic LED
"Learn" Button
Installed Safety Reversing
Sensor
Your garage door opener is programmed with jumper wire. OR 2 FLASHES
Safety reversing sensors wire shorted or black/white wire reversed.
3 FLASHES 3 FLASHES...
3265M Manual - Page 31
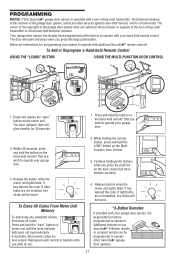
... keyless entry you press the push bar on the hand-held remote* that you press the large push button. Release buttons when the motor unit lights blink. Your garage door opener has already been programmed at the factory to circumvent that technical measure. While holding both buttons while you wish to operate other Security...
3265M Manual - Page 32
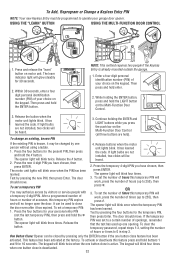
... active.
Press the four buttons for your garage door opener. Release buttons when the motor unit lights blink. To set the number of openings, remember that the test has used to 255), then press #. Press and release the "learn indicator light will work , press the number of your choice on motor unit. Press the four buttons for...
Similar Questions

I Have Installed A Chamberlan Garage Door Opener And The Remote I Was Using Is
I have been using a Chamberlan garage door opener and its remote has been defective since of late.Pl...
I have been using a Chamberlan garage door opener and its remote has been defective since of late.Pl...
(Posted by donweera42 8 months ago)
Garage Door Opens After Shutting.
My Lift master 8550 inside keypad is Inside wall pad is model #880LM. outside keypad Model # is 877M...
My Lift master 8550 inside keypad is Inside wall pad is model #880LM. outside keypad Model # is 877M...
(Posted by BONNIECA92 2 years ago)

Noise From Garage Door Opener
I have a liftmaster garage door opener. It makes a loud screeching noise when the door is lowered....
I have a liftmaster garage door opener. It makes a loud screeching noise when the door is lowered....
(Posted by tom19097 11 years ago)

Chamberlin Liftmaster Garage Door Opener Model # 3265-267
Where do I put the trolley before I attach the chain to the sprocket?
Where do I put the trolley before I attach the chain to the sprocket?
(Posted by garretmegan 11 years ago)

Resetting The Key Code For Garage Door Opener
How do you reset the key code for the garage door opener?
How do you reset the key code for the garage door opener?
(Posted by khiggins69 12 years ago)