LiftMaster 1355 Support Question
LiftMaster 1355 Support Question
Find answers below for this question about LiftMaster 1355.Need a LiftMaster 1355 manual? We have 1 online manual for this item!
Question posted by nskanson on November 28th, 2022
I Need A Replacement Lens Cover For Garage Door Opener Liftmaster Model #1355- 1
I need a replacement Lens Cover for a garage door opener Model # 1355M- 1/2 HP Liftmaste
Current Answers
Answer #1: Posted by HelpHero on January 5th, 2023 2:01 PM
HelpHero

Member since:
September 3rd, 2022 Points: 523,380

Member since:
September 3rd, 2022 Points: 523,380
Visit www.ebay.com or www.amazon.com to buy the replacement part, They may have the spare part in stock.
I hope this is helpful? PLEASE "ACCEPT" and mark it "HELPFUL" to complement my little effort. Hope to bring you more detailed answers.
Helphero
Related LiftMaster 1355 Manual Pages
1355 Manual - Page 1
... Elmhurst, Illinois 60126-1196 www.liftmaster.com
®
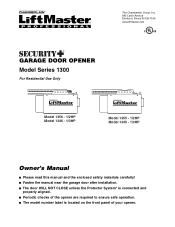
GARAGE DOOR OPENER Model Series 1300
For Residential Use Only
Model 1356 - 1/2HP Model 1346 - 1/3HP
Model 1355 - 1/2HP Model 1345 - 1/3HP
Owner's Manual
■ Please read this manual and the enclosed safety materials carefully! ■ Fasten the manual near the garage door after installation. ■ The door WILL NOT CLOSE unless the...
1355 Manual - Page 2

... 2
Preparing your garage door 3
Tools needed 3
Planning 4-5
Carton inventory 6
Hardware inventory 7
Assembly
8-11
Fasten the rail to the motor unit 8, 9
Install the chain and the sprocket cover 8
Install the chain...the header bracket 15
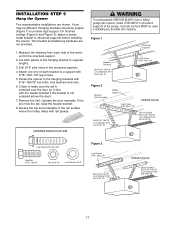
Position the opener 16
Hang the opener 17
Install the door control 18
Install the light and lens 19
Attach the emergency release rope ...
1355 Manual - Page 3

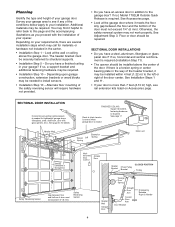
... Door
Tools needed
During assembly, installation and adjustment of balance, call a trained door systems technician.
Release
the door. If your
garage door is balanced and is out of which are under EXTREME tension. • Disable ALL locks and remove ALL ropes connected to
WARNING garage door BEFORE installing and operating garage
door opener to loosen, move or adjust garage door, door...
1355 Manual - Page 4
..., extension brackets or wood blocks may be needed for lightweight garage doors (fiberglass, steel, aluminum, door with the installation of your opener. Alternate floor mounting of the safety reversing sensor will require hardware not provided.
• Do you have an access door in addition to this page and the accompanying illustrations as you proceed with glass...
1355 Manual - Page 6
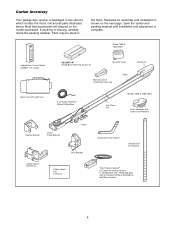
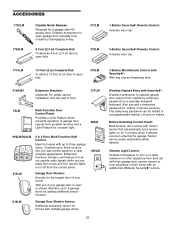
...Model 1355 & 1345 ONLY
Lighted Door Control Button w/6ABx1-1/2" screws
SECURITY✚® Single-Button Remote Control (1)
Sprocket Cover
Remote Control Transmitter Visor Clip
Chain
Styrofoam
Motor Unit with Light Lens...on the model purchased. Note that accessories will depend on the next page. If anything is packaged in
the foam. Carton Inventory
Your garage door opener is ...
1355 Manual - Page 8
...chain and styrofoam. • REMOVE STYROFOAM. Squeeze the cover slightly and insert the front tab in the slot on the trolley to door opener. • Align rail and styrofoam over the sprocket...in. Proceed to garage door opener, use ONLY those bolts/fasteners mounted in the top of the opener. ASSEMBLY STEP 1
Fasten the Rail to the Motor Unit
MODELS 1355 AND 1345 ONLY (For Models 1356 and 1346 ...
1355 Manual - Page 9
ASSEMBLY STEP 3
Fasten the Rail to the Motor Unit
MODELS 1356 AND 1346 ONLY
• Remove the two washered bolts mounted in the ...only these bolts! WARNING
CAUTION
To avoid SERIOUS damage to door opener. Use of any other bolts will cause serious damage to garage door opener, use ONLY those bolts/fasteners mounted in top of the opener. Remove styrofoam and pull the chain back (away from ...
1355 Manual - Page 10
...; Securely fasten the chain spreader with the hardware provided.
• Remove the trolley threaded shaft from
CAUTION moving garage door opener:
• ALWAYS keep hand clear of sprocket while operating opener.
• Securely attach sprocket cover BEFORE operating. WARNING
To avoid possible SERIOUS INJURY to fingers from the trolley by loosening the inner nut and...
1355 Manual - Page 11

... re-adjust the chain. NEVER connect garage door opener to power source until instructed to cables, spring assemblies and other hardware MUST be caught in plain view on properly balanced and lubricated garage door. ASSEMBLY STEP 5
Tighten the Chain
Outer Nut To Tighten Outer Nut
Lock Washer
Inner Nut
ALL MODELS
• Spin the inner nut...
1355 Manual - Page 16
...garage door, rest garage door opener rail on 2x4 placed on the trolley release arm to this height.
• The top of the door should be level with the top of door. ENGAGED
Trolley Release Arm
RELEASED
ONE-PIECE DOOR WITHOUT TRACK
• With the door fully open...door, pull down on top section of the motor unit. Slide the outer trolley toward the motor unit.
You will need help at...
1355 Manual - Page 17
.... 4. Grease the top and underside of the hanging bracket to provide rigid support. Measure the distance from a falling
CAUTION garage door opener, fasten it SECURELY to make sure the rail is not centered above the door). 7. Cut both pieces of the rail surface where the trolley slides with
5/16"-18x7/8" hex bolts, lock washers...
1355 Manual - Page 19
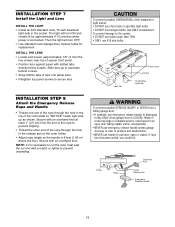
.... • Use standard neck Garage Door Opener bulbs for approximately 4-1/2 minutes when power is necessary to cut the rope, heat seal the cut end with an overhand knot at least 1" (2.5 cm) from a
CAUTION falling garage door:
• If possible, use handle to pull door open or closed. INSTALLATION STEP 7
Install the Light and Lens
INSTALL THE LIGHT •...
1355 Manual - Page 20
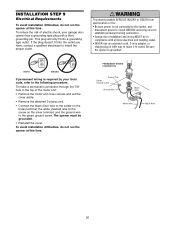
..., refer to the following procedure. the white (neutral) wire to the green ground screw. The opener must be in ANY way to establish permanent wiring connection.
• Garage door installation and wiring MUST be grounded.
• Reinstall the cover.
PERMANENT WIRING CONNECTION
Ground Tab Green Ground Screw
Ground Wire
Black Wire
White Wire
Black...
1355 Manual - Page 21

... shines directly into the receiving eye lens. The invisible light beam path must be securely fastened to clip onto the track of sectional garage doors without additional hardware. INSTALLATION STEP 10
Install The Protector System®
The safety reversing sensor must be connected and aligned correctly before the garage door opener will detect an obstacle in...
1355 Manual - Page 30

... control may also need adjustment. • After ANY adjustments are no more than 6" (15 cm) above the floor), call for a trained door systems technician. Door MUST reverse on contact...garage door. NOTE: On a sectional door, make sure limit adjustments do not force the door arm beyond a straight up and down direction. The garage door opener will not move more than an inch, and the opener...
1355 Manual - Page 31

... close when the beam is CLOSED. Activate your garage door opener, it must be seen clearly, it can close the door with up to disengage trolley ONLY when garage door is broken. If open or closed . The sensor has no obstructions to deactivate any repairs or removing covers.
15. The opener light will stop .
4. Weak or broken springs or...
1355 Manual - Page 34
...opener won 't work:
• The garage door springs may need for occasional adjustment of power failure.
17. The door can affect door travel limits. If the chain returns to operate door:
• The door... solves the problem, the door control is faulty (replace), or there is in any obstruction or align the receiving eye. See Adjustment Step 2.
• If the door opens at least 5 feet (1.5...
1355 Manual - Page 35
... and hold the button on the hand-held remote* that technical measure. If light bulbs are now erased. The owner of the copyright in the garage door opener does not authorize the purchaser or supplier of the non-rolling code transmitter to operate with a non-rolling code transmitter, the technical measure in the...
1355 Manual - Page 36
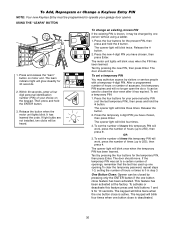
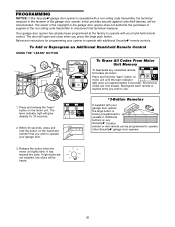
.... To set the number of times this feature press and hold buttons 1 and 9 for your garage door opener. After a programmed number of hours or number of your choice on motor unit. Test by pressing... a four digit personal identification number (PIN) of accesses, this temporary PIN will no longer open the door. The motor unit lights will be used up to 0 in step 3. Release the button ...
1355 Manual - Page 39
... with an additional LiftMaster Security✚® remote. Enhanced functions include Lock Feature to a programmable number of hours or entries. Tells you are away from home and turn on a lamp, television or other appliance from their car with their garage door opener remote or from anywhere in their home with up to 4 garage OPEN doors by entering...
Similar Questions

Garage Door Opener Model
How do I know if I have a 3255 or 3255-2M garage door opener?
How do I know if I have a 3255 or 3255-2M garage door opener?
(Posted by ericoster1 3 years ago)

Garage Door Remote Doesn't Work When Motor Light Is On
(Posted by conbdgo 10 years ago)


Programming Universal Remote
Model 1355m
Does the1355M (the motor unit) have the DIP switches, a roll of jumpers or any code setting device o...
Does the1355M (the motor unit) have the DIP switches, a roll of jumpers or any code setting device o...
(Posted by tedavlas 12 years ago)

Garage Door Opener Light
We just purchased our house and the light was out in the door opener. When we replaced the bulb the ...
We just purchased our house and the light was out in the door opener. When we replaced the bulb the ...
(Posted by smokiesgirl 12 years ago)