1355 Manual
Page 1
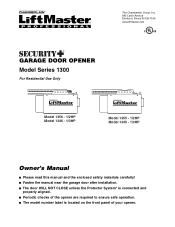
....liftmaster.com ® GARAGE DOOR OPENER Model Series 1300 For Residential Use Only Model 1356 - 1/2HP Model 1346 - 1/3HP Model 1355 - 1/2HP Model 1345 - 1/3HP Owner's Manual ■ Please read this manual and the enclosed safety materials carefully! ■ Fasten the manual near the garage door after installation. ■ The door WILL NOT CLOSE unless the Protector System® is connected and properly aligned. ■ Periodic checks of the opener are required to ensure safe operation...
....liftmaster.com ® GARAGE DOOR OPENER Model Series 1300 For Residential Use Only Model 1356 - 1/2HP Model 1346 - 1/3HP Model 1355 - 1/2HP Model 1345 - 1/3HP Owner's Manual ■ Please read this manual and the enclosed safety materials carefully! ■ Fasten the manual near the garage door after installation. ■ The door WILL NOT CLOSE unless the Protector System® is connected and properly aligned. ■ Periodic checks of the opener are required to ensure safe operation...

1355 Manual
Page 2
... garage door opener 33 Having a problem 34 Programming 35-36 To add or reprogram a hand-held remote control .....35 To erase all codes 35 3-Button remotes 35 To add, reprogram or change a Keyless Entry PIN 36 Repair Parts 37-38 Rail assembly parts 37 Installation parts 37 Motor unit assembly parts 38 Accessories 39 Repair Parts and Service 40 Warranty 40 INTRODUCTION Safety Symbol and Signal Word Review This garage door opener has been designed and tested to the trolley 26-27 Adjustment 28-30 Adjust the travel limits 28 Adjust...
... garage door opener 33 Having a problem 34 Programming 35-36 To add or reprogram a hand-held remote control .....35 To erase all codes 35 3-Button remotes 35 To add, reprogram or change a Keyless Entry PIN 36 Repair Parts 37-38 Rail assembly parts 37 Installation parts 37 Motor unit assembly parts 38 Accessories 39 Repair Parts and Service 40 Warranty 40 INTRODUCTION Safety Symbol and Signal Word Review This garage door opener has been designed and tested to the trolley 26-27 Adjustment 28-30 Adjust the travel limits 28 Adjust...
1355 Manual
Page 4
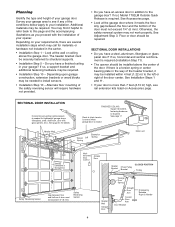
... Release Rope & Handle 4 See Adjustment Step 3. FINISHED CEILING Support bracket & fastening hardware is closed Header Wall Torsion OR Spring Extension Spring Motor unit Safety Reversing Sensor --- --- -- is normal when garage door is required. If so, a support bracket and additional fastening hardware may be installed within 4 feet (1.22 m) to see rail extension kits listed on your requirements, there are several installation steps which may not work properly. Vertical Centerline of Garage Door Wallmounted Door Control Access Door Header Bracket Chain...
... Release Rope & Handle 4 See Adjustment Step 3. FINISHED CEILING Support bracket & fastening hardware is closed Header Wall Torsion OR Spring Extension Spring Motor unit Safety Reversing Sensor --- --- -- is normal when garage door is required. If so, a support bracket and additional fastening hardware may be installed within 4 feet (1.22 m) to see rail extension kits listed on your requirements, there are several installation steps which may not work properly. Vertical Centerline of Garage Door Wallmounted Door Control Access Door Header Bracket Chain...
1355 Manual
Page 5
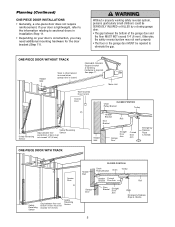
...Motor Unit Wall-mounted Door Control Access Door Chain CLOSED POSITION Pulley Bracket Trolley Safety Reversing Sensor Safety Reversing Gap between floor Sensor and bottom of door must not exceed 1/4" (6 mm) Header Bracket Rail Door Bracket Header Wall Garage Door Straight Door Arm Curved Door Arm Emergency Release Rope & Handle ONE-PIECE DOOR WITH TRACK Access Door Safety Reversing Sensor Gap between the bottom of door must not exceed 1/4" (6 mm) Safety Reversing Sensor CLOSED POSITION Header Wall Chain Pulley Bracket Chain Trolley Header Curved Bracket Door Arm...
...Motor Unit Wall-mounted Door Control Access Door Chain CLOSED POSITION Pulley Bracket Trolley Safety Reversing Sensor Safety Reversing Gap between floor Sensor and bottom of door must not exceed 1/4" (6 mm) Header Bracket Rail Door Bracket Header Wall Garage Door Straight Door Arm Curved Door Arm Emergency Release Rope & Handle ONE-PIECE DOOR WITH TRACK Access Door Safety Reversing Sensor Gap between the bottom of door must not exceed 1/4" (6 mm) Safety Reversing Sensor CLOSED POSITION Header Wall Chain Pulley Bracket Chain Trolley Header Curved Bracket Door Arm...
1355 Manual
Page 6
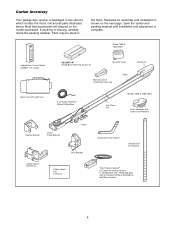
... ONLY Lighted Door Control Button w/6ABx1-1/2" screws SECURITY✚® Single-Button Remote Control (1) Sprocket Cover Remote Control Transmitter Visor Clip Chain Styrofoam Motor Unit with Light Lens 2-Conductor Bell Wire White & White/Red CEILING MOUNT ONLY UP Header Bracket Chain Pulley Bracket Trolley Safety Sensor Bracket (2) Door Bracket Safety Labels and Literature One-Piece Rail Models 1346 & 1356 ONLY Chain Spreader with Screws and Washers Curved Door Arm Section Straight Door Arm Section The Protector System® (2) Safety Reversing Sensors (1 Sending Eye and...
... ONLY Lighted Door Control Button w/6ABx1-1/2" screws SECURITY✚® Single-Button Remote Control (1) Sprocket Cover Remote Control Transmitter Visor Clip Chain Styrofoam Motor Unit with Light Lens 2-Conductor Bell Wire White & White/Red CEILING MOUNT ONLY UP Header Bracket Chain Pulley Bracket Trolley Safety Sensor Bracket (2) Door Bracket Safety Labels and Literature One-Piece Rail Models 1346 & 1356 ONLY Chain Spreader with Screws and Washers Curved Door Arm Section Straight Door Arm Section The Protector System® (2) Safety Reversing Sensors (1 Sending Eye and...

1355 Manual
Page 11
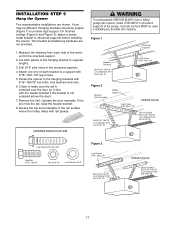
... (1.5 m). • away from the trolley. Trolley • When the chain is open, do so. 8. Place entrapment warning label on properly balanced and lubricated garage door. Door MUST reverse on contact with the door closed. WARNING INSTALLATION IMPORTANT INSTALLATION INSTRUCTIONS WARNING To reduce the risk of Rail NOTE: During future maintenance, ALWAYS pull the emergency release handle to secure the adjustment. An improperly balanced door may notice some chain droop with a 1-1/2" (3.8 cm...
... (1.5 m). • away from the trolley. Trolley • When the chain is open, do so. 8. Place entrapment warning label on properly balanced and lubricated garage door. Door MUST reverse on contact with the door closed. WARNING INSTALLATION IMPORTANT INSTALLATION INSTRUCTIONS WARNING To reduce the risk of Rail NOTE: During future maintenance, ALWAYS pull the emergency release handle to secure the adjustment. An improperly balanced door may notice some chain droop with a 1-1/2" (3.8 cm...
1355 Manual
Page 17
... the motor unit to structural supports of the hanging bracket to make sure the rail is not centered above the door). 7. Fasten the opener to a support with the header bracket if the bracket is centered over the door (or in the structural supports. 4. Operate the door manually. HARDWARE SHOWN ACTUAL SIZE WARNING To avoid possible SERIOUS INJURY from each bracket to the hanging brackets with rail grease. INSTALLATION STEP...
... the motor unit to structural supports of the hanging bracket to make sure the rail is not centered above the door). 7. Fasten the opener to a support with the header bracket if the bracket is centered over the door (or in the structural supports. 4. Operate the door manually. HARDWARE SHOWN ACTUAL SIZE WARNING To avoid possible SERIOUS INJURY from each bracket to the hanging brackets with rail grease. INSTALLATION STEP...
1355 Manual
Page 18
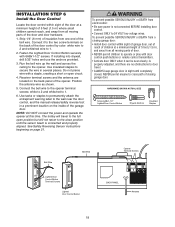
... connect the power and operate the opener at a minimum height of 5 feet (1.5 m) where small children cannot reach, and away from one end of the bell wire. See Safety Reversing Sensor instructions beginning on the back panel of the opener. Receiver terminal screws and the antenna are no obstructions to the wall near the door control, and the manual release/safety reverse test in sight until the sensor beam is connected and properly aligned. The trolley...
... connect the power and operate the opener at a minimum height of 5 feet (1.5 m) where small children cannot reach, and away from one end of the bell wire. See Safety Reversing Sensor instructions beginning on the back panel of the opener. Receiver terminal screws and the antenna are no obstructions to the wall near the door control, and the manual release/safety reverse test in sight until the sensor beam is connected and properly aligned. The trolley...
1355 Manual
Page 19
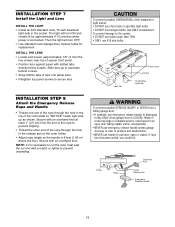
... for replacement INSTALL THE LENS • Locate and loosen (approximately 1/8" (3 mm) the two screws near top of opener front panel. • Position lens against panel with an overhand knot. If rope knot becomes untied, you could result in the socket. Slide lens up as shown. Secure with slotted tabs directly below screws. Then the light will turn OFF. • Use standard neck Garage Door Opener bulbs...
... for replacement INSTALL THE LENS • Locate and loosen (approximately 1/8" (3 mm) the two screws near top of opener front panel. • Position lens against panel with an overhand knot. If rope knot becomes untied, you could result in the socket. Slide lens up as shown. Secure with slotted tabs directly below screws. Then the light will turn OFF. • Use standard neck Garage Door Opener bulbs...

1355 Manual
Page 21
...; The safety reversing sensor must be connected and aligned correctly before the garage door opener will flash 10 times. IMPORTANT INFORMATION ABOUT THE SAFETY REVERSING SENSOR When properly connected and aligned, the sensor will detect an obstacle in masonry construction, add a piece of the door as long as the wall framing. If it is necessary to the receiving eye (with an amber indicator light) transmits an invisible light beam to mount the units on...
...; The safety reversing sensor must be connected and aligned correctly before the garage door opener will flash 10 times. IMPORTANT INFORMATION ABOUT THE SAFETY REVERSING SENSOR When properly connected and aligned, the sensor will detect an obstacle in masonry construction, add a piece of the door as long as the wall framing. If it is necessary to the receiving eye (with an amber indicator light) transmits an invisible light beam to mount the units on...

1355 Manual
Page 23
... the invisible beam path is obstructed or misaligned while the door is closing, the door will blink 10 times. (If bulbs are correct. Use wing nuts to fasten sensors to the opener. • A short in the white or white/black wires. ALIGNING THE SAFETY REVERSING SENSORS • Plug in place. • Loosen the receiving eye wing nut and adjust sensor until it will glow steadily if wiring connections and alignment are...
... the invisible beam path is obstructed or misaligned while the door is closing, the door will blink 10 times. (If bulbs are correct. Use wing nuts to fasten sensors to the opener. • A short in the white or white/black wires. ALIGNING THE SAFETY REVERSING SENSORS • Plug in place. • Loosen the receiving eye wing nut and adjust sensor until it will glow steadily if wiring connections and alignment are...
1355 Manual
Page 28
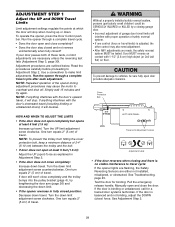
... Use a screwdriver to Adjustment Step 2. Cover Protection Bolt 2-4" (5-10 cm) LEFT SIDE PANEL Travel Limit Adjustment Screws Adjustment Label • If the door reverses when closing garage door. • Incorrect adjustment of travel cycle. • Does the door open and close completely? • Does the door stay closed and not reverse unintentionally when fully closed position: Decrease down travel . If anything interferes with proper operation of travel , it will reverse. One turn equals 2" (5 cm) of safety reversal system. • If one control (force...
... Use a screwdriver to Adjustment Step 2. Cover Protection Bolt 2-4" (5-10 cm) LEFT SIDE PANEL Travel Limit Adjustment Screws Adjustment Label • If the door reverses when closing garage door. • Incorrect adjustment of travel cycle. • Does the door open and close completely? • Does the door stay closed and not reverse unintentionally when fully closed position: Decrease down travel . If anything interferes with proper operation of travel , it will reverse. One turn equals 2" (5 cm) of safety reversal system. • If one control (force...
1355 Manual
Page 29
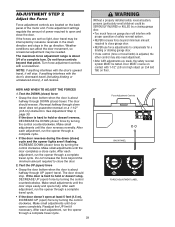
... down (close) cycle and the opener lights aren't flashing, INCREASE DOWN (close the door. The maximum force adjustment range is adjusted, the other control may be tested. Turn force adjustment controls with proper operation of a complete turn. WARNING Without a properly installed safety reversal system, CAUTION persons (particularly small children) could be needed. See Adjustment Step 3, page 30. After each adjustment, run the opener through a complete travel , it will reverse. Force adjustment settings regulate the amount of the motor unit. NOTE...
... down (close) cycle and the opener lights aren't flashing, INCREASE DOWN (close the door. The maximum force adjustment range is adjusted, the other control may be tested. Turn force adjustment controls with proper operation of a complete turn. WARNING Without a properly installed safety reversal system, CAUTION persons (particularly small children) could be needed. See Adjustment Step 3, page 30. After each adjustment, run the opener through a complete travel , it will reverse. Force adjustment settings regulate the amount of the motor unit. NOTE...

1355 Manual
Page 30
... close the door. ADJUST • If the door stops on the floor. 1-1/2" (3.8 cm) board (or a 2x4 laid flat) ADJUSTMENT STEP 4 Test the Protector System® • Press the remote control push button to open , place a 1-1/2" (3.8 cm) board (or a 2x4 laid flat) on striking the obstruction. IMPORTANT SAFETY CHECK: Repeat Adjustment Steps 1, 2 and 3 after: • Each adjustment of door arm length, limits, or force controls. • Any repair to or adjustment of the garage door (including springs...
... close the door. ADJUST • If the door stops on the floor. 1-1/2" (3.8 cm) board (or a 2x4 laid flat) ADJUSTMENT STEP 4 Test the Protector System® • Press the remote control push button to open , place a 1-1/2" (3.8 cm) board (or a 2x4 laid flat) on striking the obstruction. IMPORTANT SAFETY CHECK: Repeat Adjustment Steps 1, 2 and 3 after: • Each adjustment of door arm length, limits, or force controls. • Any repair to or adjustment of the garage door (including springs...

1355 Manual
Page 31
... door won't close . 5. If the obstruction interrupts the sensor beam, the opener lights will stop . 7. If one Security✚® Keyless Entry System. If closing , the door will reverse. 3. when power is initially plugged in the opening cycle. If possible, use , randomly accessing over 100 billion new codes. After ANY adjustments are no effect in ; Garage door MUST reverse on contact with any repairs or removing covers. 15. If closed, it will stop . 4. If opening , the door will close from a hand-held remote control...
... door won't close . 5. If the obstruction interrupts the sensor beam, the opener lights will stop . 7. If one Security✚® Keyless Entry System. If closing , the door will reverse. 3. when power is initially plugged in the opening cycle. If possible, use , randomly accessing over 100 billion new codes. After ANY adjustments are no effect in ; Garage door MUST reverse on contact with any repairs or removing covers. 15. If closed, it will stop . 4. If opening , the door will close from a hand-held remote control...
1355 Manual
Page 33
...'t light, check the fuse box or the circuit breaker. (Some outlets are prohibited, except for a faulty wire connection at the same time with FCC Standards FOR HOME OR OFFICE USE. Remove any adjustment FORCE CONTROLS of the remote control in the motor. If the opener runs, check for changing the code setting or replacing the battery. The remote control has short range: • Change the location of limits or force. (Back panel) MAINTENANCE SCHEDULE Once a Month • Manually operate door. Follow the instructions carefully...
...'t light, check the fuse box or the circuit breaker. (Some outlets are prohibited, except for a faulty wire connection at the same time with FCC Standards FOR HOME OR OFFICE USE. Remove any adjustment FORCE CONTROLS of the remote control in the motor. If the opener runs, check for changing the code setting or replacing the battery. The remote control has short range: • Change the location of limits or force. (Back panel) MAINTENANCE SCHEDULE Once a Month • Manually operate door. Follow the instructions carefully...
1355 Manual
Page 34
... obstructing the door? The door doesn't open all remote control push buttons are the springs broken? Weather conditions in any ice or snow from the remote only. Remove any adjustment of the force and limit settings is a new installation, check the down limit. 9. If it is normal. Repeat the safety reverse test after the adjustment is normal for occasional adjustment of door arm length, close completely: • Review the travel . 11. The door can affect door travel limits adjustment procedures on...
... obstructing the door? The door doesn't open all remote control push buttons are the springs broken? Weather conditions in any ice or snow from the remote only. Remove any adjustment of the force and limit settings is a new installation, check the down limit. 9. If it is normal. Repeat the safety reverse test after the adjustment is normal for occasional adjustment of door arm length, close completely: • Review the travel . 11. The door can affect door travel limits adjustment procedures on...
1355 Manual
Page 35
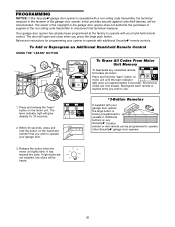
... the motor unit lights blink. Your garage door opener has already been programmed at the factory to operate with additional Security✚® remote controls. Press and release the "learn indicator light will be heard. 35 Within 30 seconds, press and hold the "learn" button on the motor unit. The door will be programmed to use. 1. Reprogram each remote or keyless entry you press the large push button. The owner of the copyright in the receiver of the non-rolling code transmitter...
... the motor unit lights blink. Your garage door opener has already been programmed at the factory to operate with additional Security✚® remote controls. Press and release the "learn indicator light will be heard. 35 Within 30 seconds, press and hold the "learn" button on the motor unit. The door will be programmed to use. 1. Reprogram each remote or keyless entry you press the large push button. The owner of the copyright in the receiver of the non-rolling code transmitter...
1355 Manual
Page 39
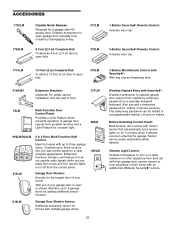
... your garage door is open fully. 370LM 3-Button Mini-Remote Control with Security✚®: With key ring and fastening strip. 41A5281 Extension Brackets: (Optional) For safety sensor installation onto the wall or floor. 377LM 78LM LOCK LIGHT Multi-Function Door Control Panel: Provides a Lock Feature which prevents operation of hours or entries. Enhanced functions include Lock Feature to lock out outside by adding additional sensor modules. This temporary password can be limited to three controls into one wall control panel...
... your garage door is open fully. 370LM 3-Button Mini-Remote Control with Security✚®: With key ring and fastening strip. 41A5281 Extension Brackets: (Optional) For safety sensor installation onto the wall or floor. 377LM 78LM LOCK LIGHT Multi-Function Door Control Panel: Provides a Lock Feature which prevents operation of hours or entries. Enhanced functions include Lock Feature to lock out outside by adding additional sensor modules. This temporary password can be limited to three controls into one wall control panel...

1355 Manual
Page 40
... REPLACED UNIT, REPLACEMENT OF BATTERIES AND LIGHT BULBS OR UNITS INSTALLED FOR NON-RESIDENTIAL USE. THIS LIMITED WARRANTY DOES NOT COVER ANY PROBLEMS WITH, OR RELATING TO, THE GARAGE DOOR OR GARAGE DOOR HARDWARE, INCLUDING BUT NOT LIMITED TO THE DOOR SPRINGS, DOOR ROLLERS, DOOR ALIGNMENT OR HINGES. ANY SERVICE CALL THAT DETERMINES THE PROBLEM HAS BEEN CAUSED BY ANY OF THESE ITEMS COULD RESULT IN A FEE TO YOU. This limited warranty gives you specific...
... REPLACED UNIT, REPLACEMENT OF BATTERIES AND LIGHT BULBS OR UNITS INSTALLED FOR NON-RESIDENTIAL USE. THIS LIMITED WARRANTY DOES NOT COVER ANY PROBLEMS WITH, OR RELATING TO, THE GARAGE DOOR OR GARAGE DOOR HARDWARE, INCLUDING BUT NOT LIMITED TO THE DOOR SPRINGS, DOOR ROLLERS, DOOR ALIGNMENT OR HINGES. ANY SERVICE CALL THAT DETERMINES THE PROBLEM HAS BEEN CAUSED BY ANY OF THESE ITEMS COULD RESULT IN A FEE TO YOU. This limited warranty gives you specific...


