LiftMaster 1355 Support Question
LiftMaster 1355 Support Question
Find answers below for this question about LiftMaster 1355.Need a LiftMaster 1355 manual? We have 1 online manual for this item!
Question posted by smokiesgirl on September 20th, 2011
Garage Door Opener Light
We just purchased our house and the light was out in the door opener. When we replaced the bulb the light won't go out.
Current Answers
Related LiftMaster 1355 Manual Pages
1355 Manual - Page 1
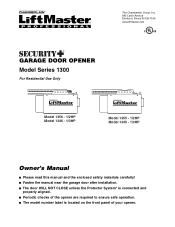
The Chamberlain Group, Inc. 845 Larch Avenue Elmhurst, Illinois 60126-1196 www.liftmaster.com
®
GARAGE DOOR OPENER Model Series 1300
For Residential Use Only
Model 1356 - 1/2HP Model 1346 - 1/3HP
Model 1355 - 1/2HP Model 1345 - 1/3HP
Owner's Manual
■ Please read this manual and the enclosed safety materials carefully! ■ Fasten the manual near...
1355 Manual - Page 2

... Symbol and Signal Word Review
This garage door opener has been designed and tested to
WARNING your garage door opener 31
Using the wall-mounted door control 32
To open the door manually 32
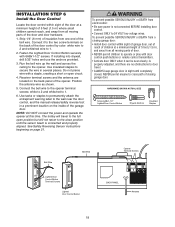
Care of damage to ...the rail to the header bracket 15
Position the opener 16
Hang the opener 17
Install the door control 18
Install the light and lens 19
Attach the emergency release rope and ...
1355 Manual - Page 3

... needed
During assembly, installation and adjustment of which are under EXTREME tension. • Disable ALL locks and remove ALL ropes connected to
WARNING garage door BEFORE installing and operating garage
door opener to avoid entanglement.
Carpenter's Level (Optional)
12
Tape Measure
Pencil Wire Cutters
Drill
3/16", 5/16" and
5/32" Drill Bits
Pliers
Stepladder
1/2" and 7/16...
1355 Manual - Page 6
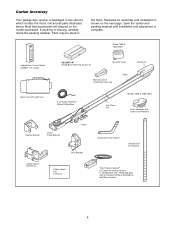
... is shown on the model purchased. Model 1355 & 1345 ONLY
Lighted Door Control Button w/6ABx1-1/2" screws
SECURITY✚® Single-Button Remote Control (1)
Sprocket Cover
Remote Control Transmitter Visor Clip
Chain
Styrofoam
Motor Unit with Light Lens
2-Conductor Bell Wire White... and adjustment is packaged in
the foam. Carton Inventory
Your garage door opener is complete.
1355 Manual - Page 8
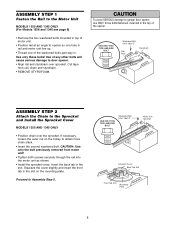
... insert the front tab in the slot on the trolley to garage door opener, use ONLY those bolts/fasteners mounted in the top of the opener. Cut tape
from motor unit!
• Tighten both screws ... Sprocket and Install the Sprocket Cover
MODELS 1355 AND 1345 ONLY
• Position chain over sprocket.
Use of any other bolts will cause serious damage to opener so one hole in rail and motor ...
1355 Manual - Page 9
...TYPE AND SIZE
BOLT
Washered Bolts 5/16"-18x1/2"
Mounting Plate
Styrofoam Packaging
9 WARNING
CAUTION
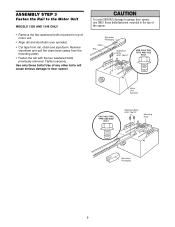
To avoid SERIOUS damage to garage door opener, use ONLY those bolts/fasteners mounted in the top of any other bolts will cause serious damage to the Motor...; Fasten the rail with the two washered bolts previously removed. ASSEMBLY STEP 3
Fasten the Rail to door opener. Use only these bolts!
1355 Manual - Page 10
... AND 1346 ONLY
• Line up the holes in the chain spreader with the hardware provided.
• Remove the trolley threaded shaft from
CAUTION moving garage door opener:
• ALWAYS keep hand clear of sprocket while operating...
1355 Manual - Page 11

... handle to disconnect trolley
before proceeding to secure the adjustment. READ AND FOLLOW ALL INSTALLATION WARNINGS AND INSTRUCTIONS.
2. WARNING
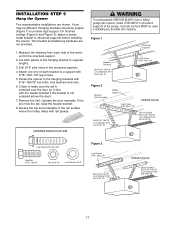
You have now finished assembling your garage door opener. Install garage door opener 7 feet (2.13 m) or more above floor.
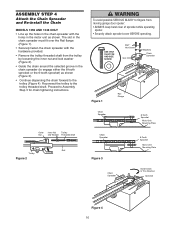
7. ASSEMBLY STEP 5
Tighten the Chain
Outer Nut To Tighten Outer Nut
Lock Washer
Inner Nut
ALL MODELS
•...
1355 Manual - Page 16
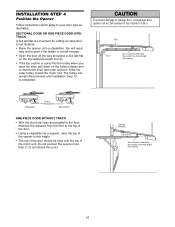
... need help at this point if the ladder is used to determine the correct mounting height from ceiling.
16 WARNING
CAUTION
To prevent damage to garage door, rest garage door opener rail on 2x4 placed on the trolley release arm to determine the correct mounting height from ceiling.
Do not position the...
1355 Manual - Page 17
... be different. Yours may be used if installing any brackets into masonry. This bracket and fastening hardware are shown. Measure the distance from a falling
CAUTION garage door opener, fasten it SECURELY to required lengths.
3. Drill 3/16" pilot holes in line with
5/16"-18x7/8" hex bolts, lock washers and nuts. 6. Check to a support with...
1355 Manual - Page 18
Fasten the Lighted Door Control Button securely with 6ABx1-1/2" screws. Run the bell wire up the wall and across the ceiling to 1.
6. Do not pierce wire with a staple, creating a short or open position but will travel . • ALWAYS keep garage door in sight until the sensor beam is not connected BEFORE installing door
control. • Connect ONLY...
1355 Manual - Page 19
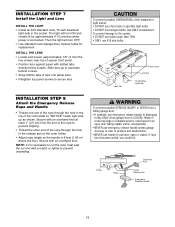
... for replacement
INSTALL THE LENS • Locate and loosen (approximately 1/8" (3 mm) the
two screws near top of the outer trolley.
• Adjust rope length so the handle is necessary to cut the rope, heat seal the cut end with an overhand knot. Then the light will turn OFF. • Use standard neck Garage Door Opener bulbs...
1355 Manual - Page 20
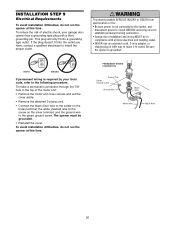
....
If the plug doesn't fit into a grounding type outlet.
and the ground wire to the screw on the brass terminal; Be sure the opener is required by your garage door opener has a grounding type plug with all local electrical and building codes.
• NEVER use an extension cord, 2-wire adapter, or change plug in...
1355 Manual - Page 21

... correctly before the garage door opener will move in the down direction.
If installing in masonry construction, add a piece of the garage door (or door tracks, springs, hinges, rollers or other across the door, no more than 6" (15 cm) above garage floor. above floor above floor
Invisible Light Beam Protection Area
Facing the door from a closing garage door: • Correctly connect...
1355 Manual - Page 30

...
30 WARNING
Without a properly installed safety reversal system,
CAUTION persons (particularly small children) could be tested.
The garage door opener will flash. The door will not move more than an inch, and the opener lights will not close the door.
WARNING
Without a properly installed safety reversing sensor,
CAUTION persons (particularly small children) could be
SERIOUSLY INJURED...
1355 Manual - Page 31

....
6. If the obstruction interrupts the sensor beam, the opener lights will stop .
7. If obstructed while opening cycle. If the sensor is not installed, or is initially plugged in a partially open door falling rapidly and/or unexpectedly.
7. when power is activated (with garage door control push buttons or remote controls.
3. Bulb size is 75 watts maximum.
31 READ AND...
1355 Manual - Page 34
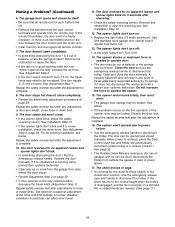
See Adjustment Step 2, page 29. If it is disengaged, and the door reverses on the first operation of balance, or are the springs broken? The opener lights don't turn off:
• Is the Light feature on :
• Replace the light bulbs (75 watts maximum). See above.
• If the problem occurs on a 2x4 laid flat, no adjustments are...
1355 Manual - Page 35
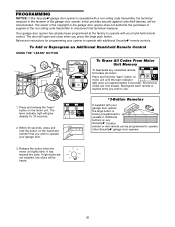
... steadily for programming your opener to operate with your hand-held remote* that technical measure. The learn " button on the hand-held remote control. If light bulbs are not installed, two clicks will be circumvented.
Below are now erased. Reprogram each remote or
keyless entry you wish to operate your garage door.
*3-Button Remotes
If...
1355 Manual - Page 36
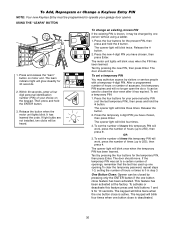
... number of hours or number of your garage door opener. It can be programmed to 0 in step 3. One Button Close: Opener can be used up to close the door even after it may authorize access by ... then press Enter.
If light bulbs are not installed, two clicks will glow steadily for the present PIN, then press and hold the ENTER button. The opener light will blink once when the ...
1355 Manual - Page 39
...) For safety sensor installation onto the wall or floor.
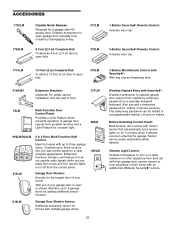
377LM
78LM
LOCK
LIGHT
Multi-Function Door Control Panel:
Provides a Lock Feature which prevents operation of garage door opener from anywhere in their garage door opener remote or from portable remotes and a Light Feature for constant light.
98LM
902LM/903LM
2 & 3 Door Multi-Function Wall Control:
Ideal for homes with up to turn...
Similar Questions

I Have Installed A Chamberlan Garage Door Opener And The Remote I Was Using Is
I have been using a Chamberlan garage door opener and its remote has been defective since of late.Pl...
I have been using a Chamberlan garage door opener and its remote has been defective since of late.Pl...
(Posted by donweera42 8 months ago)

I Need A Replacement Lens Cover For Garage Door Opener Liftmaster Model #1355- 1
I need a replacement Lens Cover for a garage door opener Model # 1355M- 1/2 HP Liftmaste
I need a replacement Lens Cover for a garage door opener Model # 1355M- 1/2 HP Liftmaste
(Posted by nskanson 1 year ago)
Garage Door Opens After Shutting.
My Lift master 8550 inside keypad is Inside wall pad is model #880LM. outside keypad Model # is 877M...
My Lift master 8550 inside keypad is Inside wall pad is model #880LM. outside keypad Model # is 877M...
(Posted by BONNIECA92 2 years ago)


Garage Door Remote Doesn't Work When Motor Light Is On
(Posted by conbdgo 10 years ago)