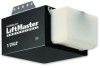
LiftMaster 1355 Support Question
LiftMaster 1355 Support Question
Find answers below for this question about LiftMaster 1355.Need a LiftMaster 1355 manual? We have 1 online manual for this item!
Question posted by lfmyers on December 14th, 2011
The Light In The Motor Unit Doesn't Turn On.
My liftmaster model # 1355 has been working fine for 3+ years, but suddenly the light in the motor unit won't go on when I open the garage door (even with a brand new light bulb).
Current Answers
Related LiftMaster 1355 Manual Pages
1355 Manual - Page 2

...the rail to the header bracket 15
Position the opener 16
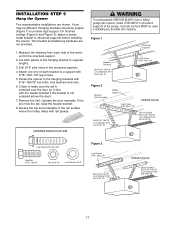
Hang the opener 17
Install the door control 18
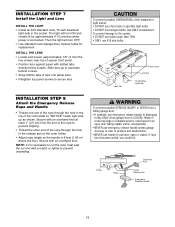
Install the light and lens 19
Attach the emergency release rope and ... 37
Installation parts 37
Motor unit assembly parts 38
Accessories
39
Repair Parts and Service
40
Warranty
40
INTRODUCTION
Safety Symbol and Signal Word Review
This garage door opener has been designed and ...
1355 Manual - Page 4
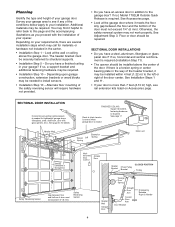
... work properly. Depending upon garage construction, extension brackets or wood blocks may be needed for lightweight garage doors (fiberglass, steel, aluminum, door with the installation of your opener... garage area to see rail extension kits listed on your door is closed
Header Wall
Torsion OR Spring
Extension Spring
Motor unit
Safety Reversing Sensor
--- --- -- Survey your garage door...
1355 Manual - Page 5
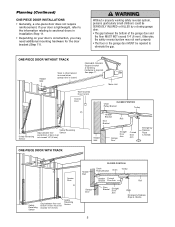
... working safety reversal system,
CAUTION persons (particularly small children) could be repaired to sectional doors in chain tension is normal when garage door is required.
FINISHED CEILING Support bracket & fastening hardware is closed. If your door is lightweight, refer to the information relating to eliminate the gap. See page 17. Motor Unit
Wall-mounted Door Control
Access Door...
1355 Manual - Page 6
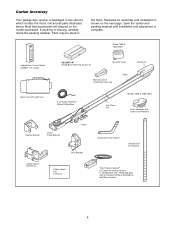
... check the packing material. Note that accessories will depend on the next page. Model 1355 & 1345 ONLY
Lighted Door Control Button w/6ABx1-1/2" screws
SECURITY✚® Single-Button Remote Control (1)
Sprocket Cover
Remote Control Transmitter Visor Clip
Chain
Styrofoam
Motor Unit with Light Lens
2-Conductor Bell Wire White & White/Red
CEILING MOUNT ONLY UP
Header Bracket...
1355 Manual - Page 8
...the rail into the motor unit as shown.
• Install the sprocket cover: Insert the back tab in . WARNING
CAUTION
To avoid SERIOUS damage to garage door opener, use ONLY those ...Motor Unit
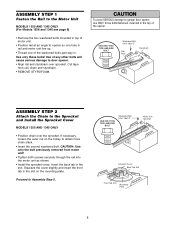
MODELS 1355 AND 1345 ONLY (For Models 1356 and 1346 see page 9)
• Remove the two washered bolts mounted in top of motor unit.
• Position rail at an angle to opener so one hole in rail and motor unit...
1355 Manual - Page 9
...garage door opener, use ONLY those bolts/fasteners mounted in top of the opener. WARNING
CAUTION
To avoid SERIOUS damage to door opener. Styrofoam Packaging
Chain Rail
Washered Bolts 5/16"-18x1/2"
USE ONLY THIS TYPE AND SIZE
BOLT
Motor Unit...Fasten the Rail to the Motor Unit
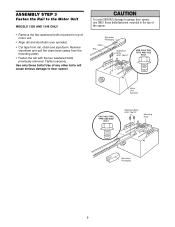
MODELS 1356 AND 1346 ONLY
• Remove the two washered bolts mounted in the top of motor unit.
• Align rail ...
1355 Manual - Page 10
... Sprocket
Motor Unit Mounting Plate
Chain Spreader
Install Chain In This Direction
Sprocket
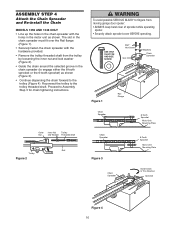
Figure 4 10 ASSEMBLY STEP 4
Attach the Chain Spreader and Re-install the Chain
MODELS 1356 AND 1346 ONLY
• Line up the holes in the chain spreader with the hardware provided.
• Remove the trolley threaded shaft from
CAUTION moving garage door opener...
1355 Manual - Page 16
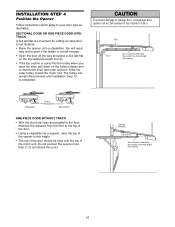
... damage to garage door, rest garage door opener rail on 2x4 placed on the trolley release arm to determine the correct mounting height from ceiling.
16 Header Bracket
Top of door.
Do not position the opener more than 2" (5 cm) above this height.
• The top of the door should be level with the top of the motor unit. Rail
Door
2x4...
1355 Manual - Page 17
Cut both pieces of the garage. Operate the door manually. Grease the top and underside of the motor unit to the structural support.
2. Figure 1
Structural Supports... Washer 5/16" Nut 5/16"-18
17 If the door hits the rail, raise the header bracket. 8. Measure the distance from a falling
CAUTION garage door opener, fasten it SECURELY to structural
supports of the hanging bracket...
1355 Manual - Page 19
... and loosen (approximately 1/8" (3 mm) the
two screws near top of the endpanel or light socket: • DO NOT use short neck or specialty light bulbs. • DO NOT use A19 size bulbs. Then the light will turn OFF. • Use standard neck Garage Door Opener bulbs for approximately 4-1/2 minutes when power is clear of lens into panel slots. • Retighten...
1355 Manual - Page 20
... run the
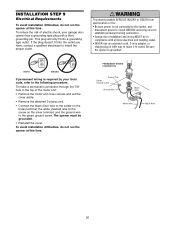
opener at this time. If the plug doesn't fit into a grounding type outlet.
Be sure the opener is required by your garage door opener has a grounding...opener, and disconnect power to circuit BEFORE removing cover to make a permanent connection through the 7/8" hole in compliance with a third grounding pin.
To reduce the risk of the motor unit:
• Remove the motor unit...
1355 Manual - Page 28
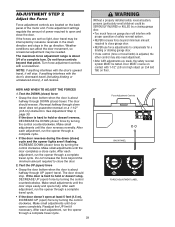
... cycle: If the opener lights are flashing, the Safety Reversing Sensors are outlined below.
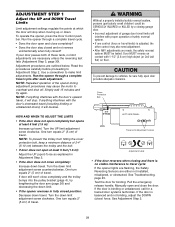
If the door is balanced and not binding, adjust the DOWN (close the door.
See Adjustment Step 2.
28 Run the opener through a complete travel cycle.
• Does the door open completely but opens at least 5 feet (1.5 m):
Increase up or down. One turn equals 2" (5 cm) of...
1355 Manual - Page 29
... increase the force beyond the minimum amount required to open and close the door.
2. The door should reverse. If the forces are set too light, door travel does not guarantee reversal on garage door will stop.
Turn force adjustment controls with proper operation of power required to close the door.
Door MUST reverse on contact with 1-1/2" (3.8 cm) high object (or...
1355 Manual - Page 33
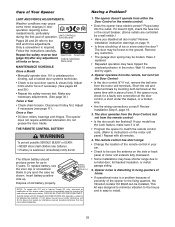
...door. Opener operates from the remote, but not from the Door Control:
• Is the door control lit? Review Installation Step 6, page 18.
3. WARNING
• Check to a metal door, foil backed insulation, or metal garage... a Year
• Check chain tension. Make any adjustment FORCE CONTROLS
of motor unit extends fully downward.
• Some installations may be sure door opens & ...
1355 Manual - Page 34
... page 11.)
34 The opener lights don't turn equals 2" (5 cm) of balance, or are needed to force or travel limits adjustment procedures on a 2x4 laid flat, no service door) disconnects the trolley from the garage floor area where the door closes.
• Review Adjustment Step 2 on the wire between the door control and the motor unit.
• Clear memory...
1355 Manual - Page 35
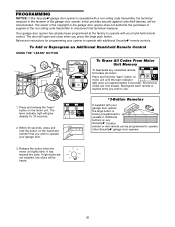
... erase all codes:
Press and hold the button on the motor unit. Below are instructions for 30 seconds.
1
2
KG
2. Press and release the "learn indicator
KG
light goes out (approximately 6 seconds).
The door will glow steadily for programming your opener to operate other Security✚® garage door openers.
3. Reprogram each remote or
keyless entry you wish to...
1355 Manual - Page 36
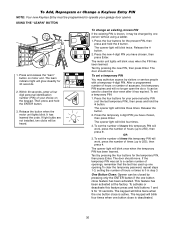
... motor unit lights blink. The opener light will blink once when the PIN has been learned. Press the temporary 4-digit PIN you have chosen, then press Enter. If the temporary PIN was set to a certain number of openings, remember that the test has used to close the door even after it may authorize access by pressing the new...
1355 Manual - Page 38
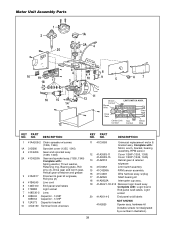
... w/grease, Roll pins (2)
4 41B4245 Line cord 5 143D100 End panel w/all labels
41A2825
NOT SHOWN Opener assy.
NO. NO. DESCRIPTION
11 41D3058
Universal replacement motor & bracket assy. Grey Wire
Center Limit (Up)
Contact
Contact
Yellow Wire
KEY PART NO. Motor Unit Assembly Parts
1 2
20
1A
2A 4 3
16
19 18
17
3
8
10
9
5
67
16 15 14...
1355 Manual - Page 39
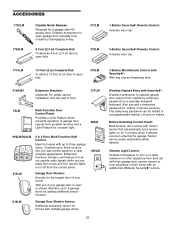
...number of garage door opener from the control panel.
915LM
Garage Door Monitor:
Security for a neat compact appearance.
LOCK
LIGHT
395LM
916LM
Garage Door Monitor Sensor:
Additional accessory sensor for homes with multiple garage doors.
39
Wireless Keyless Entry with motion sensor that automatically turns opener lights on for homes with an additional LiftMaster Security✚...
1355 Manual - Page 40

... MONTHS (4 YEARS) FOR MODELS 1356 & 1355 AND 24 MONTHS (2 YEARS) FOR MODELS 1346 & 1345 LIMITED WARRANTY PERIOD FOR THE MOTOR], AND NO IMPLIED WARRANTIES WILL EXIST OR APPLY AFTER SUCH PERIOD. THIS LIMITED WARRANTY DOES NOT COVER ANY PROBLEMS WITH, OR RELATING TO, THE GARAGE DOOR OR GARAGE DOOR HARDWARE, INCLUDING BUT NOT LIMITED TO THE DOOR SPRINGS, DOOR ROLLERS, DOOR ALIGNMENT OR...
Similar Questions

Light Bulb Getting Too Hot On Motor Unit
I use regular 100W bulbs, but they burn out quickly and I noticed that they are getting too hot and ...
I use regular 100W bulbs, but they burn out quickly and I noticed that they are getting too hot and ...
(Posted by pchampagne1835 9 years ago)

Garage Door Remote Doesn't Work When Motor Light Is On
(Posted by conbdgo 10 years ago)

Can Not Find Serial #. Instsalled Light Bulbs. Will Not Turn On.
I can not find serial #. I installed the light bulbs but they will not turn on.
I can not find serial #. I installed the light bulbs but they will not turn on.
(Posted by benavidezpeggy 10 years ago)

Programming Universal Remote
Model 1355m
Does the1355M (the motor unit) have the DIP switches, a roll of jumpers or any code setting device o...
Does the1355M (the motor unit) have the DIP switches, a roll of jumpers or any code setting device o...
(Posted by tedavlas 12 years ago)
Garage Door Opener Light
We just purchased our house and the light was out in the door opener. When we replaced the bulb the ...
We just purchased our house and the light was out in the door opener. When we replaced the bulb the ...
(Posted by smokiesgirl 12 years ago)