LiftMaster 3130 Support Question
LiftMaster 3130 Support Question
Find answers below for this question about LiftMaster 3130.Need a LiftMaster 3130 manual? We have 1 online manual for this item!
Question posted by terry21792 on November 4th, 2011
Garage Door Removal Model 3130
i need to remove my garage doors and want to know how to do it safely this unit does not have the standard spring on the rail. How do i reduce the tension on the cables
Current Answers
Related LiftMaster 3130 Manual Pages
Owners Manual - Page 1
... the enclosed safety materials carefully! ■ Fasten the manual near the garage door after installation. ■ The door WILL NOT CLOSE unless the Protector System® is connected and properly aligned. ■ Periodic checks of the opener are required to ensure safe operation. ■ The model number label is located on the front panel of your...
Owners Manual - Page 2
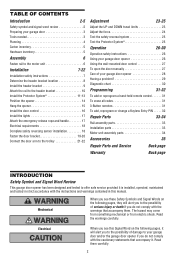
... garage door 3 Tools needed 3 Planning 4 Carton inventory 5 Hardware inventory 5
Assembly
6
Fasten rail to the motor unit 6
Installation
7-22
Installation safety instructions 7 Determine the header bracket location 8 Install the header bracket 9 Attach the rail to the header bracket 10 Install the Protector System 11-13 Position the opener 14 Hang the opener 15 Install the door...
Owners Manual - Page 3
... technician.
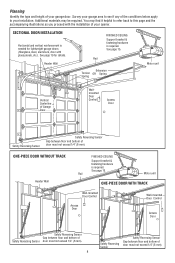
Sectional Door
One-Piece Door
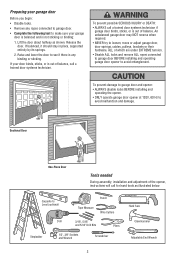
Tools needed
During assembly, installation and adjustment of which are under EXTREME tension.
• Disable ALL locks and remove ALL ropes connected to garage door BEFORE installing and operating garage door opener to avoid malfunction and damage. If balanced, it should stay in place, supported entirely by its springs.
2.
Carpenter's Level...
Owners Manual - Page 4
...FINISHED CEILING Support bracket & fastening hardware is required.
Planning
Identify the type and height of your opener. Rail
Extension Torsion OR Spring Spring
Motor unit
Vertical Centerline of door must not exceed 1/4" (6 mm). Safety Reversing Sensor
Safety Reversing Sensor
Gap between floor and bottom of Garage Door
Wallmounted Door Control
Access Door
--- --- --
Owners Manual - Page 5

... Nut 1/4"-20 (2) Rope Handle
5 Accessories will depend on the model purchased. Hardware for installation is also listed below . If anything is missing, carefully check the packing material. Parts may be stuck in two cartons which contain the motor unit and all parts illustrated below .
Carton Inventory
Your garage door opener is packaged in the foam.
Owners Manual - Page 6
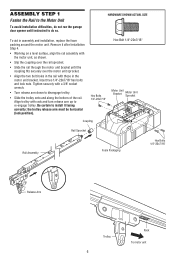
... avoid installation difficulties, do not run the garage door opener until the coupling fits securely over the motor unit sprocket.
• Align the two bolt holes in the rail with those in assembly and installation, replace the foam packing around the motor unit. Remove it after Installation Step 4.
• Working on a level surface, align...
Owners Manual - Page 7
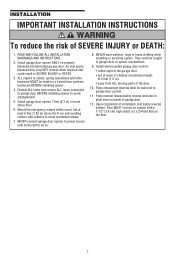
...avoid entanglement.
5. Disable ALL locks and remove ALL ropes connected to garage door BEFORE installing opener to cables, spring assemblies and other hardware MUST be caught in garage door or opener mechanisms.
9. NEVER wear watches, rings or loose clothing while installing or servicing opener. Door MUST reverse on contact with vehicles to garage door control.
11. An improperly balanced...
Owners Manual - Page 8
...garage door types.
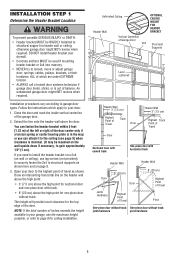
Open your door to gain approximately 1/2" (1 cm). Close the door and mark the inside vertical centerline of Travel
Pivot
One-piece door without track: One-piece door without track. or you need... or adjust garage door, springs, cables, pulleys, brackets, or their hardware, ALL of which apply to page 9 for ceiling installation. An unbalanced garage door might NOT reverse...
Owners Manual - Page 10
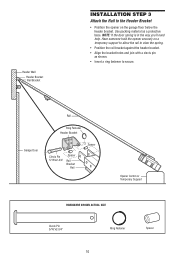
... join with a clevis pin as a protective base. Use packing material as shown.
• Insert a ring fastener to the Header Bracket
• Position the opener on the garage floor below the header bracket.
NOTE: If the door spring is in the way you'll need help. Header Wall
Header Bracket Rail Bracket
INSTALLATION STEP 3
Attach the...
Owners Manual - Page 14
.... Top of Door
Door
2x4 is used to garage door, rest garage door opener rail on 2x4 placed on the trolley release arm to determine the correct mounting height from ceiling. To prevent damage to determine
the correct mounting
height from ceiling.
14
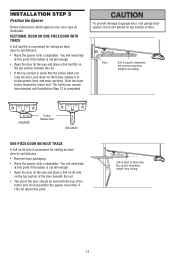
INSTALLATION STEP 5
Position the Opener
Follow instructions which apply to -rail distance.
• Remove foam packaging.
•...
Owners Manual - Page 15
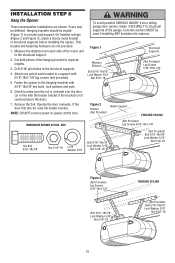
...garage door opener, fasten it SECURELY to required lengths.
3. If the door hits the rail, raise the header bracket. This bracket and fastening hardware are shown. Attach one end of each side of the garage... unit to make sure the rail is not centered above the door).
7. Operate the door manually.
Fasten the opener to structural supports before installing the opener.
Remove the...
Owners Manual - Page 16
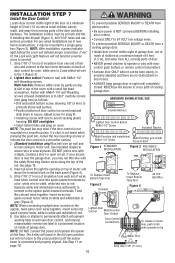
... relocate the door control to a smoother surface. 3. (Standard installation only) Run bell wire up wall and
across ceiling to secure wire in new home construction), it can be seen clearly, is connected and properly aligned. Use insulated staples to motor unit. INSTALLATION STEP 7
Install the Door Control
Locate door control within sight of garage door, out of...
Owners Manual - Page 17
....
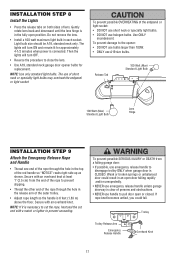
• Use A19, standard neck garage door opener bulbs for approximately 4-1/2 minutes when power is in each socket. To prevent damage to prevent unraveling. Do not remove the lens.
• Install...the hole in an open or closed. Weak or broken springs or unbalanced door could fall.
Release Tab
100 Watt (Max) Standard Light Bulb
100 Watt (Max) Standard Light Bulb
Lens Hinge...
Owners Manual - Page 18

... either sensor.
TROUBLESHOOTING THE SAFETY REVERSING SENSORS
1.
The opener lights will glow regardless of the motor unit:
• Remove the motor unit cover screws and set the cover aside.
• Remove the attached 3-prong cord.
• Connect the black (line) wire to establish permanent wiring connection.
• Garage door installation and wiring MUST be in the top...
Owners Manual - Page 25
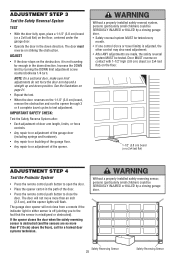
... reversing sensor is not traveling far enough in the path of the opener. IMPORTANT SAFETY CHECK:
Test the Safety Reverse System after: • Each adjustment of door arm length, limits, or force
controls. • Any repair to or adjustment of the garage door
(including springs and hardware). • Any repair to or buckling of the...
Owners Manual - Page 26
....
3. ALWAYS keep remote controls out of reach of children. Weak or broken springs or unbalanced door could result in the opening , the door will close.
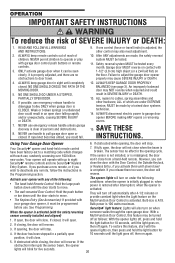
5. Using Your Garage Door Opener
6. If you release them until down until the door starts to garage door opener BEFORE making ANY repairs or removing covers.
15. They will close from a hand-held remote control have been...
Owners Manual - Page 30
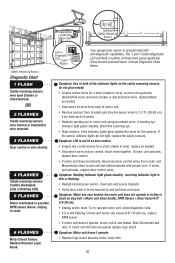
... wires, replace/attach as needed . • Disconnect all wires from back of sensor. • Reattach sending eye to 1-2 ft. (30-60 cm) from motor unit. RPM Sensor = Short travel 6-8" (15-20 cm). • Unplug unit to wall and does not move. LED or Diagnostic LED "Learn"
Button
Your garage door opener is stuck on the safety...
Owners Manual - Page 34
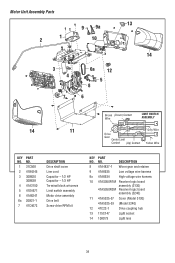
... 41A6634
High voltage wire harness
10 41AS050R1M Receiver logic board assembly (3130)
41AS050R2M Receiver logic board assembly (3240)
11 41A5525-57 Cover (Model 3130)
41A5525-53 (Model 3240)
12 41C22-1
Drive coupling hub
13 175C147
Light socket
14 108D79
Light lens
34
NO. Motor Unit Assembly Parts
13 9 9a
1 2
10
14
3 4
7
6a
12
5 8
6
Brown (Down...
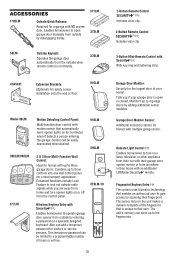
Owners Manual - Page 35
...;oor.
915LM
CLOSED OPEN
Model 98LM
LOCK
LIGHT
902LM/903LM
377LM
Motion Detecting Control Panel:
Multi-function door control with motion sensor that automatically turns opener lights on the unit makes a numeric template of your garage door is open garage door manually from outside by scanning their home with multiple garage doors. Enables homeowner to open or closed. Fingerprint...
Owners Manual - Page 36
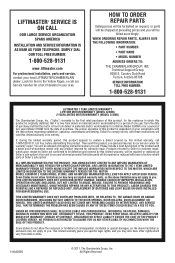
...LABOR CHARGES FOR REINSTALLING A REPAIRED OR REPLACED UNIT, REPLACEMENT OF BATTERIES AND LIGHT BULBS OR UNITS INSTALLED FOR NON-RESIDENTIAL USE. UNDER NO...MODEL NUMBER
ADDRESS ORDERS TO: THE CHAMBERLAIN GROUP, INC.
THIS LIMITED WARRANTY DOES NOT COVER ANY PROBLEMS WITH, OR RELATING TO, THE GARAGE DOOR OR GARAGE DOOR HARDWARE, INCLUDING BUT NOT LIMITED TO THE DOOR SPRINGS, DOOR ROLLERS, DOOR...
Similar Questions

Garage Door Opener Model
How do I know if I have a 3255 or 3255-2M garage door opener?
How do I know if I have a 3255 or 3255-2M garage door opener?
(Posted by ericoster1 3 years ago)
How To Replace Battery In Lift Master Garage Door Opener Model 3850
(Posted by pinButter 10 years ago)


Cant Close Garage Door By Remote. We Have To Hold The Button Down To Close It
We can open the garage door with they keypad and remote however, we have to hold the button down by ...
We can open the garage door with they keypad and remote however, we have to hold the button down by ...
(Posted by caylamccaskill75 11 years ago)

Replacing Motor On Model Bg770-50-11 Barrier Gate Operator Needs To Be Reversibl
(Posted by jcarcano 12 years ago)