Owners Manual
Page 2
...Connect the door arm to your garage door and/or the garage door opener if you do not comply with the cautionary statements that accompany them carefully. 2 Mechanical When you do not comply with the warnings that accompany it will alert you to the possibility of damage to the trolley 21-22... Adjustment 23-25 Adjust the UP and DOWN travel limits 23 Adjust the force 24 Test the safety reversal system 25 Test the Protector System 25 Operation 26-30 Operation safety instructions 26 Using your garage door opener 28 Having a ...
...Connect the door arm to your garage door and/or the garage door opener if you do not comply with the cautionary statements that accompany them carefully. 2 Mechanical When you do not comply with the warnings that accompany it will alert you to the possibility of damage to the trolley 21-22... Adjustment 23-25 Adjust the UP and DOWN travel limits 23 Adjust the force 24 Test the safety reversal system 25 Test the Protector System 25 Operation 26-30 Operation safety instructions 26 Using your garage door opener 28 Having a ...

Owners Manual
Page 5
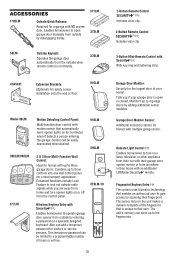
... Your garage door opener is packaged in the foam. Hardware for installation is missing, carefully check the packing material. Accessories will depend on the model purchased. Model 3240M Model 3130M Model 3240M (1) Model 3130M (1) Multi-Function Door Control Panel Lighted Door Control Button...CEILING MOUNT ONLY UP Remote Control Visor Clip Header Bracket Rail Curved Door Arm Section Sprocket Coupling Motor Unit with Light Lens Model 3130M Motor Unit with 2 Light Lenses Model 3240M Trolley Door Bracket Safety Reversing Sensor Brackets (2) The Protector System® (2) Safety...
... Your garage door opener is packaged in the foam. Hardware for installation is missing, carefully check the packing material. Accessories will depend on the model purchased. Model 3240M Model 3130M Model 3240M (1) Model 3130M (1) Multi-Function Door Control Panel Lighted Door Control Button...CEILING MOUNT ONLY UP Remote Control Visor Clip Header Bracket Rail Curved Door Arm Section Sprocket Coupling Motor Unit with Light Lens Model 3130M Motor Unit with 2 Light Lenses Model 3240M Trolley Door Bracket Safety Reversing Sensor Brackets (2) The Protector System® (2) Safety...
Owners Manual
Page 6
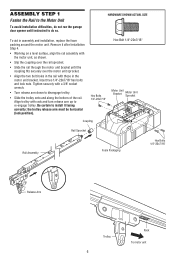
... arm must be horizontal (lock position). Insert two 1/4"-20x7/16" hex bolts and lock nuts. Align trolley with rack and turn release arm up to do not run the garage door opener until the coupling fits securely over the motor unit sprocket. • Align the two bolt holes in the rail with...
... arm must be horizontal (lock position). Insert two 1/4"-20x7/16" hex bolts and lock nuts. Align trolley with rack and turn release arm up to do not run the garage door opener until the coupling fits securely over the motor unit sprocket. • Align the two bolt holes in the rail with...
Owners Manual
Page 14
... for setting an ideal door-to garage door, rest garage door opener rail on 2x4 placed on the top section of the door beneath the rail. • The top of the door should be level with the top of Door Door 2x4 is convenient for setting an ideal door-to your door type as illustrated. Slide the outer trolley toward the motor...
... for setting an ideal door-to garage door, rest garage door opener rail on 2x4 placed on the top section of the door beneath the rail. • The top of the door should be level with the top of Door Door 2x4 is convenient for setting an ideal door-to your door type as illustrated. Slide the outer trolley toward the motor...
Owners Manual
Page 16
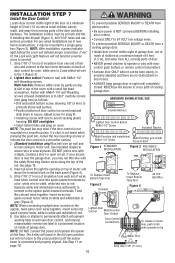
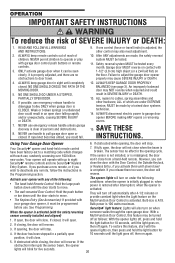
... Figure 1 STANDARD INSTALLATION Figure 2 PRE-WIRED INSTALLATION a staple, creating a short or open position but will travel . • ALWAYS keep garage door in several places. Fasten with 6ABx1-1/4" self-threading • NEVER permit children to grey (Figure 4). NEVER permit anyone to cross path of ...to correct). • Be sure power is connected and properly aligned. The trolley will not return to red. 6. To prevent possible SERIOUS INJURY or DEATH from a closing garage door. Insert door control wire into quick-connect holes: white to white and red/white to the...
... Figure 1 STANDARD INSTALLATION Figure 2 PRE-WIRED INSTALLATION a staple, creating a short or open position but will travel . • ALWAYS keep garage door in several places. Fasten with 6ABx1-1/4" self-threading • NEVER permit children to grey (Figure 4). NEVER permit anyone to cross path of ...to correct). • Be sure power is connected and properly aligned. The trolley will not return to red. 6. To prevent possible SERIOUS INJURY or DEATH from a closing garage door. Insert door control wire into quick-connect holes: white to white and red/white to the...
Owners Manual
Page 17
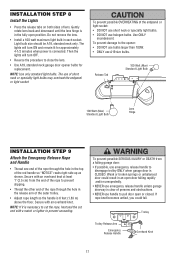
...a 100 watt maximum light bulb in the top of lens. Then the lights will turn OFF. • Reverse the procedure to disengage trolley ONLY when garage door is necessary to cut the rope, heat seal the cut end with an overhand knot. Secure with an overhand knot at least 1" (2.5... cm) from a falling garage door: • If possible, use A19 size bulbs. Trolley Trolley Release Arm Emergency Release Handle NOTICE Overhand Knot 17 The lights will turn ON and remain lit for replacement. Gently ...
...a 100 watt maximum light bulb in the top of lens. Then the lights will turn OFF. • Reverse the procedure to disengage trolley ONLY when garage door is necessary to cut the rope, heat seal the cut end with an overhand knot. Secure with an overhand knot at least 1" (2.5... cm) from a falling garage door: • If possible, use A19 size bulbs. Trolley Trolley Release Arm Emergency Release Handle NOTICE Overhand Knot 17 The lights will turn ON and remain lit for replacement. Gently ...
Owners Manual
Page 21
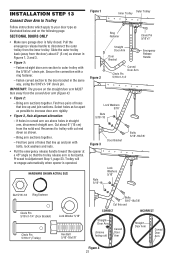
... apart as possible to Adjustment Step 1, page 23. SECTIONAL DOORS ONLY • Make sure garage door is operated. Fasten curved section to the door bracket in straight arm, disconnect straight arm. Slide the outer trolley back (away from the curved door arm (Figure 4). • Figure 2: - Proceed to increase door arm rigidity. • Figure 3, Hole alignment alternative: - INSTALLATION...
... apart as possible to Adjustment Step 1, page 23. SECTIONAL DOORS ONLY • Make sure garage door is operated. Fasten curved section to the door bracket in straight arm, disconnect straight arm. Slide the outer trolley back (away from the curved door arm (Figure 4). • Figure 2: - Proceed to increase door arm rigidity. • Figure 3, Hole alignment alternative: - INSTALLATION...
Owners Manual
Page 23
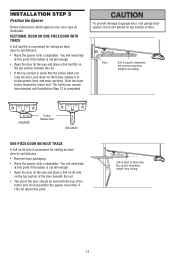
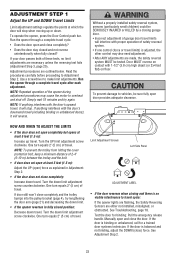
... 5 feet (1.5 m): Increase up or down travel (including binding or unbalanced doors), it will stop . Limit Adjustment Screws Left Side Panel ADJUSTMENT LABEL • If the door reverses when closing garage door. • Incorrect adjustment of the opener during adjustment procedures may also need adjustment...NOTE: If anything interferes with proper operation of travel . One turn equals 2" (5 cm) of 2-4" (5-10 m) between the trolley and the bolt. • If door does not open and close ) force. One turn equals 2" (5 cm) of safety reversal system. • If one control...
... 5 feet (1.5 m): Increase up or down travel (including binding or unbalanced doors), it will stop . Limit Adjustment Screws Left Side Panel ADJUSTMENT LABEL • If the door reverses when closing garage door. • Incorrect adjustment of the opener during adjustment procedures may also need adjustment...NOTE: If anything interferes with proper operation of travel . One turn equals 2" (5 cm) of 2-4" (5-10 m) between the trolley and the bolt. • If door does not open and close ) force. One turn equals 2" (5 cm) of safety reversal system. • If one control...
Owners Manual
Page 26
...SEVERE INJURY or DEATH. 12. SAVE THESE INSTRUCTIONS. Your opener will reverse. If you could result in sight until the door starts to disengage trolley ONLY when garage door is A19. The opener lights will blink for 4. when the opener is 100 watts maximum. Bulb size is CLOSED. ...someone walks through the open or closed . If the door has been stopped in ; If the obstruction interrupts the sensor beam, ...
...SEVERE INJURY or DEATH. 12. SAVE THESE INSTRUCTIONS. Your opener will reverse. If you could result in sight until the door starts to disengage trolley ONLY when garage door is A19. The opener lights will blink for 4. when the opener is 100 watts maximum. Bulb size is CLOSED. ...someone walks through the open or closed . If the door has been stopped in ; If the obstruction interrupts the sensor beam, ...
Owners Manual
Page 27
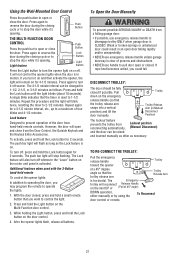
... to a maximum of persons and obstructions. • NEVER use emergency release handle to disengage trolley ONLY when garage door is in Manual position) and lift the door manually. Additional features when used with the 3-Button hand-held remote controls. With the door closed . If rope knot becomes untied, you turn it 's opening . Push Button THE...
... to a maximum of persons and obstructions. • NEVER use emergency release handle to disengage trolley ONLY when garage door is in Manual position) and lift the door manually. Additional features when used with the 3-Button hand-held remote controls. With the door closed . If rope knot becomes untied, you turn it 's opening . Push Button THE...
Owners Manual
Page 30
...8226; Realign receiving eye sensor, clean lens and secure brackets. • Verify door track is stuck on door control. • Inspect door control/wires for the sensors. the motor unit does not operate or trolley is firmly secured to motor unit using shortened wires. If motor unit still...Inspect sensor wires for a short (staple in wire), replace as needed . • Disconnect wires at door control, touch wires together. Unplug to reset. LED or Diagnostic LED "Learn" Button Your garage door opener is not lit on stop bolt = Motor unit hums briefly; Try to 1-2 ft. (...
...8226; Realign receiving eye sensor, clean lens and secure brackets. • Verify door track is stuck on door control. • Inspect door control/wires for the sensors. the motor unit does not operate or trolley is firmly secured to motor unit using shortened wires. If motor unit still...Inspect sensor wires for a short (staple in wire), replace as needed . • Disconnect wires at door control, touch wires together. Unplug to reset. LED or Diagnostic LED "Learn" Button Your garage door opener is not lit on stop bolt = Motor unit hums briefly; Try to 1-2 ft. (...
Owners Manual
Page 35
... for 5 minutes when it detects a person entering the garage. OPEN CLOSED GarageOPEN Door Monitor Sensor: Additional accessory sensor for a garage with an additional LiftMaster Security✚® remote. This temporary password can be limited to gain access by disengaging trolley. 371LM 373LM 59LM Outside Keylock: Operates the garage door automatically from the control panel. 379LM-10 Wireless...
... for 5 minutes when it detects a person entering the garage. OPEN CLOSED GarageOPEN Door Monitor Sensor: Additional accessory sensor for a garage with an additional LiftMaster Security✚® remote. This temporary password can be limited to gain access by disengaging trolley. 371LM 373LM 59LM Outside Keylock: Operates the garage door automatically from the control panel. 379LM-10 Wireless...


