
LiftMaster 3255 Support Question
LiftMaster 3255 Support Question
Find answers below for this question about LiftMaster 3255.Need a LiftMaster 3255 manual? We have 1 online manual for this item!
Question posted by goetzschlotterbeck on August 29th, 2011
3255 O.5 Hp Chain Drive Installed 2 Years Ago Inner Trolley Is Worn On One Side
how do i purchase the inner trolley and how to install
on liftmaster chaindrive 3255 0.5 hp
Current Answers
Related LiftMaster 3255 Manual Pages
3255 Manual - Page 1
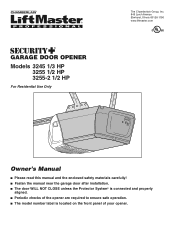
®
GARAGE DOOR OPENER
Models 3245 1/3 HP 3255 1/2 HP 3255-2 1/2 HP
For Residential Use Only
The Chamberlain Group, Inc. 845 Larch Avenue Elmhurst, Illinois 60126-1196
www.liftmaster.com
Owner's Manual
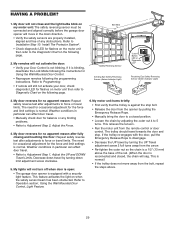
■ Please read this manual and the enclosed safety materials carefully! ■ Fasten the manual near the garage door after installation. ■ The door WILL NOT CLOSE unless the ...
3255 Manual - Page 2

... 15
Install the Protector System 16-18
Fasten the door bracket 19-20
Connect the door arm to the trolley 21-22
Adjustment
23-25
Adjust the travel limits 23
Adjust the force 24
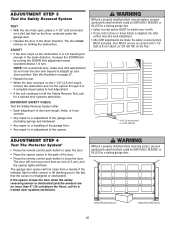
Test the safety reversal system 25
Test the Protector System 25
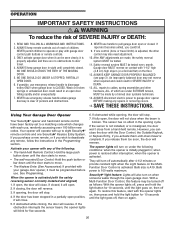
Operation
26-30
Operation safety instructions 26
Using your garage door opener...
3255 Manual - Page 3
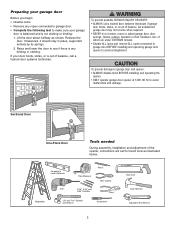
... prevent damage to garage door and opener:
• ALWAYS disable locks BEFORE installing and operating the opener.
• ONLY operate garage door opener at 120V, 60 Hz to avoid entanglement. Release the
door. Raise and lower the door to see if there is any ropes connected to garage door. • Complete the following test to loosen, move or adjust garage door, door springs, cables, pulleys...
3255 Manual - Page 4
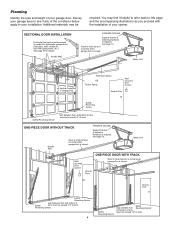
... not exceed 1/4" (6 mm). SECTIONAL DOOR INSTALLATION
Horizontal and vertical reinforcement is required. Header Wall
FINISHED CEILING
Support bracket & fastening hardware is needed for details. Additional materials may find it helpful to refer back to your opener. ONE-PIECE DOOR WITHOUT TRACK
Header Wall
Slack in chain tension is normal when garage door is required. See page 12...
3255 Manual - Page 5

... garage door opener is packaged in the foam.
Trolley
One-Piece Rail
Curved Door Arm Section
Chain Pulley Bracket
Door Bracket
Safety Sensor Bracket (2)
The Protector System® (2) Safety Reversing Sensors (1 Sending Eye and 1 Receiving Eye) with Light Lens
CEILING MOUNT ONLY UP
Header Bracket
2 Conductor Bell Wire White & White/Red? is also listed below . Hardware for installation...
3255 Manual - Page 6
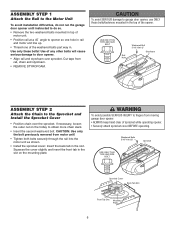
... through the rail into the motor unit as shown.
• Install the sprocket cover: Insert the back tab in the slot on the trolley to the Sprocket and Install the Sprocket Cover
• Position chain over sprocket.
To avoid possible SERIOUS INJURY to garage door opener, use ONLY those bolts/fasteners mounted in the top of the...
3255 Manual - Page 7

...caught in garage door or opener mechanisms.
9.
Trolley
Figure 2
Sprocket noise can result if chain is normal. READ AND FOLLOW ALL INSTALLATION WARNINGS AND INSTRUCTIONS.
2. Figure 1
Outer Nut To Tighten Outer Nut
Lock Washer
Inner Nut
To Tighten Inner Nut
• When the chain is complete, you may notice loosening of garage door.
12.
Install garage door opener 7 feet (2.13...
3255 Manual - Page 10
... opener on the garage floor below the header bracket. Garage Door
Ring Fastener
Rail
Header Bracket
Clevis Pin 5/16"x2-3/4"
Chain Pulley Bracket
Rail
Temporary Support
HARDWARE SHOWN ACTUAL SIZE
Clevis Pin 5/16"x2-3/4"
10
Ring Fastener
NOTE: If the door spring is in the way you'll need help. Header Wall
Header Bracket
Chain Pulley Bracket
INSTALLATION...
3255 Manual - Page 11
...
the top section beneath the rail. • If the top section or panel hits the trolley when you raise
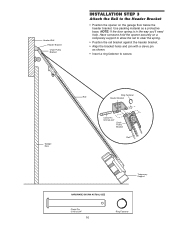
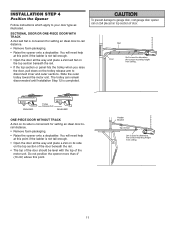
the door, pull down on the trolley release arm to determine the correct mounting height from ceiling. INSTALLATION STEP 4
Position the Opener
Follow instructions which apply to garage door, rest garage door opener rail on 2x4 placed on top section of...
3255 Manual - Page 12
Measure the distance from a falling garage door opener, fasten it SECURELY to structural supports of the rail surface where the trolley slides with 5/16"-18x7/8" hex bolts, lock ...door).
7. Drill 3/16" pilot holes in line with 5/16"-18x1-7/8" lag screws.
5. Operate the door manually. Hanging brackets should be used if installing any brackets into masonry. Remove the 2x4.
If the door...
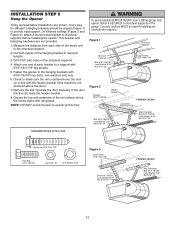
3255 Manual - Page 14
... and downward until the lens hinge is CLOSED. Do not remove the lens.
• Install up as shown. Then the lights will turn OFF.
• Reverse the procedure to close the lens.
• Use A19, standard neck garage door opener bulbs for approximately 4-1/2 minutes when power is necessary to cut the rope, heat seal...
3255 Manual - Page 15
...
WRONG
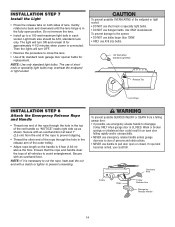
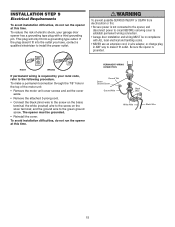
If permanent wiring is grounded. INSTALLATION STEP 9
Electrical Requirements
To avoid installation difficulties, do not run the opener at this time.
This plug will only fit into the outlet you have, contact a qualified electrician to the green ground screw. Be sure the opener is required by your garage door opener has a grounding type plug with ALL...
3255 Manual - Page 16
...
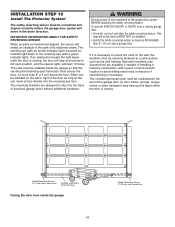
than 6" (15 cm) above floor Safety Reversing Sensor 6" (15 cm) max. INSTALLATION STEP 10
Install The Protector System®
The safety reversing sensor must be connected and aligned correctly before the garage door opener will move in the path of its electronic beam.
above garage floor. Either can be unobstructed. The sending eye (with a green indicator...
3255 Manual - Page 25
... the door fully open the door.
• Place the opener carton in the down position. The door must reverse on the floor, centered under the garage door. • Operate the door in the path of the opener. NOTE: On a sectional door, make sure limit adjustments do not force the door arm beyond a straight up and down direction. Without a properly installed safety reversal...
3255 Manual - Page 26
... you purchase a new remote, or if you can be seen clearly, it must be tested.
11. If closed . If opening , the door will not close . The sensor has no obstructions to operate or play with the safety reversing sensor correctly installed and aligned) 1. The opener lights will close.
5. Bulb size is activated (with garage door control push...
3255 Manual - Page 29
... against the stop . My remotes will not turn off when door is open: • The garage door opener is blinking, deactivate the Lock Mode following the instructions for flashes on the motor unit then refer to Diagnostic Chart on the following page. Refer to Installation Step 10: Install The Protector System®.
• Check diagnostic LED for...
3255 Manual - Page 30
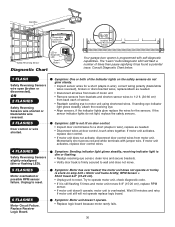
... Replace Receiver Logic Board. If motor unit activates, replace door control wires.
the motor unit does not operate or trolley is stuck on the safety sensors do not light, replace ...
Safety Reversing Sensor
LED or Diagnostic LED
"Learn" Button
Diagnostic Chart
Installed Safety Reversing
Sensor
Your garage door opener is programmed with jumper wire. The "Learn" button/diagnostic LED will...
3255 Manual - Page 31
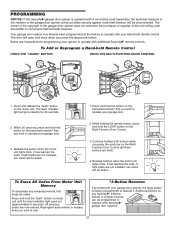
... ).
4. If light bulbs are not installed, two clicks will glow steadily for programming your opener to operate your garage door.
2. The door will open and close when you wish to operate with a non-rolling code transmitter, the technical measure in the garage door opener does not authorize the purchaser or supplier of the garage door opener, which provides security against code-theft...
3255 Manual - Page 32
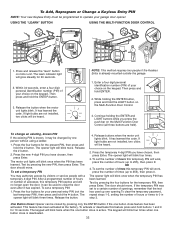
... closed by pressing the new PIN, then press Enter. Release buttons when the motor unit lights blink. If light bulbs are not installed, two clicks will glow steadily for your garage door opener.
Press and release the "learn indicator light will be heard. Release the button when the motor unit lights blink. Press the...
3255 Manual - Page 35

...garage.
Surge Protector: The Garage Door Opener Surge Protector is open garage door manually from outside by disengaging trolley.
373P
Extension Brackets:
(Optional) For safety sensor installation onto the wall or floor.
374LM
377LM
915LM
CLOSED OPEN...
Garage Door Monitor:
Security for the largest door of your garage door is designed to protect LiftMaster® garage door openers ...
Similar Questions

Garage Door Opener Model
How do I know if I have a 3255 or 3255-2M garage door opener?
How do I know if I have a 3255 or 3255-2M garage door opener?
(Posted by ericoster1 3 years ago)

How Much Does A Lift Master 3255 Garage Door Opener Cost
(Posted by cosin 9 years ago)

How To Install Cable Wire For Garage Door Opener Model 3800
(Posted by laedmhrink 10 years ago)

My Garage Door Opener Isn't Working - Chain Doesn't Move - Motor Runs Though.
(Posted by leefriedman 11 years ago)

Power Head Replacement
I am currently using a Legacy Chain Drive 1/3 hp Model 496CD/b garage door opener power head. Can t...
I am currently using a Legacy Chain Drive 1/3 hp Model 496CD/b garage door opener power head. Can t...
(Posted by billchua 11 years ago)