
Network Scan Drivers
Page 3
... Linux ...5 Installing on Debian GNU/Linux or Ubuntu Linux 6 Checking if the network scan driver is installed 6 Scanning using a network printer...6 Removing the network scan driver...6 Scanning...7 Scanning using applications...7 Scanning using XSane...7 Scanning using OpenOffice.org...7 Scanning using GIMP ...8 Scanning ...12 Adjusting scan settings using scanimage ...13 Setting default scan options ...17 Troubleshooting 18 Printer scans the page, but image is not displayed on the computer 18 Printer stops scanning or prints a "Profile scan failed" page 18 Disable any firewall application...
... Linux ...5 Installing on Debian GNU/Linux or Ubuntu Linux 6 Checking if the network scan driver is installed 6 Scanning using a network printer...6 Removing the network scan driver...6 Scanning...7 Scanning using applications...7 Scanning using XSane...7 Scanning using OpenOffice.org...7 Scanning using GIMP ...8 Scanning ...12 Adjusting scan settings using scanimage ...13 Setting default scan options ...17 Troubleshooting 18 Printer scans the page, but image is not displayed on the computer 18 Printer stops scanning or prints a "Profile scan failed" page 18 Disable any firewall application...
Network Scan Drivers
Page 5
...openSUSE, Red Hat Enterprise Linux, or Red Flag Linux 1 Download the driver: a Go to the network scan driver 5 Introduction to www.lexmark.com. c Select the Linux distribution running any of free disk space for a complete installation. • You have SANE and/or SANE ...path /usr/lexscan/docs/ after installation. Supported operating systems Make sure you are not supported. b Select Driver Finder from a network-based printer. Introduction to the network scan driver The network scan driver provides a SANE (Scanner Access Now Easy) interface to allow scanning from the Drivers...
...openSUSE, Red Hat Enterprise Linux, or Red Flag Linux 1 Download the driver: a Go to the network scan driver 5 Introduction to www.lexmark.com. c Select the Linux distribution running any of free disk space for a complete installation. • You have SANE and/or SANE ...path /usr/lexscan/docs/ after installation. Supported operating systems Make sure you are not supported. b Select Driver Finder from a network-based printer. Introduction to the network scan driver The network scan driver provides a SANE (Scanner Access Now Easy) interface to allow scanning from the Drivers...
Network Scan Drivers
Page 6
...Linux or Linspire Linux Open a terminal window, and then type dpkg -r lexmark-network-scan. c Select the Linux distribution running on your computer. For more information, see the printer User's Guide. Introduction to www.lexmark.com. Once the device is found, a message indicating that your device ..., SUSE Linux, Linux openSUSE, Red Hat Enterprise Linux, or Red Flag Linux Open a terminal window, and then type rpm -e lexmark-network-scan. Scanning using a network printer 1 To use the network scan driver, open a terminal window, and then type dpkg -i network-scan-linux-glibc2-x86.deb. Press...
...Linux or Linspire Linux Open a terminal window, and then type dpkg -r lexmark-network-scan. c Select the Linux distribution running on your computer. For more information, see the printer User's Guide. Introduction to www.lexmark.com. Once the device is found, a message indicating that your device ..., SUSE Linux, Linux openSUSE, Red Hat Enterprise Linux, or Red Flag Linux Open a terminal window, and then type rpm -e lexmark-network-scan. Scanning using a network printer 1 To use the network scan driver, open a terminal window, and then type dpkg -i network-scan-linux-glibc2-x86.deb. Press...
Network Scan Drivers
Page 7
... > Picture > Scan > Select Source. • Click Insert > Graphics > Scan > Select Source. 2 From the "Device Used" menu, select your printer. 3 If necessary, select other scan settings. 5 From the "Network:scanner" dialog, click Scan. 6 Place your document in the Automatic Document Feeder (ADF... Insert > Graphics > Scan > Request. 5 Place your document in the Automatic Document Feeder (ADF) or on the scanner glass. 7 From the printer control panel, select your scan job. Scanning using XSane 1 Open a terminal window, and then type xsane. Scanning For more information on the scanner ...
... > Picture > Scan > Select Source. • Click Insert > Graphics > Scan > Select Source. 2 From the "Device Used" menu, select your printer. 3 If necessary, select other scan settings. 5 From the "Network:scanner" dialog, click Scan. 6 Place your document in the Automatic Document Feeder (ADF... Insert > Graphics > Scan > Request. 5 Place your document in the Automatic Document Feeder (ADF) or on the scanner glass. 7 From the printer control panel, select your scan job. Scanning using XSane 1 Open a terminal window, and then type xsane. Scanning For more information on the scanner ...
Network Scan Drivers
Page 8
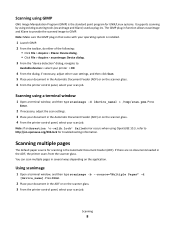
...tmp/scan.pnm. Press Enter. 2 If necessary, adjust the scan settings. 3 Place your document in the ADF or on the scanner glass. 4 From the printer control panel, select your operating system is installed. 1 Launch GIMP. 2 From the toolbar, do either of the following: • Click File > Acquire ... -d [device_name]. Press Enter. 2 Place your document in the Automatic Document Feeder (ADF) or on the scanner glass. 3 From the printer control panel, select your scan job. Scanning 8 If there are no documents loaded in function allows xscanimage and XSane to provide the scanned image...
...tmp/scan.pnm. Press Enter. 2 If necessary, adjust the scan settings. 3 Place your document in the ADF or on the scanner glass. 4 From the printer control panel, select your operating system is installed. 1 Launch GIMP. 2 From the toolbar, do either of the following: • Click File > Acquire ... -d [device_name]. Press Enter. 2 Place your document in the Automatic Document Feeder (ADF) or on the scanner glass. 3 From the printer control panel, select your scan job. Scanning 8 If there are no documents loaded in function allows xscanimage and XSane to provide the scanned image...
Network Scan Drivers
Page 9
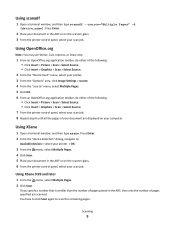
...; Click Insert > Picture > Scan > Select Source. • Click Insert > Graphics > Scan > Select Source. 2 From the "Device Used" menu, select your printer. 3 From the "Options" area, click Image Settings > source. 4 From the "source" menu, select Multiple Pages. 5 Click OK. 6 From an OpenOffice.org ...the following: • Click Insert > Picture > Scan > Select Source. • Click Insert > Graphics > Scan > Select Source. 7 From the printer control panel, select your scan job. 8 Repeat step 6 until all the pages of your scan job. Using scanadf 1 Open a terminal window, and then...
...; Click Insert > Picture > Scan > Select Source. • Click Insert > Graphics > Scan > Select Source. 2 From the "Device Used" menu, select your printer. 3 From the "Options" area, click Image Settings > source. 4 From the "source" menu, select Multiple Pages. 5 Click OK. 6 From an OpenOffice.org ...the following: • Click Insert > Picture > Scan > Select Source. • Click Insert > Graphics > Scan > Select Source. 7 From the printer control panel, select your scan job. 8 Repeat step 6 until all the pages of your scan job. Using scanadf 1 Open a terminal window, and then...
Network Scan Drivers
Page 10
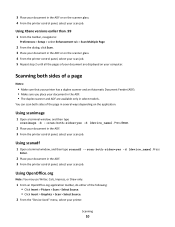
...Writer, Calc, Impress, or Draw only. 1 From an OpenOffice.org application toolbar, do either of a page Notes: • Make sure that your printer has a duplex scanner and an Automatic Document Feeder (ADF). • Make sure you place your document in the ADF. • The duplex scanner... on your document are available only in select models. 3 Place your document in the ADF or on the scanner glass. 4 From the printer control panel, select your printer. Using XSane versions earlier than .99 1 From the toolbar, navigate to: Preferences > Setup > select Enhancement tab > Scan Multiple Page ...
...Writer, Calc, Impress, or Draw only. 1 From an OpenOffice.org application toolbar, do either of a page Notes: • Make sure that your printer has a duplex scanner and an Automatic Document Feeder (ADF). • Make sure you place your document in the ADF. • The duplex scanner... on your document are available only in select models. 3 Place your document in the ADF or on the scanner glass. 4 From the printer control panel, select your printer. Using XSane versions earlier than .99 1 From the toolbar, navigate to: Preferences > Setup > select Enhancement tab > Scan Multiple Page ...
Network Scan Drivers
Page 11
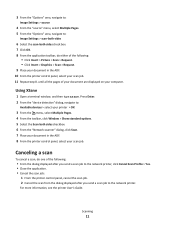
... panel, cancel the scan job. 2 Cancel the scan from the dialog displayed after you send a scan job to : Available devices > select your printer > OK 3 From the menu, select Multiple Pages. 4 From the toolbar, click Window > Show standard options. 5 Select the Scan both sides checkbox. ...6 From the "Network:scanner" dialog, click Scan. 7 Place your document in the ADF. 10 From the printer control panel, select your scan job. 11 Repeat step 8. Canceling a scan To cancel a scan, do either of the following : • Click Insert > Picture ...
... panel, cancel the scan job. 2 Cancel the scan from the dialog displayed after you send a scan job to : Available devices > select your printer > OK 3 From the menu, select Multiple Pages. 4 From the toolbar, click Window > Show standard options. 5 Select the Scan both sides checkbox. ...6 From the "Network:scanner" dialog, click Scan. 7 Place your document in the ADF. 10 From the printer control panel, select your scan job. 11 Repeat step 8. Canceling a scan To cancel a scan, do either of the following : • Click Insert > Picture ...

Network Scan Drivers
Page 12
..., Calc, Impress, or Draw only. 1 From an OpenOffice.org application toolbar, do either of the following : - Make sure the printer supports the size you select. Perform a duplex scan. Click Insert > Graphics > Scan > Select Source. 2 From the "Device Used" menu, select your... • Using XSane 1 Open a terminal window, and then type xsane. Press Enter 2 From the "device detection" dialog, navigate to: Available devices > select your printer > OK 3 From the "Network:scanner" main dialog, do either of the following: - Click Insert > Picture > Scan > Select Source. - or mode Note: ...
..., Calc, Impress, or Draw only. 1 From an OpenOffice.org application toolbar, do either of the following : - Make sure the printer supports the size you select. Perform a duplex scan. Click Insert > Graphics > Scan > Select Source. 2 From the "Device Used" menu, select your... • Using XSane 1 Open a terminal window, and then type xsane. Press Enter 2 From the "device detection" dialog, navigate to: Available devices > select your printer > OK 3 From the "Network:scanner" main dialog, do either of the following: - Click Insert > Picture > Scan > Select Source. - or mode Note: ...
Network Scan Drivers
Page 13
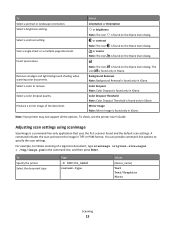
... is found on the XSane main dialog. Color Dropout Note: Color Dropout is found only in XSane. Note: Your printer may not support all the options. To check, see the printer User's Guide. Remove smudges and light background shading when scanning color documents. Produce a mirror image of a legal-size... Scanimage is found and the default scan settings. Select a brightness setting. Scan a single-sheet or a multiple-page document. To Specify the printer Select the document type Type -d [device_name] content-type Values [device_name] Text Text/Graphics Photo Scanning 13
... is found on the XSane main dialog. Color Dropout Note: Color Dropout is found only in XSane. Note: Your printer may not support all the options. To check, see the printer User's Guide. Remove smudges and light background shading when scanning color documents. Produce a mirror image of a legal-size... Scanimage is found and the default scan settings. Select a brightness setting. Scan a single-sheet or a multiple-page document. To Specify the printer Select the document type Type -d [device_name] content-type Values [device_name] Text Text/Graphics Photo Scanning 13
Network Scan Drivers
Page 14
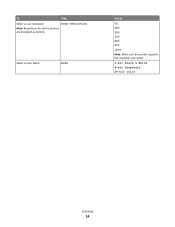
To Type Select a scan resolution scan-resolution Note: Resolutions for all the printers are displayed as options. Select a color depth mode Values 75 150 200 300 400 600 1200 Note: Make sure the printer supports the resolution you select. 1-bit Black & White 8-bit Grayscale 24-bit Color Scanning 14
To Type Select a scan resolution scan-resolution Note: Resolutions for all the printers are displayed as options. Select a color depth mode Values 75 150 200 300 400 600 1200 Note: Make sure the printer supports the resolution you select. 1-bit Black & White 8-bit Grayscale 24-bit Color Scanning 14
Network Scan Drivers
Page 15
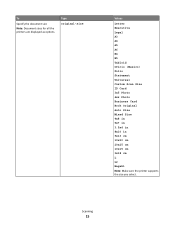
Scanning 15 Type original-size Values Letter Executive Legal A3 A4 A5 A6 B4 B5 Tabloid Oficio (Mexico) Folio Statement Universal Custom Scan Size ID Card 3x5 Photo 4x6 Photo Business Card Book Original Auto Size Mixed Size 4x8 in 5x7 in 3.5x4 in 8x10 in 9x13 cm 10x20 cm 20x25 cm 10x15 cm 3x18 cm L L2 Hagaki Note: Make sure the printer supports the size you select. To Specify the document size Note: Document sizes for all the printers are displayed as options.
Scanning 15 Type original-size Values Letter Executive Legal A3 A4 A5 A6 B4 B5 Tabloid Oficio (Mexico) Folio Statement Universal Custom Scan Size ID Card 3x5 Photo 4x6 Photo Business Card Book Original Auto Size Mixed Size 4x8 in 5x7 in 3.5x4 in 8x10 in 9x13 cm 10x20 cm 20x25 cm 10x15 cm 3x18 cm L L2 Hagaki Note: Make sure the printer supports the size you select. To Specify the document size Note: Document sizes for all the printers are displayed as options.
Network Scan Drivers
Page 16
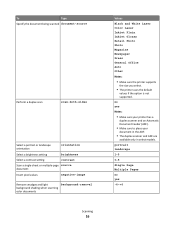
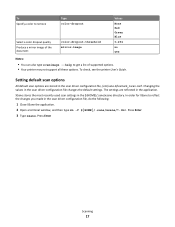
portrait landscape 1-9 0-5 Single Page Multiple Pages no yes Notes: • Make sure your printer has a duplex scanner and an Automatic Document Feeder (ADF). • Make sure to place your document in the ADF. • The duplex scanner and ADF ... Black and White Laser Color Laser Inkjet Plain Inkjet Glossy Retail Photo Photo Magazine Newspaper Press General Office Auto Other Notes: • Make sure the printer supports the size you select. • The printer uses the default values if the option is not supported. no yes -4-+4
portrait landscape 1-9 0-5 Single Page Multiple Pages no yes Notes: • Make sure your printer has a duplex scanner and an Automatic Document Feeder (ADF). • Make sure to place your document in the ADF. • The duplex scanner and ADF ... Black and White Laser Color Laser Inkjet Plain Inkjet Glossy Retail Photo Photo Magazine Newspaper Press General Office Auto Other Notes: • Make sure the printer supports the size you select. • The printer uses the default values if the option is not supported. no yes -4-+4
Network Scan Drivers
Page 17
The settings are stored in the scan driver configuration file, /etc/sane.d/lexmark_nscan.conf. To check, see the printer User's Guide. Press Enter 3 Type xsane. XSane stores the most recently used scan settings in the scan driver configuration file changes the ...sane/xsane directory. To Specify a color to remove Type color-dropout Select a color dropout quality Produce a mirror image of supported options. • Your printer may not support all these options. Setting default scan options All default scan options are reflected in the application. Press Enter Scanning 17
The settings are stored in the scan driver configuration file, /etc/sane.d/lexmark_nscan.conf. To check, see the printer User's Guide. Press Enter 3 Type xsane. XSane stores the most recently used scan settings in the scan driver configuration file changes the ...sane/xsane directory. To Specify a color to remove Type color-dropout Select a color dropout quality Produce a mirror image of supported options. • Your printer may not support all these options. Setting default scan options All default scan options are reflected in the application. Press Enter Scanning 17
Network Scan Drivers
Page 18
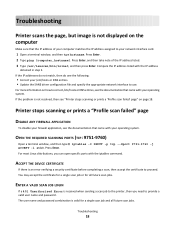
...for a single scan job or for a single scan job and all future scan jobs. Compare the IP address listed with the iptables command. Printer stops scanning or prints a "Profile scan failed" page DISABLE ANY FIREWALL APPLICATION To disable your firewall application, see the documentation that came with ... there is an error verifying a security certificate before completing a scan, then accept the certificate to correct /etc/hosts or DNS entries, see "Printer stops scanning or prints a 'Profile scan failed' page" on page 18. Press Enter, and then take note of your computer matches the IP...
...for a single scan job or for a single scan job and all future scan jobs. Compare the IP address listed with the iptables command. Printer stops scanning or prints a "Profile scan failed" page DISABLE ANY FIREWALL APPLICATION To disable your firewall application, see the documentation that came with ... there is an error verifying a security certificate before completing a scan, then accept the certificate to correct /etc/hosts or DNS entries, see "Printer stops scanning or prints a 'Profile scan failed' page" on page 18. Press Enter, and then take note of your computer matches the IP...
Network Scan Drivers
Page 19
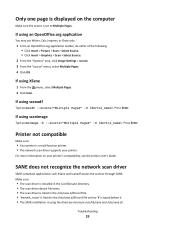
...conf file and no '#' is typed before it. • The SANE installation is a multifunction printer. • The network scan driver supports your printer's compatibility, see the printer User's Guide. SANE does not recognize the network scan driver SANE-compliant applications such XSane and scanadf...If using XSane 1 From the menu, select Multiple Pages. 2 Click Scan. Only one page is displayed on your printer. Printer not compatible Make sure: • Your printer is using the directory structure /usr/lib/sane and /etc/sane.d/. If using scanadf Type scanadf --source="Multiple Pages" ...
...conf file and no '#' is typed before it. • The SANE installation is a multifunction printer. • The network scan driver supports your printer's compatibility, see the printer User's Guide. SANE does not recognize the network scan driver SANE-compliant applications such XSane and scanadf...If using XSane 1 From the menu, select Multiple Pages. 2 Click Scan. Only one page is displayed on your printer. Printer not compatible Make sure: • Your printer is using the directory structure /usr/lib/sane and /etc/sane.d/. If using scanadf Type scanadf --source="Multiple Pages" ...
Network Scan Drivers
Page 21
... 6 not recognized by application 19 uninstalling 6 notices 2 O only one page is displayed on the computer 19 P printer is not compatible 19 printer scans but image not displayed 18 printer stops scanning 18 S scan settings OpenOffice.org Writer 12 XSane 12 scanning both sides of a page 10 canceling a ...scan 11 multiple pages 8 using GIMP 8 using network printer 6 using OpenOffice.org 7 using the command line 8 using XSane 7 scanning both sides of a page using OpenOffice.org 10 using scanadf 10 using...
... 6 not recognized by application 19 uninstalling 6 notices 2 O only one page is displayed on the computer 19 P printer is not compatible 19 printer scans but image not displayed 18 printer stops scanning 18 S scan settings OpenOffice.org Writer 12 XSane 12 scanning both sides of a page 10 canceling a ...scan 11 multiple pages 8 using GIMP 8 using network printer 6 using OpenOffice.org 7 using the command line 8 using XSane 7 scanning both sides of a page using OpenOffice.org 10 using scanadf 10 using...
Printer, Option, and Stand Compatibility Guide
Page 1
Printer, Option, and Stand Compatibility Guide Laser Printers May 2014 www.lexmark.com
Printer, Option, and Stand Compatibility Guide Laser Printers May 2014 www.lexmark.com

Printer, Option, and Stand Compatibility Guide
Page 2
... Lexmark C792...19 Lexmark C925...21 Lexmark C950 Series...23 Lexmark T650 Series...26 Lexmark X650 Series...28 Lexmark X658e...29 Lexmark X730 Series...30 Lexmark X740 Series...31 Lexmark X792...32 Lexmark X925...33 Lexmark X950 Series...35 Caster base 22G0544...38 Caster base 22G0544 for MFPs ...38 Caster base 22G0544 with scanner and shelf 21J0050 39 Printer stand 16N1708...40 Printer...
... Lexmark C792...19 Lexmark C925...21 Lexmark C950 Series...23 Lexmark T650 Series...26 Lexmark X650 Series...28 Lexmark X658e...29 Lexmark X730 Series...30 Lexmark X740 Series...31 Lexmark X792...32 Lexmark X925...33 Lexmark X950 Series...35 Caster base 22G0544...38 Caster base 22G0544 for MFPs ...38 Caster base 22G0544 with scanner and shelf 21J0050 39 Printer stand 16N1708...40 Printer...

Printer, Option, and Stand Compatibility Guide
Page 3
Each row represents a supported maximum configuration. Lexmark CS310, CS410, and CS510 Series The printer with optional trays and adjustable printer stand 35S8502: The printer with optional trays and swivel cabinet 3073173: Supported printer models: CS310n, CS310dn, CS410n, CS410dn, CS410dtn, CS510de, and CS510dte Placement ...Optional 650‑sheet tray 1 Optional 550‑sheet tray 2 Desktop or adjustable printer stand If an option is removed from a particular row, then the information would still indicate an acceptable configuration. ...
Each row represents a supported maximum configuration. Lexmark CS310, CS410, and CS510 Series The printer with optional trays and adjustable printer stand 35S8502: The printer with optional trays and swivel cabinet 3073173: Supported printer models: CS310n, CS310dn, CS410n, CS410dn, CS410dtn, CS510de, and CS510dte Placement ...Optional 650‑sheet tray 1 Optional 550‑sheet tray 2 Desktop or adjustable printer stand If an option is removed from a particular row, then the information would still indicate an acceptable configuration. ...


