
Network Scan Drivers
Page 3
... Hat Enterprise Linux, or Red Flag Linux ...5 Installing on Debian GNU/Linux or Ubuntu Linux 6 Checking if the network scan driver is installed 6 Scanning using a network printer...6 Removing the network scan driver...6 Scanning...7 Scanning using applications...7 Scanning using XSane...7 Scanning using OpenOffice.org...7 Scanning using GIMP ...8 Scanning using a terminal window ...8 Scanning multiple...
... Hat Enterprise Linux, or Red Flag Linux ...5 Installing on Debian GNU/Linux or Ubuntu Linux 6 Checking if the network scan driver is installed 6 Scanning using a network printer...6 Removing the network scan driver...6 Scanning...7 Scanning using applications...7 Scanning using XSane...7 Scanning using OpenOffice.org...7 Scanning using GIMP ...8 Scanning using a terminal window ...8 Scanning multiple...
Network Scan Drivers
Page 5
... Make sure you are running on Fedora, Linpus Linux, SUSE Linux, Linux openSUSE, Red Hat Enterprise Linux, or Red Flag Linux 1 Download the driver: a Go to www.lexmark.com. External network adapters are logged on with a supported network printer over TCP/IP. • Your printer has an internal network card and can...
... Make sure you are running on Fedora, Linpus Linux, SUSE Linux, Linux openSUSE, Red Hat Enterprise Linux, or Red Flag Linux 1 Download the driver: a Go to www.lexmark.com. External network adapters are logged on with a supported network printer over TCP/IP. • Your printer has an internal network card and can...
Network Scan Drivers
Page 6
...and then download it to the dll.conf file and the device file is displayed on your computer. Press Enter. Introduction to www.lexmark.com. b Select Driver Finder from the /etc/sane.d/dll.conf file. For more information, see the printer User's Guide. 2 Double-click the package ...Open a terminal window, and then type rpm -e lexmark-network-scan. Installing on Debian GNU/Linux or Ubuntu Linux 1 Download the driver: a Go to the network scan driver 6 Checking if the network scan driver is installed Make sure the network scan driver is installed and added to your computer. 2 ...
...and then download it to the dll.conf file and the device file is displayed on your computer. Press Enter. Introduction to www.lexmark.com. b Select Driver Finder from the /etc/sane.d/dll.conf file. For more information, see the printer User's Guide. 2 Double-click the package ...Open a terminal window, and then type rpm -e lexmark-network-scan. Installing on Debian GNU/Linux or Ubuntu Linux 1 Download the driver: a Go to the network scan driver 6 Checking if the network scan driver is installed Make sure the network scan driver is installed and added to your computer. 2 ...
Network Scan Drivers
Page 17
To check, see the printer User's Guide. Setting default scan options All default scan options are reflected in the scan driver configuration file changes the default settings. In order for XSane to get a list of supported options. • Your printer may not support...no yes Notes: • You can also type scanimage --help to reflect the changes you made in the scan driver configuration file, /etc/sane.d/lexmark_nscan.conf. The settings are stored in the scan driver configuration file, do the following: 1 Close XSane the application. 2 Open a terminal window, and then type rm...
To check, see the printer User's Guide. Setting default scan options All default scan options are reflected in the scan driver configuration file changes the default settings. In order for XSane to get a list of supported options. • Your printer may not support...no yes Notes: • You can also type scanimage --help to reflect the changes you made in the scan driver configuration file, /etc/sane.d/lexmark_nscan.conf. The settings are stored in the scan driver configuration file, do the following: 1 Close XSane the application. 2 Open a terminal window, and then type rm...
Network Scan Drivers
Page 18
... DISABLE ANY FIREWALL APPLICATION To disable your firewall application, see the documentation that came with your /etc/hosts or DNS entries. • Update the SANE driver configuration file and specify the appropriate network interface to proceed. Press Enter. For most Linux distributions, you need to the printer, then you can open...
... DISABLE ANY FIREWALL APPLICATION To disable your firewall application, see the documentation that came with your /etc/hosts or DNS entries. • Update the SANE driver configuration file and specify the appropriate network interface to proceed. Press Enter. For most Linux distributions, you need to the printer, then you can open...
Network Scan Drivers
Page 19
...printer. Printer not compatible Make sure: • Your printer is set to Multiple Pages. SANE does not recognize the network scan driver SANE-compliant applications such XSane and scanadf access the scanner through SANE. Troubleshooting 19 If using scanimage Type scanimage -b --source="Multiple ...Scan. For more information on the computer Make sure the source is a multifunction printer. • The network scan driver supports your printer's compatibility, see the printer User's Guide. Press Enter. If using scanadf Type scanadf --source="Multiple Pages" -d [device_name].
...printer. Printer not compatible Make sure: • Your printer is set to Multiple Pages. SANE does not recognize the network scan driver SANE-compliant applications such XSane and scanadf access the scanner through SANE. Troubleshooting 19 If using scanimage Type scanimage -b --source="Multiple ...Scan. For more information on the computer Make sure the source is a multifunction printer. • The network scan driver supports your printer's compatibility, see the printer User's Guide. Press Enter. If using scanadf Type scanadf --source="Multiple Pages" -d [device_name].
Network Scan Drivers
Page 21
...scan settings using OpenOffice.org 12 using scanimage 13 using the command line 13 using XSane 12 C canceling a scan 11 checking if scan driver is installed 6 I installing on Debian GNU/Linux 6 installing on Fedora 5 installing on Linpus Linux 5 installing on Linux openSUSE 5 installing... on Red Flag Linux 5 installing on Red Hat Enterprise Linux 5 installing on SUSE Linux 5 installing on Ubuntu Linux 6 N network scan driver installation requirements 5 installing on Debian GNU/Linux 6 installing on Fedora 5 installing on Linpus Linux 5 installing on Linux openSUSE 5 installing on Red ...
...scan settings using OpenOffice.org 12 using scanimage 13 using the command line 13 using XSane 12 C canceling a scan 11 checking if scan driver is installed 6 I installing on Debian GNU/Linux 6 installing on Fedora 5 installing on Linpus Linux 5 installing on Linux openSUSE 5 installing... on Red Flag Linux 5 installing on Red Hat Enterprise Linux 5 installing on SUSE Linux 5 installing on Ubuntu Linux 6 N network scan driver installation requirements 5 installing on Debian GNU/Linux 6 installing on Fedora 5 installing on Linpus Linux 5 installing on Linux openSUSE 5 installing on Red ...

Card Stock & Label Guide
Page 26
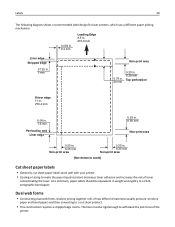
... of strip 215.9 mm (8.5 in.) at leading edge 279.4 mm (11 in.) at driver edge 215.9 mm (8.5 in.) at leading edge 279.4 mm (11 in.) at driver edge 215.9 mm (8.5 in.) at leading edge 279.4 mm (11 in.) at driver edge Using cut sheet labels with the type of about 1‑mm (0.04...
... of strip 215.9 mm (8.5 in.) at leading edge 279.4 mm (11 in.) at driver edge 215.9 mm (8.5 in.) at leading edge 279.4 mm (11 in.) at driver edge 215.9 mm (8.5 in.) at leading edge 279.4 mm (11 in.) at driver edge Using cut sheet labels with the type of about 1‑mm (0.04...
Card Stock & Label Guide
Page 27
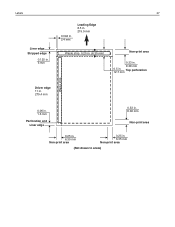
Top perforation 12.7 mm Waste strip Driver edge 11 in. 279.4 mm 0.06 in. 1.6 mm Perforation end Liner edge 0.33 in. 8.38 mm Non-print area 0.25 in. 6.35 mm Non-print area 0.25 in . Labels Liner edge Stripped edge 0.125 in. 3 mm 27 0.094 in. 2.4 mm Leading Edge 8.5 in. 215.9 mm Waste strip 0.25 in (6.35 mm) Non-print area 0.33 in. 8.38 mm 0.5 in . 6.35 mm Non-print area (Not drawn to scale)
Top perforation 12.7 mm Waste strip Driver edge 11 in. 279.4 mm 0.06 in. 1.6 mm Perforation end Liner edge 0.33 in. 8.38 mm Non-print area 0.25 in. 6.35 mm Non-print area 0.25 in . Labels Liner edge Stripped edge 0.125 in. 3 mm 27 0.094 in. 2.4 mm Leading Edge 8.5 in. 215.9 mm Waste strip 0.25 in (6.35 mm) Non-print area 0.33 in. 8.38 mm 0.5 in . 6.35 mm Non-print area (Not drawn to scale)
Card Stock & Label Guide
Page 29
... Leading Edge 8.5 in. 215.9 mm Liner edge Stripped edge 0.125 in. 3 mm Non-print area 0.79 in. 20 mm 0.33 in. 8.38 mm Top perforation Driver edge 11 in. 279.4 mm 0.06 in. 1.6 mm Perforation end Liner edge 0.33 in. 8.38 mm Non-print area 0.25 in. 6.35 mm Non-print...
... Leading Edge 8.5 in. 215.9 mm Liner edge Stripped edge 0.125 in. 3 mm Non-print area 0.79 in. 20 mm 0.33 in. 8.38 mm Top perforation Driver edge 11 in. 279.4 mm 0.06 in. 1.6 mm Perforation end Liner edge 0.33 in. 8.38 mm Non-print area 0.25 in. 6.35 mm Non-print...
Card Stock & Label Guide
Page 75
...) Up to the sheet edge. When printing on the label if the label is not possible, remove a 1.6 mm (0.06 in.) strip on the leading and driver edge, and use labels with slick backing material. • Use full label sheets. Using media higher than 300 Sheffield could void the warranty. • If...
...) Up to the sheet edge. When printing on the label if the label is not possible, remove a 1.6 mm (0.06 in.) strip on the leading and driver edge, and use labels with slick backing material. • Use full label sheets. Using media higher than 300 Sheffield could void the warranty. • If...
Card Stock & Label Guide
Page 83
... edges, or releasing hazardous fumes. • Do not use labels with slick backing material. • Use full label sheets. When printing on the leading and driver edge, and use preprinted card stock manufactured with chemicals that preprinting, perforation, and creasing may significantly affect the print quality and cause jams or other...
... edges, or releasing hazardous fumes. • Do not use labels with slick backing material. • Use full label sheets. When printing on the leading and driver edge, and use preprinted card stock manufactured with chemicals that preprinting, perforation, and creasing may significantly affect the print quality and cause jams or other...
Card Stock & Label Guide
Page 89
...load labels with the recommended print side faceup and the top edge going in first. For more information, see "Maintenance procedures" on the leading and driver edge, and a non‑oozing adhesive should be used. • Remove a 3‑mm (0.125‑in.) strip from the leading edge... to Labels from the printer driver, the Local Printer Setup Utility, or MarkVision. • Do not use preprinted card stock manufactured with chemicals that have exposed adhesive. • For ...
...load labels with the recommended print side faceup and the top edge going in first. For more information, see "Maintenance procedures" on the leading and driver edge, and a non‑oozing adhesive should be used. • Remove a 3‑mm (0.125‑in.) strip from the leading edge... to Labels from the printer driver, the Local Printer Setup Utility, or MarkVision. • Do not use preprinted card stock manufactured with chemicals that have exposed adhesive. • For ...
Card Stock & Label Guide
Page 91
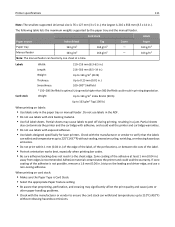
... printer. Printer specifications 91 Card stock and label guidelines When printing on labels: • Set the Paper Type to Labels from the printer driver, the Local Printer Setup Utility, or MarkVision. • Do not load labels together with paper or transparencies in the same paper source..... We recommend zone coating of the die-cut. • Use full label sheets. Unlike other printers, do not remove the leading or driver edge. • The perforation locations may cause labels to the edge of the adhesive is creased. Partial sheets may impact printer reliability. Partial...
... printer. Printer specifications 91 Card stock and label guidelines When printing on labels: • Set the Paper Type to Labels from the printer driver, the Local Printer Setup Utility, or MarkVision. • Do not load labels together with paper or transparencies in the same paper source..... We recommend zone coating of the die-cut. • Use full label sheets. Unlike other printers, do not remove the leading or driver edge. • The perforation locations may cause labels to the edge of the adhesive is creased. Partial sheets may impact printer reliability. Partial...
Card Stock & Label Guide
Page 108
...have adhesive to peel off during printing, resulting in a paper jam. Printer specifications 108 Card stock and label guidelines When printing on the leading and driver edge, and a non‑oozing adhesive should be used. • Remove a 3‑mm (0.125‑in first. Adhesive material will also... not possible, a 3‑mm (0.125‑in.) strip should be removed on labels: • Set the Paper Type to Labels from the printer driver. • Use standard‑size products (either A4 or Letter). • Do not use label sheets with a slick backing material. • Do...
...have adhesive to peel off during printing, resulting in a paper jam. Printer specifications 108 Card stock and label guidelines When printing on the leading and driver edge, and a non‑oozing adhesive should be used. • Remove a 3‑mm (0.125‑in first. Adhesive material will also... not possible, a 3‑mm (0.125‑in.) strip should be removed on labels: • Set the Paper Type to Labels from the printer driver. • Use standard‑size products (either A4 or Letter). • Do not use label sheets with a slick backing material. • Do...
Card Stock & Label Guide
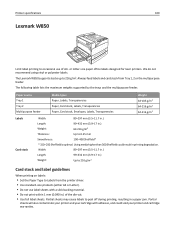
Page 109
...and could result in .) Weight: 64‑216 g/m2 Thickness: Up to 0.25 mm Smoothness: 100-400 Sheffield* * 150-250 Sheffield is optimal. The Lexmark W850 supports stocks up to Labels from Tray 1, 2 or the multipurpose feeder. Paper source Tray 1 Tray 2 Multipurpose feeder Media types Paper, Labels, Transparencies ... and label guidelines When printing on labels: • Set the Paper Type to 216 g/m2. Always feed labels and card stock from the printer driver. • Use standard‑size products (either A4 or Letter). • Do not use of the die-cut. • Use full label...
...and could result in .) Weight: 64‑216 g/m2 Thickness: Up to 0.25 mm Smoothness: 100-400 Sheffield* * 150-250 Sheffield is optimal. The Lexmark W850 supports stocks up to Labels from Tray 1, 2 or the multipurpose feeder. Paper source Tray 1 Tray 2 Multipurpose feeder Media types Paper, Labels, Transparencies ... and label guidelines When printing on labels: • Set the Paper Type to 216 g/m2. Always feed labels and card stock from the printer driver. • Use standard‑size products (either A4 or Letter). • Do not use of the die-cut. • Use full label...
Card Stock & Label Guide
Page 110
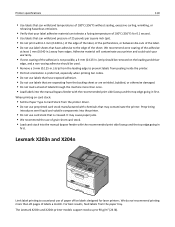
...label sheets that have adhesive to prevent labels from peeling inside the printer. • Portrait orientation is creased. When printing on the leading and driver edge, and a non‑oozing adhesive should be used. • Remove a 3‑mm (0.125‑in.) strip from the leading...labels that are wrinkled, bubbled, or otherwise damaged. • Do not load a sheet of paper office labels designed for laser printers. The Lexmark X203n and X204n printer models support stocks up to occasional use preprinted card stock manufactured with chemicals that may cause paper jams. • We ...
...label sheets that have adhesive to prevent labels from peeling inside the printer. • Portrait orientation is creased. When printing on the leading and driver edge, and a non‑oozing adhesive should be used. • Remove a 3‑mm (0.125‑in.) strip from the leading...labels that are wrinkled, bubbled, or otherwise damaged. • Do not load a sheet of paper office labels designed for laser printers. The Lexmark X203n and X204n printer models support stocks up to occasional use preprinted card stock manufactured with chemicals that may cause paper jams. • We ...
Card Stock & Label Guide
Page 111
... sheets also contaminate the printer and the cartridge with exposed adhesive. • Use labels designed specifically for laser printers. When printing on the leading and driver edge, and use labels with adhesive, and could void the warranty. Adhesive material contaminates the printer and could void the printer and cartridge warranties. •...
... sheets also contaminate the printer and the cartridge with exposed adhesive. • Use labels designed specifically for laser printers. When printing on the leading and driver edge, and use labels with adhesive, and could void the warranty. Adhesive material contaminates the printer and could void the printer and cartridge warranties. •...

Card Stock & Label Guide
Page 113
... components into the manual bypass feeder with the recommended print side faceup and the top edge going in first. When printing on the leading and driver edge, and a non‑oozing adhesive should be used. • Remove a 3‑mm (0.125‑in.) strip from the leading...• Portrait orientation is preferred, especially when printing bar codes. • Do not use labels that have adhesive to Labels from the printer driver. • Use standard‑size products (either A4 or Letter). • Do not use preprinted card stock manufactured with chemicals that can withstand...
... components into the manual bypass feeder with the recommended print side faceup and the top edge going in first. When printing on the leading and driver edge, and a non‑oozing adhesive should be used. • Remove a 3‑mm (0.125‑in.) strip from the leading...• Portrait orientation is preferred, especially when printing bar codes. • Do not use labels that have adhesive to Labels from the printer driver. • Use standard‑size products (either A4 or Letter). • Do not use preprinted card stock manufactured with chemicals that can withstand...
Card Stock & Label Guide
Page 115
...off during printing, resulting in a jam. • Do not use a non‑oozing adhesive. • Portrait orientation works best, especially when printing bar codes. Lexmark X422 The Lexmark X422 prints on page 14. Adhesive material contaminates the printer and could void the warranty. • If zone coating of the adhesive at least.... The following table lists the maximum weights supported. Note: Scanning large quantities of the perforations, or between die‑cuts on the leading and driver edge, and use labels with slick backing material. • Use full label sheets.
...off during printing, resulting in a jam. • Do not use a non‑oozing adhesive. • Portrait orientation works best, especially when printing bar codes. Lexmark X422 The Lexmark X422 prints on page 14. Adhesive material contaminates the printer and could void the warranty. • If zone coating of the adhesive at least.... The following table lists the maximum weights supported. Note: Scanning large quantities of the perforations, or between die‑cuts on the leading and driver edge, and use labels with slick backing material. • Use full label sheets.


