
Card Stock & Label Guide
Page 11
...error‑free operation of the raised image. The auto compensator has two rollers that could cause nesting and tenting should fall outside of Lexmark specifications • use of non‑Lexmark supplies (such as toner cartridges and/or inkjet cartridges) • use micro‑perfs to avoid nesting problems... multiple sheets to use of non‑Lexmark product or component Pick roller technology Some printers have an auto compensator which feeds paper more information, see "Perforations and die‑cuts" on both sides of the form and 6.35 mm (0.25 in.) on page 10...
...error‑free operation of the raised image. The auto compensator has two rollers that could cause nesting and tenting should fall outside of Lexmark specifications • use of non‑Lexmark supplies (such as toner cartridges and/or inkjet cartridges) • use micro‑perfs to avoid nesting problems... multiple sheets to use of non‑Lexmark product or component Pick roller technology Some printers have an auto compensator which feeds paper more information, see "Perforations and die‑cuts" on both sides of the form and 6.35 mm (0.25 in.) on page 10...

Universal Print Driver Version 2.0 White Paper
Page 6
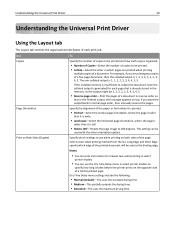
... using status monitor applications, then use only UPD 2.6.0.0. • Microsoft Device Stage support-Added support to UPD 2.7.1.0. For a complete list of supported Citrix implementations, see "Device compatibility" on a TCP/IP port. • Enhanced image resolutions-Added support for mono laser printers. A driver configuration contains settings such as the creation of .ldc. Note: This option is available in the Fold menu. • Default two‑sided printing support-Added support to enable two-sided printing in documents to create driver configurations...
... using status monitor applications, then use only UPD 2.6.0.0. • Microsoft Device Stage support-Added support to UPD 2.7.1.0. For a complete list of supported Citrix implementations, see "Device compatibility" on a TCP/IP port. • Enhanced image resolutions-Added support for mono laser printers. A driver configuration contains settings such as the creation of .ldc. Note: This option is available in the Fold menu. • Default two‑sided printing support-Added support to enable two-sided printing in documents to create driver configurations...
Universal Print Driver Version 2.0 White Paper
Page 20
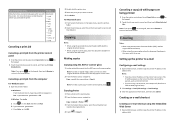
... the installed memory is insufficient to collate the document, then the collated output is generated for manual two‑sided printing in which settings to be printed. • Collate-Select the order in select printer models. • You can be 1, 2, 3, 1, 2, 3, 4, 5, 4, 5. • Reverse page order-Print the pages of a document in the finished output, the last page appears on the opposite side of copies to use the Dry Time Delay menu in normal page...
... the installed memory is insufficient to collate the document, then the collated output is generated for manual two‑sided printing in which settings to be printed. • Collate-Select the order in select printer models. • You can be 1, 2, 3, 1, 2, 3, 4, 5, 4, 5. • Reverse page order-Print the pages of a document in the finished output, the last page appears on the opposite side of copies to use the Dry Time Delay menu in normal page...

Universal Print Driver Version 2.0 White Paper
Page 35
... change history 6 confidential print jobs 27 PIN 27 connectivity 13 D device compatibility 10 downloading the Universal Print Driver 18 E enabling Travel Print 19 F fax preference tab using 26 fax settings using 26 Fax tab 26 H holding print jobs 27 I installed options updating 18 L language support 16 Layout tab using 20 M Microsoft certified 31 model‑specific print driver 31 N notices 34 O operating system support 9 options updating 18 Other Options tab using 28 overlays tab 27 overview 4 P Package Builder 18 paper sizes supported by the Universal Print Driver 14 paper types supported...
... change history 6 confidential print jobs 27 PIN 27 connectivity 13 D device compatibility 10 downloading the Universal Print Driver 18 E enabling Travel Print 19 F fax preference tab using 26 fax settings using 26 Fax tab 26 H holding print jobs 27 I installed options updating 18 L language support 16 Layout tab using 20 M Microsoft certified 31 model‑specific print driver 31 N notices 34 O operating system support 9 options updating 18 Other Options tab using 28 overlays tab 27 overview 4 P Package Builder 18 paper sizes supported by the Universal Print Driver 14 paper types supported...

Accessibility Guide
Page 2
... the changes. 4 Press to return to load the Web page correctly. 2 Select Settings > General Settings. 3 In the Screen Brightness field, enter the brightness percentage you are using a proxy server, then temporarily disable it more information, see the printer User's Guide. Extending the inactivity timeout Note: This feature is available only in some printer models. 1 From the home screen, navigate to: > Settings > Fax Settings > Analog Fax Setup 2 Do the following: • Set the speaker mode...
... the changes. 4 Press to return to load the Web page correctly. 2 Select Settings > General Settings. 3 In the Screen Brightness field, enter the brightness percentage you are using a proxy server, then temporarily disable it more information, see the printer User's Guide. Extending the inactivity timeout Note: This feature is available only in some printer models. 1 From the home screen, navigate to: > Settings > Fax Settings > Analog Fax Setup 2 Do the following: • Set the speaker mode...

Accessibility Guide
Page 4
For more information, see the Accessibility Solution Administrator's Guide. Note: You can adjust settings, send one or more information, see the Accessibility Speech Administrator's Guide. Note: Make sure to remember the key combination assigned to the job. 3 From the printer control panel, enter the key combination using Lexmark Accessibility Solution Use the application to let users print, copy, scan, and fax jobs from most network computer or handheld device. Creating a browser shortcut 1 Open a Web browser, and then type IP/cgi‑bin/direct...
For more information, see the Accessibility Solution Administrator's Guide. Note: You can adjust settings, send one or more information, see the Accessibility Speech Administrator's Guide. Note: Make sure to remember the key combination assigned to the job. 3 From the printer control panel, enter the key combination using Lexmark Accessibility Solution Use the application to let users print, copy, scan, and fax jobs from most network computer or handheld device. Creating a browser shortcut 1 Open a Web browser, and then type IP/cgi‑bin/direct...

Copy Guide
Page 1
... your copies will be printed. • Touch the paper size and type that contains mixed paper sizes with the same width, touch Mixed Sizes. • To set the printer to This option opens a screen where you make a quick copy, from one - Note: To avoid a cropped image, make a continuous decrease or increase in relation to 400% of 3 Copy Guide Copying using the ADF or scanner glass 1 Load an original document into the ADF tray or on the scanner glass. Sides (Duplex) This option...
... your copies will be printed. • Touch the paper size and type that contains mixed paper sizes with the same width, touch Mixed Sizes. • To set the printer to This option opens a screen where you make a quick copy, from one - Note: To avoid a cropped image, make a continuous decrease or increase in relation to 400% of 3 Copy Guide Copying using the ADF or scanner glass 1 Load an original document into the ADF tray or on the scanner glass. Sides (Duplex) This option...

Information Guide
Page 1
...; Loading paper • Configuring printer settings • Viewing and printing documents and photos • Setting up and using the printer software • Configuring the printer on a network • Caring for and maintaining the printer • Troubleshooting and solving problems Find it here Setup documentation-The setup documentation came with the printer provides information about setting up the printer. User's Guide and Quick Reference Guide-The guides are also available in locating additional information Provides information about ordering supplies Setup sheet The Setup...
...; Loading paper • Configuring printer settings • Viewing and printing documents and photos • Setting up and using the printer software • Configuring the printer on a network • Caring for and maintaining the printer • Troubleshooting and solving problems Find it here Setup documentation-The setup documentation came with the printer provides information about setting up the printer. User's Guide and Quick Reference Guide-The guides are also available in locating additional information Provides information about ordering supplies Setup sheet The Setup...

Print Defects Guide
Page 1
... Setup. Note: Auto is the factory default setting. Note: Off is the factory default setting. For Macintosh users, choose File > Print, and then adjust the settings from the printer software. Note: 0 is the factory default setting. To resolve repeated print quality defects, you may need to enhance fonts. Notes: • 8 is the factory default setting. • Selecting a smaller number can set this option from the Print dialog and context menus. • To set this option using the Embedded Web Server, type the network printer...
... Setup. Note: Auto is the factory default setting. Note: Off is the factory default setting. For Macintosh users, choose File > Print, and then adjust the settings from the printer software. Note: 0 is the factory default setting. To resolve repeated print quality defects, you may need to enhance fonts. Notes: • 8 is the factory default setting. • Selecting a smaller number can set this option from the Print dialog and context menus. • To set this option using the Embedded Web Server, type the network printer...

Quick Reference
Page 8
... paper type, adjust the paper type setting to match the paper loaded. 3 Click OK. b Customize the settings in the Page Setup dialog: 1 With a document open , click File > Print. After these print jobs are not supported. • USB flash drives must support the full‑speed standard. Devices formatted with New Technology File System (NTFS) or any other information that is the factory default paper type for printing. Loss of copies to match the paper loaded. 2 Send the print job: For Windows users a With a document open , choose File > Page Setup. 2 Choose a paper size...
... paper type, adjust the paper type setting to match the paper loaded. 3 Click OK. b Customize the settings in the Page Setup dialog: 1 With a document open , click File > Print. After these print jobs are not supported. • USB flash drives must support the full‑speed standard. Devices formatted with New Technology File System (NTFS) or any other information that is the factory default paper type for printing. Loss of copies to match the paper loaded. 2 Send the print job: For Windows users a With a document open , choose File > Page Setup. 2 Choose a paper size...
Quick Reference
Page 9
... to cancel. 4 Click Delete. For Macintosh users 1 From System Preferences in the Apple menu, open the printers folder. 2 Open the print queue, select the print job you want to cancel, and then touch Delete Selected Jobs. Copying Notes: • When using the automatic document feeder (ADF), load the original document faceup. • When using the scanner glass, place the document facedown in the corner with the arrow. Note: To avoid a cropped image, make a quick copy, from the control panel, press...
... to cancel. 4 Click Delete. For Macintosh users 1 From System Preferences in the Apple menu, open the printers folder. 2 Open the print queue, select the print job you want to cancel, and then touch Delete Selected Jobs. Copying Notes: • When using the automatic document feeder (ADF), load the original document faceup. • When using the scanner glass, place the document facedown in the corner with the arrow. Note: To avoid a cropped image, make a quick copy, from the control panel, press...

User's Guide
Page 23
... check for printing scan images. • Default number of copies-Specify the number of copies that should automatically print when the application is used for updates of this User's Guide, go to http://support.lexmark.com. The IP address appears as four sets of numbers separated by periods, such as 123.123.123.123. 2 Click Settings > Apps > Apps Management > Card Copy. 3 Change the default scanning options, if necessary. • Default tray-Select the default tray to be used . • Default contrast setting-Specify a setting...
... check for printing scan images. • Default number of copies-Specify the number of copies that should automatically print when the application is used for updates of this User's Guide, go to http://support.lexmark.com. The IP address appears as four sets of numbers separated by periods, such as 123.123.123.123. 2 Click Settings > Apps > Apps Management > Card Copy. 3 Change the default scanning options, if necessary. • Default tray-Select the default tray to be used . • Default contrast setting-Specify a setting...

User's Guide
Page 135
... printed before printing. The menu selection is then updated. The menu selection is then updated. Notes: • Off is the factory default setting. • On buffers jobs on the amount of memory in the printer hard disk before normal processing resumes. • The USB buffer size value can be changed from the printer control panel and then exiting the menus causes the printer to an external print server through the USB port. Temporarily store print jobs...
... printed before printing. The menu selection is then updated. The menu selection is then updated. Notes: • Off is the factory default setting. • On buffers jobs on the amount of memory in the printer hard disk before normal processing resumes. • The USB buffer size value can be changed from the printer control panel and then exiting the menus causes the printer to an external print server through the USB port. Temporarily store print jobs...

User's Guide
Page 137
... the printer hard disk. • Auto buffers print jobs only if the printer is turned on the printer hard disk before printing. Many personal computers activate the Init signal each time the computer is busy processing data from another input port. • Changing this setting from the computer. The menu selection is attached to resolve parallel port communication problems. Determine if the printer honors printer hardware initialization requests from the printer control panel...
... the printer hard disk. • Auto buffers print jobs only if the printer is turned on the printer hard disk before printing. Many personal computers activate the Init signal each time the computer is busy processing data from another input port. • Changing this setting from the computer. The menu selection is attached to resolve parallel port communication problems. Determine if the printer honors printer hardware initialization requests from the printer control panel...

User's Guide
Page 173
... not print log Print only for error Log Paper Source Tray [x] Multipurpose Feeder Log Output Bin Standard Bin Bin [x] E‑mail Bit Depth 1 bit 8 bit Custom Job scanning On Off Scan Preview On Off Allow Save as shortcuts. Specify whether to ‑e-mail job, either one file for each page of the job. Notes: • Off is the factory default setting. • This menu item appears only when a formatted, working printer hard...
... not print log Print only for error Log Paper Source Tray [x] Multipurpose Feeder Log Output Bin Standard Bin Bin [x] E‑mail Bit Depth 1 bit 8 bit Custom Job scanning On Off Scan Preview On Off Allow Save as shortcuts. Specify whether to ‑e-mail job, either one file for each page of the job. Notes: • Off is the factory default setting. • This menu item appears only when a formatted, working printer hard...

User's Guide
Page 189
... a flash drive. Adjust the printed output either by lightening the output. Note: Off is the factory default setting. Job Accounting Utilities Print and delete log files or export them to images. For Windows users, click File > Print, and then click Properties, Preferences, Options, or Setup. Note: 0 is the factory default setting. Job Accounting menu Note: This menu item appears only when a formatted, working printer hard disk is the factory default setting. Adjust the contrast of the print jobs it . Note: Monthly is installed. Log Near...
... a flash drive. Adjust the printed output either by lightening the output. Note: Off is the factory default setting. Job Accounting Utilities Print and delete log files or export them to images. For Windows users, click File > Print, and then click Properties, Preferences, Options, or Setup. Note: 0 is the factory default setting. Job Accounting menu Note: This menu item appears only when a formatted, working printer hard disk is the factory default setting. Adjust the contrast of the print jobs it . Note: Monthly is installed. Log Near...
User's Guide
Page 291
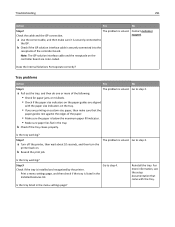
... menu settings page? Reinstall the tray. a Use the correct cable, and then make sure that came with the paper size indicators on the tray. • If you are color‑coded. b Check if the tray closes properly. b Resend the print job. Does the Internal Solutions Port operate correctly? a Pull out the tray, and then do one or more information, see the setup documentation that the paper guides rest against the edges of the controller...
... menu settings page? Reinstall the tray. a Use the correct cable, and then make sure that came with the paper size indicators on the tray. • If you are color‑coded. b Check if the tray closes properly. b Resend the print job. Does the Internal Solutions Port operate correctly? a Pull out the tray, and then do one or more information, see the setup documentation that the paper guides rest against the edges of the controller...
User's Guide
Page 355
... telephone service 98 DSL connection 95 standard telephone line connection 91 VoIP 96 Fax Station Name not set up. Index 355 Edit Security Setups menu 141 embedded solutions information erasing 203 Embedded Web Server accessing 20 adjusting brightness 200 checking the status of parts 210 checking the status of the printer cleaning 205 e‑mail canceling 86 e‑mail alerts low supply levels 239 paper jam 239 setting up 239 e‑mail options darkness 87 message...
... telephone service 98 DSL connection 95 standard telephone line connection 91 VoIP 96 Fax Station Name not set up. Index 355 Edit Security Setups menu 141 embedded solutions information erasing 203 Embedded Web Server accessing 20 adjusting brightness 200 checking the status of parts 210 checking the status of the printer cleaning 205 e‑mail canceling 86 e‑mail alerts low supply levels 239 paper jam 239 setting up 239 e‑mail options darkness 87 message...

User's Guide
Page 358
... paper types supported by printer 66 paper weights supported by printer 66 Parallel [x] menu 136 Parallel port [x] disabled [56] 279 parts checking status 210 checking, from printer control panel 210 checking, using the Embedded Web Server 210 storing 212 using genuine Lexmark 211 parts, ordering 300K maintenance kit 212 PCL Emul menu 192 PDF menu 191 Personal Identification Number method using 48 phone splitter 96 Photoconductor low [84.xy] 279 photoconductor unit ordering 211 replacing 213 Photoconductor very low [84.xy] 279 photos copying 76 placing separator sheets...
... paper types supported by printer 66 paper weights supported by printer 66 Parallel [x] menu 136 Parallel port [x] disabled [56] 279 parts checking status 210 checking, from printer control panel 210 checking, using the Embedded Web Server 210 storing 212 using genuine Lexmark 211 parts, ordering 300K maintenance kit 212 PCL Emul menu 192 PDF menu 191 Personal Identification Number method using 48 phone splitter 96 Photoconductor low [84.xy] 279 photoconductor unit ordering 211 replacing 213 Photoconductor very low [84.xy] 279 photos copying 76 placing separator sheets...

User's Guide
Page 362
... print jobs 73 streaked horizontal lines appear on prints 314 streaked vertical lines appear on prints 315 streaks appear 318 Substitute Size menu 122 supplies checking status 210 checking, from printer control panel 210 checking, using the Embedded Web Server 210 conserving 198 storing 212 using genuine Lexmark 211 using the control panel 85 sending fax at a scheduled time 106 Serial [x] menu 138 Serial port [x] disabled [56] 284 serial printing setting up 50 Set Date and Time menu 146 setting paper size 51 paper type 51 TCP/IP address 131 setting the fax number 104 setting the outgoing fax...
... print jobs 73 streaked horizontal lines appear on prints 314 streaked vertical lines appear on prints 315 streaks appear 318 Substitute Size menu 122 supplies checking status 210 checking, from printer control panel 210 checking, using the Embedded Web Server 210 conserving 198 storing 212 using genuine Lexmark 211 using the control panel 85 sending fax at a scheduled time 106 Serial [x] menu 138 Serial port [x] disabled [56] 284 serial printing setting up 50 Set Date and Time menu 146 setting paper size 51 paper type 51 TCP/IP address 131 setting the fax number 104 setting the outgoing fax...

