Printer Languages and Interfaces Technical Reference
Page 62
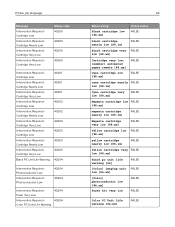
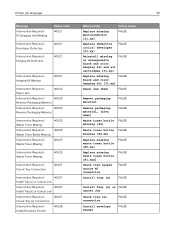
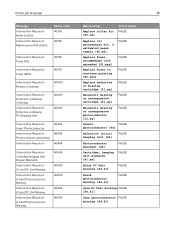
...Low Intervention Required Cartridge Very Low Intervention Required Cartridge Low Intervention Required Cartridge Nearly Low Intervention Required Cartridge Very Low Black PC Unit Life Warning 40201 40201 40201 40202 40202 40202 40203 40203 40203 40204 Intervention Required Photoconductor Low Intervention Required Photoconductor Low 40204 ... FALSE [88.xx] yellow cartridge nearly low [88.1x] FALSE Yellow cartridge very FALSE low [88.xx] Black pc unit life warning [84] [Color] imaging unit low [84.xx] FALSE FALSE [Color] photoconductor low [84.xx] Fuser kit very low FALSE FALSE Color PC...
...Low Intervention Required Cartridge Very Low Intervention Required Cartridge Low Intervention Required Cartridge Nearly Low Intervention Required Cartridge Very Low Black PC Unit Life Warning 40201 40201 40201 40202 40202 40202 40203 40203 40203 40204 Intervention Required Photoconductor Low Intervention Required Photoconductor Low 40204 ... FALSE [88.xx] yellow cartridge nearly low [88.1x] FALSE Yellow cartridge very FALSE low [88.xx] Black pc unit life warning [84] [Color] imaging unit low [84.xx] FALSE FALSE [Color] photoconductor low [84.xx] Fuser kit very low FALSE FALSE Color PC...
Printer Languages and Interfaces Technical Reference
Page 63
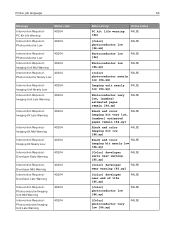
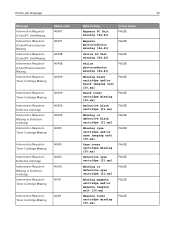
... Low 40204 Intervention Required Developer Early Warning 40204 Intervention Required Developer Mid Warning Intervention Required Developer Late Warning 40204 40204 Intervention Required Photoconductor/Imaging Unit Mid Warning Intervention Required Photoconductor/Imaging Unit Late Warning 40204 40204 63 Return string PC kit life warning [84] Online status FALSE [Color] photoconductor low [84.xx] Photoconductor low...
... Low 40204 Intervention Required Developer Early Warning 40204 Intervention Required Developer Mid Warning Intervention Required Developer Late Warning 40204 40204 Intervention Required Photoconductor/Imaging Unit Mid Warning Intervention Required Photoconductor/Imaging Unit Late Warning 40204 40204 63 Return string PC kit life warning [84] Online status FALSE [Color] photoconductor low [84.xx] Photoconductor low...
Printer Languages and Interfaces Technical Reference
Page 69
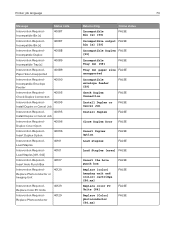
...Cartridge Intervention Required Defective Print Cartridge Status code 40021 40021 Intervention Required Defective Cartridge Intervention Required Imaging Unit Defective 40021 40021 Intervention Required Unsupported Cartridge 40021 Intervention Required - 40021 Unsupported Print Cartridge ...40021 Cartridge Region Mismatch Intervention Required - 40021 Cartridge Region Mismatch Intervention Required Cartridge Missing Intervention Required PC/Imaging Unit Defective 40021 40021 Intervention Required Developer Missing 40021 Return string Replace defective cartridge [31.xx] Online ...
...Cartridge Intervention Required Defective Print Cartridge Status code 40021 40021 Intervention Required Defective Cartridge Intervention Required Imaging Unit Defective 40021 40021 Intervention Required Unsupported Cartridge 40021 Intervention Required - 40021 Unsupported Print Cartridge ...40021 Cartridge Region Mismatch Intervention Required - 40021 Cartridge Region Mismatch Intervention Required Cartridge Missing Intervention Required PC/Imaging Unit Defective 40021 40021 Intervention Required Developer Missing 40021 Return string Replace defective cartridge [31.xx] Online ...
Printer Languages and Interfaces Technical Reference
Page 70
Printer job language 70 Message Intervention Required PC/Imaging Unit Missing Intervention Required Developer Defective Intervention Required Imaging Kit Defective Status code 40021 40021 40021 Intervention Required Imaging Kit Missing 40021 Intervention Required Paper Jam 40022 Intervention Required - 40025 Remove ... [color] developer [31.xy] FALSE Reinstall missing or unresponsive black and color imaging kit and all cartridges [31.xy] FALSE Replace missing FALSE black and color imaging kit [31.xy] Paper Jam [2xx] FALSE Remove packaging material Remove packaging material...
Printer job language 70 Message Intervention Required PC/Imaging Unit Missing Intervention Required Developer Defective Intervention Required Imaging Kit Defective Status code 40021 40021 40021 Intervention Required Imaging Kit Missing 40021 Intervention Required Paper Jam 40022 Intervention Required - 40025 Remove ... [color] developer [31.xy] FALSE Reinstall missing or unresponsive black and color imaging kit and all cartridges [31.xy] FALSE Replace missing FALSE black and color imaging kit [31.xy] Paper Jam [2xx] FALSE Remove packaging material Remove packaging material...
Printer Languages and Interfaces Technical Reference
Page 73
...Required Load Staples [G11, G12] 40101 Intervention Required Insert Hole Punch Box 40107 Intervention Required - 40129 Replace Photoconductor or Imaging Unit Intervention Required Replace Color PC Units Intervention Required Replace Photoconductor 40129 40129 Return string Incompatible Bin [x] [59] Online status FALSE Incompatible output FALSE bin [x]... Load staples FALSE FALSE Load Staples [area] FALSE Insert the hole punch box Replace [color] imaging unit and [color] cartridge [84.xx] Replace color PC Units [84] Replace [Color] photoconductor [84.xx] FALSE FALSE FALSE FALSE
...Required Load Staples [G11, G12] 40101 Intervention Required Insert Hole Punch Box 40107 Intervention Required - 40129 Replace Photoconductor or Imaging Unit Intervention Required Replace Color PC Units Intervention Required Replace Photoconductor 40129 40129 Return string Incompatible Bin [x] [59] Online status FALSE Incompatible output FALSE bin [x]... Load staples FALSE FALSE Load Staples [area] FALSE Insert the hole punch box Replace [color] imaging unit and [color] cartridge [84.xx] Replace color PC Units [84] Replace [Color] photoconductor [84.xx] FALSE FALSE FALSE FALSE
Printer Languages and Interfaces Technical Reference
Page 74
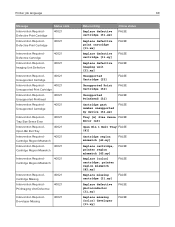
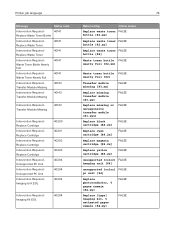
...Replace Cartridge Intervention Required Replace Cartridge Intervention Required Unsupported PC Unit Intervention Required Unsupported PC Unit Intervention Required Imaging Unit EOL 40200 40201 40202 40203 40204 40204 40204 Intervention Required Imaging Kit EOL 40204 Return string Online status Replace waste ....2x] FALSE Replace yellow cartridge [88.2x] FALSE unsupported [color] FALSE imaging unit [84] unsupported [color] FALSE pc unit [84] Replace photoconductor, 0 pages remain [84.xy] Replace [type] imaging kit, 0 estimated pages remain [84.xy] FALSE FALSE Printer job language ...
...Replace Cartridge Intervention Required Replace Cartridge Intervention Required Unsupported PC Unit Intervention Required Unsupported PC Unit Intervention Required Imaging Unit EOL 40200 40201 40202 40203 40204 40204 40204 Intervention Required Imaging Kit EOL 40204 Return string Online status Replace waste ....2x] FALSE Replace yellow cartridge [88.2x] FALSE unsupported [color] FALSE imaging unit [84] unsupported [color] FALSE pc unit [84] Replace photoconductor, 0 pages remain [84.xy] Replace [type] imaging kit, 0 estimated pages remain [84.xy] FALSE FALSE Printer job language ...
Printer Languages and Interfaces Technical Reference
Page 75
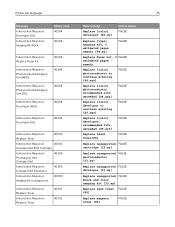
...Replace Toner 40300 Intervention Required - 40300 Unsupported Print Cartridge Intervention Required - PC/Imaging Unit Unsupported 40300 Intervention Required Unsupported Developer 40300 Intervention Required Imaging Kit Unsupported 40300 Intervention Required Replace Toner Intervention Required Replace Toner 40301 40302 ...FALSE developer [32.xy] Replace unsupported FALSE black and color imaging kit [32.xy] Replace cyan toner FALSE [88] Replace magenta toner [88] FALSE Photoconductor/Imaging Unit AEOL 40204 Intervention Required - Printer job language 75 Message Intervention...
...Replace Toner 40300 Intervention Required - 40300 Unsupported Print Cartridge Intervention Required - PC/Imaging Unit Unsupported 40300 Intervention Required Unsupported Developer 40300 Intervention Required Imaging Kit Unsupported 40300 Intervention Required Replace Toner Intervention Required Replace Toner 40301 40302 ...FALSE developer [32.xy] Replace unsupported FALSE black and color imaging kit [32.xy] Replace cyan toner FALSE [88] Replace magenta toner [88] FALSE Photoconductor/Imaging Unit AEOL 40204 Intervention Required - Printer job language 75 Message Intervention...
Printer Languages and Interfaces Technical Reference
Page 78
... Defective or Missing Cartridge Intervention Required Defective or Missing PC/Imaging Unit 40400 40400 Intervention Required Insert Photoconductor Intervention Required Photoconductor Abnormal Intervention Required - 40404 40404 40404 Intervention Required ...Cartridge/Imaging Unit Region Mismatch Intervention Required [Color] PC Unit Missing Intervention Required [Color] Photoconductor Missing Intervention Required [Color] PC Unit Missing Intervention Required [Color] Photoconductor Missing 40404 40405 40405 40406...
... Defective or Missing Cartridge Intervention Required Defective or Missing PC/Imaging Unit 40400 40400 Intervention Required Insert Photoconductor Intervention Required Photoconductor Abnormal Intervention Required - 40404 40404 40404 Intervention Required ...Cartridge/Imaging Unit Region Mismatch Intervention Required [Color] PC Unit Missing Intervention Required [Color] Photoconductor Missing Intervention Required [Color] PC Unit Missing Intervention Required [Color] Photoconductor Missing 40404 40405 40405 40406...
Printer Languages and Interfaces Technical Reference
Page 79
... Intervention Required Toner Cartridge Missing 40411 Return string Magenta PC Unit missing [84.41] Magenta photoconductor missing [84.41] Yellow PC Unit missing [84.41] Yellow photoconductor missing [84.41] Missing black cartridge and/or black imaging unit [30.xx] Black toner cartridge missing [30.xx] Defective... black cartridge [31.xx] Missing or defective black cartridge [31.xx] Missing cyan cartridge and/or cyan imaging unit [30.xx] Cyan toner cartridge missing [30.xx] Defective cyan cartridge [31.xx] Missing or defective cyan cartridge [31.xx] Missing ...
... Intervention Required Toner Cartridge Missing 40411 Return string Magenta PC Unit missing [84.41] Magenta photoconductor missing [84.41] Yellow PC Unit missing [84.41] Yellow photoconductor missing [84.41] Missing black cartridge and/or black imaging unit [30.xx] Black toner cartridge missing [30.xx] Defective... black cartridge [31.xx] Missing or defective black cartridge [31.xx] Missing cyan cartridge and/or cyan imaging unit [30.xx] Cyan toner cartridge missing [30.xx] Defective cyan cartridge [31.xx] Missing or defective cyan cartridge [31.xx] Missing ...

Printer Languages and Interfaces Technical Reference
Page 80
... Tray [x] Return string Defective magenta cartridge [31.xx] Online status FALSE Missing or defective magenta cartridge [31.xx] FALSE Missing yellow cartridge and/or yellow imaging unit [30.xx] FALSE Yellow toner cartridge missing [30.xx] FALSE Defective yellow cartridge [31.xx] FALSE Missing or defective yellow cartridge [31.xx] FALSE Fuser...
... Tray [x] Return string Defective magenta cartridge [31.xx] Online status FALSE Missing or defective magenta cartridge [31.xx] FALSE Missing yellow cartridge and/or yellow imaging unit [30.xx] FALSE Yellow toner cartridge missing [30.xx] FALSE Defective yellow cartridge [31.xx] FALSE Missing or defective yellow cartridge [31.xx] FALSE Fuser...
Lexmark MS/MX72x 82x series Disassembly of Waste Electrical and Electronic Equipment
Page 2
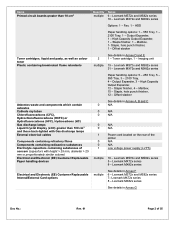
...handling options: 5 - 250 Tray, 5 - 550 Tray, 3 - 2100 Tray, 4 - Lexmark MS72x and MS82x series 5 - Lexmark MX72x series 8 - Fax, 1 - Mailbox, 1- Imaging unit multiple 19 - Lexmark MS72x and MS82x series 31 - Staple, hole punch finisher, 12 - Lexmark MX82x series See details in Annex A, B and C 0 N/A 0 N/A 0 N/A 0 ... pasty, as well as colour toner Plastic containing brominated flame retardants See details in Annex F 6 - Staple finisher, 1 - Lexmark MX72x and MX82x series Options: 1 - Staple, hole punch finisher, 1 - High Capacity Output Expander, 12 - Items Printed ...
...handling options: 5 - 250 Tray, 5 - 550 Tray, 3 - 2100 Tray, 4 - Lexmark MS72x and MS82x series 5 - Lexmark MX72x series 8 - Fax, 1 - Mailbox, 1- Imaging unit multiple 19 - Lexmark MS72x and MS82x series 31 - Staple, hole punch finisher, 12 - Lexmark MX82x series See details in Annex A, B and C 0 N/A 0 N/A 0 N/A 0 ... pasty, as well as colour toner Plastic containing brominated flame retardants See details in Annex F 6 - Staple finisher, 1 - Lexmark MX72x and MX82x series Options: 1 - Staple, hole punch finisher, 1 - High Capacity Output Expander, 12 - Items Printed ...

Lexmark MS/MX72x 82x series Disassembly of Waste Electrical and Electronic Equipment
Page 4
MS72x/ MS82x and MX72x/ MX82x Series Location Toner cartridge and Imaging Unit MS Series Doc No.: MX Series Rev. 01 Page 4 of 55
MS72x/ MS82x and MX72x/ MX82x Series Location Toner cartridge and Imaging Unit MS Series Doc No.: MX Series Rev. 01 Page 4 of 55

Users Guide PDF
Page 153
... cartridge 25B30861 25B30902 25B31011 25B31072 1 Supported only in the Lexmark XM7355 printer model. 2 Supported only in the Lexmark XM7370 printer model. Asia Pacific 25B31211 25B31222 Latin America 25B31281 25B31292 Regular toner cartridges Item Ultra high yield toner cartridge Worldwide 58D0UA0 Ordering an imaging unit Extremely low print coverage for extended periods of Europe, Middle...
... cartridge 25B30861 25B30902 25B31011 25B31072 1 Supported only in the Lexmark XM7355 printer model. 2 Supported only in the Lexmark XM7370 printer model. Asia Pacific 25B31211 25B31222 Latin America 25B31281 25B31292 Regular toner cartridges Item Ultra high yield toner cartridge Worldwide 58D0UA0 Ordering an imaging unit Extremely low print coverage for extended periods of Europe, Middle...
Users Guide PDF
Page 154
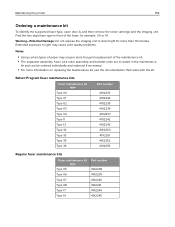
... the printer 154 Ordering a maintenance kit To identify the supported fuser type, open door A, and then remove the toner cartridge and the imaging unit. Return Program fuser maintenance kits Fuser maintenance kit type Type 00 Type 01 Type 02 Type 03 Type 04 Type 11 Type 13 Type ... Type 05 41X2238 Type 06 41X2239 Type 07 41X2240 Type 08 41X2241 Type 17 41X2244 Type 19 41X2245 Warning-Potential Damage: Do not expose the imaging unit to light may cause print quality problems. Notes: • Using certain types of paper may require more than 10 minutes. Find the two‑...
... the printer 154 Ordering a maintenance kit To identify the supported fuser type, open door A, and then remove the toner cartridge and the imaging unit. Return Program fuser maintenance kits Fuser maintenance kit type Type 00 Type 01 Type 02 Type 03 Type 04 Type 11 Type 13 Type ... Type 05 41X2238 Type 06 41X2239 Type 07 41X2240 Type 08 41X2241 Type 17 41X2244 Type 19 41X2245 Warning-Potential Damage: Do not expose the imaging unit to light may cause print quality problems. Notes: • Using certain types of paper may require more than 10 minutes. Find the two‑...

Users Guide PDF
Page 157
Maintaining the printer 157 4 Insert the new toner cartridge. 5 Close the door. Warning-Potential Damage: To prevent damage from electrostatic discharge, touch any exposed metal frame of the printer before accessing or touching interior areas of the printer. 2 Remove the toner cartridge. Replacing the imaging unit 1 Open door A.
Maintaining the printer 157 4 Insert the new toner cartridge. 5 Close the door. Warning-Potential Damage: To prevent damage from electrostatic discharge, touch any exposed metal frame of the printer before accessing or touching interior areas of the printer. 2 Remove the toner cartridge. Replacing the imaging unit 1 Open door A.

Users Guide PDF
Page 158
Warning-Potential Damage: Do not expose the imaging unit to redistribute the toner. Maintaining the printer 158 3 Remove the used imaging unit. 4 Unpack the new imaging unit, and then shake it to direct light for more than 10 minutes. Extended exposure to light may affect the quality of future print jobs. 5 Remove the packing material. Doing so may cause print quality problems. Warning-Potential Damage: Do not touch the photoconductor drum.
Warning-Potential Damage: Do not expose the imaging unit to redistribute the toner. Maintaining the printer 158 3 Remove the used imaging unit. 4 Unpack the new imaging unit, and then shake it to direct light for more than 10 minutes. Extended exposure to light may affect the quality of future print jobs. 5 Remove the packing material. Doing so may cause print quality problems. Warning-Potential Damage: Do not touch the photoconductor drum.

Users Guide PDF
Page 159
Warning-Potential Damage: To prevent damage from a hot component, allow the surface to cool before accessing or touching interior areas of the printer. Replacing the fuser 1 Open door C. To reduce the risk of injury from electrostatic discharge, touch any exposed metal frame of the printer might be hot. Maintaining the printer 159 6 Insert the new imaging unit. 7 Insert the toner cartridge. 8 Close the door. CAUTION-HOT SURFACE: The inside of the printer before touching it.
Warning-Potential Damage: To prevent damage from a hot component, allow the surface to cool before accessing or touching interior areas of the printer. Replacing the fuser 1 Open door C. To reduce the risk of injury from electrostatic discharge, touch any exposed metal frame of the printer might be hot. Maintaining the printer 159 6 Insert the new imaging unit. 7 Insert the toner cartridge. 8 Close the door. CAUTION-HOT SURFACE: The inside of the printer before touching it.

Users Guide PDF
Page 162
To reduce the risk of the printer might be hot. CAUTION-HOT SURFACE: The inside of injury from a hot component, allow the surface to cool before touching it. 5 Unpack the new transfer roller. Maintaining the printer 162 3 Remove the imaging unit. 4 Remove the used transfer roller.
To reduce the risk of the printer might be hot. CAUTION-HOT SURFACE: The inside of injury from a hot component, allow the surface to cool before touching it. 5 Unpack the new transfer roller. Maintaining the printer 162 3 Remove the imaging unit. 4 Remove the used transfer roller.

Users Guide PDF
Page 163
Maintaining the printer 163 6 Insert the new transfer roller until it clicks into place. 7 Insert the imaging unit. 8 Insert the toner cartridge. 9 Close the door. Replacing the pick roller 1 Remove the tray.
Maintaining the printer 163 6 Insert the new transfer roller until it clicks into place. 7 Insert the imaging unit. 8 Insert the toner cartridge. 9 Close the door. Replacing the pick roller 1 Remove the tray.

Users Guide PDF
Page 187
Extended exposure to direct light for more than 10 minutes. Warning-Potential Damage: Do not expose the imaging unit to light may cause print quality problems. Clearing jams 187 Paper jam in door A 1 Open door A. Warning-Potential Damage: To prevent damage from electrostatic discharge, touch any exposed metal frame of the printer before accessing or touching interior areas of the printer. 2 Remove the toner cartridge. 3 Remove the imaging unit.
Extended exposure to direct light for more than 10 minutes. Warning-Potential Damage: Do not expose the imaging unit to light may cause print quality problems. Clearing jams 187 Paper jam in door A 1 Open door A. Warning-Potential Damage: To prevent damage from electrostatic discharge, touch any exposed metal frame of the printer before accessing or touching interior areas of the printer. 2 Remove the toner cartridge. 3 Remove the imaging unit.

