User Guide
Page 250
...to function with genuine Lexmark supplies and parts. Consider the variable level of accuracy before purchasing or replacing supplies based on approximately 5 percent coverage per page. Item Return Program cartridge Toner Cartridge 24B6020 (XM7155, XM7163, XM7170, XM7263) 24B6826 (XM7270) Ordering a maintenance...pages The estimated number of the fuser. In other printer settings. Warning-Potential Damage: Do not expose the imaging unit to function best with Lexmark supplies and parts, and may affect the performance, reliability, or life of the fuser. All life indicators are...
...to function with genuine Lexmark supplies and parts. Consider the variable level of accuracy before purchasing or replacing supplies based on approximately 5 percent coverage per page. Item Return Program cartridge Toner Cartridge 24B6020 (XM7155, XM7163, XM7170, XM7263) 24B6826 (XM7270) Ordering a maintenance...pages The estimated number of the fuser. In other printer settings. Warning-Potential Damage: Do not expose the imaging unit to function best with Lexmark supplies and parts, and may affect the performance, reliability, or life of the fuser. All life indicators are...
User Guide
Page 251
... kit, see the instruction sheet that came with each part. For more information on replacing the imaging unit, see the instruction sheet that came with the supply. Lexmark Return Program fuser maintenance kit type Type XM7100 Series Return Program fuser maintenance kit Type 00 XM7100 ... kit Type 09 Part number 40X8425 40X8426 40X8427 40X8428 40X8429 Lexmark roller kit XM7100 Series roller kit Part number 40X7706 Lexmark ADF maintenance kit XM7100 Series ADF maintenance kit Part number 40X8431 Ordering an imaging unit Extremely low print coverage for extended periods of time may ...
... kit, see the instruction sheet that came with each part. For more information on replacing the imaging unit, see the instruction sheet that came with the supply. Lexmark Return Program fuser maintenance kit type Type XM7100 Series Return Program fuser maintenance kit Type 00 XM7100 ... kit Type 09 Part number 40X8425 40X8426 40X8427 40X8428 40X8429 Lexmark roller kit XM7100 Series roller kit Part number 40X7706 Lexmark ADF maintenance kit XM7100 Series ADF maintenance kit Part number 40X8431 Ordering an imaging unit Extremely low print coverage for extended periods of time may ...

User Guide
Page 255
Maintaining the printer 255 Warning-Potential Damage: When replacing a toner cartridge, do not leave the imaging unit exposed to light may cause print quality problems. 5 Close the multipurpose feeder door and the front cover. 2 1 Extended exposure to direct light for an extended period of time.
Maintaining the printer 255 Warning-Potential Damage: When replacing a toner cartridge, do not leave the imaging unit exposed to light may cause print quality problems. 5 Close the multipurpose feeder door and the front cover. 2 1 Extended exposure to direct light for an extended period of time.

User Guide
Page 256
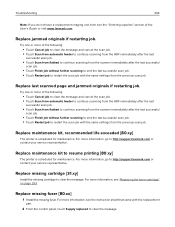
Maintaining the printer 256 Replacing the imaging unit 1 Lift the front cover, and then pull down the multipurpose feeder door. 1 2
Maintaining the printer 256 Replacing the imaging unit 1 Lift the front cover, and then pull down the multipurpose feeder door. 1 2

User Guide
Page 257
Maintaining the printer 257 2 Pull out the toner cartridge from the printer using the handle. 3 Lift the green handle, and then pull out the imaging unit from the printer. 1 2
Maintaining the printer 257 2 Pull out the toner cartridge from the printer using the handle. 3 Lift the green handle, and then pull out the imaging unit from the printer. 1 2

User Guide
Page 258
Warning-Potential Damage: Do not expose the imaging unit to light may affect the print quality of future print jobs. 6 Insert the imaging unit into the printer by aligning the arrows on the side rails of the imaging unit with the arrows on the side rails inside the printer. Doing so may cause print quality problems. Warning-Potential Damage: Do not touch the photoconductor drum. Maintaining the printer 258 4 Unpack the new imaging unit, and then shake it. 5 Remove all packing material from the imaging unit. Extended exposure to direct light for more than 10 minutes.
Warning-Potential Damage: Do not expose the imaging unit to light may affect the print quality of future print jobs. 6 Insert the imaging unit into the printer by aligning the arrows on the side rails of the imaging unit with the arrows on the side rails inside the printer. Doing so may cause print quality problems. Warning-Potential Damage: Do not touch the photoconductor drum. Maintaining the printer 258 4 Unpack the new imaging unit, and then shake it. 5 Remove all packing material from the imaging unit. Extended exposure to direct light for more than 10 minutes.

User Guide
Page 264
... periods, such as 123.123.123.123. • If you want to continue printing. Notes: • Selectable alerts can be set on the toner cartridge, imaging unit, and maintenance kit. • All selectable alerts can be set on the printer home screen. E‑mail selectable alert is reached, and the user needs...
... periods, such as 123.123.123.123. • If you want to continue printing. Notes: • Selectable alerts can be set on the toner cartridge, imaging unit, and maintenance kit. • All selectable alerts can be set on the printer home screen. E‑mail selectable alert is reached, and the user needs...

User Guide
Page 272
Extended exposure to direct light for more than 10 minutes. Note: Make sure that all paper fragments are removed. Clearing jams 272 2 Remove the toner cartridge. 3 Remove the imaging unit. 1 2 Warning-Potential Damage: Do not expose the imaging unit to light may cause print quality problems. 4 Remove the jammed paper.
Extended exposure to direct light for more than 10 minutes. Note: Make sure that all paper fragments are removed. Clearing jams 272 2 Remove the toner cartridge. 3 Remove the imaging unit. 1 2 Warning-Potential Damage: Do not expose the imaging unit to light may cause print quality problems. 4 Remove the jammed paper.

User Guide
Page 273
Clearing jams 273 1 2 5 Insert the imaging unit. Note: Use the arrows on the side of the printer as guides. 6 Insert the toner cartridge. Note: Use the arrows on the side of the printer as guides.
Clearing jams 273 1 2 5 Insert the imaging unit. Note: Use the arrows on the side of the printer as guides. 6 Insert the toner cartridge. Note: Use the arrows on the side of the printer as guides.

User Guide
Page 290
... [88.xy] If necessary, touch Continue on the printer control panel to clear the message and continue printing. Cartridge, imaging unit mismatch [41.xy] Use only a supported toner cartridge and imaging unit. Cartridge very low, [x] estimated pages remain [88.xy] You may need to replace the toner cartridge very soon. If...size and type of paper in the tray, specify the paper size and type in the Paper menu on the printer control panel to www.lexmark.com. Change [paper source] to reset the active bin for a linked set of supported supplies, go to clear the message and continue ...
... [88.xy] If necessary, touch Continue on the printer control panel to clear the message and continue printing. Cartridge, imaging unit mismatch [41.xy] Use only a supported toner cartridge and imaging unit. Cartridge very low, [x] estimated pages remain [88.xy] You may need to replace the toner cartridge very soon. If...size and type of paper in the tray, specify the paper size and type in the Paper menu on the printer control panel to www.lexmark.com. Change [paper source] to reset the active bin for a linked set of supported supplies, go to clear the message and continue ...

User Guide
Page 294
...; From the printer control panel, touch Continue to clear the message. • Complete the Fax Server setup. Fax Station Name not set up . Imaging unit low [84.xy] You may need to clear the message and continue printing. Remove hub. Try one or more of the following : • From... to clear the message. • Turn off the printer, and then turn it back on the printer control panel to order a replacement imaging unit. If the message appears again after completing the setup, then contact your system support person. Fax Station Number not set up. An unsupported USB...
...; From the printer control panel, touch Continue to clear the message. • Complete the Fax Server setup. Fax Station Name not set up . Imaging unit low [84.xy] You may need to clear the message and continue printing. Remove hub. Try one or more of the following : • From... to clear the message. • Turn off the printer, and then turn it back on the printer control panel to order a replacement imaging unit. If the message appears again after completing the setup, then contact your system support person. Fax Station Number not set up. An unsupported USB...

User Guide
Page 295
... the tray. • From the printer control panel, touch Continue to clear the message and print using the indicated bin. Troubleshooting 295 Imaging unit nearly low [84.xy] If necessary, touch Continue on the printer control panel to clear the message and continue printing. Insert hole punch... box Insert the hole punch box into the finisher, and then touch Continue to replace the imaging unit very soon. If necessary, touch Continue on the printer control panel to clear the message and continue printing. Insert staple cartridge Try ...
... the tray. • From the printer control panel, touch Continue to clear the message and print using the indicated bin. Troubleshooting 295 Imaging unit nearly low [84.xy] If necessary, touch Continue on the printer control panel to clear the message and continue printing. Insert hole punch... box Insert the hole punch box into the finisher, and then touch Continue to replace the imaging unit very soon. If necessary, touch Continue on the printer control panel to clear the message and continue printing. Insert staple cartridge Try ...

User Guide
Page 299
...customer support, and then report the message. Troubleshooting 299 Maintenance kit nearly low [80.xy] For more information, visit the Lexmark support Web site at http://support.lexmark.com. Maintenance kit very low, [x] estimated pages remain [80.xy] You may need to clear the message. •.... • Touch Attempt to print to clear the message and continue printing. Non‑Lexmark [supply type], see User's Guide [33.xy] Note: The supply type can be toner cartridge or imaging unit. For more of the following : • From the printer control panel, touch Continue ...
...customer support, and then report the message. Troubleshooting 299 Maintenance kit nearly low [80.xy] For more information, visit the Lexmark support Web site at http://support.lexmark.com. Maintenance kit very low, [x] estimated pages remain [80.xy] You may need to clear the message. •.... • Touch Attempt to print to clear the message and continue printing. Non‑Lexmark [supply type], see User's Guide [33.xy] Note: The supply type can be toner cartridge or imaging unit. For more of the following : • From the printer control panel, touch Continue ...

User Guide
Page 303
... defective imaging unit to clear the message and continue printing. x and y can have the following values: Printer and toner cartridge regions Region number Region 0 Global 1 United States, Canada 2 European Economic Area (EEA), Switzerland 3 Asia Pacific, Australia, New Zealand 4 Latin America 5 Africa, Middle East, rest of the User's Guide or visit www.lexmark.com...
... defective imaging unit to clear the message and continue printing. x and y can have the following values: Printer and toner cartridge regions Region number Region 0 Global 1 United States, Canada 2 European Economic Area (EEA), Switzerland 3 Asia Pacific, Australia, New Zealand 4 Latin America 5 Africa, Middle East, rest of the User's Guide or visit www.lexmark.com...
User Guide
Page 304
...life exceeded [80.xy] The printer is scheduled for maintenance. Replace missing cartridge [31.xy] Install the missing cartridge to http://support.lexmark.com or contact your service representative. Replace missing fuser [80.xx] 1 Install the missing fuser. For more information, go to restart... more information, go to clear the message. Replace jammed originals if restarting job. Troubleshooting 304 Note: If you do not have a replacement imaging unit, then see the "Ordering supplies" section of the following : • Touch Cancel job to clear the message and cancel the scan job...
...life exceeded [80.xy] The printer is scheduled for maintenance. Replace missing cartridge [31.xy] Install the missing cartridge to http://support.lexmark.com or contact your service representative. Replace missing fuser [80.xx] 1 Install the missing fuser. For more information, go to restart... more information, go to clear the message. Replace jammed originals if restarting job. Troubleshooting 304 Note: If you do not have a replacement imaging unit, then see the "Ordering supplies" section of the following : • Touch Cancel job to clear the message and cancel the scan job...

User Guide
Page 305
...clear the message and continue printing. This error can also be caused by installing a genuine Lexmark cartridge, such as a MICR unit, that came with the supply. Replace unsupported imaging unit [32.xy] Remove the imaging unit, and then install a supported one to be used in this product. This error can ...also be caused by installing a genuine Lexmark imaging unit, such as a high yield cartridge, that came with the supply. For more information, see the instruction sheet that is installed...
...clear the message and continue printing. This error can also be caused by installing a genuine Lexmark cartridge, such as a MICR unit, that came with the supply. Replace unsupported imaging unit [32.xy] Remove the imaging unit, and then install a supported one to be used in this product. This error can ...also be caused by installing a genuine Lexmark imaging unit, such as a high yield cartridge, that came with the supply. For more information, see the instruction sheet that is installed...
User Guide
Page 306
... 32.19 32.22 32.25 32.28 32.31 32.34 32.37 For more information, see the "Ordering supplies" section or visit www.lexmark.com. Try one or more of the following : • Replace the fuser wiper in the printer hard disk. • From the printer control panel, touch... of the following : • From the printer control panel, touch Restore to clear the message and continue printing. Note: If you do not have a replacement imaging unit, then see "Using genuine Lexmark parts and supplies" on page 250.
... 32.19 32.22 32.25 32.28 32.31 32.34 32.37 For more information, see the "Ordering supplies" section or visit www.lexmark.com. Try one or more of the following : • Replace the fuser wiper in the printer hard disk. • From the printer control panel, touch... of the following : • From the printer control panel, touch Restore to clear the message and continue printing. Note: If you do not have a replacement imaging unit, then see "Using genuine Lexmark parts and supplies" on page 250.

User Guide
Page 327
...;ed in the tray. Step 2 Go to step 2. Contact customer support. 1 Remove the toner cartridge. 2 Remove the imaging unit. The problem is solved. Is the page or image clipped? Troubleshooting 327 Action Step 1 a Move the width and length guides in the tray to the correct positions for more... of the following: • Specify the paper size from the Print dialog. Step 4 a Reinstall the imaging unit. b Resend the print job. b Resend the print job. b Resend the print job. The problem is solved. Yes Go to step 3. Do ...
...;ed in the tray. Step 2 Go to step 2. Contact customer support. 1 Remove the toner cartridge. 2 Remove the imaging unit. The problem is solved. Is the page or image clipped? Troubleshooting 327 Action Step 1 a Move the width and length guides in the tray to the correct positions for more... of the following: • Specify the paper size from the Print dialog. Step 4 a Reinstall the imaging unit. b Resend the print job. b Resend the print job. b Resend the print job. The problem is solved. Yes Go to step 3. Do ...

User Guide
Page 328
... The problem is a From the Quality Menu on the printer control panel, decrease solved. Warning-Potential Damage: Do not expose the imaging unit to step 2. Did the gray background disappear from the prints? No Go to direct light for printing on prints Leading edge ABCDE ... in the tray matches the solved. Extended exposure to light can cause print quality problems. c Install the imaging unit, and then the cartridge. d Resend the print job. Step 2 Reinstall the imaging unit and the toner cartridge. b Resend the print job. a Remove the toner cartridge. Note: Use a ...
... The problem is a From the Quality Menu on the printer control panel, decrease solved. Warning-Potential Damage: Do not expose the imaging unit to step 2. Did the gray background disappear from the prints? No Go to direct light for printing on prints Leading edge ABCDE ... in the tray matches the solved. Extended exposure to light can cause print quality problems. c Install the imaging unit, and then the cartridge. d Resend the print job. Step 2 Reinstall the imaging unit and the toner cartridge. b Resend the print job. a Remove the toner cartridge. Note: Use a ...

User Guide
Page 329
...fill pattern. Do horizontal voids appear on prints? Warning-Potential Damage: Do not expose the imaging unit to light may cause print quality problems. 3 Reinstall the imaging unit, and then the cartridge. a Load the specified tray or feeder with a recommended type... of paper. a Redistribute the toner in the imaging unit. 1 Remove the toner cartridge, and then the imaging unit. 2 Firmly shake the imaging unit. solved. a Make sure your software program is solved. b Resend the print job. Do horizontal...
...fill pattern. Do horizontal voids appear on prints? Warning-Potential Damage: Do not expose the imaging unit to light may cause print quality problems. 3 Reinstall the imaging unit, and then the cartridge. a Load the specified tray or feeder with a recommended type... of paper. a Redistribute the toner in the imaging unit. 1 Remove the toner cartridge, and then the imaging unit. 2 Firmly shake the imaging unit. solved. a Make sure your software program is solved. b Resend the print job. Do horizontal...

