Network Scan Drivers
Page 7
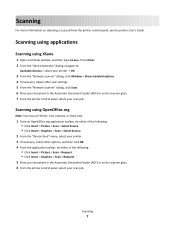
... options. 4 If necessary, adjust other options, and then click OK. 4 From the application toolbar, do either of the following: • Click Insert > Picture > Scan > Request. • Click Insert > Graphics > Scan > Request. 5 Place your document in the Automatic Document Feeder (ADF) or on the ...: You may use Writer, Calc, Impress, or Draw only. 1 From an OpenOffice.org application toolbar, do either of the following: • Click Insert > Picture > Scan > Select Source. • Click Insert > Graphics > Scan > Select Source. 2 From the "Device Used" menu, select your printer. 3 If...
... options. 4 If necessary, adjust other options, and then click OK. 4 From the application toolbar, do either of the following: • Click Insert > Picture > Scan > Request. • Click Insert > Graphics > Scan > Request. 5 Place your document in the Automatic Document Feeder (ADF) or on the ...: You may use Writer, Calc, Impress, or Draw only. 1 From an OpenOffice.org application toolbar, do either of the following: • Click Insert > Picture > Scan > Select Source. • Click Insert > Graphics > Scan > Select Source. 2 From the "Device Used" menu, select your printer. 3 If...
Network Scan Drivers
Page 9
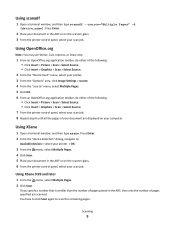
... You may use Writer, Calc, Impress, or Draw only. 1 From an OpenOffice.org application toolbar, do either of the following: • Click Insert > Picture > Scan > Select Source. • Click Insert > Graphics > Scan > Select Source. 2 From the "Device Used" menu, select your printer. 3 ...From the "source" menu, select Multiple Pages. 5 Click OK. 6 From an OpenOffice.org application toolbar, do either of the following: • Click Insert > Picture > Scan > Select Source. • Click Insert > Graphics > Scan > Select Source. 7 From the printer control panel, select your scan job. 8 Repeat ...
... You may use Writer, Calc, Impress, or Draw only. 1 From an OpenOffice.org application toolbar, do either of the following: • Click Insert > Picture > Scan > Select Source. • Click Insert > Graphics > Scan > Select Source. 2 From the "Device Used" menu, select your printer. 3 ...From the "source" menu, select Multiple Pages. 5 Click OK. 6 From an OpenOffice.org application toolbar, do either of the following: • Click Insert > Picture > Scan > Select Source. • Click Insert > Graphics > Scan > Select Source. 7 From the printer control panel, select your scan job. 8 Repeat ...
Network Scan Drivers
Page 10
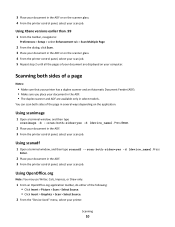
Using scanimage 1 Open a terminal window, and then type scanimage -b --scan-both sides of the following: • Click Insert > Picture > Scan > Select Source. • Click Insert > Graphics > Scan > Select Source. 2 From the "Device Used" menu, select your scan job. Scanning both -sides=yes -d [device_name]. Press ...
Using scanimage 1 Open a terminal window, and then type scanimage -b --scan-both sides of the following: • Click Insert > Picture > Scan > Select Source. • Click Insert > Graphics > Scan > Select Source. 2 From the "Device Used" menu, select your scan job. Scanning both -sides=yes -d [device_name]. Press ...
Network Scan Drivers
Page 11
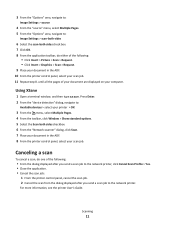
... Window > Show standard options. 5 Select the Scan both -sides check box. 7 Click OK. 8 From the application toolbar, do one of the following : • Click Insert > Picture > Scan > Request. • Click Insert > Graphics > Scan > Request. 9 Place your document in the ADF. 8 From the printer control panel, select your scan job. Canceling a scan...
... Window > Show standard options. 5 Select the Scan both -sides check box. 7 Click OK. 8 From the application toolbar, do one of the following : • Click Insert > Picture > Scan > Request. • Click Insert > Graphics > Scan > Request. 9 Place your document in the ADF. 8 From the printer control panel, select your scan job. Canceling a scan...

Network Scan Drivers
Page 12
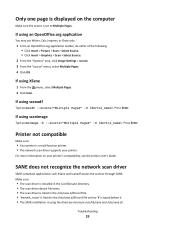
... Size or original-size Document sizes for all the printers are displayed as options. Make sure the printer supports the size you select. Click Insert > Picture > Scan > Select Source. - Note: The icon is found on the application, do either of the following to : Available devices > select your printer > OK 3 From the...
... Size or original-size Document sizes for all the printers are displayed as options. Make sure the printer supports the size you select. Click Insert > Picture > Scan > Select Source. - Note: The icon is found on the application, do either of the following to : Available devices > select your printer > OK 3 From the...
Network Scan Drivers
Page 19
....org application You may use Writer, Calc, Impress, or Draw only. 1 From an OpenOffice.org application toolbar, do either of the following: • Click Insert > Picture > Scan > Select Source. • Click Insert > Graphics > Scan > Select Source. 2 From the "Options" area, click Image Settings > source. 3 From the "source" menu, select Multiple Pages...
....org application You may use Writer, Calc, Impress, or Draw only. 1 From an OpenOffice.org application toolbar, do either of the following: • Click Insert > Picture > Scan > Select Source. • Click Insert > Graphics > Scan > Select Source. 2 From the "Options" area, click Image Settings > source. 3 From the "source" menu, select Multiple Pages...
Card Stock & Label Guide
Page 38
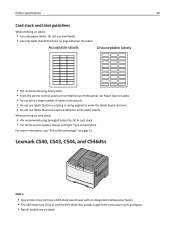
... to Labels. • Do not print a large number of labels continuously. • Do not use labels that have coating or sizing applied to Card Stock. Lexmark C540, C543, C544, and C546dtn Notes: • Your printer may not have no gaps between the labels. For more information, see "Pick roller technology" on...; The 250‑sheet tray (Tray 1) and the 650‑sheet duo drawer support the same paper sizes and types. • Not all models are pictured.
... to Labels. • Do not print a large number of labels continuously. • Do not use labels that have coating or sizing applied to Card Stock. Lexmark C540, C543, C544, and C546dtn Notes: • Your printer may not have no gaps between the labels. For more information, see "Pick roller technology" on...; The 250‑sheet tray (Tray 1) and the 650‑sheet duo drawer support the same paper sizes and types. • Not all models are pictured.


