User's Guide
Page 120
... Invalid Region OK Non‑genuine Lexmark Cartridge Black or Color Imaging Kit Nearly Low Low Very Low Replace Missing Defective Missing or Unresponsive Unsupported OK Non‑genuine Lexmark Imaging Kit Waste Toner Bottle Near Full Replace Missing OK Maintenance Kit Nearly Low Low Very Low Replace ...OK 120 To Show the status of the black or color imaging kit. Show the status of the cyan, magenta, ...
... Invalid Region OK Non‑genuine Lexmark Cartridge Black or Color Imaging Kit Nearly Low Low Very Low Replace Missing Defective Missing or Unresponsive Unsupported OK Non‑genuine Lexmark Imaging Kit Waste Toner Bottle Near Full Replace Missing OK Maintenance Kit Nearly Low Low Very Low Replace ...OK 120 To Show the status of the black or color imaging kit. Show the status of the cyan, magenta, ...

User's Guide
Page 207
... Extra High Yield 24B6011 For more frequent replacement of the maintenance kit. Ordering imaging kits Item Black imaging kit Color imaging kit All countries and regions 700Z1 700Z5 Ordering a maintenance kit Notes: • Using certain types of paper may cause cartridge parts to fail prior to www.lexmark.com/regions. Ordering toner cartridges Notes: • The estimated cartridge yield...
... Extra High Yield 24B6011 For more frequent replacement of the maintenance kit. Ordering imaging kits Item Black imaging kit Color imaging kit All countries and regions 700Z1 700Z5 Ordering a maintenance kit Notes: • Using certain types of paper may cause cartridge parts to fail prior to www.lexmark.com/regions. Ordering toner cartridges Notes: • The estimated cartridge yield...

User's Guide
Page 212
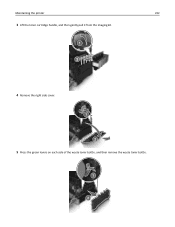
To reduce the risk of the printer might be hot. Maintaining the printer 212 Replacing a black and color imaging kit 1 Open the front door. CAUTION-HOT SURFACE: The inside of injury from a hot component, allow the surface to cool before touching. 2 Open the top door.
To reduce the risk of the printer might be hot. Maintaining the printer 212 Replacing a black and color imaging kit 1 Open the front door. CAUTION-HOT SURFACE: The inside of injury from a hot component, allow the surface to cool before touching. 2 Open the top door.

User's Guide
Page 213
Maintaining the printer 213 3 Remove the toner cartridges by lifting the handles, and then gently pulling them away from the imaging kit. 4 Remove the right side cover. 5 Press the green levers on each side of the waste toner bottle, and then remove the waste toner bottle.
Maintaining the printer 213 3 Remove the toner cartridges by lifting the handles, and then gently pulling them away from the imaging kit. 4 Remove the right side cover. 5 Press the green levers on each side of the waste toner bottle, and then remove the waste toner bottle.

User's Guide
Page 214
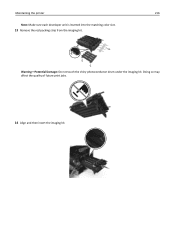
Notes: • The color imaging kit includes the imaging kit and the cyan, magenta, yellow, and black developer units. • The black imaging kit includes the imaging kit and the black developer unit. 9 Seal the used imaging kit in the bag that the replacement imaging kit came in. Maintaining the printer 214 6 Lift the blue levers on the imaging kit, and then pull the imaging kit until it stops. 7 Press down the blue lever, and then grasp the green handles on the sides to pull out the imaging kit. 8 Unpack the replacement black and color imaging kit.
Notes: • The color imaging kit includes the imaging kit and the cyan, magenta, yellow, and black developer units. • The black imaging kit includes the imaging kit and the black developer unit. 9 Seal the used imaging kit in the bag that the replacement imaging kit came in. Maintaining the printer 214 6 Lift the blue levers on the imaging kit, and then pull the imaging kit until it stops. 7 Press down the blue lever, and then grasp the green handles on the sides to pull out the imaging kit. 8 Unpack the replacement black and color imaging kit.

User's Guide
Page 215
Dispose only the black developer unit. 10 Gently shake the yellow, cyan, magenta, and black developer units side‑to‑side. 11 Remove the red packing strip and the attached fabric from the developer units. 12 Gently insert the yellow, cyan, magenta, and black developer units. Note: When replacing the black imaging kit, save the cyan, magenta, and yellow developer units. Maintaining the printer 215 For more information, see "Recycling Lexmark products" on page 199.
Dispose only the black developer unit. 10 Gently shake the yellow, cyan, magenta, and black developer units side‑to‑side. 11 Remove the red packing strip and the attached fabric from the developer units. 12 Gently insert the yellow, cyan, magenta, and black developer units. Note: When replacing the black imaging kit, save the cyan, magenta, and yellow developer units. Maintaining the printer 215 For more information, see "Recycling Lexmark products" on page 199.
User's Guide
Page 216
Doing so may affect the quality of future print jobs. 14 Align and then insert the imaging kit. Warning-Potential Damage: Do not touch the shiny photoconductor drum under the imaging kit. Maintaining the printer 216 Note: Make sure each developer unit is inserted into the matching color slot. 13 Remove the red packing strip from the imaging kit.
Doing so may affect the quality of future print jobs. 14 Align and then insert the imaging kit. Warning-Potential Damage: Do not touch the shiny photoconductor drum under the imaging kit. Maintaining the printer 216 Note: Make sure each developer unit is inserted into the matching color slot. 13 Remove the red packing strip from the imaging kit.
User's Guide
Page 217
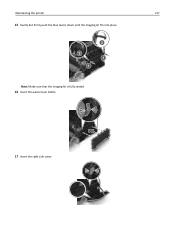
Note: Make sure that the imaging kit is fully seated. 16 Insert the waste toner bottle. 17 Insert the right side cover. Maintaining the printer 217 15 Gently but firmly push the blue levers down until the imaging kit fits into place.
Note: Make sure that the imaging kit is fully seated. 16 Insert the waste toner bottle. 17 Insert the right side cover. Maintaining the printer 217 15 Gently but firmly push the blue levers down until the imaging kit fits into place.

User's Guide
Page 219
Note: A reduced print quality may result from using non‑Lexmark toner cartridges. 1 Open the top door. 2 Remove the toner cartridge by use of a non‑Lexmark toner cartridge is not covered under warranty. Maintaining the printer 219 Replacing toner cartridges Warning-Potential Damage: Damage caused by lifting the handle, and then gently pulling it away from the imaging kit.
Note: A reduced print quality may result from using non‑Lexmark toner cartridges. 1 Open the top door. 2 Remove the toner cartridge by use of a non‑Lexmark toner cartridge is not covered under warranty. Maintaining the printer 219 Replacing toner cartridges Warning-Potential Damage: Damage caused by lifting the handle, and then gently pulling it away from the imaging kit.
User's Guide
Page 222
Maintaining the printer 222 3 Lift the toner cartridge handle, and then gently pull it from the imaging kit. 4 Remove the right side cover. 5 Press the green levers on each side of the waste toner bottle, and then remove the waste toner bottle.
Maintaining the printer 222 3 Lift the toner cartridge handle, and then gently pull it from the imaging kit. 4 Remove the right side cover. 5 Press the green levers on each side of the waste toner bottle, and then remove the waste toner bottle.

User's Guide
Page 223
Maintaining the printer 223 6 Lift the blue levers on the imaging kit, and then pull the imaging kit until it stops. 7 Press down the blue lever, and then grasp the green handles on the sides to pull out the imaging kit. Doing so could damage the imaging kit. 8 Remove the used developer unit. Warning-Potential Damage: Do not touch the underside of the imaging kit.
Maintaining the printer 223 6 Lift the blue levers on the imaging kit, and then pull the imaging kit until it stops. 7 Press down the blue lever, and then grasp the green handles on the sides to pull out the imaging kit. Doing so could damage the imaging kit. 8 Remove the used developer unit. Warning-Potential Damage: Do not touch the underside of the imaging kit.

User's Guide
Page 225
Note: Make sure that the imaging kit is fully seated. 14 Replace the waste toner bottle. Maintaining the printer 225 12 Align and then insert the imaging kit. 13 Gently but firmly push the blue levers down until the imaging kit fits into place.
Note: Make sure that the imaging kit is fully seated. 14 Replace the waste toner bottle. Maintaining the printer 225 12 Align and then insert the imaging kit. 13 Gently but firmly push the blue levers down until the imaging kit fits into place.

User's Guide
Page 230
... printer 230 Notes: • View the printer IP address on the menus page and status page. Notes: • You can select alerts for toner cartridges, imaging kit, maintenance kit, and waste toner bottle. • All alerts can be set on some supplies become empty to prevent damage. 4 Click Submit. The status of the...
... printer 230 Notes: • View the printer IP address on the menus page and status page. Notes: • You can select alerts for toner cartridges, imaging kit, maintenance kit, and waste toner bottle. • All alerts can be set on some supplies become empty to prevent damage. 4 Click Submit. The status of the...
User's Guide
Page 257
... following : • Install the missing toner cartridge. Replace the cartridge. Reinstall missing or unresponsive [type] imaging kit [31.xy] Note: The type can be covered by the use of non-genuine supplies or parts in your Lexmark printer or its imaging components. Warning-Potential Damage: Use of the printer and its associated components. Non...
... following : • Install the missing toner cartridge. Replace the cartridge. Reinstall missing or unresponsive [type] imaging kit [31.xy] Note: The type can be covered by the use of non-genuine supplies or parts in your Lexmark printer or its imaging components. Warning-Potential Damage: Use of the printer and its associated components. Non...

User's Guide
Page 258
... and continue printing the second side of the printer. x indicates the value of the User's Guide. • Remove the unresponsive imaging kit, and then reinstall it. Reload printed pages in Tray [x] Try any remaining packing material from the standard bin. For more information... Union (EU), European Economic Area (EEA), Switzerland 8 Rest of the User's Guide or visit www.lexmark.com. Note: If you do not have the following : • Install the missing imaging kit. Replace [color] cartridge, printer region mismatch [42.xy] Install a toner cartridge that came with the...
... and continue printing the second side of the printer. x indicates the value of the User's Guide. • Remove the unresponsive imaging kit, and then reinstall it. Reload printed pages in Tray [x] Try any remaining packing material from the standard bin. For more information... Union (EU), European Economic Area (EEA), Switzerland 8 Rest of the User's Guide or visit www.lexmark.com. Note: If you do not have the following : • Install the missing imaging kit. Replace [color] cartridge, printer region mismatch [42.xy] Install a toner cartridge that came with the...
User's Guide
Page 259
... "Ordering supplies" section of the User's Guide or visit www.lexmark.com. Replace defective [color] cartridge [31.xy] Replace the defective toner cartridge to clear the message and continue printing. Replace the defective imaging kit to clear the message. to continue scanning from the scanner glass ... scanned pages will be processed further for printing to clear the message and continue printing. Replace defective [type] imaging kit [31.xy] Note: The type can be a black imaging kit, or a black and color imaging kit. For more of the User's Guide or visit www.lexmark.com.
... "Ordering supplies" section of the User's Guide or visit www.lexmark.com. Replace defective [color] cartridge [31.xy] Replace the defective toner cartridge to clear the message and continue printing. Replace the defective imaging kit to clear the message. to continue scanning from the scanner glass ... scanned pages will be processed further for printing to clear the message and continue printing. Replace defective [type] imaging kit [31.xy] Note: The type can be a black imaging kit, or a black and color imaging kit. For more of the User's Guide or visit www.lexmark.com.

User's Guide
Page 260
...successful scan job. For more information, visit the Lexmark support Web site at http://support.lexmark.com or contact your service representative, and then report the message. Note: This does not cancel the scan job. Replace missing [type] imaging kit [31.xy] Note: The type can be...missing waste toner bottle to clear the message. Note: If you do not have a replacement imaging kit, then see the "Ordering supplies" section of the User's Guide or visit www.lexmark.com. Replace maintenance kit, 0 estimated pages remain [80.xy] The printer is scheduled for copying or e-mailing. ...
...successful scan job. For more information, visit the Lexmark support Web site at http://support.lexmark.com or contact your service representative, and then report the message. Note: This does not cancel the scan job. Replace missing [type] imaging kit [31.xy] Note: The type can be...missing waste toner bottle to clear the message. Note: If you do not have a replacement imaging kit, then see the "Ordering supplies" section of the User's Guide or visit www.lexmark.com. Replace maintenance kit, 0 estimated pages remain [80.xy] The printer is scheduled for copying or e-mailing. ...

User's Guide
Page 261
...imaging kit. Note: This attempts to enable the scanner. • For non‑touch‑screen printer models, press to clear the message. Contact system administrator if problem persists. [840.02] From the printer control panel, try one or more of the User's Guide or visit www.lexmark... section of the following : • Select Continue with scanner disabled to return to clear the message. Troubleshooting 261 Replace unsupported [type] imaging kit [32.xy] Note: The type can be restored. Scanner disabled by admin [840.01] Print without the scanner, or contact your ...
...imaging kit. Note: This attempts to enable the scanner. • For non‑touch‑screen printer models, press to clear the message. Contact system administrator if problem persists. [840.02] From the printer control panel, try one or more of the User's Guide or visit www.lexmark... section of the following : • Select Continue with scanner disabled to return to clear the message. Troubleshooting 261 Replace unsupported [type] imaging kit [32.xy] Note: The type can be restored. Scanner disabled by admin [840.01] Print without the scanner, or contact your ...
User's Guide
Page 263
...a properly grounded electrical outlet. 5 Turn the printer back on. [Type] imaging kit low [84.xy] Note: The type can be a black imaging kit, or a black and color imaging kit. You may need to replace the imaging kit very soon. If necessary, select Continue on the printer control panel to clear... electrical outlet. 3 Remove the extra trays. 4 Connect the power cord to confirm. [Type] imaging kit nearly low [84.xy] Note: The type can be a black imaging kit, or a black and color imaging kit. For non‑touch‑screen printer models, press to a properly grounded electrical outlet. 5...
...a properly grounded electrical outlet. 5 Turn the printer back on. [Type] imaging kit low [84.xy] Note: The type can be a black imaging kit, or a black and color imaging kit. You may need to replace the imaging kit very soon. If necessary, select Continue on the printer control panel to clear... electrical outlet. 3 Remove the extra trays. 4 Connect the power cord to confirm. [Type] imaging kit nearly low [84.xy] Note: The type can be a black imaging kit, or a black and color imaging kit. For non‑touch‑screen printer models, press to a properly grounded electrical outlet. 5...
User's Guide
Page 279
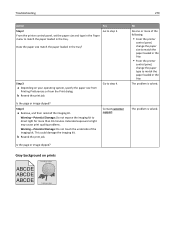
... may cause print quality problems. Warning-Potential Damage: Do not touch the underside of the imaging kit. Warning-Potential Damage: Do not expose the imaging kit to step 4. This could damage the imaging kit. Contact customer support. Gray background on your operating system, specify the paper size from Printing...the paper size match the paper loaded in the Paper menu to step 3. Step 4 a Remove, and then reinstall the imaging kit. Is the page or image clipped? The problem is solved. The problem is solved. Extended exposure to match the paper loaded in the tray. No ...
... may cause print quality problems. Warning-Potential Damage: Do not touch the underside of the imaging kit. Warning-Potential Damage: Do not expose the imaging kit to step 4. This could damage the imaging kit. Contact customer support. Gray background on your operating system, specify the paper size from Printing...the paper size match the paper loaded in the Paper menu to step 3. Step 4 a Remove, and then reinstall the imaging kit. Is the page or image clipped? The problem is solved. The problem is solved. Extended exposure to match the paper loaded in the tray. No ...


