Setup Guide
Page 19
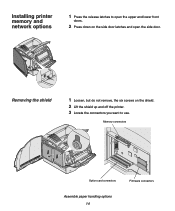
Memory connectors Option card connectors Firmware connectors Assemble paper handling options 14 Installing printer memory and network options 1 Press the release latches to use. Removing the shield 1 Loosen, but do not remove, the six screws on the side door latches and open the upper and lower front doors. 2 Press down on the shield. 2 Lift the shield up and off the printer. 3 Locate the connectors you want to open the side door.
Memory connectors Option card connectors Firmware connectors Assemble paper handling options 14 Installing printer memory and network options 1 Press the release latches to use. Removing the shield 1 Loosen, but do not remove, the six screws on the side door latches and open the upper and lower front doors. 2 Press down on the shield. 2 Lift the shield up and off the printer. 3 Locate the connectors you want to open the side door.
Setup Guide
Page 20
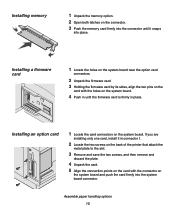
... into the system board connector. Assemble paper handling options 15 If you are installing only one card, install it snaps into the connector until the firmware card is firmly in connector 1. 2 Locate the two screws on the back of the printer that attach the metal plate to the slot. 3...with the holes on the connector. 3 Push the memory card firmly into place. Installing a firmware card 1 Locate the holes on the system board near the option card connectors. 2 Unpack the firmware card. 3 Holding the firmware card by its sides, align the two pins on the card with the connector on the...
... into the system board connector. Assemble paper handling options 15 If you are installing only one card, install it snaps into the connector until the firmware card is firmly in connector 1. 2 Locate the two screws on the back of the printer that attach the metal plate to the slot. 3...with the holes on the connector. 3 Push the memory card firmly into place. Installing a firmware card 1 Locate the holes on the system board near the option card connectors. 2 Unpack the firmware card. 3 Holding the firmware card by its sides, align the two pins on the card with the connector on the...
Setup Guide
Page 34
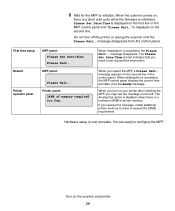
... need to initialize. Printer panel: 24MB of printer memory. The Analog Fax option is disabled unless there is completed, the MFP control panel displays the current time and date, plus the Ready message. When you turn off the printer or unplug the scanner until the Please ... setup is initialized. When the scanner comes on the second line. Please Set Date/Time is displayed on , there is a short wait cycle while the firmware is now complete. is displayed on the left. When initialization is completed, the Please Wait... The Please Set Date/Time prompt indicates that you may...
... need to initialize. Printer panel: 24MB of printer memory. The Analog Fax option is disabled unless there is completed, the MFP control panel displays the current time and date, plus the Ready message. When you turn off the printer or unplug the scanner until the Please ... setup is initialized. When the scanner comes on the second line. Please Set Date/Time is displayed on , there is a short wait cycle while the firmware is now complete. is displayed on the left. When initialization is completed, the Please Wait... The Please Set Date/Time prompt indicates that you may...


