Quick Reference
Page 1
...a simple copy 1 Make sure the MFP control panel is in copy mode and the Ready status message is available) • Press Reduce or Enlarge to scale the original document. • Select a Paper Saver setting to the scan destination. 5 Press Go/Send. ©Copyright Lexmark International, Inc., 2002. b Press ...add finishing such as a guide to feeding the paper and make . 4 Press Go/Send. P/N 15A3602 Printed in the automatic feeder or on the scanner as staple or punch if available. • Make sure the light is on next to the Duplex setting you see your originals in U.S.A. 3/02...
...a simple copy 1 Make sure the MFP control panel is in copy mode and the Ready status message is available) • Press Reduce or Enlarge to scale the original document. • Select a Paper Saver setting to the scan destination. 5 Press Go/Send. ©Copyright Lexmark International, Inc., 2002. b Press ...add finishing such as a guide to feeding the paper and make . 4 Press Go/Send. P/N 15A3602 Printed in the automatic feeder or on the scanner as staple or punch if available. • Make sure the light is on next to the Duplex setting you see your originals in U.S.A. 3/02...
User's Reference
Page 5
Scan to e-mail status 46 Scan to FTP status 47 Job Accounting status 48 Scan to e-mail errors 48 Scan to FTP errors 50 Work with destination lists 50 Chapter 11: Solving scanning problems 52 Preventing paper jams 52 Solve scanner problems 53 Index 54 Contents v
Scan to e-mail status 46 Scan to FTP status 47 Job Accounting status 48 Scan to e-mail errors 48 Scan to FTP errors 50 Work with destination lists 50 Chapter 11: Solving scanning problems 52 Preventing paper jams 52 Solve scanner problems 53 Index 54 Contents v
User's Reference
Page 6
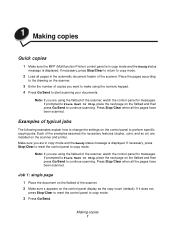
... according to start scanning your documents. Note: If you want to make using the numeric keypad. 4 Press Go/Send to the drawing on the scanner and printer. Each of the examples assumes the necessary features (duplex, color, and so on) are using the flatbed of copies you are installed .... If necessary, press Stop/Clear to reset the control panel to copy mode. 3 Press Go/Send. 1 Making copies Quick copies 1 Make sure the MFP (Multifunction Printer) control panel is in copy mode and the Ready status message is displayed. If prompted to Place Next Or Stop, place the next...
... according to start scanning your documents. Note: If you want to make using the numeric keypad. 4 Press Go/Send to the drawing on the scanner and printer. Each of the examples assumes the necessary features (duplex, color, and so on) are using the flatbed of copies you are installed .... If necessary, press Stop/Clear to reset the control panel to copy mode. 3 Press Go/Send. 1 Making copies Quick copies 1 Make sure the MFP (Multifunction Printer) control panel is in copy mode and the Ready status message is displayed. If prompted to Place Next Or Stop, place the next...
User's Reference
Page 7
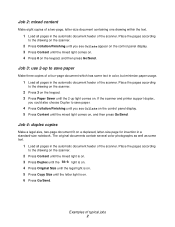
...a four-page document which has some text. 1 Load all pages in a standard-size notebook. If the scanner and printer support duplex, you could also choose Duplex to the drawing on the scanner. 2 Press Content until the mixed light is on. 3 Press Duplex until the light is on. 4 ...on . 6 Press Go/Send. Job 3: use 2-up light comes on a duplexed, letter-size page for insertion in the automatic document feeder of the scanner. The original documents contain several color photographs as well as some text in color, but minimize paper usage. 1 Load all pages in the automatic document...
...a four-page document which has some text. 1 Load all pages in a standard-size notebook. If the scanner and printer support duplex, you could also choose Duplex to the drawing on the scanner. 2 Press Content until the mixed light is on. 3 Press Duplex until the light is on. 4 ...on . 6 Press Go/Send. Job 3: use 2-up light comes on a duplexed, letter-size page for insertion in the automatic document feeder of the scanner. The original documents contain several color photographs as well as some text in color, but minimize paper usage. 1 Load all pages in the automatic document...
User's Reference
Page 8
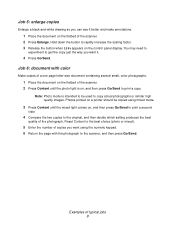
... increase the scaling factor. 3 Release the button when 125% appears on the control panel display. Photos printed on the flatbed of the scanner. 2 Press Enlarge. Examples of the scanner. 2 Press Content until the mixed light comes on, and then press Go/Send to print a second copy. 4 Compare the two ... you want using mixed mode. 3 Press Content until the photo light is on the flatbed of typical jobs 3 Hold down the button to the scanner, and then press Go/Send. Note: Photo mode is intended to be copied using the numeric keypad. 6 Return the page with color Make copies...
... increase the scaling factor. 3 Release the button when 125% appears on the control panel display. Photos printed on the flatbed of the scanner. 2 Press Enlarge. Examples of the scanner. 2 Press Content until the mixed light comes on, and then press Go/Send to print a second copy. 4 Compare the two ... you want using mixed mode. 3 Press Content until the photo light is on the flatbed of typical jobs 3 Hold down the button to the scanner, and then press Go/Send. Note: Photo mode is intended to be copied using the numeric keypad. 6 Return the page with color Make copies...
User's Reference
Page 10
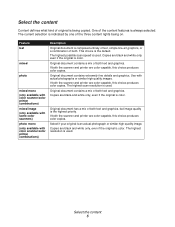
...of both text and graphics, but image quality is composed entirely of text, simple line-art graphics, or a combination of both the scanner and printer are black and white only, even if the original is the default. Feature text mixed photo mixed mono (only available with color... similar high quality images. Copies are color-capable, this choice produces color copies. If both . This choice is color. Use with color scanner/color printer combinations) Description Original document is the highest priority. Copies are black and white only, even if the original is color. Copies ...
...of both text and graphics, but image quality is composed entirely of text, simple line-art graphics, or a combination of both the scanner and printer are black and white only, even if the original is the default. Feature text mixed photo mixed mono (only available with color... similar high quality images. Copies are color-capable, this choice produces color copies. If both . This choice is color. Use with color scanner/color printer combinations) Description Original document is the highest priority. Copies are black and white only, even if the original is color. Copies ...
User's Reference
Page 11
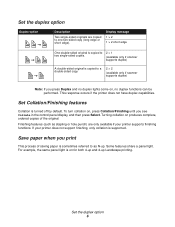
... light. Display message 1 > 2 1 > 2 short edge One double-sided original is copied to 2 > 1 two single-sided copies. (available only if scanner supports duplex) A double-sided original is copied to as stapling or hole punch) are copied to one two-sided copy (long edge or short edge...To turn collation on produces complete, ordered copies of saving paper is sometimes referred to a double-sided copy. 2 > 2 (available only if scanner supports duplex) Note: If you see Collate in the control panel display, and then press Select. If your printer supports finishing functions. Save paper...
... light. Display message 1 > 2 1 > 2 short edge One double-sided original is copied to 2 > 1 two single-sided copies. (available only if scanner supports duplex) A double-sided original is copied to as stapling or hole punch) are copied to one two-sided copy (long edge or short edge...To turn collation on produces complete, ordered copies of saving paper is sometimes referred to a double-sided copy. 2 > 2 (available only if scanner supports duplex) Note: If you see Collate in the control panel display, and then press Select. If your printer supports finishing functions. Save paper...
User's Reference
Page 13
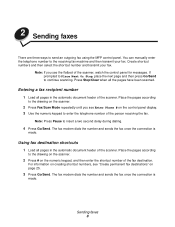
... numeric keypad, and then enter the shortcut number of the fax destination. Press Stop/Clear when all pages in the automatic document feeder of the scanner, watch the control panel for messages. Place the pages according to the receiving fax machine and then transmit your fax. 2 Sending faxes There are .... Note: If you see "Create permanent fax destinations" on the control panel display. 3 Use the numeric keypad to send an outgoing fax using the MFP control panel. Entering a fax recipient number 1 Load all the pages have been scanned. Place the pages according to the drawing on the...
... numeric keypad, and then enter the shortcut number of the fax destination. Press Stop/Clear when all pages in the automatic document feeder of the scanner, watch the control panel for messages. Place the pages according to the receiving fax machine and then transmit your fax. 2 Sending faxes There are .... Note: If you see "Create permanent fax destinations" on the control panel display. 3 Use the numeric keypad to send an outgoing fax using the MFP control panel. Entering a fax recipient number 1 Load all the pages have been scanned. Place the pages according to the drawing on the...
User's Reference
Page 14
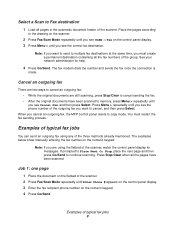
...outgoing fax: • While the original documents are using any of the three methods already mentioned. When you cancel an outgoing fax, the MFP control panel resets to continue scanning. You must create a permanent destination containing all the fax numbers of the group. If prompted to Place... sending the fax. • After the original documents have been scanned. Press Stop/Clear when all pages in the automatic document feeder of the scanner. The examples below show manually entering the fax number on the control panel display. 3 Press Menu > until you see SCAN → Fax...
...outgoing fax: • While the original documents are using any of the three methods already mentioned. When you cancel an outgoing fax, the MFP control panel resets to continue scanning. You must create a permanent destination containing all the fax numbers of the group. If prompted to Place... sending the fax. • After the original documents have been scanned. Press Stop/Clear when all pages in the automatic document feeder of the scanner. The examples below show manually entering the fax number on the control panel display. 3 Press Menu > until you see SCAN → Fax...
User's Reference
Page 15
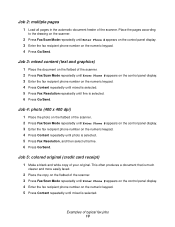
...10 This often produces a document that is much clearer and more easily faxed. 2 Place the copy on the flatbed of the scanner. Examples of the scanner. 3 Press Fax/Scan Mode repeatedly until Enter Phone # appears on the control panel display. 4 Enter the fax recipient phone number... keypad. 4 Press Content repeatedly until photo is selected. Job 5: colored original (credit card receipt) 1 Make a black and white copy of the scanner. 2 Press Fax/Scan Mode repeatedly until Enter Phone # appears on the control panel display. 3 Enter the fax recipient phone number on the numeric keypad...
...10 This often produces a document that is much clearer and more easily faxed. 2 Place the copy on the flatbed of the scanner. Examples of the scanner. 3 Press Fax/Scan Mode repeatedly until Enter Phone # appears on the control panel display. 4 Enter the fax recipient phone number... keypad. 4 Press Content repeatedly until photo is selected. Job 5: colored original (credit card receipt) 1 Make a black and white copy of the scanner. 2 Press Fax/Scan Mode repeatedly until Enter Phone # appears on the control panel display. 3 Enter the fax recipient phone number on the numeric keypad...
User's Reference
Page 17
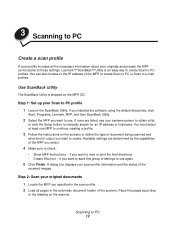
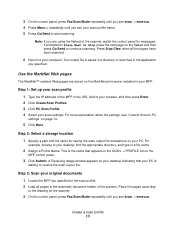
... hostname. If you installed the software using the default directories, click Start, Programs, Lexmark, MFP, and then ScanBack Utility. 2 Select the MFP you want to use . You must select at least one MFP to continue creating a profile. 3 Follow the instructions on the screens to define the...if you want to use again 5 Click Finish. Step 2: Scan your original documents 1 Locate the MFP you want to create. Lexmark™ ScanBack™ Utility is shipped on the scanner. A dialog box displays your Scan to e-mail profiles. If none are determined by the capabilities of ...
... hostname. If you installed the software using the default directories, click Start, Programs, Lexmark, MFP, and then ScanBack Utility. 2 Select the MFP you want to use . You must select at least one MFP to continue creating a profile. 3 Follow the instructions on the screens to define the...if you want to use again 5 Click Finish. Step 2: Scan your original documents 1 Locate the MFP you want to create. Lexmark™ ScanBack™ Utility is shipped on the scanner. A dialog box displays your Scan to e-mail profiles. If none are determined by the capabilities of ...
User's Reference
Page 18
... your scan settings. Use the MarkNet Web pages The MarkNet™ resident Web pages are using the flatbed of the scanner, watch the control panel for saving the scan output file somewhere on the MFP control panel. 3 Click Submit. Step 1: Set up your scan profile 1 Type the IP address of the... about the settings, see "Custom Scan to the drawing on your desktop indicating that appears in the URL field of the scanner. Press Stop/Clear when all pages in your MFP. 3 On the control panel, press Fax/Scan Mode repeatedly until you see SCAN → PROFILE. 4 Press Menu > repeatedly until...
... your scan settings. Use the MarkNet Web pages The MarkNet™ resident Web pages are using the flatbed of the scanner, watch the control panel for saving the scan output file somewhere on the MFP control panel. 3 Click Submit. Step 1: Set up your scan profile 1 Type the IP address of the... about the settings, see "Custom Scan to the drawing on your desktop indicating that appears in the URL field of the scanner. Press Stop/Clear when all pages in your MFP. 3 On the control panel, press Fax/Scan Mode repeatedly until you see SCAN → PROFILE. 4 Press Menu > repeatedly until...
User's Reference
Page 19
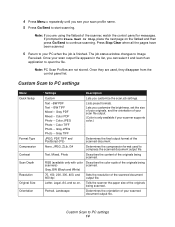
Gray JPEG Photo -- None, JPEG, ZLib, G4 Determines the compression format used , they are using the flatbed of the scanner, watch the control panel for messages. RGB (available only with color Describes the color scale of the scanned document output file. Gray, BW (... Photo -- Gray TIFF Lists preset formats. Lets you see your scan profile name. 5 Press Go/Send to your scanned document output file. Tells the scanner the paper size of the originals being scanned. Custom Scan to Image Received. Note: If you are used to continue scanning. 4 Press Menu > repeatedly...
Gray JPEG Photo -- None, JPEG, ZLib, G4 Determines the compression format used , they are using the flatbed of the scanner, watch the control panel for messages. RGB (available only with color Describes the color scale of the scanned document output file. Gray, BW (... Photo -- Gray TIFF Lists preset formats. Lets you see your scan profile name. 5 Press Go/Send to your scanned document output file. Tells the scanner the paper size of the originals being scanned. Custom Scan to Image Received. Note: If you are used to continue scanning. 4 Press Menu > repeatedly...
User's Reference
Page 20
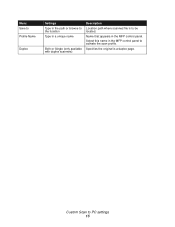
Name that appears in a unique name Both or Single (only available with duplex scanners) Description Location path where scanned file is a duplex page. Specifies the original is to be located. Custom Scan to activate the scan profile. Menu Save to Profile Name Duplex Settings Type in the path or browse to the location Type in the MFP control panel. Select this name in the MFP control panel to PC settings 15
Name that appears in a unique name Both or Single (only available with duplex scanners) Description Location path where scanned file is a duplex page. Specifies the original is to be located. Custom Scan to activate the scan profile. Menu Save to Profile Name Duplex Settings Type in the path or browse to the location Type in the MFP control panel. Select this name in the MFP control panel to PC settings 15
User's Reference
Page 21
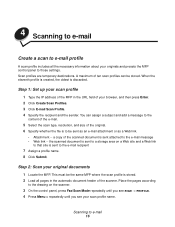
... the sender. Place the pages according to the drawing on a Web site and a Web link to that site is sent to a storage area on the scanner. 3 On the control panel, press Fax/Scan Mode repeatedly until you see SCAN → PROFILE. 4 Press Menu > repeatedly until you see your original ...documents 1 Locate the MFP. When the eleventh profile is created, the oldest is to be stored. Scan profiles are temporary destinations. the scanned document is sent to the e-mail...
... the sender. Place the pages according to the drawing on a Web site and a Web link to that site is sent to a storage area on the scanner. 3 On the control panel, press Fax/Scan Mode repeatedly until you see SCAN → PROFILE. 4 Press Menu > repeatedly until you see your original ...documents 1 Locate the MFP. When the eleventh profile is created, the oldest is to be stored. Scan profiles are temporary destinations. the scanned document is sent to the e-mail...
User's Reference
Page 22
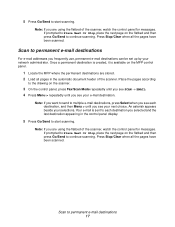
...e-mail destination. If prompted to Place Next Or Stop, place the next page on the MFP control panel. 1 Locate the MFP where the permanent destinations are using the flatbed of the scanner. Scan to continue scanning. Scan to permanent e-mail destinations For e-mail addresses you are using... the flatbed of the scanner, watch the control panel for messages. Your e-mail is available on ...
...e-mail destination. If prompted to Place Next Or Stop, place the next page on the MFP control panel. 1 Locate the MFP where the permanent destinations are using the flatbed of the scanner. Scan to continue scanning. Scan to permanent e-mail destinations For e-mail addresses you are using... the flatbed of the scanner, watch the control panel for messages. Your e-mail is available on ...

User's Reference
Page 23
... then press Select. 5 Press Go/Send to start scanning. If prompted to continue scanning. Press Stop/Clear when all pages in the MFP control panel. 1 Locate the MFP you want to FTP 18 FTP confirmation page FTP server: rome.gre.kidnet.bigcity.com Directory: web/scans Save Scan File (s) pic2000-03... the pages have been scanned. After the job is finished, an FTP confirmation page is printed. Note: If you are using the flatbed of the scanner, watch the control panel for messages. The confirmation page includes the FTP server, directory, and the file name. 5 Scanning to FTP Scan to an...
... then press Select. 5 Press Go/Send to start scanning. If prompted to continue scanning. Press Stop/Clear when all pages in the MFP control panel. 1 Locate the MFP you want to FTP 18 FTP confirmation page FTP server: rome.gre.kidnet.bigcity.com Directory: web/scans Save Scan File (s) pic2000-03... the pages have been scanned. After the job is finished, an FTP confirmation page is printed. Note: If you are using the flatbed of the scanner, watch the control panel for messages. The confirmation page includes the FTP server, directory, and the file name. 5 Scanning to FTP Scan to an...
User's Reference
Page 25
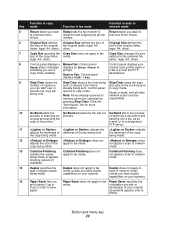
... sent. e-mail, or to copy mode. not apply to scan to network copy being made . 12 does not does adjusts the size of your scanner. Collation/Finishing does not apply to scan to network mode. 14 Duplex specifies the Duplex does not apply to save landscape) of the apply to...copy to Faxes, e-mails, and all other ). 7 Copy Size specifies the Copy Size does not apply to PDFs). Scan to fax mode. capabilities on your scanner. 15 Paper Saver lets you Paper Saver does not apply to fax Paper Saver specifies the print copies 2-up in order to fax type of...
... sent. e-mail, or to copy mode. not apply to scan to network copy being made . 12 does not does adjusts the size of your scanner. Collation/Finishing does not apply to scan to network mode. 14 Duplex specifies the Duplex does not apply to save landscape) of the apply to...copy to Faxes, e-mails, and all other ). 7 Copy Size specifies the Copy Size does not apply to PDFs). Scan to fax mode. capabilities on your scanner. 15 Paper Saver lets you Paper Saver does not apply to fax Paper Saver specifies the print copies 2-up in order to fax type of...
User's Reference
Page 27
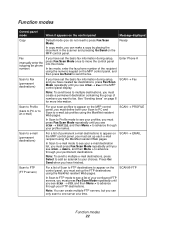
... To send faxes to multiple destinations, you must press Fax/Scan Mode repeatedly until you see SCAN → Fax in the scanner and pressing Go/Send on the MFP control panel. Press Go/ Send when you have created fax destinations, press Fax/Scan Mode repeatedly until you see SCAN →... through your permanent destinations. SCAN → EMAIL Scan to FTP (FTP servers) For a list of permanent e-mail destinations to appear on the MFP control panel, you must set the basic fax information during setup, press Fax/Scan Mode once to move the control panel into this mode. In...
... To send faxes to multiple destinations, you must press Fax/Scan Mode repeatedly until you see SCAN → Fax in the scanner and pressing Go/Send on the MFP control panel. Press Go/ Send when you have created fax destinations, press Fax/Scan Mode repeatedly until you see SCAN →... through your permanent destinations. SCAN → EMAIL Scan to FTP (FTP servers) For a list of permanent e-mail destinations to appear on the MFP control panel, you must set the basic fax information during setup, press Fax/Scan Mode once to move the control panel into this mode. In...
User's Reference
Page 28
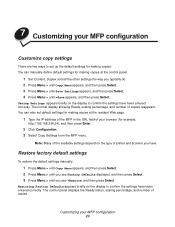
... reappears. The normal display showing Ready, scaling percentage, and number of copies. Restoring Factory Defaults appears briefly on the type of printer and scanner you see Factory Defaults displayed, and then press Select. 3 Press Menu > until =Save appears, and then press Select. Note: Many... settings for example, http://192.168.236.24), and then press Enter. 2 Click Configuration. 3 Select Copy Settings from the MFP menu. 7 Customizing your MFP configuration Customize copy settings There are two ways to set default settings for making copies at the control panel. 1 Set Content,...
... reappears. The normal display showing Ready, scaling percentage, and number of copies. Restoring Factory Defaults appears briefly on the type of printer and scanner you see Factory Defaults displayed, and then press Select. 3 Press Menu > until =Save appears, and then press Select. Note: Many... settings for example, http://192.168.236.24), and then press Enter. 2 Click Configuration. 3 Select Copy Settings from the MFP menu. 7 Customizing your MFP configuration Customize copy settings There are two ways to set default settings for making copies at the control panel. 1 Set Content,...


