IPDS Printer and Host Setup Guide
Page 61
.../SCS/TNe or printer firmware on the printer and host. Several jobs may result in jobs not printing correctly or hardware options (such as output bins or finishers) not operating correctly. Obtain an unused network address from your administrator. C. Solution to be updated. Problem 18: Active IPDS Ses.
.../SCS/TNe or printer firmware on the printer and host. Several jobs may result in jobs not printing correctly or hardware options (such as output bins or finishers) not operating correctly. Obtain an unused network address from your administrator. C. Solution to be updated. Problem 18: Active IPDS Ses.
User's Reference
Page 32
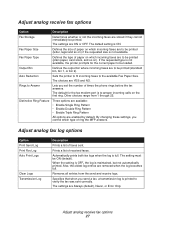
... prints both fax logs when the log is maintained, but not automatically printed. Fax Paper Type Defines the type of ring the MFP answers. The setting must be loaded. The default for the correct paper to answer incoming calls on which incoming faxes are enabled ...by default. The settings are to be printed (standard bin, bin 1, or bin 2). Distinctive Ring Feature Three options are available: • Enable Single Ring Pattern • Enable Double Ring Pattern • Enable Triple...
... prints both fax logs when the log is maintained, but not automatically printed. Fax Paper Type Defines the type of ring the MFP answers. The setting must be loaded. The default for the correct paper to answer incoming calls on which incoming faxes are enabled ...by default. The settings are to be printed (standard bin, bin 1, or bin 2). Distinctive Ring Feature Three options are available: • Enable Single Ring Pattern • Enable Double Ring Pattern • Enable Triple...
User's Reference
Page 33
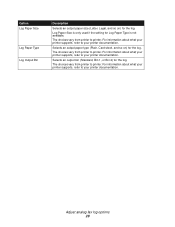
The choices vary from printer to printer. Adjust analog fax log options 28 Option Log Paper Size Log Paper Type Log Output Bin Description Selects an output paper size (Letter, Legal, and so on ) for the log. Selects an output paper type (Plain, Card stock, and so on )...the log. The choices vary from printer to your printer supports, refer to printer. The choices vary from printer to printer. Selects an output bin (Standard, Bin 1, or Bin 2) for Log Paper Type is only used if the setting for the log. Log Paper Size is not available. For information about what your...
The choices vary from printer to printer. Adjust analog fax log options 28 Option Log Paper Size Log Paper Type Log Output Bin Description Selects an output paper size (Letter, Legal, and so on ) for the log. Selects an output paper type (Plain, Card stock, and so on )...the log. The choices vary from printer to your printer supports, refer to printer. The choices vary from printer to printer. Selects an output bin (Standard, Bin 1, or Bin 2) for Log Paper Type is only used if the setting for the log. Log Paper Size is not available. For information about what your...
User's Reference
Page 59
... Ready never appears 38 selecting content 5 selecting media 7 D destination lists 50 duplex option, setting 6 F factory defaults, restoring copy settings 23 Fax log menu Log Output Bin 28 Log Paper Size 28 Log Paper Type 28 Fax send menu Automatic Redial 26 Default Content 26 Default Darkness 26 Dialing Mode 26 Fax...
... Ready never appears 38 selecting content 5 selecting media 7 D destination lists 50 duplex option, setting 6 F factory defaults, restoring copy settings 23 Fax log menu Log Output Bin 28 Log Paper Size 28 Log Paper Type 28 Fax send menu Automatic Redial 26 Default Content 26 Default Darkness 26 Dialing Mode 26 Fax...

Setup Guide
Page 27
3 Remove the top cover or any previously installed print media handling options from the printer. You will be needed if you remove the shelf. 4 Align and insert the scanner shelf mounting brackets into the ends of the plastic brackets so that the bail curves downward. Store the cover, it will not need the cover when the scanner shelf is positioned securely. 6 Place the tips of the wire bail into the slots on top of the printer. 5 Make sure the scanner shelf is attached. The wire bail came with the printer and rests in the standard output bin when installed. Set up the printer 22
3 Remove the top cover or any previously installed print media handling options from the printer. You will be needed if you remove the shelf. 4 Align and insert the scanner shelf mounting brackets into the ends of the plastic brackets so that the bail curves downward. Store the cover, it will not need the cover when the scanner shelf is positioned securely. 6 Place the tips of the wire bail into the slots on top of the printer. 5 Make sure the scanner shelf is attached. The wire bail came with the printer and rests in the standard output bin when installed. Set up the printer 22
Setup Guide
Page 36
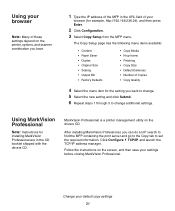
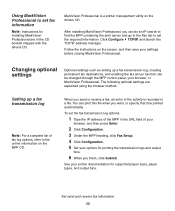
...The Copy Setup page has the following menu items available: • Content • Paper Saver • Duplex • Original Size • Scaling • Output Bin • Factory Defaults • Copy Media • N-up frame • Finishing • Copy Size • Default Darkness • Number of Copies •... Instructions for installing MarkVision Professional are in the URL field of your browser (for the setting you can do an IP search to find the MFP containing the print server and go to the Copy tab to change . 5 Select the new setting and click Submit. 6 Repeat steps 1 ...
...The Copy Setup page has the following menu items available: • Content • Paper Saver • Duplex • Original Size • Scaling • Output Bin • Factory Defaults • Copy Media • N-up frame • Finishing • Copy Size • Default Darkness • Number of Copies •... Instructions for installing MarkVision Professional are in the URL field of your browser (for the setting you can do an IP search to find the MFP containing the print server and go to the Copy tab to change . 5 Select the new setting and click Submit. 6 Repeat steps 1 ...

Setup Guide
Page 39
... route faxes received through the fax modem port on the print server (with modem) to an output bin on your printer. 1 Type the IP address of the MFP in the URL field of receive fax options, refer to get the correct time. If you are prompted for a password during the ...following instructions, see your options for Fax storage, Output bin, Rings to Answer, and so on the MFP CD. 8 After you must set the required fax information. You can access the configuration page. 5 Enter the required FCC information: ...
... route faxes received through the fax modem port on the print server (with modem) to an output bin on your printer. 1 Type the IP address of the MFP in the URL field of receive fax options, refer to get the correct time. If you are prompted for a password during the ...following instructions, see your options for Fax storage, Output bin, Rings to Answer, and so on the MFP CD. 8 After you must set the required fax information. You can access the configuration page. 5 Enter the required FCC information: ...
Setup Guide
Page 40
... Professional. See your printer documentation for printing the transmission logs and output bins. 6 When you send or receive a fax, an entry of your browser, and then press Enter. 2 Click Configuration. 3 Under the MFP heading, click Fax Setup. 4 Click Configuration. 5 Set your options for... supported paper sizes, paper types, and output bins. Set send and receive fax information 35 The following optional settings are in a file...
... Professional. See your printer documentation for printing the transmission logs and output bins. 6 When you send or receive a fax, an entry of your browser, and then press Enter. 2 Click Configuration. 3 Under the MFP heading, click Fax Setup. 4 Click Configuration. 5 Set your options for... supported paper sizes, paper types, and output bins. Set send and receive fax information 35 The following optional settings are in a file...


