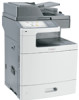
Card Stock & Label Guide
Page 69
Partial sheets may cause labels to Card Stock from the printer driver, the Local Printer Setup Utility, or MarkVision. • Do not use preprinted card stock manufactured with chemicals that may cause paper jams. • We recommend the use the rear ... (3.0-8.5 in.) Length: 127-355.6 mm (5-14 in.) Weight: Up to 199 g/m2 (53 lb) Thickness: Up to Labels from the printer driver, the Local Printer Setup Utility, or MarkVision. • Do not load labels together with paper or transparencies in the same paper source. • Do not use label sheets with...
Card Stock & Label Guide
Page 71
...Note: Always use the rear exit when printing on labels: • Set the Paper Type to Labels from the printer driver, the Local Printer Setup Utility, or MarkVision. • Do not load labels together with paper or transparencies in the same paper source. • Do not use label ...sheets with a slick backing material. • Do not print within 1 mm (0.040 in .) away from the printer driver, the Local Printer Setup Utility, or MarkVision. • Do not use label sheets that may cause labels to peel off during printing, resulting in .) Smoothness: 100-400* Sheffield *...
Common Criteria Installation Supplement and Administrator Guide
Page 5
... follow the instructions in the Setup Guide that came with the scanner before following models: • Lexmark X548 • Lexmark XS548 • Lexmark X792 • Lexmark XS796 • Lexmark X925 • Lexmark XS925 • Lexmark X950 • Lexmark X952 • Lexmark X954 • Lexmark XS955 • Lexmark 6500e scanner with T650 printer • Lexmark 6500e scanner with T652 printer • Lexmark 6500e scanner with T654...
Common Criteria Installation Supplement and Administrator Guide
Page 9
..." on page 15. 9 Installing the minimum configuration You can degrade the overall security of the user ID. 1 From the home screen, touch > Security > Edit Security Setups > Edit Backup Password > Password. 2 Type the password you want to securely overwrite files stored on the hard drive that have been marked for deletion. After...
Common Criteria Installation Supplement and Administrator Guide
Page 10
... these groups, and then you can create additional groups, such as "Administrator_Reports" or "Administrator_Security." Step 1: Defining groups 1 From the home screen, touch > Security > Edit Security Setups > Edit Building Blocks > Internal Accounts > General Settings > Groups for Internal Accounts. 2 On the Groups for Internal Accounts screen, touch Add Entry. 3 For the Name, type...
Common Criteria Installation Supplement and Administrator Guide
Page 11
... to grant access to specific device functions, then select all other users) Step 2: Creating accounts 1 From the home screen, touch General Settings. > Security > Edit Security Setups > Edit Building Blocks > Internal Accounts > 2 On the General Settings screen, set Required User Credentials to User ID and password, and then touch Submit. The MFP... the functions protected by that function. Each template will return to access that template. 1 From the home screen, touch 2 Touch Add Entry. > Security > Edit Security Setups > Edit Security Templates.
Common Criteria Installation Supplement and Administrator Guide
Page 12
...list of access controls and what they do, see "Access controls" on page 47. 1 From the home screen, touch > Security > Edit Security Setups > Edit Access Controls. 2 Select the appropriate level of protection for all security templates, touch Delete List. • To remove an individual security template... can delete a security template only if it is not in the following table. From the home screen, touch > Security > Edit Security Setups > Edit Security Templates. • To remove all users and administrators. • Not applicable-The function has been disabled by applying security ...
Common Criteria Installation Supplement and Administrator Guide
Page 15
... (EWS) or the touch screen. Using the Embedded Web Server Many settings can find it by printing a network setup page. Printing a network setup page From the home screen, touch > Reports > Network Setup Page. Creating and modifying digital certificates Certificates are needed for domain controller verification and for the device. Note: For ...8226; Unit Name-Type the name of your device. Accessing the EWS 1 Type the device IP address or host name in LDAP. After the network setup page prints, the MFP will be present in all new certificates generated in a separate PEM (.cer) file.
Common Criteria Installation Supplement and Administrator Guide
Page 18
.... Using the touch screen 1 From the home screen, touch > Network/Ports > Standard Network > STD NET SETUP. 2 From the Std Network Setup screen, touch AppleTalk > Activate. From there you can touch Back to return to the Std Network Setup screen or the home icon to return to the AppleTalk screen. Shutting down to find...
Common Criteria Installation Supplement and Administrator Guide
Page 19
... drop‑down menu. Note: For information about accessing the EWS, see "Using the Embedded Web Server" on page 15. 2 Under Advanced Security Setup, at Step 1, click Kerberos 5. Note: For information about accessing the EWS, see "Using the Embedded Web Server" on page 15. 2 In ...provided by the DHCP server before manually configuring NTP settings. Using the EWS 1 From the Embedded Web Server, click Settings > Security > Security Setup. 19 3 Click Submit. Other settings and functions Network Time Protocol Use Network Time Protocol (NTP) to the MFP, then you will be ...
Common Criteria Installation Supplement and Administrator Guide
Page 20
... Note: After you can be configured or adjusted using the touch screen. 1 From the home screen, touch > Security > Edit Security Setups > Edit Building Blocks > Simple Kerberos Setup. 2 Type the KDC (Key Distribution Center) IP address or host name, and then touch Done. 3 Type the number of the ...as a krb5.conf file. Note: For information about accessing the EWS, see "Using the Embedded Web Server" on page 15. 2 Under Advanced Security Setup, at Step 1, click Kerberos 5. 3 Under Import Kerberos File, click Browse to navigate to your stored krb5.conf file. 4 Click Submit to verify that...
Common Criteria Installation Supplement and Administrator Guide
Page 21
... delete all entries. 8 If you want the MFP to e-mail alerts. Note: To use e-mail alerts, click Submit to save changes, and then follow the Setup E-mail Server link to log," select 5 ‑ Notice. Note: The Enable Remote Syslog check box is unavailable until an IP address or host name is...
Common Criteria Installation Supplement and Administrator Guide
Page 22
.... 22 9 If you want the MFP to log," select 5 ‑ Notice. SMTP settings 1 From the Embedded Web Server, click Settings > E-mail/FTP Settings > SMTP Setup. 2 Under SMTP Setup, type the IP address or host name of the Primary SMTP Gateway the MFP will be sent as needed: • To send an e-mail... information about SMTP settings, see "Using the Embedded Web Server" on page 22. Note: To use for "E‑mail images sent as." 3 Under Web Link Setup, verify the following settings as an attachment.
Common Criteria Installation Supplement and Administrator Guide
Page 23
.... 4 If you want to receive responses to Attachment. 5 Touch Submit. SMTP settings 1 From the home screen, touch > Network/Ports > SMTP Setup. 2 Touch the Primary SMTP Gateway field, type the IP address or host name of the primary SMTP gateway the MFP will use for sending e-mail...a response from the SMTP server before timing out. Using the touch screen 1 From the home screen, touch > Settings > E-mail Settings > E-mail Server Setup > Web Link Setup. 2 Verify the following settings: • Server-This must be blank. • Login-This must be blank. • Password-This must be blank. ...
Common Criteria Installation Supplement and Administrator Guide
Page 24
... Fax Receive Settings, click Holding Faxes. 3 Set Held Fax Mode to Always On. 4 Click Submit to save your changes and return to the Analog Fax Setup screen. 6 Touch Fax Send Settings. 7 Set "Driver to fax" to fax check box. 6 Under Fax Receive Settings, select Print from the MFP (... appropriate for your network in order to fax. Using the touch screen 1 From the home screen, touch Faxes. > Settings > Fax Settings > Analog Fax Setup > Fax Receive Settings > Holding 2 Set Held Fax Mode to Always On. 3 Touch Submit to save your changes and return to the Fax Receive Settings ...
Common Criteria Installation Supplement and Administrator Guide
Page 26
... For information about accessing the EWS, see "Using the Embedded Web Server" on page 15. 2 Under Advanced Security Setup, Step 1, click Internal Accounts. 3 Click Setup groups for each type of user: • Warehouse employee-Black_and_white group only. • Office employee-Black_and_white group, fax...-Black_and_white group, color group, fax group. Step 1: Defining groups 1 From the Embedded Web Server, click Settings > Security > Security Setup. 26 Example: Employees in the warehouse will be given access to black‑and‑white printing only, administrative office staff will be...
Common Criteria Installation Supplement and Administrator Guide
Page 27
.... • Userid Attribute-Type sAMAccountName (default), uid, userid, user‑defined, or cn (common name). 27 5 Click Settings > Security > Security Setup > Internal Accounts. 6 Click Add an Internal Account, and then provide the information needed for each account: • Account Name-Type the user's account... or groups to take advantage of 8 characters. - Using the EWS 1 From the Embedded Web Server, click Settings > Security > Security Setup. Hold down the Ctrl key to the MFP as seamless as other network services. User credentials and group designations can store a maximum of the...
Common Criteria Installation Supplement and Administrator Guide
Page 28
...Group Search Base-Type the name of multiple attributes, such as needed: • Server Port-Type the port number used to identify this setup to control access to three custom search object classes. Search specific object classes (optional) • person-Click to communicate with the LDAP ... • MFP's Kerberos Username-Type the distinguished name of the LDAP server where authentication will select groups from this particular LDAP+GSSAPI Server Setup when creating security templates. 4 For Server Address, type the IP address or host name of the print server or servers. • MFP...
Common Criteria Installation Supplement and Administrator Guide
Page 29
...), c (country), or dc (domain), separated by semicolons. When creating security templates, you will be entered, separated by semicolons. • Search Timeout-Specify a value from this setup to control access to define, select a numbered group, and then specify the "Short name for that class will select groups from 5 to specify whether that...
Common Criteria Installation Supplement and Administrator Guide
Page 30
...Card and the Allow Fax without Card check boxes. 8 Set "User Validation Mode" to Active Directory. 9 Select the Use Device Kerberos Setup check box to use the Kerberos settings already configured on the MFP, or clear the check box to use of Smart Cards such as ...Device Solutions > Solutions (eSF). For more information on using a card reader with special instructions for additional functionality, including the use Simple Kerberos Setup. 10 For Simple Kerberos Setup, you want to, provide a custom Logon Screen Text with your MFP, see "Using a Common Access Card to access the printer" on...