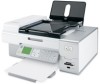

User's Guide
Page 2
... stress. CAUTION: Do not twist, bind, crush, or place heavy objects on the power cord. Do not pinch the power cord between objects such as the power supply cord or telephone, during a lightning storm. Remove the power cord from the electrical outlet before inspecting it. Lexmark is misused, a risk of misuse. SAVE THESE INSTRUCTIONS. Safety information Use only the...
... stress. CAUTION: Do not twist, bind, crush, or place heavy objects on the power cord. Do not pinch the power cord between objects such as the power supply cord or telephone, during a lightning storm. Remove the power cord from the electrical outlet before inspecting it. Lexmark is misused, a risk of misuse. SAVE THESE INSTRUCTIONS. Safety information Use only the...
User's Guide
Page 17
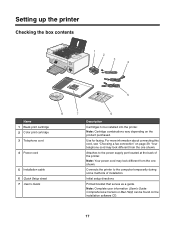
... methods of the printer. Note: Your power cord may look different from the one shown. For more information about connecting this cord, see "Choosing a fax connection" on the product purchased. Attaches to the power supply port located at the back of ...Setting up the printer Checking the box contents 1 2 3 4 1 2 3 5 8 Name 1 Black print cartridge 2 Color print cartridge 3 Telephone cord 4 Power cord 5 Installation cable 6 Quick Setup sheet 7 User's Guide 7 6 Description Cartridges to be found on the installation software CD. 17 Initial setup directions Printed...
... methods of the printer. Note: Your power cord may look different from the one shown. For more information about connecting this cord, see "Choosing a fax connection" on the product purchased. Attaches to the power supply port located at the back of ...Setting up the printer Checking the box contents 1 2 3 4 1 2 3 5 8 Name 1 Black print cartridge 2 Color print cartridge 3 Telephone cord 4 Power cord 5 Installation cable 6 Quick Setup sheet 7 User's Guide 7 6 Description Cartridges to be found on the installation software CD. 17 Initial setup directions Printed...
User's Guide
Page 20
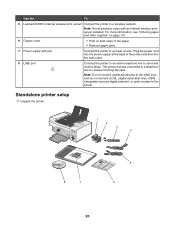
... fax calls. Standalone printer setup 1 Unpack the printer. 1 2 3 4 8 7 1 2 3 5 6 20 Use the To 5 Lexmark N2050 (internal wireless print server) Connect the printer to a power source. Note: Not all products come with port Connect the printer to a wireless network. Plug the power cord into the power supply at the back of the paper • Remove paper jams...
... fax calls. Standalone printer setup 1 Unpack the printer. 1 2 3 4 8 7 1 2 3 5 6 20 Use the To 5 Lexmark N2050 (internal wireless print server) Connect the printer to a power source. Note: Not all products come with port Connect the printer to a wireless network. Plug the power cord into the power supply at the back of the paper • Remove paper jams...

User's Guide
Page 23
b Press to save . 12 If prompted, set the language. 1 21 a Using the control panel of the printer, press or repeatedly until the language you want appears on the display. 9 Connect the power cord. 10 Make sure the power is on. 1 2 11 If prompted, set the country/region. 1 21 a Using the control panel of the printer, press or repeatedly until the country/region you want appears on the display. b Press to save . 23
b Press to save . 12 If prompted, set the language. 1 21 a Using the control panel of the printer, press or repeatedly until the language you want appears on the display. 9 Connect the power cord. 10 Make sure the power is on. 1 2 11 If prompted, set the country/region. 1 21 a Using the control panel of the printer, press or repeatedly until the country/region you want appears on the display. b Press to save . 23
User's Guide
Page 47
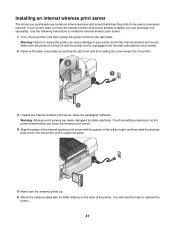
Make sure the printer is turned off your printer, and then unplug the power cord from the printer. 2 1 3 3 Unpack the internal wireless print server. Touch something metal such as the printer frame before you touch the wireless print server. 4 Align .... If your printer and to the internal wireless print server. Use the following instructions to install the internal wireless print server: 1 Turn off and the power cord is unplugged from the wall outlet before you proceed. 2 Remove the back cover plate by static electricity. You will need this later to network the...
Make sure the printer is turned off your printer, and then unplug the power cord from the printer. 2 1 3 3 Unpack the internal wireless print server. Touch something metal such as the printer frame before you touch the wireless print server. 4 Align .... If your printer and to the internal wireless print server. Use the following instructions to install the internal wireless print server: 1 Turn off and the power cord is unplugged from the wall outlet before you proceed. 2 Remove the back cover plate by static electricity. You will need this later to network the...
User's Guide
Page 141
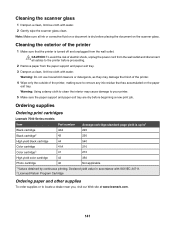
... the paper support and paper exit tray are dry before placing the document on the paper exit tray. Ordering supplies Ordering print cartridges Lexmark 7500 Series models Item Part number Average cartridge standard page yield is dry before beginning a new print job. Declared yield value in accordance...a dealer near you, visit our Web site at www.lexmark.com. 141 Warning: Using a damp cloth to clean the interior may damage the finish of the printer. 4 Wipe only the outside of electric shock, unplug the power cord from the wall outlet and disconnect all ink or corrective ...
... the paper support and paper exit tray are dry before placing the document on the paper exit tray. Ordering supplies Ordering print cartridges Lexmark 7500 Series models Item Part number Average cartridge standard page yield is dry before beginning a new print job. Declared yield value in accordance...a dealer near you, visit our Web site at www.lexmark.com. 141 Warning: Using a damp cloth to clean the interior may damage the finish of the printer. 4 Wipe only the outside of electric shock, unplug the power cord from the wall outlet and disconnect all ink or corrective ...

User's Guide
Page 144
... cable into the USB port of the following: Check your computer. 2 Click Cancel on all the way into the power supply on the printer. 1 2 3 Plug the cord into an electrical outlet that the Wi-Fi indicator light is on the computer screen to reinstall the software. 144 Reinstall...Mac OS X versions 10.34 and 10.4 (not versions 10.0, 10.1, or 10.2). Disconnect and reconnect the power cord 1 Disconnect the power cord from the wall outlet, and then from the printer. 2 Plug the cord all New Hardware Found screens. 3 Insert the CD, and then follow the instructions on . The USB port ...
... cable into the USB port of the following: Check your computer. 2 Click Cancel on all the way into the power supply on the printer. 1 2 3 Plug the cord into an electrical outlet that the Wi-Fi indicator light is on the computer screen to reinstall the software. 144 Reinstall...Mac OS X versions 10.34 and 10.4 (not versions 10.0, 10.1, or 10.2). Disconnect and reconnect the power cord 1 Disconnect the power cord from the wall outlet, and then from the printer. 2 Plug the cord all New Hardware Found screens. 3 Insert the CD, and then follow the instructions on . The USB port ...

User's Guide
Page 145
... paper Remove and then load paper. Make sure the power cord is plugged into the wall outlet. 6 Press to turn the printer off. 2 Disconnect the power cord from the wall outlet. 3 Gently remove the power supply from the printer. 4 Reconnect the power supply to the printer. 5 Plug the power cord into a properly grounded outlet. Page does not print...
... paper Remove and then load paper. Make sure the power cord is plugged into the wall outlet. 6 Press to turn the printer off. 2 Disconnect the power cord from the wall outlet. 3 Gently remove the power supply from the printer. 4 Reconnect the power supply to the printer. 5 Plug the power cord into a properly grounded outlet. Page does not print...

User's Guide
Page 146
...The printer and the computer cannot exchange data. Remove and reinstall the software Uninstall the printer software, and then reinstall it. Reconnect power supply 1 Press to turn the printer on page 176. 146 Try one of the following : Establish bidirectional communication between the ... device for each file you want to turn the printer off. 2 Disconnect the power cord from the wall outlet. 3 Gently remove the power supply from the printer. 4 Reconnect the power supply to the printer. 5 Plug the power cord into the wall outlet. 6 Press to print. These are possible solutions.
...The printer and the computer cannot exchange data. Remove and reinstall the software Uninstall the printer software, and then reinstall it. Reconnect power supply 1 Press to turn the printer on page 176. 146 Try one of the following : Establish bidirectional communication between the ... device for each file you want to turn the printer off. 2 Disconnect the power cord from the wall outlet. 3 Gently remove the power supply from the printer. 4 Reconnect the power supply to the printer. 5 Plug the power cord into the wall outlet. 6 Press to print. These are possible solutions.

User's Guide
Page 185
... scanner glass If the scanner glass is plugged into a properly grounded outlet. Note: If your wireless connection is not on page 203. Check power If the light is down, use your configuration cable to connect your printer to improve print quality See "Improving print quality" on page 160.... levels, and install a new print cartridge if necessary. Review steps to your wireless network is active Make sure that your computer. Make sure the power cord is properly connected to see "Error messages on the computer screen" on , make sure the printer is dirty, gently wipe it with a clean,...
... scanner glass If the scanner glass is plugged into a properly grounded outlet. Note: If your wireless connection is not on page 203. Check power If the light is down, use your configuration cable to connect your printer to improve print quality See "Improving print quality" on page 160.... levels, and install a new print cartridge if necessary. Review steps to your wireless network is active Make sure that your computer. Make sure the power cord is properly connected to see "Error messages on the computer screen" on , make sure the printer is dirty, gently wipe it with a clean,...
User's Guide
Page 187
Check power If the light is not on page 147. Removing and reinstalling the software For more of the following: Check messages Resolve all error messages. If a ... back of the printer. 3 Firmly plug the rectangular end of the computer. Restart computer Turn off and then restart your computer. 187 Make sure the power cord is plugged into the USB port of the USB cable into a properly grounded outlet. Check printer default and pause settings 1 Do one or more of...
Check power If the light is not on page 147. Removing and reinstalling the software For more of the following: Check messages Resolve all error messages. If a ... back of the printer. 3 Firmly plug the rectangular end of the computer. Restart computer Turn off and then restart your computer. 187 Make sure the power cord is plugged into the USB port of the USB cable into a properly grounded outlet. Check printer default and pause settings 1 Do one or more of...

User's Guide
Page 199
... properly. 1 Remove the print cartridges, and close the cartridge carrier lids. 2 Close the scanner unit. 3 Disconnect the power cord from the electrical outlet. 4 Reconnect the power cord to the electrical outlet. 5 If the button is not lit, press . 6 Reinsert the print cartridges and close the scanner... unit. 3 Disconnect the power cord from the electrical outlet. 4 Reconnect the power cord to the electrical outlet. 5 If the button is not lit, press . 6 Reinsert the black (or photo) print cartridge...
... properly. 1 Remove the print cartridges, and close the cartridge carrier lids. 2 Close the scanner unit. 3 Disconnect the power cord from the electrical outlet. 4 Reconnect the power cord to the electrical outlet. 5 If the button is not lit, press . 6 Reinsert the print cartridges and close the scanner... unit. 3 Disconnect the power cord from the electrical outlet. 4 Reconnect the power cord to the electrical outlet. 5 If the button is not lit, press . 6 Reinsert the black (or photo) print cartridge...

User's Guide
Page 200
... 1205 (Left Cartridge) or Error 1206 (Right Cartridge). 1 Remove the indicated print cartridge and close the cartridge carrier lid. 2 Close the scanner unit. 3 Disconnect the power cord from the electrical outlet. 4 Reconnect the power cord to the electrical outlet. 5 If the button is closed . 4 Close the scanner unit. 5 Press .
... 1205 (Left Cartridge) or Error 1206 (Right Cartridge). 1 Remove the indicated print cartridge and close the cartridge carrier lid. 2 Close the scanner unit. 3 Disconnect the power cord from the electrical outlet. 4 Reconnect the power cord to the electrical outlet. 5 If the button is closed . 4 Close the scanner unit. 5 Press .

User's Guide
Page 201
...fax settings. 4 Click the Dialing and Sending tab. 5 From the "Sending options" area, select After Dial from the electrical outlet. 4 Reconnect the power cord to scan document" section. 6 Click OK. 7 Resend the fax. Memory Failure These are missing or not installed properly. For more of the options on... copy or print when only the photo cartridge is not lit, press . 6 Reinsert the print cartridge and close the scanner unit. 3 Disconnect the power cord from the "When to the electrical outlet. 5 If the button is installed. • To remove the error message, press . No images have ...
...fax settings. 4 Click the Dialing and Sending tab. 5 From the "Sending options" area, select After Dial from the electrical outlet. 4 Reconnect the power cord to scan document" section. 6 Click OK. 7 Resend the fax. Memory Failure These are missing or not installed properly. For more of the options on... copy or print when only the photo cartridge is not lit, press . 6 Reinsert the print cartridge and close the scanner unit. 3 Disconnect the power cord from the "When to the electrical outlet. 5 If the button is installed. • To remove the error message, press . No images have ...

User's Guide (Mac)
Page 5
... inspecting it. CAUTION: Do not use the fax feature during a lightning storm. Safety information 5 If the power cord is not responsible for signs of fire or electrical shock results. Lexmark is misused, a risk of misuse. Inspect the power cord regularly for the use of other than those described in the user documentation, to meet strict...
... inspecting it. CAUTION: Do not use the fax feature during a lightning storm. Safety information 5 If the power cord is not responsible for signs of fire or electrical shock results. Lexmark is misused, a risk of misuse. Inspect the power cord regularly for the use of other than those described in the user documentation, to meet strict...

User's Guide (Mac)
Page 16
... the guides on a wireless network. Use the following instructions to install the internal wireless print server: 1 Turn off and the power cord is turned off your printer, and then unplug the power cord from the wall outlet before you proceed. 2 Remove the back cover plate by static electricity. Installing an internal wireless print server...
... the guides on a wireless network. Use the following instructions to install the internal wireless print server: 1 Turn off and the power cord is turned off your printer, and then unplug the power cord from the wall outlet before you proceed. 2 Remove the back cover plate by static electricity. Installing an internal wireless print server...

User's Guide (Mac)
Page 108
... "Choosing a fax connection" on the product purchased. Note: Your power cord may look different from the one shown. Connects the printer to the power supply port located at the back of installation. Initial setup directions Printed booklet that serves as a ...guide. Understanding the printer Understanding the printer parts Checking the box contents Name 1 Black print cartridge 2 Color print cartridge 3 Telephone cord 4 Power cord 5 Installation cable 6 Quick Setup sheet 7 User's Guide Description Cartridges to be found on the installation software CD. Note: Cartridge combinations ...
... "Choosing a fax connection" on the product purchased. Note: Your power cord may look different from the one shown. Connects the printer to the power supply port located at the back of installation. Initial setup directions Printed booklet that serves as a ...guide. Understanding the printer Understanding the printer parts Checking the box contents Name 1 Black print cartridge 2 Color print cartridge 3 Telephone cord 4 Power cord 5 Installation cable 6 Quick Setup sheet 7 User's Guide Description Cartridges to be found on the installation software CD. Note: Cartridge combinations ...

User's Guide (Mac)
Page 111
... sides of the printer and then into the power supply at the back of the paper • Remove paper jams. 7 Power supply with an internal wireless print server installed. Use the To 5 Lexmark N2050 (internal wireless print server) Connect the printer to a power source. Plug the power cord into the wall outlet. 8 LINE port Connect the...
... sides of the printer and then into the power supply at the back of the paper • Remove paper jams. 7 Power supply with an internal wireless print server installed. Use the To 5 Lexmark N2050 (internal wireless print server) Connect the printer to a power source. Plug the power cord into the wall outlet. 8 LINE port Connect the...
User's Guide (Mac)
Page 149
...water. If you believe you receive an Out of Original Lexmark Ink message, the original Lexmark ink in the indicated cartridge (s) has been depleted. CAUTION: To avoid the risk of electric shock, unplug the power cord from the wall outlet and disconnect all cables to the printer.... Ordering print cartridges Lexmark 7500 Series models Maintaining the printer 149 Related topics: • "Improving print quality" on page...
...water. If you believe you receive an Out of Original Lexmark Ink message, the original Lexmark ink in the indicated cartridge (s) has been depleted. CAUTION: To avoid the risk of electric shock, unplug the power cord from the wall outlet and disconnect all cables to the printer.... Ordering print cartridges Lexmark 7500 Series models Maintaining the printer 149 Related topics: • "Improving print quality" on page...

User's Guide (Mac)
Page 156
... electrical outlet that your system requirements Check that other end of the USB cable is on. Disconnect and reconnect the power cord 1 Disconnect the power cord from the wall outlet, and then from the printer. 2 Plug the cord all the way into the power supply on the printer. 3 Plug the cord into the back of the printer.
... electrical outlet that your system requirements Check that other end of the USB cable is on. Disconnect and reconnect the power cord 1 Disconnect the power cord from the wall outlet, and then from the printer. 2 Plug the cord all the way into the power supply on the printer. 3 Plug the cord into the back of the printer.


