MFP X4500 Option Setup Guide
Page 4
... cords 5 Step 4: Complete the hardware setup 6 Attaching the Quick Reference 6 Installing the printer operator panel cover 6 Turning on the scanner and printer 7 Step 5: Configure your MFP 8 Setting the IP address 8 Configuring Scan to E-mail 9 Configuring Fax Setup 9 Registering with a Windows NT domain server 10 Table of contents v
... cords 5 Step 4: Complete the hardware setup 6 Attaching the Quick Reference 6 Installing the printer operator panel cover 6 Turning on the scanner and printer 7 Step 5: Configure your MFP 8 Setting the IP address 8 Configuring Scan to E-mail 9 Configuring Fax Setup 9 Registering with a Windows NT domain server 10 Table of contents v

MFP X4500 Option Setup Guide
Page 5
Step 6: Verify setup 11 Making a test copy 11 Sending a test fax 11 Sending a test e-mail 12 Sending a network print job to the MFP 12 Maintaining your MFP 13 Cleaning the touch screen 13 Cleaning the scanner bed 13 Paper feeding problems 14 Cleaning the feeding rollers and pick pad 15 Replacing the pick pad assembly 16 Moving the scanner 17 Document Distributor 18 Troubleshooting 19 Notices 20 Safety information 20 Emission notices 21 Telecommunications notices 22 vi Table of contents
Step 6: Verify setup 11 Making a test copy 11 Sending a test fax 11 Sending a test e-mail 12 Sending a network print job to the MFP 12 Maintaining your MFP 13 Cleaning the touch screen 13 Cleaning the scanner bed 13 Paper feeding problems 14 Cleaning the feeding rollers and pick pad 15 Replacing the pick pad assembly 16 Moving the scanner 17 Document Distributor 18 Troubleshooting 19 Notices 20 Safety information 20 Emission notices 21 Telecommunications notices 22 vi Table of contents
MFP X4500 Option Setup Guide
Page 6
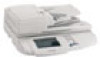
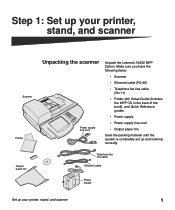
... have the following items: • Scanner • Ethernet cable (RJ-45) • Telephone fax line cable (RJ-11) • Folder with Setup Guide (includes the MFP CD in the back of the book), and Quick Reference guides • Power supply • Power supply line cord • Output paper bin Save the... Ethernet cable Power supply Set up your printer, stand, and scanner Scanner Folder Output paper bin Unpacking the scanner Power supply line cord Unpack the Lexmark X4500 MFP Option.
... have the following items: • Scanner • Ethernet cable (RJ-45) • Telephone fax line cable (RJ-11) • Folder with Setup Guide (includes the MFP CD in the back of the book), and Quick Reference guides • Power supply • Power supply line cord • Output paper bin Save the... Ethernet cable Power supply Set up your printer, stand, and scanner Scanner Folder Output paper bin Unpacking the scanner Power supply line cord Unpack the Lexmark X4500 MFP Option.
MFP X4500 Option Setup Guide
Page 7
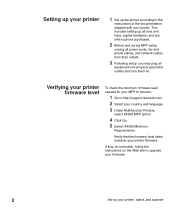
... according to upgrade your firmware. 2 Set up all bins and trays, duplex hardware, and any other options purchased. 2 Before and during MFP setup, unplug all power cords, fax and phone cables, and network cables from their outlets. 3 Following setup, you may plug all equipment...not match, follow the instructions on . Verifying your printer firmware level To check the minimum firmware level needed for your MFP to function: 1 Go to http://support.lexmark.com. 2 Select your printer firmware. Verify that the firmware level listed matches your country and language. 3 Under Multifunction...
... according to upgrade your firmware. 2 Set up all bins and trays, duplex hardware, and any other options purchased. 2 Before and during MFP setup, unplug all power cords, fax and phone cables, and network cables from their outlets. 3 Following setup, you may plug all equipment...not match, follow the instructions on . Verifying your printer firmware level To check the minimum firmware level needed for your MFP to function: 1 Go to http://support.lexmark.com. 2 Select your printer firmware. Verify that the firmware level listed matches your country and language. 3 Under Multifunction...
MFP X4500 Option Setup Guide
Page 8
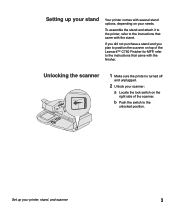
... off and unplugged. 2 Unlock your printer, stand, and scanner 3 Setting up your scanner: a Locate the lock switch on the right side of the Lexmark™ C750 Finisher for MFP, refer to the instructions that came with the stand. b Push the switch to the instructions that came with several stand options, depending on...
... off and unplugged. 2 Unlock your printer, stand, and scanner 3 Setting up your scanner: a Locate the lock switch on the right side of the Lexmark™ C750 Finisher for MFP, refer to the instructions that came with the stand. b Push the switch to the instructions that came with several stand options, depending on...
MFP X4500 Option Setup Guide
Page 12
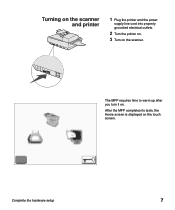
The MFP requires time to warm up after you turn it on the scanner. Complete the hardware setup 7 Turning on the scanner and printer 1 Plug the printer and the power supply line cord into properly grounded electrical outlets. 2 Turn the printer on. 3 Turn on . After the MFP completes its tests, the Home screen is displayed on the touch screen.
The MFP requires time to warm up after you turn it on the scanner. Complete the hardware setup 7 Turning on the scanner and printer 1 Plug the printer and the power supply line cord into properly grounded electrical outlets. 2 Turn the printer on. 3 Turn on . After the MFP completes its tests, the Home screen is displayed on the touch screen.
MFP X4500 Option Setup Guide
Page 13
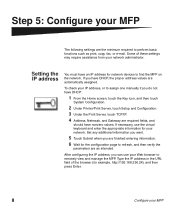
... the IP address, you have DHCP, the proper address values are automatically assigned. If necessary, use your Web browser to remotely view and manage the MFP. Set any additional information you want. 5 Touch Submit when you do not have DHCP: 1 From the Home screen, touch the Key icon, and then ..., and should have an IP address for example, http://192.168.236.24), and then press Enter. 8 Configure your MFP Some of the browser (for network devices to find the MFP on the network. To check your IP address, or to assign one manually if you are finished entering information. 6 Wait...
... the IP address, you have DHCP, the proper address values are automatically assigned. If necessary, use your Web browser to remotely view and manage the MFP. Set any additional information you want. 5 Touch Submit when you do not have DHCP: 1 From the Home screen, touch the Key icon, and then ..., and should have an IP address for example, http://192.168.236.24), and then press Enter. 8 Configure your MFP Some of the browser (for network devices to find the MFP on the network. To check your IP address, or to assign one manually if you are finished entering information. 6 Wait...
MFP X4500 Option Setup Guide
Page 14
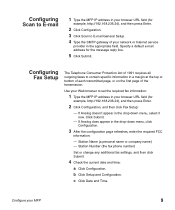
..., and then click Fax Setup: - a Click Configuration. b Click Setup and Configuration. Use your Web browser to set the required fax information: 1 Type the MFP IP address in your browser URL field (for the message reply line. 5 Click Submit. Station Name (a personal name or company name) - c Click Date and... Set or change any additional fax settings, and then click Submit. 4 Check the current date and time; Configuring Scan to E-mail 1 Type the MFP IP address in your browser URL field (for example, http://192.168.236.24), and then press Enter. 2 Click Configuration. 3 Click Scan to ...
..., and then click Fax Setup: - a Click Configuration. b Click Setup and Configuration. Use your Web browser to set the required fax information: 1 Type the MFP IP address in your browser URL field (for the message reply line. 5 Click Submit. Station Name (a personal name or company name) - c Click Date and... Set or change any additional fax settings, and then click Submit. 4 Check the current date and time; Configuring Scan to E-mail 1 Type the MFP IP address in your browser URL field (for example, http://192.168.236.24), and then press Enter. 2 Click Configuration. 3 Click Scan to ...

MFP X4500 Option Setup Guide
Page 15
... the intended domain. Registering with a Windows NT domain server To use Windows NT Authentication as a way of restricting or tracking access to register the MFP with a Windows NT domain, you with a Windows NT domain. Note: In order to your network administrator for the Fax Server mode, return to... help you must first register the device with the registration process. 10 Configure your MFP Enter the date and time information in a numerical format (YYYY-MM-DD-HH:MM), and then click Submit. Touch the Key icon on...
... the intended domain. Registering with a Windows NT domain server To use Windows NT Authentication as a way of restricting or tracking access to register the MFP with a Windows NT domain, you with a Windows NT domain. Note: In order to your network administrator for the Fax Server mode, return to... help you must first register the device with the registration process. 10 Configure your MFP Enter the date and time information in a numerical format (YYYY-MM-DD-HH:MM), and then click Submit. Touch the Key icon on...
MFP X4500 Option Setup Guide
Page 16
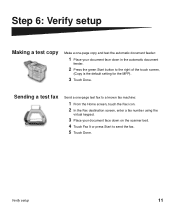
... down on the scanner bed. 4 Touch Fax It or press Start to the right of the touch screen, (Copy is the default setting for the MFP). 3 Touch Done. Sending a test fax Send a one -page copy and test the automatic document feeder: 1 Place your document face down in the automatic document feeder...
... down on the scanner bed. 4 Touch Fax It or press Start to the right of the touch screen, (Copy is the default setting for the MFP). 3 Touch Done. Sending a test fax Send a one -page copy and test the automatic document feeder: 1 Place your document face down in the automatic document feeder...
MFP X4500 Option Setup Guide
Page 17
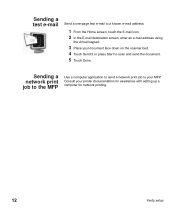
Sending a test e-mail Send a one-page test e-mail to a known e-mail address: 1 From the Home screen, touch the E-mail icon. 2 In the E-mail destination screen, enter an e-mail address using the virtual keypad. 3 Place your document face down on the scanner bed. 4 Touch Send It or press Start to your printer documentation for assistance with setting up a computer for network printing. 12 Verify setup Consult your MFP. Sending a network print job to the MFP Use a computer application to send a network print job to scan and send the document. 5 Touch Done.
Sending a test e-mail Send a one-page test e-mail to a known e-mail address: 1 From the Home screen, touch the E-mail icon. 2 In the E-mail destination screen, enter an e-mail address using the virtual keypad. 3 Place your document face down on the scanner bed. 4 Touch Send It or press Start to your printer documentation for assistance with setting up a computer for network printing. 12 Verify setup Consult your MFP. Sending a network print job to the MFP Use a computer application to send a network print job to scan and send the document. 5 Touch Done.
MFP X4500 Option Setup Guide
Page 18
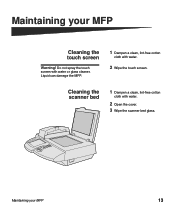
Maintaining your MFP Cleaning the touch screen Warning! Liquid can damage the MFP. 1 Dampen a clean, lint-free cotton cloth with water or glass cleaner. Maintaining your MFP 13 Do not spray the touch screen with water. 2 Wipe the touch screen. Cleaning the scanner bed 1 Dampen a clean, lint-free cotton cloth with water. 2 Open the cover. 3 Wipe the scanner bed glass.
Maintaining your MFP Cleaning the touch screen Warning! Liquid can damage the MFP. 1 Dampen a clean, lint-free cotton cloth with water or glass cleaner. Maintaining your MFP 13 Do not spray the touch screen with water. 2 Wipe the touch screen. Cleaning the scanner bed 1 Dampen a clean, lint-free cotton cloth with water. 2 Open the cover. 3 Wipe the scanner bed glass.
MFP X4500 Option Setup Guide
Page 19
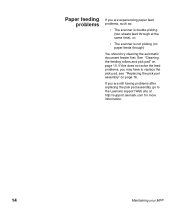
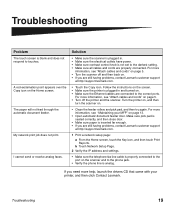
If this does not solve the feed problems, you may have to the Lexmark support Web site at the same time), or; • The scanner is double-picking (two sheets feed through ) You should try cleaning the automatic document ... you are experiencing paper feed problems, such as: • The scanner is not picking (no paper feeds through at http://support.lexmark.com for more information. 14 Maintaining your MFP Paper feeding problems If you are still having problems after replacing the pick pad assembly, go to replace the pick pad, see...
If this does not solve the feed problems, you may have to the Lexmark support Web site at the same time), or; • The scanner is double-picking (two sheets feed through ) You should try cleaning the automatic document ... you are experiencing paper feed problems, such as: • The scanner is not picking (no paper feeds through at http://support.lexmark.com for more information. 14 Maintaining your MFP Paper feeding problems If you are still having problems after replacing the pick pad assembly, go to replace the pick pad, see...
MFP X4500 Option Setup Guide
Page 20
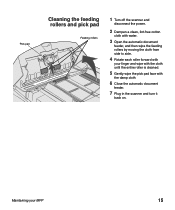
Pick pad Cleaning the feeding rollers and pick pad Feeding rollers 1 Turn off the scanner and disconnect the power. 2 Dampen a clean, lint-free cotton cloth with water. 3 Open the automatic document feeder, and then wipe the feeding rollers by moving the cloth from side to side. 4 Rotate each roller forward with the damp cloth 6 Close the automatic document feeder. 7 Plug in the scanner and turn it back on. Maintaining your finger and wipe with the cloth until the entire roller is cleaned. 5 Gently wipe the pick pad face with your MFP 15
Pick pad Cleaning the feeding rollers and pick pad Feeding rollers 1 Turn off the scanner and disconnect the power. 2 Dampen a clean, lint-free cotton cloth with water. 3 Open the automatic document feeder, and then wipe the feeding rollers by moving the cloth from side to side. 4 Rotate each roller forward with the damp cloth 6 Close the automatic document feeder. 7 Plug in the scanner and turn it back on. Maintaining your finger and wipe with the cloth until the entire roller is cleaned. 5 Gently wipe the pick pad face with your MFP 15
MFP X4500 Option Setup Guide
Page 21
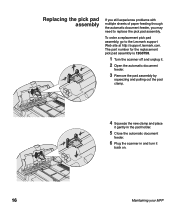
... and place it gently in the pad holder. 5 Close the automatic document feeder. 6 Plug the scanner in and turn it back on. 16 Maintaining your MFP Replacing the pick pad assembly If you still experience problems with multiple sheets of paper feeding through the automatic document feeder, you may need to...
... and place it gently in the pad holder. 5 Close the automatic document feeder. 6 Plug the scanner in and turn it back on. 16 Maintaining your MFP Replacing the pick pad assembly If you still experience problems with multiple sheets of paper feeding through the automatic document feeder, you may need to...
MFP X4500 Option Setup Guide
Page 22
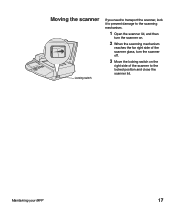
Moving the scanner Locking switch If you need to transport the scanner, lock it to prevent damage to the scanning mechanism. 1 Open the scanner lid, and then turn the scanner on. 2 When the scanning mechanism reaches the far right side of the scanner glass, turn the scanner off. 3 Move the locking switch on the right side of the scanner to the locked position and close the scanner lid. Maintaining your MFP 17
Moving the scanner Locking switch If you need to transport the scanner, lock it to prevent damage to the scanning mechanism. 1 Open the scanner lid, and then turn the scanner on. 2 When the scanning mechanism reaches the far right side of the scanner glass, turn the scanner off. 3 Move the locking switch on the right side of the scanner to the locked position and close the scanner lid. Maintaining your MFP 17
MFP X4500 Option Setup Guide
Page 23
Document Distributor Your MFP comes with your MFP. The Document Distributor software lets you can quickly scan documents back to your document workflow. Lexmark Document Distributor 18 The ScanBack Utility is a software package available from Lexmark for creating desktop shortcuts with your personal scan settings so you automate the scanning process and streamline your computer. Document Distributor is a Windows-based wizard for use with a CD containing the ScanBack Utility.
Document Distributor Your MFP comes with your MFP. The Document Distributor software lets you can quickly scan documents back to your document workflow. Lexmark Document Distributor 18 The ScanBack Utility is a software package available from Lexmark for creating desktop shortcuts with your personal scan settings so you automate the scanning process and streamline your computer. Document Distributor is a Windows-based wizard for use with a CD containing the ScanBack Utility.
MFP X4500 Option Setup Guide
Page 24
... in and turned on page 13. • Open automatic document feeder door. For more information, see "Maintaining your printer, and then click Contact Lexmark. Make sure pick pad is seated correctly, and then close door. • Make sure paper is inserted far enough. • If you are...pad, and then try again. For more help, launch the drivers CD that came with your MFP" on . • Make sure the Ethernet cables are still having problems, contact Lexmark customer support at http://support.lexmark.com. • Touch the Copy icon. For more information, see "Attach cables and cords...
... in and turned on page 13. • Open automatic document feeder door. For more information, see "Maintaining your printer, and then click Contact Lexmark. Make sure pick pad is seated correctly, and then close door. • Make sure paper is inserted far enough. • If you are...pad, and then try again. For more help, launch the drivers CD that came with your MFP" on . • Make sure the Ethernet cables are still having problems, contact Lexmark customer support at http://support.lexmark.com. • Touch the Copy icon. For more information, see "Attach cables and cords...
MFP X4500 Option Setup Guide
Page 25
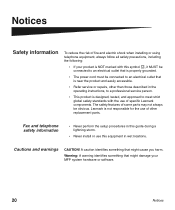
... MUST be connected to an electrical outlet that might cause you harm. Warning: A warning identifies something that is not responsible for the use of specific Lexmark components. Lexmark is near the product and easily accessible. • Refer service or repairs, other replacement parts. The safety features of some parts may not always... reduce the risk of fire and electric shock when installing or using telephone equipment, always follow all safety precautions, including the following: • If your MFP system hardware or software. 20 Notices
... MUST be connected to an electrical outlet that might cause you harm. Warning: A warning identifies something that is not responsible for the use of specific Lexmark components. Lexmark is near the product and easily accessible. • Refer service or repairs, other replacement parts. The safety features of some parts may not always... reduce the risk of fire and electric shock when installing or using telephone equipment, always follow all safety precautions, including the following: • If your MFP system hardware or software. 20 Notices

MFP X4500 Option Setup Guide
Page 29
... of successful operation on every PSTN network termination point. The REN of problems, you should ensure for the following jack: CA11A. Lexmark does not currently know of terminals allowed to be compliant with PSTN networks that accept analog signals. The REN assigned to each terminal...provides an indication of the maximum number of interoperating difficulties for their own protection that the sum of the RENs of all X4500 MFP Options which bear the following mark: This equipment is 0.4. This equipment uses the following countries: Austria France Greece Portugal Spain Belgium...
... of successful operation on every PSTN network termination point. The REN of problems, you should ensure for the following jack: CA11A. Lexmark does not currently know of terminals allowed to be compliant with PSTN networks that accept analog signals. The REN assigned to each terminal...provides an indication of the maximum number of interoperating difficulties for their own protection that the sum of the RENs of all X4500 MFP Options which bear the following mark: This equipment is 0.4. This equipment uses the following countries: Austria France Greece Portugal Spain Belgium...


