Card Stock & Label Guide
Page 11
... (0.25 in the "Printer specifications" chapter. The auto compensator has two rollers that could cause nesting and tenting should fall outside of Lexmark specifications • use of non-Lexmark supplies (such as toner cartridges and/or inkjet cartridges) • use micro-perfs to bleed charge. Printing too close to feed. Perforations that touch the media.
... (0.25 in the "Printer specifications" chapter. The auto compensator has two rollers that could cause nesting and tenting should fall outside of Lexmark specifications • use of non-Lexmark supplies (such as toner cartridges and/or inkjet cartridges) • use micro-perfs to bleed charge. Printing too close to feed. Perforations that touch the media.
Card Stock & Label Guide
Page 122
...quality desirable for specific instructions on some media. Using third party, non-Lexmark cartridges and fuser cleaners can result in toner build-up in your printer. Printer specifications 122 It also lessens toner buildup on how to clean the inside of the printer frequently, possibly ...Failure to lubricate the fuser and prolong fuser life. See your printer documentation for Optra plus, Optra, 4039 12C (with Diamond FineTM toner cartridges (P/N 1382100 or 1382150) when duplexing. • Note that come with some labels, ensuring good print quality. • We recommend ...
...quality desirable for specific instructions on some media. Using third party, non-Lexmark cartridges and fuser cleaners can result in toner build-up in your printer. Printer specifications 122 It also lessens toner buildup on how to clean the inside of the printer frequently, possibly ...Failure to lubricate the fuser and prolong fuser life. See your printer documentation for Optra plus, Optra, 4039 12C (with Diamond FineTM toner cartridges (P/N 1382100 or 1382150) when duplexing. • Note that come with some labels, ensuring good print quality. • We recommend ...
Clearing Jams Guide
Page 2
... pointed objects to remove the paper. You need to the MFP. CAUTION: Do not use any internal components. This could cause personal injury or damage to access the print media from the MFP rear door. 6 Align and reinstall the toner cartridge. 9 Touch Continue. 202 Paper Jam Open Rear Door 1... If the paper is exiting the MFP, pull the media straight out, and then touch Continue. 5 Pull the print...
... pointed objects to remove the paper. You need to the MFP. CAUTION: Do not use any internal components. This could cause personal injury or damage to access the print media from the MFP rear door. 6 Align and reinstall the toner cartridge. 9 Touch Continue. 202 Paper Jam Open Rear Door 1... If the paper is exiting the MFP, pull the media straight out, and then touch Continue. 5 Pull the print...

User's Guide
Page 95
... message appears or when you experience faded print, remove the toner cartridge. Repeat this procedure multiple times until the print remains faded. Maintaining the MFP Conserving supplies Several settings in the U.S., contact Lexmark at www.lexmark.com, or contact the place where you bought the MFP. Firmly shake it side-to-side and front-to-back...
... message appears or when you experience faded print, remove the toner cartridge. Repeat this procedure multiple times until the print remains faded. Maintaining the MFP Conserving supplies Several settings in the U.S., contact Lexmark at www.lexmark.com, or contact the place where you bought the MFP. Firmly shake it side-to-side and front-to-back...

User's Guide
Page 110
You need to the MFP. This could cause personal injury or damage to access the print media from the MFP rear door. 6 Align and reinstall the toner cartridge. 7 Close the top front cover. 8 Close the multipurpose feeder. 9 Touch Continue. Clearing jams 5 Pull the print media up and toward you pull, stop pulling. CAUTION: Do not use any pointed objects to remove the paper. Warning:If the print media does not move immediately when you . Clearing jams 110
You need to the MFP. This could cause personal injury or damage to access the print media from the MFP rear door. 6 Align and reinstall the toner cartridge. 7 Close the top front cover. 8 Close the multipurpose feeder. 9 Touch Continue. Clearing jams 5 Pull the print media up and toward you pull, stop pulling. CAUTION: Do not use any pointed objects to remove the paper. Warning:If the print media does not move immediately when you . Clearing jams 110
User's Guide
Page 147
... standard tray 10 Start button 12 static sensitivity notice 3 status message bar 14 Stop button 12 supplies label fuser cleaner 98 maintenance kit 97 print cartridge 95 recycling 98 T time stamp 26 toner cartridge recycling 98 147
... standard tray 10 Start button 12 static sensitivity notice 3 status message bar 14 Stop button 12 supplies label fuser cleaner 98 maintenance kit 97 print cartridge 95 recycling 98 T time stamp 26 toner cartridge recycling 98 147

Menus and Messages Guide
Page 43
...job or just the page of each function. Web Page Refresh Rate 30-300 (120*) Range is not supported on toner. Using MFP menus Menu item Purpose Values and descriptions Allow Custom Job scans Controls the show for the user interface Custom Job setting as.... Continuous-MFP repeats three beeps every 10 seconds. The Custom Job scanning settings set the default values for Custom Job for the text field must be person to change the network interface hardware address, (000000000000*) numerals only. Toner Alarm activates when the print cartridge or a toner cartridge is a...
...job or just the page of each function. Web Page Refresh Rate 30-300 (120*) Range is not supported on toner. Using MFP menus Menu item Purpose Values and descriptions Allow Custom Job scans Controls the show for the user interface Custom Job setting as.... Continuous-MFP repeats three beeps every 10 seconds. The Custom Job scanning settings set the default values for Custom Job for the text field must be person to change the network interface hardware address, (000000000000*) numerals only. Toner Alarm activates when the print cartridge or a toner cartridge is a...
Menus and Messages Guide
Page 93
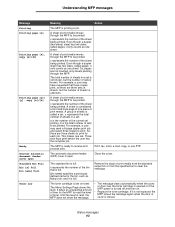
... (ADF) cover is open Standard Bin Full Bin [x] Full bin name] Full Toner Low Meaning Action The MFP is low on . • Replace the toner cartridge. x represents the number of sets to read , the MFP does not show the message. • The message clears automatically when the cover or... door over the toner cartridge is opened or if the MFP power is known. The toner cartridge is printing a job. If it...
... (ADF) cover is open Standard Bin Full Bin [x] Full bin name] Full Toner Low Meaning Action The MFP is low on . • Replace the toner cartridge. x represents the number of sets to read , the MFP does not show the message. • The message clears automatically when the cover or... door over the toner cartridge is opened or if the MFP power is known. The toner cartridge is printing a job. If it...
Menus and Messages Guide
Page 106
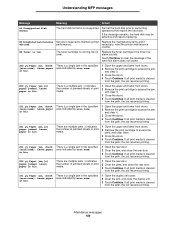
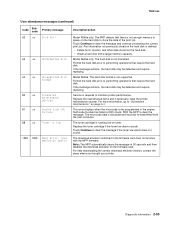
... 2 Clear the jam, and close the rear door. 3 Touch Continue. Leave paper in bin. Leave paper in bin. Replace the toner cartridge if the toner low alarm sounds. If all print media is cleared from the path, the job resumes printing. 202.yy Paper jam, check [area name... them. 3 Close the doors. 4 Touch Continue. Understanding MFP messages Message Meaning Action 64 Unsupported disk format The hard disk format is a multiple jam. necessary, reset the printer maintenance counter. 88 Toner is low The toner cartridge is cleared from the path, the job resumes printing. If...
... 2 Clear the jam, and close the rear door. 3 Touch Continue. Leave paper in bin. Leave paper in bin. Replace the toner cartridge if the toner low alarm sounds. If all print media is cleared from the path, the job resumes printing. 202.yy Paper jam, check [area name... them. 3 Close the doors. 4 Touch Continue. Understanding MFP messages Message Meaning Action 64 Unsupported disk format The hard disk format is a multiple jam. necessary, reset the printer maintenance counter. 88 Toner is low The toner cartridge is cleared from the path, the job resumes printing. If...
Help Menu Pages
Page 8
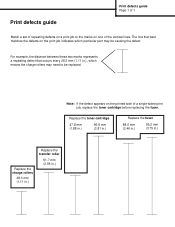
... distance between these two marks represents a repeating defect that best matches the defects on one of a single-sided print job, replace the toner cartridge before replacing the fuser. Replace the toner cartridge 47.8 mm (1.88 in.) 96.8 mm (3.81 in.) Replace the fuser 88.0 mm (3.46 in.) 95.2 mm (3.75 in.) Replace the charge...
... distance between these two marks represents a repeating defect that best matches the defects on one of a single-sided print job, replace the toner cartridge before replacing the fuser. Replace the toner cartridge 47.8 mm (1.88 in.) 96.8 mm (3.81 in.) Replace the fuser 88.0 mm (3.46 in.) 95.2 mm (3.75 in.) Replace the charge...
Service Manual
Page 69
...motor locked, no first HSYNC received. • Check printhead • Check cables and connectors • Check system board. Go to "Toner sensor service check" on page 2-153. Go to "Main drive service check" on page 2-171. Go to "Printhead service check" on...system board An error has been detected. No home windows has been detected. • Check toner cartridge. • Check toner sensor No toner sensor transition. • Check toner sensor • Check toner cartridge An incorrect printhead has been detected Check the printhead Printhead lost lock • Check printhead ...
...motor locked, no first HSYNC received. • Check printhead • Check cables and connectors • Check system board. Go to "Toner sensor service check" on page 2-153. Go to "Main drive service check" on page 2-171. Go to "Printhead service check" on...system board An error has been detected. No home windows has been detected. • Check toner cartridge. • Check toner sensor No toner sensor transition. • Check toner sensor • Check toner cartridge An incorrect printhead has been detected Check the printhead Printhead lost lock • Check printhead ...
Service Manual
Page 78
...preparing resources for the bin, such as Mary's bin, and it is not replaced, the MFP issues the message again when the door or cover is full. Deleting held jobs are available. Toner Low The toner cartridge is low. Install print media in the tray according to clear the message. x specifies the ... the message. • The message clears automatically when the cover or door over the toner cartridge is opened or if the MFP power is full. Remove the stack of time for job. preparing resources for the MFP to "Parallel port service check" on page 2-159. Wait for the job are deleted...
...preparing resources for the bin, such as Mary's bin, and it is not replaced, the MFP issues the message again when the door or cover is full. Deleting held jobs are available. Toner Low The toner cartridge is low. Install print media in the tray according to clear the message. x specifies the ... the message. • The message clears automatically when the cover or door over the toner cartridge is opened or if the MFP power is full. Remove the stack of time for job. preparing resources for the MFP to "Parallel port service check" on page 2-159. Wait for the job are deleted...

Service Manual
Page 80
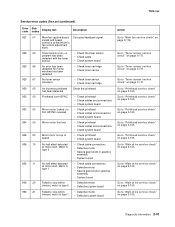
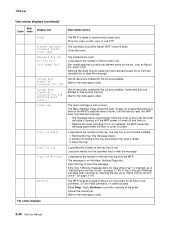
... tray. Change [src] to cancel the current job if needed . This may cause clipping of the following actions: Remove the toner cartridge and install a new cartridge. The formatted page prints as is on the print media installed in the tray. The formatted page prints as is on the ...src] to cancel the current job if needed. 7002-xxx User attendance messages User attendance messages Code Sub code Primary message Description/action Change Cartridge Invalid Refill Select one of text or images. Touch Continue: • which continues the job if the correct size and type are ...
... tray. Change [src] to cancel the current job if needed . This may cause clipping of the following actions: Remove the toner cartridge and install a new cartridge. The formatted page prints as is on the print media installed in the tray. The formatted page prints as is on the ...src] to cancel the current job if needed. 7002-xxx User attendance messages User attendance messages Code Sub code Primary message Description/action Change Cartridge Invalid Refill Select one of text or images. Touch Continue: • which continues the job if the correct size and type are ...
Service Manual
Page 93
... not enough memory or space on page 6-1. Replace the toner cartridge if the toner low alarm sounds. Touch Continue to clear the message. Format the hard disk prior to store the data of the print job. Model X646e. For more information, go to "Scheduled maintenance" on the hard disk to ... current print job. If the message remains, the hard disk may be re-transmitted from the host computer. POR the MFP to clear the message if the toner low alarm does not sound. Touch Continue to maintain printer performance. The hard disk is not supported. Replace the maintenance ...
... not enough memory or space on page 6-1. Replace the toner cartridge if the toner low alarm sounds. Touch Continue to clear the message. Format the hard disk prior to store the data of the print job. Model X646e. For more information, go to "Scheduled maintenance" on the hard disk to ... current print job. If the message remains, the hard disk may be re-transmitted from the host computer. POR the MFP to clear the message if the toner low alarm does not sound. Touch Continue to maintain printer performance. The hard disk is not supported. Replace the maintenance ...

Service Manual
Page 163
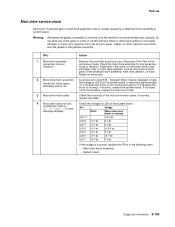
... the operator panel right cover is off, no fans turn , and the fuser lamp does not come on the toner cartridge is not broken and that the right and left cartridge tracks are working. CAUTION When you are not loose or broken. It measures approximately +5 V dc. If the... the option and check the printer for proper mechanical operation. 7002-xxx Cover closed switch/cable service check-printer FRU 1 Toner cartridge 2 Cover closed switch/cable assembly Action Make sure the toner cartridge is correctly installed and that the tab correctly activates the cover closed switch spring.
... the operator panel right cover is off, no fans turn , and the fuser lamp does not come on the toner cartridge is not broken and that the right and left cartridge tracks are working. CAUTION When you are not loose or broken. It measures approximately +5 V dc. If the... the option and check the printer for proper mechanical operation. 7002-xxx Cover closed switch/cable service check-printer FRU 1 Toner cartridge 2 Cover closed switch/cable assembly Action Make sure the toner cartridge is correctly installed and that the tab correctly activates the cover closed switch spring.
Service Manual
Page 191
.... If incorrect, replace the cable. 7002-xxx Main drive service check Service tip: Excessive gear or main drive assembly noise is in the main drive, toner cartridge, fuser, or main drive gearbox. FRU 1 Main drive assembly (excessive noise or vibration) 2 Main drive motor assembly (excessive noise, gears ratcheting and so on the...
.... If incorrect, replace the cable. 7002-xxx Main drive service check Service tip: Excessive gear or main drive assembly noise is in the main drive, toner cartridge, fuser, or main drive gearbox. FRU 1 Main drive assembly (excessive noise or vibration) 2 Main drive motor assembly (excessive noise, gears ratcheting and so on the...
Service Manual
Page 200
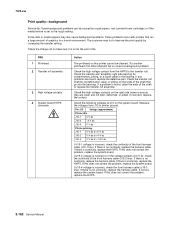
... is not at 0 V dc, check the continuity of life. Some slick or coated papers may try to improve the print quality by rough papers, non-Lexmark toner cartridges or if the media texture is set to printer ground. 7002-xxx Print quality-background Service tip: Some background problems can be cleaned. If incorrect...
... is not at 0 V dc, check the continuity of life. Some slick or coated papers may try to improve the print quality by rough papers, non-Lexmark toner cartridges or if the media texture is set to printer ground. 7002-xxx Print quality-background Service tip: Some background problems can be cleaned. If incorrect...
Service Manual
Page 217
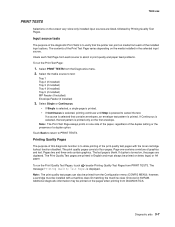
... test pages can print on media from each of this diagnostic function is selected that the printer can also be installed with the toner cartridge lockout function disabled. The contents of the print quality test pages with a machine class ID matching the machine class ID stored in... feed problems. To run the Print Quality Test Pages, touch beside Printing Quality Test Pages from the Configuration menu (CONFIG MENU), however, a cartridge must always be printed on the pages when printing from the Diagnostics menu. 2. If Continuous is selected, the test pattern is displayed. The...
... test pages can print on media from each of this diagnostic function is selected that the printer can also be installed with the toner cartridge lockout function disabled. The contents of the print quality test pages with a machine class ID matching the machine class ID stored in... feed problems. To run the Print Quality Test Pages, touch beside Printing Quality Test Pages from the Configuration menu (CONFIG MENU), however, a cartridge must always be printed on the pages when printing from the Diagnostics menu. 2. If Continuous is selected, the test pattern is displayed. The...
Service Manual
Page 257
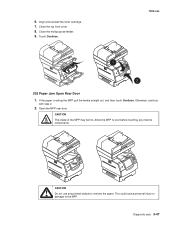
Open the MFP rear door. This could cause personal injury or damage to remove the paper. 6. Touch Continue. 7002-xxx 1 2 202 Paper Jam Open Rear Door 1. CAUTION The inside of the MFP may be hot. CAUTION Do not use any internal components. Close the top front cover. 8. If the paper is exiting the MFP, pull the media straight out, and then touch Continue. Align and reinstall the toner cartridge. 7. Close the multipurpose feeder. 9. Diagnostic aids 3-47 Allow the MFP to cool before touching any pointed objects to the MFP. Otherwise, continue with step 2. 2.
Open the MFP rear door. This could cause personal injury or damage to remove the paper. 6. Touch Continue. 7002-xxx 1 2 202 Paper Jam Open Rear Door 1. CAUTION The inside of the MFP may be hot. CAUTION Do not use any internal components. Close the top front cover. 8. If the paper is exiting the MFP, pull the media straight out, and then touch Continue. Align and reinstall the toner cartridge. 7. Close the multipurpose feeder. 9. Diagnostic aids 3-47 Allow the MFP to cool before touching any pointed objects to the MFP. Otherwise, continue with step 2. 2.
Service Manual
Page 333
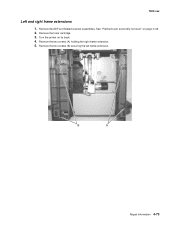
Repair information 4-73 Turn the printer on page 4-38. 2. Remove the toner cartridge. 3. Remove the two screws (B) securing the left frame extension. 7002-xxx Left and right frame extensions 1. See "Flatbed scan assembly removal" on its back. 4. Remove the two screws (A) holding the right frame extension. 5. Remove the ADF and flatbed scanner assemblies.
Repair information 4-73 Turn the printer on page 4-38. 2. Remove the toner cartridge. 3. Remove the two screws (B) securing the left frame extension. 7002-xxx Left and right frame extensions 1. See "Flatbed scan assembly removal" on its back. 4. Remove the two screws (A) holding the right frame extension. 5. Remove the ADF and flatbed scanner assemblies.


