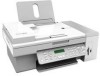
User's Guide
Page 5
...card ...67 Inserting a flash drive ...68 Understanding the Photo Card menu...69 Understanding the PictBridge menu...71 Transferring photos ...72 Changing the Lexmark Productivity Studio preferences 74 Editing photos...75 Cropping a photo ...75 Rotating a photo ...75 Changing the Resolution / Size of a photo...76...of a photo 78 Applying a color effect to a photo...78 Changing the Exposure setting of a photo ...78 Removing wavy patterns from scanned photos, magazines, or newspapers 79 Printing photos...79 Printing photos from a CD or removable storage device using the computer 79 Viewing / ...
...card ...67 Inserting a flash drive ...68 Understanding the Photo Card menu...69 Understanding the PictBridge menu...71 Transferring photos ...72 Changing the Lexmark Productivity Studio preferences 74 Editing photos...75 Cropping a photo ...75 Rotating a photo ...75 Changing the Resolution / Size of a photo...76...of a photo 78 Applying a color effect to a photo...78 Changing the Exposure setting of a photo ...78 Removing wavy patterns from scanned photos, magazines, or newspapers 79 Printing photos...79 Printing photos from a CD or removable storage device using the computer 79 Viewing / ...
User's Guide
Page 6
......90 Enlarging or reducing an image...90 Understanding the Copy menu...91 Modifying the Copy settings...91 Scanning 93 Scanning a document...93 Scanning a document using the computer...93 Scanning text for editing...94 Scanning images for editing...94 Scanning a photo to the Library...95 Scanning multiple photos at one time using the computer 95 Creating a PDF from...
......90 Enlarging or reducing an image...90 Understanding the Copy menu...91 Modifying the Copy settings...91 Scanning 93 Scanning a document...93 Scanning a document using the computer...93 Scanning text for editing...94 Scanning images for editing...94 Scanning a photo to the Library...95 Scanning multiple photos at one time using the computer 95 Creating a PDF from...
User's Guide
Page 9
...cannot communicate with computers over peer-to-peer network 149 Printer is not able to communicate with the computer 151 Problems when copying, scanning, or faxing ...151 Wrong printer is attached...151 Updating the printer software ...151 Bidirectional communication is not established...152 Experiencing poor quality ...digital camera 153 Jams and misfeeds troubleshooting...154 How to clear and avoid paper jams...154 Paper jam in the Automatic Document Feeder (ADF)...154 Paper jam in the printer...155 Paper jam in the paper support...156 Paper or specialty media misfeeds...156 Printer does not...
...cannot communicate with computers over peer-to-peer network 149 Printer is not able to communicate with the computer 151 Problems when copying, scanning, or faxing ...151 Wrong printer is attached...151 Updating the printer software ...151 Bidirectional communication is not established...152 Experiencing poor quality ...digital camera 153 Jams and misfeeds troubleshooting...154 How to clear and avoid paper jams...154 Paper jam in the Automatic Document Feeder (ADF)...154 Paper jam in the printer...155 Paper jam in the paper support...156 Paper or specialty media misfeeds...156 Printer does not...
User's Guide
Page 14
...Loading paper • In Windows XP and earlier, click Start. • Printing 2 Click Programs or All Programs ŒLexmark X5400 • Working with photos Series. • Scanning (if supported by your printer) 3 Click User's Guide. • Making copies (if supported by your printer) If the...the Mac Help: 2 Click Documentation. 1 From the Finder desktop, double-click the Lexmark 3 Click View User's Guide (including Setup X5400 Series folder. In Windows XP and earlier versions, click Start Œ scanning, faxing, paper jams, and misfeeds Run, and then type D:\setup, where D ...
...Loading paper • In Windows XP and earlier, click Start. • Printing 2 Click Programs or All Programs ŒLexmark X5400 • Working with photos Series. • Scanning (if supported by your printer) 3 Click User's Guide. • Making copies (if supported by your printer) If the...the Mac Help: 2 Click Documentation. 1 From the Finder desktop, double-click the Lexmark 3 Click View User's Guide (including Setup X5400 Series folder. In Windows XP and earlier versions, click Start Œ scanning, faxing, paper jams, and misfeeds Run, and then type D:\setup, where D ...
User's Guide
Page 25
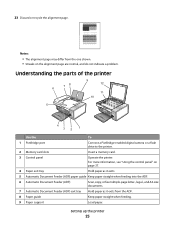
...8226; Streaks on page 37. 4 Paper exit tray Hold paper as it exits. 5 Automatic Document Feeder (ADF) paper guide Keep paper straight when feeding into the ADF. 6 Automatic Document Feeder (ADF) Scan, copy, or fax multiple-page letter-, legal-, and A4-size documents. 7 Automatic Document Feeder... (ADF) exit tray Hold paper as it exits from the ADF. 8 Paper guide Keep paper straight when feeding. 9 ...
...8226; Streaks on page 37. 4 Paper exit tray Hold paper as it exits. 5 Automatic Document Feeder (ADF) paper guide Keep paper straight when feeding into the ADF. 6 Automatic Document Feeder (ADF) Scan, copy, or fax multiple-page letter-, legal-, and A4-size documents. 7 Automatic Document Feeder... (ADF) exit tray Hold paper as it exits from the ADF. 8 Paper guide Keep paper straight when feeding. 9 ...
User's Guide
Page 26
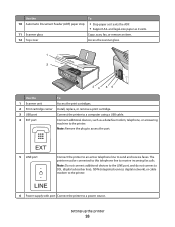
... printer to an active telephone line to receive incoming fax calls. Use the To 10 Automatic Document Feeder (ADF) paper stop • Stop paper as it exits. 11 Scanner glass Copy, scan, fax, or remove an item. 12 Top cover Access the scanner glass. 1 2 34 56 Use ...Access the print cartridges. 2 Print cartridge carrier Install, replace, or remove a print cartridge. 3 USB port Connect the printer to a computer using a USB cable. 4 EXT port Connect additional devices, such as it exits the ADF. • Support A4- Note: Remove the plug to the printer. Note: Do not connect ...
... printer to an active telephone line to receive incoming fax calls. Use the To 10 Automatic Document Feeder (ADF) paper stop • Stop paper as it exits. 11 Scanner glass Copy, scan, fax, or remove an item. 12 Top cover Access the scanner glass. 1 2 34 56 Use ...Access the print cartridges. 2 Print cartridge carrier Install, replace, or remove a print cartridge. 3 USB port Connect the printer to a computer using a USB cable. 4 EXT port Connect additional devices, such as it exits the ADF. • Support A4- Note: Remove the plug to the printer. Note: Do not connect ...
User's Guide
Page 37
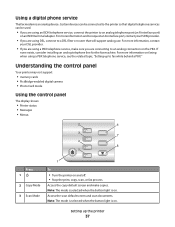
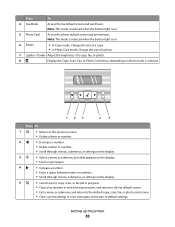
... • Photo Card mode Using the control panel The display shows: • Printer status • Messages • Menus Press 1 2 Copy Mode 3 Scan Mode To • Turn the printer on faxing when using DSL, connect to a DSL filter or router that digital telephone services can be used. •... printer to fax while behind a PBX." For more information and to the printer so that will support analog use. Access the scan default screen and scan documents. If none exists, consider installing an analog telephone line for the fax machine. Note: The mode is selected when the button...
... • Photo Card mode Using the control panel The display shows: • Printer status • Messages • Menus Press 1 2 Copy Mode 3 Scan Mode To • Turn the printer on faxing when using DSL, connect to a DSL filter or router that digital telephone services can be used. •... printer to fax while behind a PBX." For more information and to the printer so that will support analog use. Access the scan default screen and scan documents. If none exists, consider installing an analog telephone line for the fax machine. Note: The mode is selected when the button...
User's Guide
Page 38
... photo. 7 Lighter / Darker Adjust the brightness of a copy, fax, or photo. 8 Display the Copy, Scan, Fax, or Photo Card menu, depending on which mode is on the display. 5 • Cancel a print, copy, scan, or fax job in progress. • Clear a fax number or end a fax transmission, and return to... the fax default screen. • Exit a menu or submenu, and return to the default copy, scan, fax, or photo card screen. • Clear current ...
... photo. 7 Lighter / Darker Adjust the brightness of a copy, fax, or photo. 8 Display the Copy, Scan, Fax, or Photo Card menu, depending on which mode is on the display. 5 • Cancel a print, copy, scan, or fax job in progress. • Clear a fax number or end a fax transmission, and return to... the fax default screen. • Exit a menu or submenu, and return to the default copy, scan, fax, or photo card screen. • Clear current ...
User's Guide
Page 39
... programmed Speed Dial numbers (1-89) or Group Dial numbers (90-99). 5 Start Color Start a color copy, scan, fax, or photo print job, depending on which mode is selected. 6 Start Black Start a black-and-white copy, scan, fax, or photo print job, depending on which mode is on. Enter a pause only when you...
... programmed Speed Dial numbers (1-89) or Group Dial numbers (90-99). 5 Start Color Start a color copy, scan, fax, or photo print job, depending on which mode is selected. 6 Start Black Start a black-and-white copy, scan, fax, or photo print job, depending on which mode is on. Enter a pause only when you...
User's Guide
Page 40
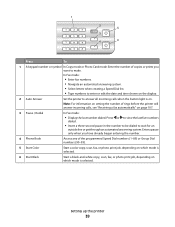
... minutes of inactivity or if the printer is removed. - Photo Effects - Paper Size - Photo Size - Layout - Setting up the printer 40 Original Size - Original Type Scan Mode - b Press or repeatedly until the setting you want appears. 2 Press : • To save most settings. An * appears next to the default setting. Original Size...
... minutes of inactivity or if the printer is removed. - Photo Effects - Paper Size - Photo Size - Layout - Setting up the printer 40 Original Size - Original Type Scan Mode - b Press or repeatedly until the setting you want appears. 2 Press : • To save most settings. An * appears next to the default setting. Original Size...
User's Guide
Page 43
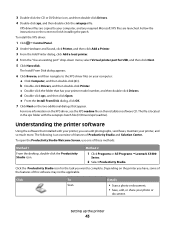
...the features of these methods: Method 1 From the desktop, double-click the Productivity Studio icon. Click the Productivity Studio icon for USB, and then click Next. 5 Click Have disk. Depending on the two additional dialogs that installed with the setupxps batch file (D:\...Drivers\xps\readme). Method 2 1 Click Programs or All Programs ŒLexmark X5400 Series. 2 Select Productivity Studio. Click To Scan Details • Scan a photo or document. • Save, edit, or share your computer: a Click Computer, and then ...
...the features of these methods: Method 1 From the desktop, double-click the Productivity Studio icon. Click the Productivity Studio icon for USB, and then click Next. 5 Click Have disk. Depending on the two additional dialogs that installed with the setupxps batch file (D:\...Drivers\xps\readme). Method 2 1 Click Programs or All Programs ŒLexmark X5400 Series. 2 Select Productivity Studio. Click To Scan Details • Scan a photo or document. • Save, edit, or share your computer: a Click Computer, and then ...
User's Guide
Page 45
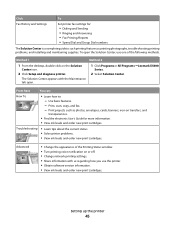
... as photos, envelopes, cards, banners, iron-on the Solution Center icon. 2 Click Setup and diagnose printer. 1 Click Programs or All Programs ŒLexmark X5400 Series. 2 Select Solution Center. Print, scan, copy, and fax. - To open the Solution Center, use the printer. • Obtain software version information. • View ink levels and order...
... as photos, envelopes, cards, banners, iron-on the Solution Center icon. 2 Click Setup and diagnose printer. 1 Click Programs or All Programs ŒLexmark X5400 Series. 2 Select Solution Center. Print, scan, copy, and fax. - To open the Solution Center, use the printer. • Obtain software version information. • View ink levels and order...
User's Guide
Page 46
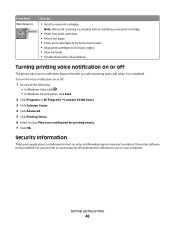
Note: Wait until scanning is completed. Security Information Third-party applications, including anti-virus, security, and firewall programs may alert you when printing starts and when it is complete ... off : 1 Do one of the following: • In Windows Vista, click . • In Windows XP and earlier, click Start. 2 Click Programs or All Programs ŒLexmark X5400 Series. 3 Click Solution Center. 4 Click Advanced. 5 Click Printing Status. 6 Select or clear Play voice notification for printing events. 7 Click OK.
Note: Wait until scanning is completed. Security Information Third-party applications, including anti-virus, security, and firewall programs may alert you when printing starts and when it is complete ... off : 1 Do one of the following: • In Windows Vista, click . • In Windows XP and earlier, click Start. 2 Click Programs or All Programs ŒLexmark X5400 Series. 3 Click Solution Center. 4 Click Advanced. 5 Click Printing Status. 6 Select or clear Play voice notification for printing events. 7 Click OK.
User's Guide
Page 49
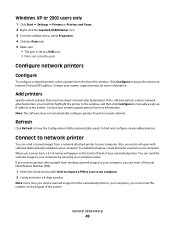
... your system support person for more information. Also, your computer. If you want to prevent other people from the networked printer to a USB port. • File is already installed on your jobs will appear on remote subnets. Note: The software does not automatically configure printers ... send scanned images from the list in the window, and then click Configure to manually assign an IP address to my computer. 2 Create and enter a 4-digit number. Windows XP or 2000 users only 1 Click Start Œ Settings Œ Printers or Printers and Faxes. 2 Right-click the Lexmark X5400 ...
... your system support person for more information. Also, your computer. If you want to prevent other people from the networked printer to a USB port. • File is already installed on your jobs will appear on remote subnets. Note: The software does not automatically configure printers ... send scanned images from the list in the window, and then click Configure to manually assign an IP address to my computer. 2 Create and enter a 4-digit number. Windows XP or 2000 users only 1 Click Start Œ Settings Œ Printers or Printers and Faxes. 2 Right-click the Lexmark X5400 ...
User's Guide
Page 53
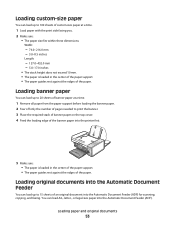
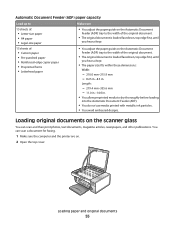
Loading paper and original documents 53 You can load A4-, letter-, or legal-size paper into the Automatic Document Feeder (ADF) for scanning, copying, and faxing. Loading custom-size paper You can load up to 100 sheets of custom-size paper at a time. 1 Remove all paper from the ... loaded in the center of the paper support. • The paper guides rest against the edges of an original document into the Automatic Document Feeder (ADF).
Loading paper and original documents 53 You can load A4-, letter-, or legal-size paper into the Automatic Document Feeder (ADF) for scanning, copying, and faxing. Loading custom-size paper You can load up to 100 sheets of custom-size paper at a time. 1 Remove all paper from the ... loaded in the center of the paper support. • The paper guides rest against the edges of an original document into the Automatic Document Feeder (ADF).
User's Guide
Page 55
....6 mm - 11.0 in.-14.0 in . Loading original documents on the scanner glass You can scan a document for faxing. 1 Make sure the computer and the printer are on the Automatic Document Feeder (ADF) tray to the width of the original document. • The original document is loaded facedown, ... paper guide on . 2 Open the top cover. Loading paper and original documents 55 You can scan and then print photos, text documents, magazine articles, newspapers, and other publications. Automatic Document Feeder (ADF) paper capacity Load up to 15 sheets of: • Letter-size paper • A4 paper...
....6 mm - 11.0 in.-14.0 in . Loading original documents on the scanner glass You can scan a document for faxing. 1 Make sure the computer and the printer are on the Automatic Document Feeder (ADF) tray to the width of the original document. • The original document is loaded facedown, ... paper guide on . 2 Open the top cover. Loading paper and original documents 55 You can scan and then print photos, text documents, magazine articles, newspapers, and other publications. Automatic Document Feeder (ADF) paper capacity Load up to 15 sheets of: • Letter-size paper • A4 paper...
User's Guide
Page 56
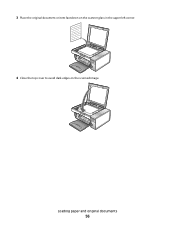
3 Place the original document or item facedown on the scanner glass in the upper left corner. 4 Close the top cover to avoid dark edges on the scanned image. Loading paper and original documents 56
3 Place the original document or item facedown on the scanner glass in the upper left corner. 4 Close the top cover to avoid dark edges on the scanned image. Loading paper and original documents 56
User's Guide
Page 62
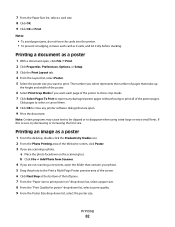
... programs may cause text to be clipped or to print all of the poster. 6 Select Print Crop Marks if you are not scanning a new item, open the folder that are scanning a photo: a Place the photo facedown on " drop-down list, select a paper size. 8 From the "Print Quality for poster" drop-down list...
... programs may cause text to be clipped or to print all of the poster. 6 Select Print Crop Marks if you are not scanning a new item, open the folder that are scanning a photo: a Place the photo facedown on " drop-down list, select a paper size. 8 From the "Print Quality for poster" drop-down list...

User's Guide
Page 69
... Black. An * appears next to the selected setting. 6 To go into the printer. Note: Pressing selects a setting. Menu item Action Proof Sheet Print and then scan a proof sheet: • for all photos on the memory card • for the most recent 20 photos • by date For more than one active...
... Black. An * appears next to the selected setting. 6 To go into the printer. Note: Pressing selects a setting. Menu item Action Proof Sheet Print and then scan a proof sheet: • for all photos on the memory card • for the most recent 20 photos • by date For more than one active...
User's Guide
Page 79
...and the computer are on. 2 Load an original document facedown on the scanner glass. 3 From the desktop, double-click the Productivity Studio icon. 4 Click Scan. 5 Select the Photo or Several Photos option. 6 Click Start. 7 Click the Advanced tab. 8 Click Image Patterns. 9 To remove the image patterns caused by... scanning from a CD or removable storage device using the computer 1 Load photo paper with the glossy or printable side facing you. (If you are not ...
...and the computer are on. 2 Load an original document facedown on the scanner glass. 3 From the desktop, double-click the Productivity Studio icon. 4 Click Scan. 5 Select the Photo or Several Photos option. 6 Click Start. 7 Click the Advanced tab. 8 Click Image Patterns. 9 To remove the image patterns caused by... scanning from a CD or removable storage device using the computer 1 Load photo paper with the glossy or printable side facing you. (If you are not ...


