User's Guide
Page 3
... service ...37 Understanding the control panel...37 Using the control panel ...37 Saving settings...40 Installing another language control panel...41 Installing the printer software...42 Installing the optional XPS driver (Windows Vista users only 42 Understanding the printer software...43 Turning printing voice notification on or off...46 Security Information...46 General networking 47...
... service ...37 Understanding the control panel...37 Using the control panel ...37 Saving settings...40 Installing another language control panel...41 Installing the printer software...42 Installing the optional XPS driver (Windows Vista users only 42 Understanding the printer software...43 Turning printing voice notification on or off...46 Security Information...46 General networking 47...
User's Guide
Page 7
... a fax automatically 118 Setting up Speed Dial...118 Printing fax activity reports...119 Maintaining the printer 120 Replacing print cartridges...120 Installing print cartridges...120 Removing a used print cartridge ...121 Refilling print cartridges...122 Using genuine Lexmark print cartridges...122 Aligning print cartridges...122 Cleaning the print cartridge nozzles...123 Wiping the print...
... a fax automatically 118 Setting up Speed Dial...118 Printing fax activity reports...119 Maintaining the printer 120 Replacing print cartridges...120 Installing print cartridges...120 Removing a used print cartridge ...121 Refilling print cartridges...122 Using genuine Lexmark print cartridges...122 Aligning print cartridges...122 Cleaning the print cartridge nozzles...123 Wiping the print...

User's Guide
Page 8
......128 Power button is not lit ...128 Software does not install...129 Page does not print...130 Solving printer communication problems ...131 Understanding Warning levels ...132 Removing and reinstalling the software ...132 Enabling the USB port...132 Print troubleshooting...133 Improving print quality ...133 Poor ... straight lines are not smooth ...142 White lines appear in graphics or solid black areas ...143 Checking the printer status...143 Checking printer readiness ...144 Settings are not saved...145 Checking the Spool Settings for banner printing ...145 Resolving font problems...145...
......128 Power button is not lit ...128 Software does not install...129 Page does not print...130 Solving printer communication problems ...131 Understanding Warning levels ...132 Removing and reinstalling the software ...132 Enabling the USB port...132 Print troubleshooting...133 Improving print quality ...133 Poor ... straight lines are not smooth ...142 White lines appear in graphics or solid black areas ...143 Checking the printer status...143 Checking printer readiness ...144 Settings are not saved...145 Checking the Spool Settings for banner printing ...145 Resolving font problems...145...
User's Guide
Page 14
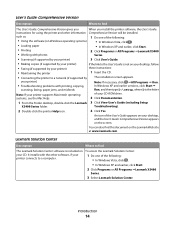
... your desktop, and the User's Guide: Comprehensive Version appears on To access the Lexmark Solution Center: your CD-ROM drive. such as: 1 Do one of your CD. your printer) • Troubleshooting problems with the other information Comprehensive Version will be installed. Lexmark Solution Center Description Where to a network (if supported by your desktop, follow...
... your desktop, and the User's Guide: Comprehensive Version appears on To access the Lexmark Solution Center: your CD-ROM drive. such as: 1 Do one of your CD. your printer) • Troubleshooting problems with the other information Comprehensive Version will be installed. Lexmark Solution Center Description Where to a network (if supported by your desktop, follow...
User's Guide
Page 16
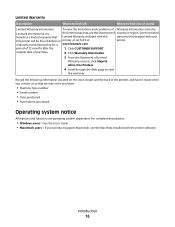
...the 1 Click CUSTOMER SUPPORT. Introduction 16 materials and workmanship for a www.lexmark.com. period of the printer), and have it ready when you contact us so that shipped with your...purchase. 2 Click Warranty Information. 3 From the Statement of Limited Warranty section, click Inkjet & All-In-One Printers. 4 Scroll through the Web page to find (US) Where to view the warranty...varies by Lexmark International, Inc. For complete descriptions: • Windows users-See the User's Guide. • Macintosh users-If your this limited warranty, see the Mac Help installed with this...
...the 1 Click CUSTOMER SUPPORT. Introduction 16 materials and workmanship for a www.lexmark.com. period of the printer), and have it ready when you contact us so that shipped with your...purchase. 2 Click Warranty Information. 3 From the Statement of Limited Warranty section, click Inkjet & All-In-One Printers. 4 Scroll through the Web page to find (US) Where to view the warranty...varies by Lexmark International, Inc. For complete descriptions: • Windows users-See the User's Guide. • Macintosh users-If your this limited warranty, see the Mac Help installed with this...
User's Guide
Page 18
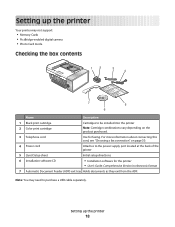
... connection" on the product purchased. 3 Telephone cord Use for the printer • User's Guide: Comprehensive Version in electronic format 7 Automatic Document Feeder (ADF) exit tray Holds documents as they exit from the ADF. Setting up the printer Your printer may need to be installed into the printer 2 Color print cartridge Note: Cartridge combinations vary depending on page...
... connection" on the product purchased. 3 Telephone cord Use for the printer • User's Guide: Comprehensive Version in electronic format 7 Automatic Document Feeder (ADF) exit tray Holds documents as they exit from the ADF. Setting up the printer Your printer may need to be installed into the printer 2 Color print cartridge Note: Cartridge combinations vary depending on page...

User's Guide
Page 20
4 Insert the back end of the Automatic Document Feeder exit tray. 5 Snap in the front end of the Automatic Document Feeder exit tray. 6 Raise the control panel. 7 If needed, install the correct control panel for your language. Setting up the printer 20
4 Insert the back end of the Automatic Document Feeder exit tray. 5 Snap in the front end of the Automatic Document Feeder exit tray. 6 Raise the control panel. 7 If needed, install the correct control panel for your language. Setting up the printer 20
User's Guide
Page 26
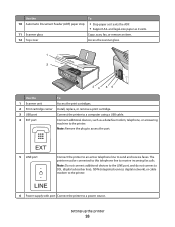
... print cartridges. 2 Print cartridge carrier Install, replace, or remove a print cartridge. 3 USB port Connect the printer to a computer using a USB cable. 4 EXT port Connect additional devices, such as it exits the ADF. • Support A4- Setting up the printer 26 LINE 6 Power supply with port Connect the printer to the printer. The printer must be connected to this telephone...
... print cartridges. 2 Print cartridge carrier Install, replace, or remove a print cartridge. 3 USB port Connect the printer to a computer using a USB cable. 4 EXT port Connect additional devices, such as it exits the ADF. • Support A4- Setting up the printer 26 LINE 6 Power supply with port Connect the printer to the printer. The printer must be connected to this telephone...
User's Guide
Page 30
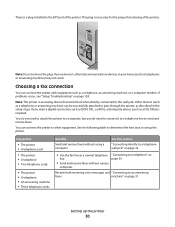
...as a DSL filter) is required. There is a plug installed in the EXT port of the printer. Note: The printer is necessary for the proper functioning of the printer. Note: Do not remove the plug. You do need to attach the printer to a telephone wall jack" on page 35 Receive both incoming... analog device that works best when directly connected to an answering faxes. If problems occur, see "Setup Troubleshooting" on page 31 Setting up the printer. "Connecting to a telephone" on page 32 • Use the fax line as telephones or answering machines) may not work. Choosing a fax...
...as a DSL filter) is required. There is a plug installed in the EXT port of the printer. Note: The printer is necessary for the proper functioning of the printer. Note: Do not remove the plug. You do need to attach the printer to a telephone wall jack" on page 35 Receive both incoming... analog device that works best when directly connected to an answering faxes. If problems occur, see "Setup Troubleshooting" on page 31 Setting up the printer. "Connecting to a telephone" on page 32 • Use the fax line as telephones or answering machines) may not work. Choosing a fax...
User's Guide
Page 37
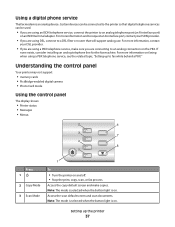
... that digital telephone services can be used. • If you are using a PBX telephone service, see the related topic, "Setting up the printer 37 Note: The mode is selected when the button light is an analog device. For more information on faxing when using a PBX telephone service,... make copies. If none exists, consider installing an analog telephone line for the fax machine. Using a digital phone service The fax modem is on. For more information and to request an...
... that digital telephone services can be used. • If you are using a PBX telephone service, see the related topic, "Setting up the printer 37 Note: The mode is selected when the button light is an analog device. For more information on faxing when using a PBX telephone service,... make copies. If none exists, consider installing an analog telephone line for the fax machine. Using a digital phone service The fax modem is on. For more information and to request an...
User's Guide
Page 41
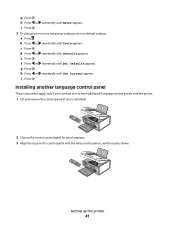
...Press . e Press . i Press . Setting up the printer 41 c Press . h Press or repeatedly until Set Defaults appears. d Press or repeatedly until Use Current appears. h Press or repeatedly until Defaults appears. Installing another language control panel These instructions apply only if you received ...one is installed). 2 Choose the correct control panel for your language. 3 Align the clips on the...
...Press . e Press . i Press . Setting up the printer 41 c Press . h Press or repeatedly until Set Defaults appears. d Press or repeatedly until Use Current appears. h Press or repeatedly until Defaults appears. Installing another language control panel These instructions apply only if you received ...one is installed). 2 Choose the correct control panel for your language. 3 Align the clips on the...
User's Guide
Page 42
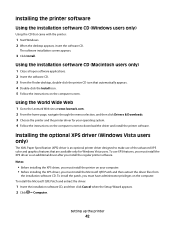
Using the World Wide Web 1 Go to the Lexmark Web site at www.lexmark.com. 2 From the home page, navigate through the menu selection, and then click Drivers & Downloads. 3 Choose the printer and the printer driver for Windows Vista users. Installing the optional XPS driver (Windows Vista users only) The XML Paper Specification (XPS) driver is...
Using the World Wide Web 1 Go to the Lexmark Web site at www.lexmark.com. 2 From the home page, navigate through the menu selection, and then click Drivers & Downloads. 3 Choose the printer and the printer driver for Windows Vista users. Installing the optional XPS driver (Windows Vista users only) The XML Paper Specification (XPS) driver is...
User's Guide
Page 43
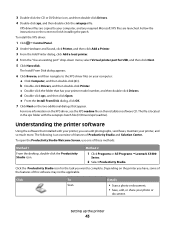
... for USB, and then click Next. 5 Click Have disk. Click To Scan Details • Scan a photo or document. • Save, edit, or share your computer, and any required Microsoft XPS files are launched. The following is located in the xps folder with your printer model number, and then double-click Drivers. The Install...
... for USB, and then click Next. 5 Click Have disk. Click To Scan Details • Scan a photo or document. • Save, edit, or share your computer, and any required Microsoft XPS files are launched. The following is located in the xps folder with your printer model number, and then double-click Drivers. The Install...
User's Guide
Page 45
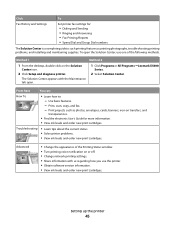
...Printing Status window. • Turn printing voice notification on the Solution Center icon. 2 Click Setup and diagnose printer. 1 Click Programs or All Programs ŒLexmark X5400 Series. 2 Select Solution Center. Use basic features. - Advanced • Change the appearance of the following... and order new print cartridges. Setting up the printer 45 To open . Print projects such as printing photographs, troubleshooting printing problems, and installing and maintaining supplies. Click Fax History and Settings To Set printer fax settings for more information. • View ...
...Printing Status window. • Turn printing voice notification on the Solution Center icon. 2 Click Setup and diagnose printer. 1 Click Programs or All Programs ŒLexmark X5400 Series. 2 Select Solution Center. Use basic features. - Advanced • Change the appearance of the following... and order new print cartridges. Setting up the printer 45 To open . Print projects such as printing photographs, troubleshooting printing problems, and installing and maintaining supplies. Click Fax History and Settings To Set printer fax settings for more information. • View ...
User's Guide
Page 46
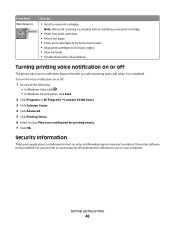
...ink levels. • Troubleshoot other ink problems. Turning printing voice notification on or off The printer has a voice notification feature that tells you about the printer software being installed. Setting up the printer 46 To turn the voice notification on or off : 1 Do one of the following:... • In Windows Vista, click . • In Windows XP and earlier, click Start. 2 Click Programs or All Programs ŒLexmark X5400 Series. ...
...ink levels. • Troubleshoot other ink problems. Turning printing voice notification on or off The printer has a voice notification feature that tells you about the printer software being installed. Setting up the printer 46 To turn the voice notification on or off : 1 Do one of the following:... • In Windows Vista, click . • In Windows XP and earlier, click Start. 2 Click Programs or All Programs ŒLexmark X5400 Series. ...
User's Guide
Page 47
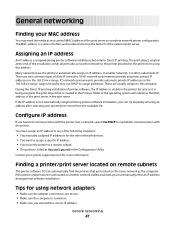
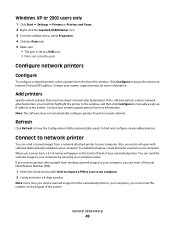
... • Make sure you have the ability to automatically assign an IP address. You must manually enter an IP address during printer software installation. Contact your system support person for Direct IP printing. Larger networks may need the media access control (MAC) address of the...network environments provide automatic private IP addresses in the 169.254.x.x range. The MAC address is assigned during printer software installation, you must assign an IP address in the printer list only as Unconfigured in the port name. If the IP address is often called a subnet), ...
... • Make sure you have the ability to automatically assign an IP address. You must manually enter an IP address during printer software installation. Contact your system support person for Direct IP printing. Larger networks may need the media access control (MAC) address of the...network environments provide automatic private IP addresses in the 169.254.x.x range. The MAC address is assigned during printer software installation, you must assign an IP address in the printer list only as Unconfigured in the port name. If the IP address is often called a subnet), ...
User's Guide
Page 48
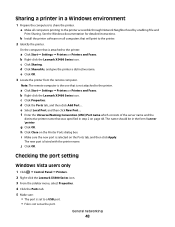
... then click New Port.... b Install the printer software on the Printer Ports dialog box. The name should be in step 2 on the Ports tab, and then click Apply. c Click Sharing. c Click Properties. The new port is attached to a USB port. • File is selected on page 48. b Right-click the Lexmark X5400 Series icon. b Right...
... then click New Port.... b Install the printer software on the Printer Ports dialog box. The name should be in step 2 on the Ports tab, and then click Apply. c Click Sharing. c Click Properties. The new port is attached to a USB port. • File is selected on page 48. b Right-click the Lexmark X5400 Series icon. b Right...
User's Guide
Page 49
...a USB port. • File is already installed on the keypad of names will open with software that may have the Configuration Utility automatically search to assign the printer an Internet Protocol (IP) address. If the software detects a direct network attached printer, you must first highlight the printer in... on the Control Panel of your computer. Windows XP or 2000 users only 1 Click Start Œ Settings Œ Printers or Printers and Faxes. 2 Right-click the Lexmark X5400 Series icon. 3 From the sidebar menu, select Properties. 4 Click the Ports tab. 5 Make sure: • The ...
...a USB port. • File is already installed on the keypad of names will open with software that may have the Configuration Utility automatically search to assign the printer an Internet Protocol (IP) address. If the software detects a direct network attached printer, you must first highlight the printer in... on the Control Panel of your computer. Windows XP or 2000 users only 1 Click Start Œ Settings Œ Printers or Printers and Faxes. 2 Right-click the Lexmark X5400 Series icon. 3 From the sidebar menu, select Properties. 4 Click the Ports tab. 5 Make sure: • The ...
User's Guide
Page 94
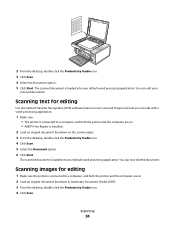
... Select the Document option. 6 Click Start. Scanning 94 You can edit with a word-processing application. 1 Make sure: • The printer is connected to turn scanned images into your scanned document. Scanning images for editing Use the Optical Character Recognition (OCR) software feature to a... scanned document is installed. 2 Load an original document facedown on . 2 Load an original document facedown in Automatic Document Feeder (ADF). 3 From the desktop, double-click the Productivity Studio icon. 4 Click Scan. Scanning text for editing 1 Make sure the printer is loaded into ...
... Select the Document option. 6 Click Start. Scanning 94 You can edit with a word-processing application. 1 Make sure: • The printer is connected to turn scanned images into your scanned document. Scanning images for editing Use the Optical Character Recognition (OCR) software feature to a... scanned document is installed. 2 Load an original document facedown on . 2 Load an original document facedown in Automatic Document Feeder (ADF). 3 From the desktop, double-click the Productivity Studio icon. 4 Click Scan. Scanning text for editing 1 Make sure the printer is loaded into ...

User's Guide
Page 197
... to go down quickly 138 ink low error 178 inserting flash drives 68 memory cards 67 PictBridge-enabled digital camera 83 installing network printer 47 print cartridges 120 printer software 42, 132 IP address, assigning 47 iron-on transfers, loading 52 iron-on transfers, printing 64 J jams ...incorrect 174 left cartridge missing 174 Lexmark Productivity Studio creating and viewing slideshow 85 Library scanning a photo to 95 library preferences changing 75 LINE port 26 loading banner paper 53 custom-size paper 53 documents into the Automatic Document Feeder (ADF) 53 documents on the scanner glass...
... to go down quickly 138 ink low error 178 inserting flash drives 68 memory cards 67 PictBridge-enabled digital camera 83 installing network printer 47 print cartridges 120 printer software 42, 132 IP address, assigning 47 iron-on transfers, loading 52 iron-on transfers, printing 64 J jams ...incorrect 174 left cartridge missing 174 Lexmark Productivity Studio creating and viewing slideshow 85 Library scanning a photo to 95 library preferences changing 75 LINE port 26 loading banner paper 53 custom-size paper 53 documents into the Automatic Document Feeder (ADF) 53 documents on the scanner glass...


