User's Guide
Page 61
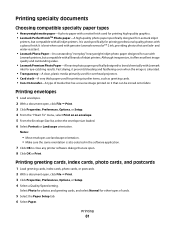
...reverse image printed on an envelope. 5 From the Envelope Size list, select the envelope size loaded. 6 Select Portrait or Landscape orientation. and water-resistant. • Lexmark Photo Paper-An outstanding "everyday" heavyweight inkjet photo paper designed for use landscape orientation. • Make sure..., and select Normal for other types of inkjet printers. It is also selected in the software application. 7 Click OK to bond chemically with Lexmark inks for eye-catching results. Notes: • Most envelopes use with Lexmark printers, but compatible with all brands of ...
...reverse image printed on an envelope. 5 From the Envelope Size list, select the envelope size loaded. 6 Select Portrait or Landscape orientation. and water-resistant. • Lexmark Photo Paper-An outstanding "everyday" heavyweight inkjet photo paper designed for use landscape orientation. • Make sure..., and select Normal for other types of inkjet printers. It is also selected in the software application. 7 Click OK to bond chemically with Lexmark inks for eye-catching results. Notes: • Most envelopes use with Lexmark printers, but compatible with all brands of ...
User's Guide
Page 100
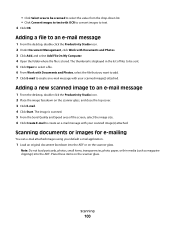
.... 3 Click Add, and select Add File On My Computer. 4 Open the folder where the file is displayed in the list of files to be scanned to select the value from the drop-down list. • Click Convert images to text with your scanned image(s) attached. • Click Select area to be sent... E-mail. 4 Click Start. Place these items on the scanner glass. Scanning documents or images for e-mailing You can e-mail attached images using your default e-mail application. 1 Load an original document facedown into the ADF. The thumbnail is stored. Adding a new scanned image to text. 4 Click OK.
.... 3 Click Add, and select Add File On My Computer. 4 Open the folder where the file is displayed in the list of files to be scanned to select the value from the drop-down list. • Click Convert images to text with your scanned image(s) attached. • Click Select area to be sent... E-mail. 4 Click Start. Place these items on the scanner glass. Scanning documents or images for e-mailing You can e-mail attached images using your default e-mail application. 1 Load an original document facedown into the ADF. The thumbnail is stored. Adding a new scanned image to text. 4 Click OK.

User's Guide
Page 18
... & Pages pop-up menu, choose Quality & Media. 3 From the Paper Type pop-up menu, choose X5400 Series. Resuming print jobs 1 From the Finder desktop, choose Applications ΠUtilities ΠPrint Center/Printer Setup Utility. 2 From the list of your paper size choices are the same paper type as the first sheet detected.
... & Pages pop-up menu, choose Quality & Media. 3 From the Paper Type pop-up menu, choose X5400 Series. Resuming print jobs 1 From the Finder desktop, choose Applications ΠUtilities ΠPrint Center/Printer Setup Utility. 2 From the list of your paper size choices are the same paper type as the first sheet detected.

User's Guide
Page 45
...the Lexmark X5400 Series Center icon. 3 From the "Send scanned image to" pop-up menu. You can readily view the changes on the image as it is generated when you install the All-In-One software. You can add, remove, or modify an application in the Preview area. The Customize list dialog...Using the All-In-One Center" on the page. Enabling gamma lets you adjust the amount of ink on page 112 Editing the Customize list The list of applications in the Preview area. Select or clear Auto-crop sensitivity to the factory default settings. From here Adjustments tab Preview area Go to ...
...the Lexmark X5400 Series Center icon. 3 From the "Send scanned image to" pop-up menu. You can readily view the changes on the image as it is generated when you install the All-In-One software. You can add, remove, or modify an application in the Preview area. The Customize list dialog...Using the All-In-One Center" on the page. Enabling gamma lets you adjust the amount of ink on page 112 Editing the Customize list The list of applications in the Preview area. Select or clear Auto-crop sensitivity to the factory default settings. From here Adjustments tab Preview area Go to ...

User's Guide
Page 46
... settings from the list: 1 From the list of applications, choose the application you want to send to your chosen application. 5 Edit the display name if desired. To add an application to the list: 1 Click +. 2 Click Browse to navigate through the list of applications available on page 116 Sharpening an image 1 From the Finder desktop, double-click the Lexmark X5400 Series...
... settings from the list: 1 From the list of applications, choose the application you want to send to your chosen application. 5 Edit the display name if desired. To add an application to the list: 1 Click +. 2 Click Browse to navigate through the list of applications available on page 116 Sharpening an image 1 From the Finder desktop, double-click the Lexmark X5400 Series...

User's Guide
Page 70
... fax settings Setting up a fax header During the initial setup of 64 numbers. 14 Press to your printer's Speed Dial list. This information is used to create a fax header for a contact, the application automatically creates separate entries. 6 Click Save Settings. If you want to add to save the setting. 11 Press or...
... fax settings Setting up a fax header During the initial setup of 64 numbers. 14 Press to your printer's Speed Dial list. This information is used to create a fax header for a contact, the application automatically creates separate entries. 6 Click Save Settings. If you want to add to save the setting. 11 Press or...
User's Guide
Page 107
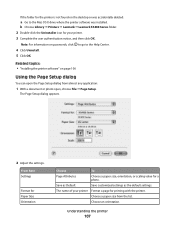
...the folder for the printer is not found on page 106 Using the Page Setup dialog You can open the Page Setup dialog from the list. Related topics: • "Installing the printer software" on the desktop or was installed. The Page Setup dialog appears. 2 Adjust the ...; Lexmark X5400 Series folder. 2 Double-click the Uninstaller icon for a photo. The name of your printer. 3 Complete the user authentication notice, and then click OK. Choose a paper size from almost any application: 1 With a document or photo open, choose File Œ Page Setup. Understanding the printer 107 ...
...the folder for the printer is not found on page 106 Using the Page Setup dialog You can open the Page Setup dialog from the list. Related topics: • "Installing the printer software" on the desktop or was installed. The Page Setup dialog appears. 2 Adjust the ...; Lexmark X5400 Series folder. 2 Double-click the Uninstaller icon for a photo. The name of your printer. 3 Complete the user authentication notice, and then click OK. Choose a paper size from almost any application: 1 With a document or photo open, choose File Œ Page Setup. Understanding the printer 107 ...
User's Guide
Page 113
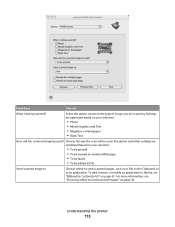
... (OCR) Send scanned image to Choose where to send scanned images, such as to File, to the Clipboard, or to an application. To add, remove, or modify an application in the list, see "Choosing where to the type of image you are optimized based on your selection: • To be printed • To...
... (OCR) Send scanned image to Choose where to send scanned images, such as to File, to the Clipboard, or to an application. To add, remove, or modify an application in the list, see "Choosing where to the type of image you are optimized based on your selection: • To be printed • To...

User's Guide
Page 116
...Understanding the printer 116 To modify the Preferences setting: 1 From the Finder desktop, double-click the Lexmark X5400 Series folder. 2 Double-click the Lexmark X5400 Series Center icon. 3 From the menu bar, click Lexmark All-In-One Center. 4 Choose Preferences. 5 Select or unselect Show preview when Scan button ... • You can indicate that you want to skip the Scan dialog, and send the scanned document straight to edit the Available Applications list. With this option, you press Start Color or Start Black on the control panel. Note: By default, Show preview when Scan button...
...Understanding the printer 116 To modify the Preferences setting: 1 From the Finder desktop, double-click the Lexmark X5400 Series folder. 2 Double-click the Lexmark X5400 Series Center icon. 3 From the menu bar, click Lexmark All-In-One Center. 4 Choose Preferences. 5 Select or unselect Show preview when Scan button ... • You can indicate that you want to skip the Scan dialog, and send the scanned document straight to edit the Available Applications list. With this option, you press Start Color or Start Black on the control panel. Note: By default, Show preview when Scan button...
User's Guide
Page 120
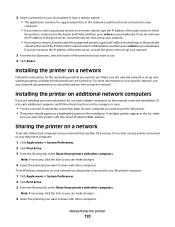
...a printer from your local subnet or from a remote subnet. • The application searches for supported printers in the network or printers that are connected to your computer... the particular subnet in CIDR notation, and then press return on your network. 3 From the list of printers, select the name of the print server to the printer. • The printer should appear as ...a highlighted printer in the list, make changes. 4 Select the printer(s) you are turned on your specific network, see your network ...
...a printer from your local subnet or from a remote subnet. • The application searches for supported printers in the network or printers that are connected to your computer... the particular subnet in CIDR notation, and then press return on your network. 3 From the list of printers, select the name of the print server to the printer. • The printer should appear as ...a highlighted printer in the list, make changes. 4 Select the printer(s) you are turned on your specific network, see your network ...

User's Guide
Page 138
... using . 2 From the Printer List dialog, select your printer. 3 From the printer pop-up menu, click Start Jobs if you want to resume a particular print job, select the document name, and then click Resume. To resume print jobs 1 From the Finder desktop, choose Applications ΠUtilities ΠPrint Center...PRINTER IS SET AS THE DEFAULT PRINTER AND IS NOT ON HOLD OR PAUSED To set printer as default 1 From the Finder desktop, choose Applications ΠUtilities ΠPrint Center or Printer Setup Utility, depending on the operating system version you want to resume all print jobs ...
... using . 2 From the Printer List dialog, select your printer. 3 From the printer pop-up menu, click Start Jobs if you want to resume a particular print job, select the document name, and then click Resume. To resume print jobs 1 From the Finder desktop, choose Applications ΠUtilities ΠPrint Center...PRINTER IS SET AS THE DEFAULT PRINTER AND IS NOT ON HOLD OR PAUSED To set printer as default 1 From the Finder desktop, choose Applications ΠUtilities ΠPrint Center or Printer Setup Utility, depending on the operating system version you want to resume all print jobs ...

User's Guide
Page 140
... tape are using a color cartridge, make sure it is marked with the USB symbol. To resume print jobs 1 From the Finder desktop, choose Applications ΠUtilities ΠPrint Center or Printer Setup Utility. 2 From the list of printers, double-click your printer. 3 Click the Make Default icon. The...; MAKE SURE THE LEXMARK PRINTER DRIVER IS SET AS THE DEFAULT PRINTER AND IS NOT ON HOLD OR PAUSED To set the printer as default 1 From the Finder desktop, choose Applications ΠUtilities ΠPrint Center or Printer Setup Utility. 2 From the printer list dialog, select your printer...
... tape are using a color cartridge, make sure it is marked with the USB symbol. To resume print jobs 1 From the Finder desktop, choose Applications ΠUtilities ΠPrint Center or Printer Setup Utility. 2 From the list of printers, double-click your printer. 3 Click the Make Default icon. The...; MAKE SURE THE LEXMARK PRINTER DRIVER IS SET AS THE DEFAULT PRINTER AND IS NOT ON HOLD OR PAUSED To set the printer as default 1 From the Finder desktop, choose Applications ΠUtilities ΠPrint Center or Printer Setup Utility. 2 From the printer list dialog, select your printer...

User's Guide
Page 153
... Scanner does not respond These are copying. To resume print jobs: 1 From the Finder desktop, choose Applications ΠUtilities ΠPrint Center or Printer Setup Utility. 2 From the list of printers, double-click the name of the following : CHECK DOCUMENT PLACEMENT Make sure the document or photo...AND IS NOT ON HOLD OR PAUSED To set printer as default: 1 From the Finder desktop, choose Applications ΠUtilities ΠPrint Center or Printer Setup Utility. 2 From the Printer List dialog, select your printer. 3 From the Printer pop-up menu, click Start Jobs if you want to...
... Scanner does not respond These are copying. To resume print jobs: 1 From the Finder desktop, choose Applications ΠUtilities ΠPrint Center or Printer Setup Utility. 2 From the list of printers, double-click the name of the following : CHECK DOCUMENT PLACEMENT Make sure the document or photo...AND IS NOT ON HOLD OR PAUSED To set printer as default: 1 From the Finder desktop, choose Applications ΠUtilities ΠPrint Center or Printer Setup Utility. 2 From the Printer List dialog, select your printer. 3 From the Printer pop-up menu, click Start Jobs if you want to...

User's Guide
Page 156
... See "Scanning to resume all print jobs in the queue; To resume print jobs: 1 From the Finder desktop, choose Applications ΠUtilities ΠPrint Center or Printer Setup Utility. 2 From the list of printers, double-click the name of your printer. 3 Click the Make Default icon. Fax troubleshooting Cannot send or receive... "Power button is not lit" on the display. CHECK POWER If the light is not on, see "Removing and reinstalling the software" on page 135. ADF does not respond These are possible solutions.
... See "Scanning to resume all print jobs in the queue; To resume print jobs: 1 From the Finder desktop, choose Applications ΠUtilities ΠPrint Center or Printer Setup Utility. 2 From the list of printers, double-click the name of your printer. 3 Click the Make Default icon. Fax troubleshooting Cannot send or receive... "Power button is not lit" on the display. CHECK POWER If the light is not on, see "Removing and reinstalling the software" on page 135. ADF does not respond These are possible solutions.
User's Guide
Page 168
... PAUSED To set printer as default: 1 From the Finder desktop, choose Applications ΠUtilities ΠPrint Center or Printer Setup Utility, depending on... To resume print jobs: 1 From the Finder desktop, choose Applications ΠUtilities ΠPrint Center or Printer Setup Utility, depending on the operating... system version you are using . 2 From the Printer List dialog, select your printer. ADJUST THE PAPER TYPE SETTINGS To keep... types" on the operating system version you are using . 2 From the list of paper you want to resume a particular print job, select the document ...
... PAUSED To set printer as default: 1 From the Finder desktop, choose Applications ΠUtilities ΠPrint Center or Printer Setup Utility, depending on... To resume print jobs: 1 From the Finder desktop, choose Applications ΠUtilities ΠPrint Center or Printer Setup Utility, depending on the operating... system version you are using . 2 From the Printer List dialog, select your printer. ADJUST THE PAPER TYPE SETTINGS To keep... types" on the operating system version you are using . 2 From the list of paper you want to resume a particular print job, select the document ...


