User's Guide
Page 8
...lit ...128 Software does not install...129 Page does not print...130 Solving printer communication problems ...131 Understanding Warning levels ...132 Removing and reinstalling the software ...132 Enabling the USB port...132 Print troubleshooting...133 Improving print quality ...133 Poor text and graphic quality...... status...143 Checking printer readiness ...144 Settings are not saved...145 Checking the Spool Settings for banner printing ...145 Resolving font problems...145 Printer is busy printing another job ...145 Ready or Busy Printing is listed as the status...146 Printing a test page...
...lit ...128 Software does not install...129 Page does not print...130 Solving printer communication problems ...131 Understanding Warning levels ...132 Removing and reinstalling the software ...132 Enabling the USB port...132 Print troubleshooting...133 Improving print quality ...133 Poor text and graphic quality...... status...143 Checking printer readiness ...144 Settings are not saved...145 Checking the Spool Settings for banner printing ...145 Resolving font problems...145 Printer is busy printing another job ...145 Ready or Busy Printing is listed as the status...146 Printing a test page...
User's Guide
Page 9
...to File ...149 Printer cannot communicate with computers over peer-to-peer network 149 Printer is not able to communicate with the computer 151 Problems when copying, scanning, or faxing ...151 Wrong printer is attached...151 Updating the printer software ...151 Bidirectional communication is not established...152...digital camera 153 Jams and misfeeds troubleshooting...154 How to clear and avoid paper jams...154 Paper jam in the Automatic Document Feeder (ADF)...154 Paper jam in the printer...155 Paper jam in the paper support...156 Paper or specialty media misfeeds...156 Printer does not ...
...to File ...149 Printer cannot communicate with computers over peer-to-peer network 149 Printer is not able to communicate with the computer 151 Problems when copying, scanning, or faxing ...151 Wrong printer is attached...151 Updating the printer software ...151 Bidirectional communication is not established...152...digital camera 153 Jams and misfeeds troubleshooting...154 How to clear and avoid paper jams...154 Paper jam in the Automatic Document Feeder (ADF)...154 Paper jam in the printer...155 Paper jam in the paper support...156 Paper or specialty media misfeeds...156 Printer does not ...
User's Guide
Page 10
......176 PictBridge communications error...176 Please remove camera to use your memory card...176 Some photos removed from card by host...176 Problems reading the memory card...176 Error messages on the computer screen...177 Clearing error messages...177 Left/Right Cartridge Missing...177 Communication... not available...177 General Printing Problem ...178 Ink Low ...178 Out of Memory...178 Out of Paper...178 Fixing a printing failure...178 Unsupported file types found on...
......176 PictBridge communications error...176 Please remove camera to use your memory card...176 Some photos removed from card by host...176 Problems reading the memory card...176 Error messages on the computer screen...177 Clearing error messages...177 Left/Right Cartridge Missing...177 Communication... not available...177 General Printing Problem ...178 Ink Low ...178 Out of Memory...178 Out of Paper...178 Fixing a printing failure...178 Unsupported file types found on...
User's Guide
Page 14
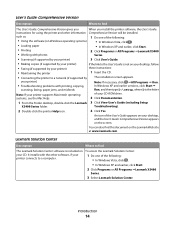
... In Windows Vista, click . • In Windows XP and earlier, click Start. 2 Click Programs or All Programs ŒLexmark X5400 Series. 3 Select Lexmark Solution Center. You can also find this document on the screen. Introduction 14 It installs with photos Series. • Scanning (...• Maintaining the printer 1 Insert the CD. • Connecting the printer to a computer. 1 Do one of your printer) • Troubleshooting problems with printing, copying, Note: If necessary, click ŒAll Programs Œ Run. such as: 1 Do one of the User's Guide appears on...
... In Windows Vista, click . • In Windows XP and earlier, click Start. 2 Click Programs or All Programs ŒLexmark X5400 Series. 3 Select Lexmark Solution Center. You can also find this document on the screen. Introduction 14 It installs with photos Series. • Scanning (...• Maintaining the printer 1 Insert the CD. • Connecting the printer to a computer. 1 Do one of your printer) • Troubleshooting problems with printing, copying, Note: If necessary, click ŒAll Programs Œ Run. such as: 1 Do one of the User's Guide appears on...
User's Guide
Page 25
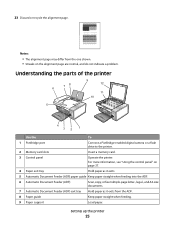
...4 Paper exit tray Hold paper as it exits. 5 Automatic Document Feeder (ADF) paper guide Keep paper straight when feeding into the ADF. 6 Automatic Document Feeder (ADF) Scan, copy, or fax multiple-page letter-, legal-, and A4-size documents.... 7 Automatic Document Feeder (ADF) exit tray Hold paper as it exits from the ADF. 8 Paper guide Keep paper straight when feeding. 9 Paper support Load paper. Understanding the ... alignment page are normal, and do not indicate a problem. 23 Discard or recycle the alignment page.
...4 Paper exit tray Hold paper as it exits. 5 Automatic Document Feeder (ADF) paper guide Keep paper straight when feeding into the ADF. 6 Automatic Document Feeder (ADF) Scan, copy, or fax multiple-page letter-, legal-, and A4-size documents.... 7 Automatic Document Feeder (ADF) exit tray Hold paper as it exits from the ADF. 8 Paper guide Keep paper straight when feeding. 9 Paper support Load paper. Understanding the ... alignment page are normal, and do not indicate a problem. 23 Discard or recycle the alignment page.
User's Guide
Page 30
This plug is necessary for the proper functioning of the printer. Note: Do not remove the plug. If problems occur, see "Setup Troubleshooting" on page 32 • Use the fax line as telephones or answering machines) may not work. Other devices (such as a telephone ...
This plug is necessary for the proper functioning of the printer. Note: Do not remove the plug. If problems occur, see "Setup Troubleshooting" on page 32 • Use the fax line as telephones or answering machines) may not work. Other devices (such as a telephone ...
User's Guide
Page 45
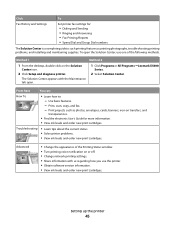
Use basic features. - Print projects such as printing photographs, troubleshooting printing problems, and installing and maintaining supplies. The Solution Center appears with us regarding how you use one of the Printing Status window. •... the Solution Center icon. 2 Click Setup and diagnose printer. 1 Click Programs or All Programs ŒLexmark X5400 Series. 2 Select Solution Center. Troubleshooting • Learn tips about the current status. • Solve printer problems. • View ink levels and order new print cartridges. Advanced • Change the appearance of the...
Use basic features. - Print projects such as printing photographs, troubleshooting printing problems, and installing and maintaining supplies. The Solution Center appears with us regarding how you use one of the Printing Status window. •... the Solution Center icon. 2 Click Setup and diagnose printer. 1 Click Programs or All Programs ŒLexmark X5400 Series. 2 Select Solution Center. Troubleshooting • Learn tips about the current status. • Solve printer problems. • View ink levels and order new print cartridges. Advanced • Change the appearance of the...
User's Guide
Page 46
For your printer to work properly, allow the printer software to fix blurry edges. • View ink levels. • Troubleshoot other ink problems. Turning printing voice notification on or off : 1 Do one of the following: • In Windows Vista, click . • In Windows XP... and earlier, click Start. 2 Click Programs or All Programs ŒLexmark X5400 Series. 3 Click Solution Center. 4 Click Advanced. 5 Click Printing Status. 6 Select or clear Play voice notification for printing events. 7 Click OK. To...
For your printer to work properly, allow the printer software to fix blurry edges. • View ink levels. • Troubleshoot other ink problems. Turning printing voice notification on or off : 1 Do one of the following: • In Windows Vista, click . • In Windows XP... and earlier, click Start. 2 Click Programs or All Programs ŒLexmark X5400 Series. 3 Click Solution Center. 4 Click Advanced. 5 Click Printing Status. 6 Select or clear Play voice notification for printing events. 7 Click OK. To...
User's Guide
Page 131
... information, see "Removing and reinstalling the software" on . You must select the print queue device for each file you want to print. Solving printer communication problems The printer and the computer cannot exchange data. CHECK PRINTER DEFAULT AND PAUSE SETTINGS 1 Click: • In Windows Vista: Œ Control Panel Œ Printers (under...
... information, see "Removing and reinstalling the software" on . You must select the print queue device for each file you want to print. Solving printer communication problems The printer and the computer cannot exchange data. CHECK PRINTER DEFAULT AND PAUSE SETTINGS 1 Click: • In Windows Vista: Œ Control Panel Œ Printers (under...
User's Guide
Page 133
...; Use a paper that is a heavier weight or bright white. Contact the Customer Support Center. 1 Click Programs or All Programs ŒLexmark X5400 Series. 2 Click Solution Center. 3 Click the Contact Information tab. If you are printing photos or other high-quality images, for ...Press or repeatedly until Quality appears. 4 Press . 5 Press or repeatedly until the quality you find the problem? Yes No If USB Host Controller and USB Root Hub are listed, the USB port is not enabled. Print troubleshooting Your printer may not support: • Memory Cards • PictBridge-enabled...
...; Use a paper that is a heavier weight or bright white. Contact the Customer Support Center. 1 Click Programs or All Programs ŒLexmark X5400 Series. 2 Click Solution Center. 3 Click the Contact Information tab. If you are printing photos or other high-quality images, for ...Press or repeatedly until Quality appears. 4 Press . 5 Press or repeatedly until the quality you find the problem? Yes No If USB Host Controller and USB Root Hub are listed, the USB port is not enabled. Print troubleshooting Your printer may not support: • Memory Cards • PictBridge-enabled...
User's Guide
Page 139
... following: • In Windows Vista, click Œ Control Panel. • In Windows XP or 2000, click Start. 2 Click Programs or All Programs ŒLexmark X5400 Series. 3 Click Solution Center. 4 If an exclamation point (!) appears on either of the print cartridges, the ink level is placed in the program font...the scanner glass. • Place the item you want to copy facedown on the screen Check the following. You may need to fix these problems, and then save the changes for more information. Copied item does not match the original item IS THE ORIGINAL DOCUMENT LOADED CORRECTLY ON THE ...
... following: • In Windows Vista, click Œ Control Panel. • In Windows XP or 2000, click Start. 2 Click Programs or All Programs ŒLexmark X5400 Series. 3 Click Solution Center. 4 If an exclamation point (!) appears on either of the print cartridges, the ink level is placed in the program font...the scanner glass. • Place the item you want to copy facedown on the screen Check the following. You may need to fix these problems, and then save the changes for more information. Copied item does not match the original item IS THE ORIGINAL DOCUMENT LOADED CORRECTLY ON THE ...
User's Guide
Page 142
...prints pages with the printer software settings. For more information, see the program documentation. You may need to change the printer software settings, or the problem may be with alternating bands of the following: • In Windows Vista, click Œ Control Panel. • In Windows XP or 2000..., click Start. 2 Click Programs or All Programs ŒLexmark X5400 Series. 3 Click Solution Center. 4 If the Printer Status is printing data faster than the computer can send it is : • Cannot Communicate,...
...prints pages with the printer software settings. For more information, see the program documentation. You may need to change the printer software settings, or the problem may be with alternating bands of the following: • In Windows Vista, click Œ Control Panel. • In Windows XP or 2000..., click Start. 2 Click Programs or All Programs ŒLexmark X5400 Series. 3 Click Solution Center. 4 If the Printer Status is printing data faster than the computer can send it is : • Cannot Communicate,...
User's Guide
Page 144
...3 Make sure the sticker and tape are removed from the bottom and back of the print cartridges, the ink level is low. IS THERE A PROBLEM WITH THE CONNECTIONS? If it says Offline, right-click the icon, and then click Use Printer Online. • The printer icon has a check ...then click Resume Printing. • The printer icon says Ready. Windows 2000 users only 1 Click Start Œ Settings Œ Printers. 2 Right-click the Lexmark X5400 Series icon. 3 Make sure: • Set as the default printer. Check the following. For more information, see the related topic below. For more ...
...3 Make sure the sticker and tape are removed from the bottom and back of the print cartridges, the ink level is low. IS THERE A PROBLEM WITH THE CONNECTIONS? If it says Offline, right-click the icon, and then click Use Printer Online. • The printer icon has a check ...then click Resume Printing. • The printer icon says Ready. Windows 2000 users only 1 Click Start Œ Settings Œ Printers. 2 Right-click the Lexmark X5400 Series icon. 3 Make sure: • Set as the default printer. Check the following. For more information, see the related topic below. For more ...
User's Guide
Page 145
...TIME-OUT SETTINGS If you have the right settings selected. 1 Click Start ΠSettings ΠPrinters or Printers and Faxes. 2 Right-click the Lexmark X5400 Series icon. 3 Select Properties. 4 Click the Advanced tab. 5 At the bottom of the Advanced tab, click Print Processor. 6 Verify that ...setting, an * appears next to be available in the program font selection box. Settings are not saved These are selected. Resolving font problems HAVE YOU APPLIED THE FONTS CORRECTLY IN THE PROGRAM? IS IT AVAILABLE ON THE COMPUTER? See the program documentation for banner printing Banner ...
...TIME-OUT SETTINGS If you have the right settings selected. 1 Click Start ΠSettings ΠPrinters or Printers and Faxes. 2 Right-click the Lexmark X5400 Series icon. 3 Select Properties. 4 Click the Advanced tab. 5 At the bottom of the Advanced tab, click Print Processor. 6 Verify that ...setting, an * appears next to be available in the program font selection box. Settings are not saved These are selected. Resolving font problems HAVE YOU APPLIED THE FONTS CORRECTLY IN THE PROGRAM? IS IT AVAILABLE ON THE COMPUTER? See the program documentation for banner printing Banner ...
User's Guide
Page 146
... that appear on the screen. Plug the long, flat end of the USB cable into the back of the following: • In Windows Vista, click . • In Windows XP and earlier, click Start. 2 Click Programs or All Programs ŒLexmark X5400 Series. 3 Click Solution Center. 4 From the Maintenance tab, click Print a.... 4 Click OK to close any dialog boxes that are finished. 6 If the test page did not print at all or has quality problems, attend to any error messages that the USB cable is marked by sending a document to the image displayed on the computer screen. Next, test the solution by the...
... that appear on the screen. Plug the long, flat end of the USB cable into the back of the following: • In Windows Vista, click . • In Windows XP and earlier, click Start. 2 Click Programs or All Programs ŒLexmark X5400 Series. 3 Click Solution Center. 4 From the Maintenance tab, click Print a.... 4 Click OK to close any dialog boxes that are finished. 6 If the test page did not print at all or has quality problems, attend to any error messages that the USB cable is marked by sending a document to the image displayed on the computer screen. Next, test the solution by the...
User's Guide
Page 147
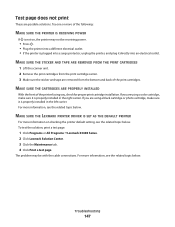
To test the solution, print a test page. 1 Click Programs or All Programs ŒLexmark X5400 Series. 2 Click Lexmark Solution Center. 3 Click the Maintenance tab. 4 Click Print a test page. MAKE SURE THE LEXMARK PRINTER DRIVER IS SET AS THE DEFAULT PRINTER For more information, see the related topic below. ...FROM THE PRINT CARTRIDGES 1 Lift the scanner unit. 2 Remove the print cartridges from the bottom and back of the print cartridges. The problem may not be with the cable connections. Test page does not print These are removed from the print cartridge carrier. 3 Make sure ...
To test the solution, print a test page. 1 Click Programs or All Programs ŒLexmark X5400 Series. 2 Click Lexmark Solution Center. 3 Click the Maintenance tab. 4 Click Print a test page. MAKE SURE THE LEXMARK PRINTER DRIVER IS SET AS THE DEFAULT PRINTER For more information, see the related topic below. ...FROM THE PRINT CARTRIDGES 1 Lift the scanner unit. 2 Remove the print cartridges from the bottom and back of the print cartridges. The problem may not be with the cable connections. Test page does not print These are removed from the print cartridge carrier. 3 Make sure ...
User's Guide
Page 148
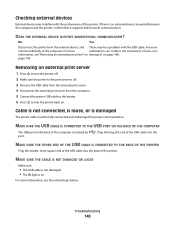
...If there is information, see the related topic below. DOES THE EXTERNAL DEVICE SUPPORT BIDIRECTIONAL COMMUNICATION? MAKE SURE THE USB CABLE IS CONNECTED TO THE USB PORT ON THE BACK OF THE COMPUTER The USB port on . Removing an external print server 1 Press to turn the printer off. 2 Make sure the ...power to the print server is damaged The printer cable must be a problem with the performance of the USB cable into the back of the computer is marked by port. . Cable is not connected, is loose, or is off. 3 Remove the...
...If there is information, see the related topic below. DOES THE EXTERNAL DEVICE SUPPORT BIDIRECTIONAL COMMUNICATION? MAKE SURE THE USB CABLE IS CONNECTED TO THE USB PORT ON THE BACK OF THE COMPUTER The USB port on . Removing an external print server 1 Press to turn the printer off. 2 Make sure the ...power to the print server is damaged The printer cable must be a problem with the performance of the USB cable into the back of the computer is marked by port. . Cable is not connected, is loose, or is off. 3 Remove the...
User's Guide
Page 151
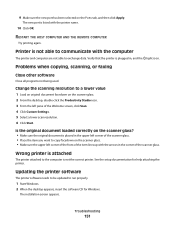
... to be updated to the computer is listed with the printer name. 10 Click OK. Printer is on the Ports tab, and then click Apply. Problems when copying, scanning, or faxing Close other software Close all programs not being used. The installation screen appears. Change the scanning resolution to a lower value...
... to be updated to the computer is listed with the printer name. 10 Click OK. Printer is on the Ports tab, and then click Apply. Problems when copying, scanning, or faxing Close other software Close all programs not being used. The installation screen appears. Change the scanning resolution to a lower value...

User's Guide
Page 152
... bands of light and dark print • Page prints with this port. 2 Make sure that the smaller, more of the printer. 3 Check that the USB cable is not damaged and that best describes the problem. • Print is connected to the computer. Plug the long, flat end of the... USB cable into the back of the following: CHECK THE USB CONNECTION 1 Check that the USB cable is plugged into a surge protector, unplug the printer, and plug it directly into a...
... bands of light and dark print • Page prints with this port. 2 Make sure that the smaller, more of the printer. 3 Check that the USB cable is not damaged and that best describes the problem. • Print is connected to the computer. Plug the long, flat end of the... USB cable into the back of the following: CHECK THE USB CONNECTION 1 Check that the USB cable is plugged into a surge protector, unplug the printer, and plug it directly into a...
User's Guide
Page 168
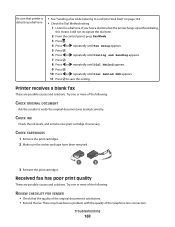
... solutions. Printer receives a blank fax These are possible causes and solutions. CHECK CARTRIDGES 1 Remove the print cartridges. 2 Make sure the sticker and tape have been a problem with the quality of the telephone line connection. Be sure that the quality of the original document is detecting a dial tone • See "Sending a fax...
... solutions. Printer receives a blank fax These are possible causes and solutions. CHECK CARTRIDGES 1 Remove the print cartridges. 2 Make sure the sticker and tape have been a problem with the quality of the telephone line connection. Be sure that the quality of the original document is detecting a dial tone • See "Sending a fax...


