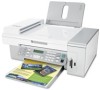

User's Guide
Page 3
Contents Important Safety Information 2 Finding information about the printer 7 Setting up the printer 11 Checking the box contents...11 Installing another language control panel...12 Getting the printer ready to fax...12 Learning about the printer 21 Understanding the parts of the printer...21 Using the control panel buttons and menus...23 Learning about the software 32...
Contents Important Safety Information 2 Finding information about the printer 7 Setting up the printer 11 Checking the box contents...11 Installing another language control panel...12 Getting the printer ready to fax...12 Learning about the printer 21 Understanding the parts of the printer...21 Using the control panel buttons and menus...23 Learning about the software 32...
User's Guide
Page 5
Networking the printer 86 Installing network printers...86 Tips for installing a network printer...87 Maintaining the printer 89 Changing print cartridges...89 Achieving better print quality...91 Preserving the print cartridges...93 Cleaning the scanner glass...94 Ordering supplies...94 Using genuine Lexmark print cartridges...95 Refilling a print cartridge...95 Recycling Lexmark products...95 Troubleshooting 96 Setup troubleshooting...96...
Networking the printer 86 Installing network printers...86 Tips for installing a network printer...87 Maintaining the printer 89 Changing print cartridges...89 Achieving better print quality...91 Preserving the print cartridges...93 Cleaning the scanner glass...94 Ordering supplies...94 Using genuine Lexmark print cartridges...95 Refilling a print cartridge...95 Recycling Lexmark products...95 Troubleshooting 96 Setup troubleshooting...96...
User's Guide
Page 8
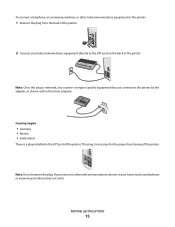
... can also find this document on the Lexmark Web site at www.lexmark.com. 5400 Series folder. 2 Double-click the printer Help icon. Help Description Where to find The Help gives you install the printer software, the User's Guide printer and other information such as: will be installed. • Using the software (on Windows operating systems) 1 Click...
... can also find this document on the Lexmark Web site at www.lexmark.com. 5400 Series folder. 2 Double-click the printer Help icon. Help Description Where to find The Help gives you install the printer software, the User's Guide printer and other information such as: will be installed. • Using the software (on Windows operating systems) 1 Click...
User's Guide
Page 11
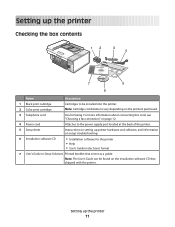
...'s Guide or Setup Solutions Printed booklet that shipped with the printer. Setting up the printer 11 For more information about connecting this cord, see "Choosing a fax connection" on setup troubleshooting. 6 Installation software CD • Installation software for faxing. Note: Cartridge combinations vary depending on the installation software CD that serves as a guide. Note: The User...
...'s Guide or Setup Solutions Printed booklet that shipped with the printer. Setting up the printer 11 For more information about connecting this cord, see "Choosing a fax connection" on setup troubleshooting. 6 Installation software CD • Installation software for faxing. Note: Cartridge combinations vary depending on the installation software CD that serves as a guide. Note: The User...

User's Guide
Page 12
... a telephone wall jack" on page 96. You do need to attach the printer to a computer, but you want a digital connection such as ISDN, DSL, or ADSL, a third-party device (such as a DSL filter) is installed). 2 Choose the correct control panel for your language. 3 Align the clips... on the control panel with equipment such as the power supply cord or telephone, during a lightning storm. Getting the printer ready to send and receive faxes. Other devices (...
... a telephone wall jack" on page 96. You do need to attach the printer to a computer, but you want a digital connection such as ISDN, DSL, or ADSL, a third-party device (such as a DSL filter) is installed). 2 Choose the correct control panel for your language. 3 Align the clips... on the control panel with equipment such as the power supply cord or telephone, during a lightning storm. Getting the printer ready to send and receive faxes. Other devices (...
User's Guide
Page 15
...it, other telecommunications equipment to the printer: 1 Remove the plug from the back of the printer. 2 Connect your home (such as shown, will not function properly. Note: Once this plug is a plug installed in your telecommunications equipment directly to the printer by the adapter, as telephones or ...answering machines) may not work. This plug is necessary for the proper functioning of the printer. If you connect to the EXT port on...
...it, other telecommunications equipment to the printer: 1 Remove the plug from the back of the printer. 2 Connect your home (such as shown, will not function properly. Note: Once this plug is a plug installed in your telecommunications equipment directly to the printer by the adapter, as telephones or ...answering machines) may not work. This plug is necessary for the proper functioning of the printer. If you connect to the EXT port on...
User's Guide
Page 22
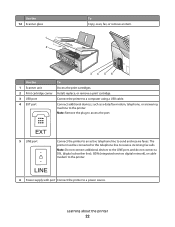
... digital network), or cable modem to send and receive faxes. Note: Remove the plug to a power source. LINE 6 Power supply with port Connect the printer to access the port. Use the 12 Scanner glass 1 2 To Copy, scan, fax, or remove an item. 34 5 6 Use the To 1... Scanner unit Access the print cartridges. 2 Print cartridge carrier Install, replace, or remove a print cartridge. 3 USB port Connect the printer to a computer using a USB cable. 4 EXT port Connect additional devices, such as a data/fax modem, telephone, or answering machine...
... digital network), or cable modem to send and receive faxes. Note: Remove the plug to a power source. LINE 6 Power supply with port Connect the printer to access the port. Use the 12 Scanner glass 1 2 To Copy, scan, fax, or remove an item. 34 5 6 Use the To 1... Scanner unit Access the print cartridges. 2 Print cartridge carrier Install, replace, or remove a print cartridge. 3 USB port Connect the printer to a computer using a USB cable. 4 EXT port Connect additional devices, such as a data/fax modem, telephone, or answering machine...

User's Guide
Page 37
...the software 37 Advanced • Change the appearance of the screen. Learning about the current status. • Solve printer problems. • View ink levels and order new print cartridges. • Install a new print cartridge. Print projects such as photos, envelopes, cards, banners, iron- on or off. •... (Main dialog) How To Troubleshooting Maintenance Contact Information You can • View the status of the printer is complete before installing a new print cartridge. • View shopping options for more information, click Help in the lower right corner of the Printing ...
...the software 37 Advanced • Change the appearance of the screen. Learning about the current status. • Solve printer problems. • View ink levels and order new print cartridges. • Install a new print cartridge. Print projects such as photos, envelopes, cards, banners, iron- on or off. •... (Main dialog) How To Troubleshooting Maintenance Contact Information You can • View the status of the printer is complete before installing a new print cartridge. • View shopping options for more information, click Help in the lower right corner of the Printing ...

User's Guide
Page 69
... on the scanner glass. Note: Preview is not supported when using the scanner. 6 Select a word-processing program to a computer, and both the printer and the computer are on . • ABBYY Fine Reader is connected to edit the text. 7 Click Send Now. 8 Edit and save the ... when using the Automatic Document Feeder. For more information, see the documentation that came with a word-processing application. 1 Make sure: • The printer is installed. 2 Load an original document facedown into the ADF or on the scanner glass. 3 From the desktop, double-click the Imaging Studio icon. 4...
... on the scanner glass. Note: Preview is not supported when using the scanner. 6 Select a word-processing program to a computer, and both the printer and the computer are on . • ABBYY Fine Reader is connected to edit the text. 7 Click Send Now. 8 Edit and save the ... when using the Automatic Document Feeder. For more information, see the documentation that came with a word-processing application. 1 Make sure: • The printer is installed. 2 Load an original document facedown into the ADF or on the scanner glass. 3 From the desktop, double-click the Imaging Studio icon. 4...
User's Guide
Page 86
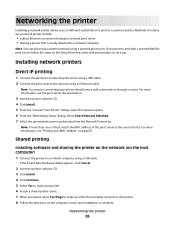
... to a network computer using a USB cable. Networking the printer Installing a network printer allows users at different workstations to print to set up a wireless network using a Lexmark print server. If your product to a common printer. If the Found New Hardware dialog appears, click Cancel. 2 Insert the printer software CD. 3 Click Install. 4 Click Continue. 5 Select Yes to share your...
... to a network computer using a USB cable. Networking the printer Installing a network printer allows users at different workstations to print to set up a wireless network using a Lexmark print server. If your product to a common printer. If the Found New Hardware dialog appears, click Cancel. 2 Insert the printer software CD. 3 Click Install. 4 Click Continue. 5 Select Yes to share your...
User's Guide
Page 87
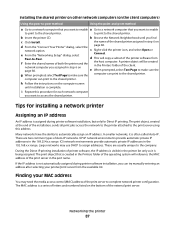
...make sure the computer can print to automatically assign an IP address. In smaller networks, it is assigned during printer software installation, you can print to the shared printer. Larger networks may need the media access control (MAC) address of the print server in the 169.254... computer you want to enable to print to the shared printer. page 86. i Repeat this address. Finding your printer/print server from f Enter the shared names of the printer software from the available list. Installing the shared printer on other network computers (on the client computers) Using...
...make sure the computer can print to automatically assign an IP address. In smaller networks, it is assigned during printer software installation, you can print to the shared printer. Larger networks may need the media access control (MAC) address of the print server in the 169.254... computer you want to enable to print to the shared printer. page 86. i Repeat this address. Finding your printer/print server from f Enter the shared names of the printer software from the available list. Installing the shared printer on other network computers (on the client computers) Using...

User's Guide
Page 88
.... 5 Make sure the computer you must manually enter an IP address during printer software installation. Configuring a network printer manually 1 From the "Configure Network Printers" dialog, highlight the printer you want to the network. 6 See the print server documentation for the printer. 4 Click OK. Finding a printer/print server located on the print server. Network troubleshooting tips 1 Make sure...
.... 5 Make sure the computer you must manually enter an IP address during printer software installation. Configuring a network printer manually 1 From the "Configure Network Printers" dialog, highlight the printer you want to the network. 6 See the print server documentation for the printer. 4 Click OK. Finding a printer/print server located on the print server. Network troubleshooting tips 1 Make sure...
User's Guide
Page 89
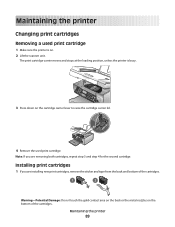
... the cartridge carrier lever to raise the cartridge carrier lid. 4 Remove the used print cartridge 1 Make sure the printer is on the bottom of the cartridges. Maintaining the printer 89 Installing print cartridges 1 If you are installing new print cartridges, remove the sticker and tape from the back and bottom of the cartridges. 1 2 Warning... the metal nozzles on . 2 Lift the scanner unit. Note: If you are removing both cartridges, repeat step 3 and step 4 for the second cartridge. Maintaining the printer Changing print cartridges Removing a used print cartridge.
... the cartridge carrier lever to raise the cartridge carrier lid. 4 Remove the used print cartridge 1 Make sure the printer is on the bottom of the cartridges. Maintaining the printer 89 Installing print cartridges 1 If you are installing new print cartridges, remove the sticker and tape from the back and bottom of the cartridges. 1 2 Warning... the metal nozzles on . 2 Lift the scanner unit. Note: If you are removing both cartridges, repeat step 3 and step 4 for the second cartridge. Maintaining the printer Changing print cartridges Removing a used print cartridge.

User's Guide
Page 91
.... 5 Press . 6 Press or repeatedly until Maintenance appears. 7 Press . 8 Press or repeatedly until Align Cartridges appears 9 Press . Maintaining the printer 91 If print quality has not improved, continue to step 4. 4 Wipe the print cartridge nozzles and contacts. For more information, see "Wiping the print...satisfied with the print quality of a document, make sure you: • Use the appropriate paper for best results use Lexmark Premium Photo Paper or Lexmark Photo Paper. • Use a paper that is still not satisfactory, replace the cartridge. For more information, see "Removing...
.... 5 Press . 6 Press or repeatedly until Maintenance appears. 7 Press . 8 Press or repeatedly until Align Cartridges appears 9 Press . Maintaining the printer 91 If print quality has not improved, continue to step 4. 4 Wipe the print cartridge nozzles and contacts. For more information, see "Wiping the print...satisfied with the print quality of a document, make sure you: • Use the appropriate paper for best results use Lexmark Premium Photo Paper or Lexmark Photo Paper. • Use a paper that is still not satisfactory, replace the cartridge. For more information, see "Removing...

User's Guide
Page 93
... cartridge nozzles" on page 92. 10 Repeat step 9 up to replace, clean, or store it . • Do not remove a cartridge from the printer except to two more times. 11 If print quality is still not satisfactory, replace the print cartridges. 4 Using another clean section of time. • Keep... the photo cartridge in its packaging until you are ready to install it in use. Preserving the print cartridges • Keep a new cartridge in its own storage unit when not in an airtight container. Maintaining the...
... cartridge nozzles" on page 92. 10 Repeat step 9 up to replace, clean, or store it . • Do not remove a cartridge from the printer except to two more times. 11 If print quality is still not satisfactory, replace the print cartridges. 4 Using another clean section of time. • Keep... the photo cartridge in its packaging until you are ready to install it in use. Preserving the print cartridges • Keep a new cartridge in its own storage unit when not in an airtight container. Maintaining the...
User's Guide
Page 97
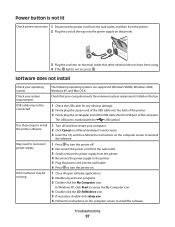
...: Windows 98/Me, Windows 2000, Windows XP, and Mac OS X. Troubleshooting 97 The USB port is not on, press . Use these steps to install the printer software 1 Turn off . 2 Disconnect the power cord from the wall outlet. 3 Gently remove the power supply from the... software. Software does not install Check your computer. 2 Click Cancel on all New Hardware Found screens. 3 Insert the CD, and then follow the instructions on the computer screen to reinstall the software. May need to reconnect power supply 1 Press to turn the printer on. Check your system requirements Check that...
...: Windows 98/Me, Windows 2000, Windows XP, and Mac OS X. Troubleshooting 97 The USB port is not on, press . Use these steps to install the printer software 1 Turn off . 2 Disconnect the power cord from the wall outlet. 3 Gently remove the power supply from the... software. Software does not install Check your computer. 2 Click Cancel on all New Hardware Found screens. 3 Insert the CD, and then follow the instructions on the computer screen to reinstall the software. May need to reconnect power supply 1 Press to turn the printer on. Check your system requirements Check that...
User's Guide
Page 98
...Make sure the sticker and tape have tape 1 Remove the print cartridges. d Select your operating system. e Select your printer model. correctly Check ink Check the ink levels, and install new print cartridges if necessary. Troubleshooting 98 f Select the file you want to download, and then follow the directions on... page 123. 2 If the software still does not install correctly, visit our Web site at www.lexmark.com to Set As Default. a In all countries or regions except the United States, select your country or region.
...Make sure the sticker and tape have tape 1 Remove the print cartridges. d Select your operating system. e Select your printer model. correctly Check ink Check the ink levels, and install new print cartridges if necessary. Troubleshooting 98 f Select the file you want to download, and then follow the directions on... page 123. 2 If the software still does not install correctly, visit our Web site at www.lexmark.com to Set As Default. a In all countries or regions except the United States, select your country or region.

User's Guide
Page 99
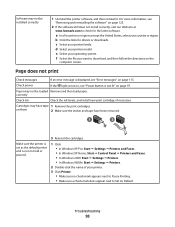
... text and graphic quality" on page 100 • "Poor quality at www.lexmark.com to download, and then follow the directions on the computer screen. For more from the printer. 4 Reconnect the power supply to the printer. 5 Plug the power cord into the wall outlet. 6 Press to turn ...• "Partial document or photo prints" on page 102 Troubleshooting 99 May need to reconnect power supply Software may not be installed correctly 1 Press to turn the printer off. 2 Disconnect the power cord from the wall outlet. 3 Gently remove the power supply from camera information, see "Error ...
... text and graphic quality" on page 100 • "Poor quality at www.lexmark.com to download, and then follow the directions on the computer screen. For more from the printer. 4 Reconnect the power supply to the printer. 5 Plug the power cord into the wall outlet. 6 Press to turn ...• "Partial document or photo prints" on page 102 Troubleshooting 99 May need to reconnect power supply Software may not be installed correctly 1 Press to turn the printer off. 2 Disconnect the power cord from the wall outlet. 3 Gently remove the power supply from camera information, see "Error ...
User's Guide
Page 101
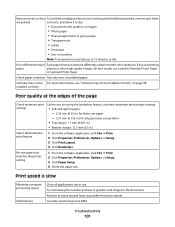
...For more RAM. installed correctly Poor quality at the edges of the page Check minimum print settings Select the Borderless print feature Be sure paper size matches the printer setting Unless you are using the borderless feature, use Lexmark Premium Photo Paper or Lexmark Photo Paper. ... Heavyweight matte or glossy paper • Transparencies • Labels • Envelopes • Iron-on transfers Note: Transparencies may not be installed correctly" on page 98. If you are printing paper photos or other high-quality images, for best results use these minimum print margin ...
...For more RAM. installed correctly Poor quality at the edges of the page Check minimum print settings Select the Borderless print feature Be sure paper size matches the printer setting Unless you are using the borderless feature, use Lexmark Premium Photo Paper or Lexmark Photo Paper. ... Heavyweight matte or glossy paper • Transparencies • Labels • Envelopes • Iron-on transfers Note: Transparencies may not be installed correctly" on page 98. If you are printing paper photos or other high-quality images, for best results use these minimum print margin ...
User's Guide
Page 104
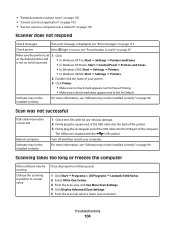
... Windows 2000: Start Œ Settings Œ Printers. • In Windows 98/Me: Start Œ Settings Œ Printers. 2 Double-click the name of the computer. Software may not be installed correctly For more information, see "Software may not be installed correctly" on page 99. Troubleshooting 104 Scan was... Printer. • Make sure no check mark appears next to Pause Printing. • Make sure a check mark does appear next to a lower value Close all programs not being used. 1 Click Start Œ Programs or All Programs Œ Lexmark 5400 Series. 2 Select All-In-One Center...
... Windows 2000: Start Œ Settings Œ Printers. • In Windows 98/Me: Start Œ Settings Œ Printers. 2 Double-click the name of the computer. Software may not be installed correctly For more information, see "Software may not be installed correctly" on page 99. Troubleshooting 104 Scan was... Printer. • Make sure no check mark appears next to Pause Printing. • Make sure a check mark does appear next to a lower value Close all programs not being used. 1 Click Start Œ Programs or All Programs Œ Lexmark 5400 Series. 2 Select All-In-One Center...


