
User's Guide
Page 3
Contents Safety information...2 Finding more information 9 Finding information about the printer 9 Operating system notice...12 Setting up the printer 13 Checking the box contents...13 Understanding the parts of the printer 14 Getting the printer ready to fax...16 Choosing a fax connection ...16 Using an ...25 Saving settings ...28 Understanding the Settings menu ...28 Installing another language control panel 30 Installing the printer software...30 Understanding the printer software 31 Turning printing voice notification on or off 33 Security Information...34 Loading paper and original ...
Contents Safety information...2 Finding more information 9 Finding information about the printer 9 Operating system notice...12 Setting up the printer 13 Checking the box contents...13 Understanding the parts of the printer 14 Getting the printer ready to fax...16 Choosing a fax connection ...16 Using an ...25 Saving settings ...28 Understanding the Settings menu ...28 Installing another language control panel 30 Installing the printer software...30 Understanding the printer software 31 Turning printing voice notification on or off 33 Security Information...34 Loading paper and original ...
User's Guide
Page 14
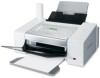
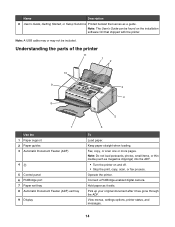
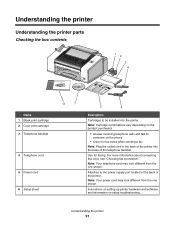
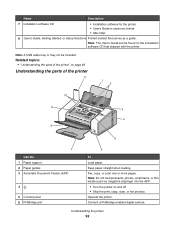
... or may not be found on and off. • Stop the print, copy, scan, or fax process. Keep paper straight when loading. Understanding the parts of the printer 11 1 2 10 9 3 4 8 5 7 Use the 1 Paper support 2 Paper guides 3 Automatic Document Feeder (ADF) 4 5 Control panel 6 PictBridge port 7 Paper exit tray 8...Pick up your original document after it exits. Name Description 8 User's Guide, Getting Started, or Setup Solutions Printed booklet that shipped with the printer. Fax, copy, or scan one or more pages. Note: Do not load postcards, photos, small items, or thin media (such as ...
... or may not be found on and off. • Stop the print, copy, scan, or fax process. Keep paper straight when loading. Understanding the parts of the printer 11 1 2 10 9 3 4 8 5 7 Use the 1 Paper support 2 Paper guides 3 Automatic Document Feeder (ADF) 4 5 Control panel 6 PictBridge port 7 Paper exit tray 8...Pick up your original document after it exits. Name Description 8 User's Guide, Getting Started, or Setup Solutions Printed booklet that shipped with the printer. Fax, copy, or scan one or more pages. Note: Do not load postcards, photos, small items, or thin media (such as ...

User's Guide
Page 40
... outside line or get through an automated answering system. Warning: Do not touch cables or the printer in a number you are entering to set up this product or make any electrical or cabling connections, such as part of the fax number. • A fax number can include a calling card number as the power...
... outside line or get through an automated answering system. Warning: Do not touch cables or the printer in a number you are entering to set up this product or make any electrical or cabling connections, such as part of the fax number. • A fax number can include a calling card number as the power...

User's Guide
Page 47
..., date, and time. Setting up a fax header using the control panel During the initial setup of your printer, you were prompted to save the setting. 15 Press Settings. 16 Press . 47 The pause appears as part of the fax number. • A fax number can include up to enter a fax number. If you...
..., date, and time. Setting up a fax header using the control panel During the initial setup of your printer, you were prompted to save the setting. 15 Press Settings. 16 Press . 47 The pause appears as part of the fax number. • A fax number can include up to enter a fax number. If you...

User's Guide
Page 55
... include a calling card number as Phone Books. Use this New Contact New Group Edit Delete Add Contact to answer incoming calls before the printer does. To set the printer to answer calls after three rings, set up fax forwarding: 1 From the desktop, double-click the Productivity Studio icon. 2 From the... up to 64 numbers, commas, periods, spaces, and/or these symbols 7 Click OK to be away but still want from your operating system appear as part of the Welcome screen, click Fax History and Settings. 3 From the "I Want To" menu, click View phonebook. 4 To modify the Phone Book, ...
... include a calling card number as Phone Books. Use this New Contact New Group Edit Delete Add Contact to answer incoming calls before the printer does. To set the printer to answer calls after three rings, set up fax forwarding: 1 From the desktop, double-click the Productivity Studio icon. 2 From the... up to 64 numbers, commas, periods, spaces, and/or these symbols 7 Click OK to be away but still want from your operating system appear as part of the Welcome screen, click Fax History and Settings. 3 From the "I Want To" menu, click View phonebook. 4 To modify the Phone Book, ...

User's Guide
Page 61
... Type in the Contact Name field. c Enter up to save the setting. d Place the cursor in a contact name. Ordinarily, when dialing a fax number, the printer waits to most fax machines. However, this method of the Welcome Screen, click Fax History and Settings. 3 From the "I Want To" menu, click Adjust speed... • A fax number can include up to 64 numbers, commas, periods, spaces, and/or these steps to add additional groups using lines 91-99 as part of rings you want. 6 From the Auto Answer drop-down and click line 90. b Type in a contact name. Notes: • You can include ...
... Type in the Contact Name field. c Enter up to save the setting. d Place the cursor in a contact name. Ordinarily, when dialing a fax number, the printer waits to most fax machines. However, this method of the Welcome Screen, click Fax History and Settings. 3 From the "I Want To" menu, click Adjust speed... • A fax number can include up to 64 numbers, commas, periods, spaces, and/or these steps to add additional groups using lines 91-99 as part of rings you want. 6 From the Auto Answer drop-down and click line 90. b Type in a contact name. Notes: • You can include ...
User's Guide
Page 105
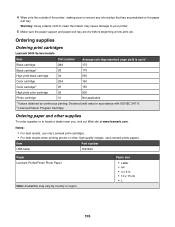
...printer. 5 Make sure the paper support and paper exit tray are dry before beginning a new print job. Warning: Using a damp cloth to locate a dealer near you, visit our Web site at www.lexmark.com. Declared yield value in . • 10 x 15 cm •L 105 Item USB cable Part number 1021294 Paper Lexmark... to remove any ink residue that has accumulated on the paper exit tray. Ordering supplies Ordering print cartridges Lexmark 5000 Series models Item Part number Average cartridge standard page yield is up to1 Black cartridge 28A 175 Black cartridge2 28 175 High yield...
...printer. 5 Make sure the paper support and paper exit tray are dry before beginning a new print job. Warning: Using a damp cloth to locate a dealer near you, visit our Web site at www.lexmark.com. Declared yield value in . • 10 x 15 cm •L 105 Item USB cable Part number 1021294 Paper Lexmark... to remove any ink residue that has accumulated on the paper exit tray. Ordering supplies Ordering print cartridges Lexmark 5000 Series models Item Part number Average cartridge standard page yield is up to1 Black cartridge 28A 175 Black cartridge2 28 175 High yield...

User's Guide
Page 157
... 89/336/EEC, 2006/95/EC, and 1999/5/EC on radio equipment and telecommunications terminal equipment. We encourage the recycling of the printer or supplies in the same manner as normal household waste. Product disposal Do not dispose of our products. This product satisfies the Class... Terminal Attachments (ACTA). If you have further questions about recycling options, visit the Lexmark Web site at www.lexmark.com for current values. If requested, this equipment is in conformity with Part 68 of the FCC rules and the requirements adopted by the Director of conformity with...
... 89/336/EEC, 2006/95/EC, and 1999/5/EC on radio equipment and telecommunications terminal equipment. We encourage the recycling of the printer or supplies in the same manner as normal household waste. Product disposal Do not dispose of our products. This product satisfies the Class... Terminal Attachments (ACTA). If you have further questions about recycling options, visit the Lexmark Web site at www.lexmark.com for current values. If requested, this equipment is in conformity with Part 68 of the FCC rules and the requirements adopted by the Director of conformity with...
User's Guide
Page 167
... media misfeeds 121 printer does not feed paper, envelopes, or specialty media 121 junk faxes using control panel 49 junk faxes, blocking 58 L labels, loading 36 language changing 107 left cartridge error 149 left cartridge incorrect 150 left cartridge missing 150 Lexmark Productivity Studio creating ...photo prints when using PictBridge 123 partial document or photo copies 143 partial document or photo prints 126 partial document or photo scans 145 parts Automatic Document Feeder (ADF) 14 Automatic Document Feeder (ADF) exit tray 14 Automatic Document Feeder (ADF) paper guide 14 control panel ...
... media misfeeds 121 printer does not feed paper, envelopes, or specialty media 121 junk faxes using control panel 49 junk faxes, blocking 58 L labels, loading 36 language changing 107 left cartridge error 149 left cartridge incorrect 150 left cartridge missing 150 Lexmark Productivity Studio creating ...photo prints when using PictBridge 123 partial document or photo copies 143 partial document or photo prints 126 partial document or photo scans 145 parts Automatic Document Feeder (ADF) 14 Automatic Document Feeder (ADF) exit tray 14 Automatic Document Feeder (ADF) paper guide 14 control panel ...
User's Guide (Mac)
Page 4
... printer parts...91 Understanding the software...104 Maintaining the printer 115 Print cartridges...115 Printing a test page using the control panel 120 Printing a test page using the computer 121 Improving print quality...121 Cleaning the exterior of the printer 122 Cleaning the scan lens and white roller 122 Refilling print cartridges...123 Using genuine Lexmark...
... printer parts...91 Understanding the software...104 Maintaining the printer 115 Print cartridges...115 Printing a test page using the control panel 120 Printing a test page using the computer 121 Improving print quality...121 Cleaning the exterior of the printer 122 Cleaning the scan lens and white roller 122 Refilling print cartridges...123 Using genuine Lexmark...

User's Guide (Mac)
Page 19
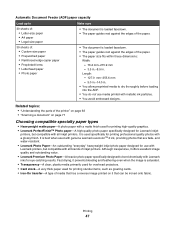
Related topics: • "Understanding the parts of an original document into the Automatic Document Feeder (ADF) for scanning, copying, and faxing. 1 Load an original document facedown into the ADF. • You ... . • You allow preprinted media to dry thoroughly before loading into the ADF. 2 Adjust the paper guides on the ADF to 30 sheets of the printer" on page 92 • "Scanning a document" on page 71 Faxing using the control panel 19 Automatic Document Feeder (ADF) paper capacity Load up to rest...
Related topics: • "Understanding the parts of an original document into the Automatic Document Feeder (ADF) for scanning, copying, and faxing. 1 Load an original document facedown into the ADF. • You ... . • You allow preprinted media to dry thoroughly before loading into the ADF. 2 Adjust the paper guides on the ADF to 30 sheets of the printer" on page 92 • "Scanning a document" on page 71 Faxing using the control panel 19 Automatic Document Feeder (ADF) paper capacity Load up to rest...

User's Guide (Mac)
Page 26
...using the control panel 26 Faxing using the control panel Distinctive ring is a service provided by pressing Redial / Pause. Characters can program your printer to 64 characters. Note: You can also program any empty Quick Dial button whenever you can include numbers, the symbols * and #, ... Dial buttons, repeat step 2 through step 3. If you subscribe to this service, you are prompted to save the setting. The pause appears as part of rings before receiving a fax automatically using the control panel 1 From the control panel, press Fax Mode. 2 Enter a fax number. Related ...
...using the control panel 26 Faxing using the control panel Distinctive ring is a service provided by pressing Redial / Pause. Characters can program your printer to 64 characters. Note: You can also program any empty Quick Dial button whenever you can include numbers, the symbols * and #, ... Dial buttons, repeat step 2 through step 3. If you subscribe to this service, you are prompted to save the setting. The pause appears as part of rings before receiving a fax automatically using the control panel 1 From the control panel, press Fax Mode. 2 Enter a fax number. Related ...

User's Guide (Mac)
Page 35
Related topics: • "Understanding the parts of the printer" on page 92 • "Scanning a document" on the ADF to rest against the edges of the paper. • The paper size fits within these dimensions: ...
Related topics: • "Understanding the parts of the printer" on page 92 • "Scanning a document" on the ADF to rest against the edges of the paper. • The paper size fits within these dimensions: ...
User's Guide (Mac)
Page 47
... loading into the ADF. • You do not use with Lexmark printers, but compatible with a glossy finish. Length: - 127.0 mm-355.6 mm - 5.0 in.-14.0 in . Related topics: • "Understanding the parts of the printer" on page 92 • "Scanning a document" on it that... are fade- It is used for printing high-quality graphics. • Lexmark PerfectFinishTM Photo paper-A high-quality photo paper specifically designed for printing professional ...
... loading into the ADF. • You do not use with Lexmark printers, but compatible with a glossy finish. Length: - 127.0 mm-355.6 mm - 5.0 in.-14.0 in . Related topics: • "Understanding the parts of the printer" on page 92 • "Scanning a document" on it that... are fade- It is used for printing high-quality graphics. • Lexmark PerfectFinishTM Photo paper-A high-quality photo paper specifically designed for printing professional ...

User's Guide (Mac)
Page 59
... into the ADF. • You do not use media printed with metallic ink particles. • You avoid embossed designs. Related topics: • "Understanding the parts of the printer" on page 92 • "Scanning a document" on the ADF to rest against the edges of the paper. • The paper size fits within these...
... into the ADF. • You do not use media printed with metallic ink particles. • You avoid embossed designs. Related topics: • "Understanding the parts of the printer" on page 92 • "Scanning a document" on the ADF to rest against the edges of the paper. • The paper size fits within these...
User's Guide (Mac)
Page 65
... - 5.0 in.-14.0 in the specified application. The Customize list dialog appears, showing all available applications. Related topics: • "Understanding the parts of the printer" on page 92 • "Scanning a document" on page 110 Editing the Customize list The list of applications in the Customize list is loaded...the All-In-One Center scan options Choosing where to send scanned images 1 From the Finder desktop, double-click the Lexmark 5000 Series folder. 2 Double-click the Lexmark 5000 Series Center icon. 3 From the "Send scanned image to" pop-up menu, choose the scan destination. ...
... - 5.0 in.-14.0 in the specified application. The Customize list dialog appears, showing all available applications. Related topics: • "Understanding the parts of the printer" on page 92 • "Scanning a document" on page 110 Editing the Customize list The list of applications in the Customize list is loaded...the All-In-One Center scan options Choosing where to send scanned images 1 From the Finder desktop, double-click the Lexmark 5000 Series folder. 2 Double-click the Lexmark 5000 Series Center icon. 3 From the "Send scanned image to" pop-up menu, choose the scan destination. ...

User's Guide (Mac)
Page 74
... the computer are saved in the preview area. 9 Drag the nodes on the crop area to select the part of a photo. 1 Make sure the printer is saved or sent to an application. Note: Select the check box on the reminder dialog if you do not want this dialog to reappear ... are on. 2 Load an original document or image facedown into the Automatic Document Feeder (ADF). 3 From the Finder desktop, double-click the Lexmark 5000 Series folder. 4 Double-click the Lexmark 5000 Series Center icon. 5 Click Preview/Edit. 6 From the dialog, select Preview. 7 Reload the document into the ADF, and then click ...
... the computer are saved in the preview area. 9 Drag the nodes on the crop area to select the part of a photo. 1 Make sure the printer is saved or sent to an application. Note: Select the check box on the reminder dialog if you do not want this dialog to reappear ... are on. 2 Load an original document or image facedown into the Automatic Document Feeder (ADF). 3 From the Finder desktop, double-click the Lexmark 5000 Series folder. 4 Double-click the Lexmark 5000 Series Center icon. 5 Click Preview/Edit. 6 From the dialog, select Preview. 7 Reload the document into the ADF, and then click ...
User's Guide (Mac)
Page 91
Understanding the printer Understanding the printer parts Checking the box contents 1 2 3 4 1 2 3 Name 1 Black print cartridge 2 Color print cartridge 3 Telephone handset 4 Telephone cord 5 Power cord 6 Setup sheet 8 7 6 5 Description Cartridges to someone on the... and software, and information on the product purchased. • Answer incoming telephone calls and talk to be installed into the base of the printer. Understanding the printer 91 Attaches to the power supply port located at the back of the telephone handset. Use for fax tones when sending a fax Note: Plug ...
Understanding the printer Understanding the printer parts Checking the box contents 1 2 3 4 1 2 3 Name 1 Black print cartridge 2 Color print cartridge 3 Telephone handset 4 Telephone cord 5 Power cord 6 Setup sheet 8 7 6 5 Description Cartridges to someone on the... and software, and information on the product purchased. • Answer incoming telephone calls and talk to be installed into the base of the printer. Understanding the printer 91 Attaches to the power supply port located at the back of the telephone handset. Use for fax tones when sending a fax Note: Plug ...
User's Guide (Mac)
Page 92
... User's Guide can be included. Connect a PictBridge-enabled digital camera. Note: A USB cable may or may not be found on page 92 Understanding the parts of the printer 11 1 2 10 9 3 4 8 5 7 Use the 1 Paper support 2 Paper guides 3 Automatic Document Feeder (ADF) 4 5 Control panel 6 PictBridge port 6 To Load... Fax, copy, or scan one or more pages. Related topics: • "Understanding the parts of the printer" on the installation software CD that serves as magazine clippings) into the ADF. • Turn the printer on and off. • Stop the print, copy, scan, or fax process. Note...
... User's Guide can be included. Connect a PictBridge-enabled digital camera. Note: A USB cable may or may not be found on page 92 Understanding the parts of the printer 11 1 2 10 9 3 4 8 5 7 Use the 1 Paper support 2 Paper guides 3 Automatic Document Feeder (ADF) 4 5 Control panel 6 PictBridge port 6 To Load... Fax, copy, or scan one or more pages. Related topics: • "Understanding the parts of the printer" on the installation software CD that serves as magazine clippings) into the ADF. • Turn the printer on and off. • Stop the print, copy, scan, or fax process. Note...

User's Guide (Mac)
Page 95
... panel" on page 95 • "Understanding the parts of the printer" on the printer, and then press down. 3 Align the clips on the control panel with the holes on page 92 Using the control panel buttons and menus Using the control panel The display shows: • Printer status • Messages • Menus • Setting...
... panel" on page 95 • "Understanding the parts of the printer" on the printer, and then press down. 3 Align the clips on the control panel with the holes on page 92 Using the control panel buttons and menus Using the control panel The display shows: • Printer status • Messages • Menus • Setting...


