Getting Started
Page 14
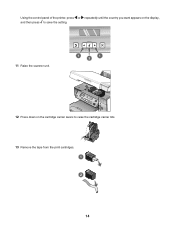
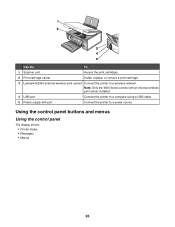
Using the control panel of the printer, press or repeatedly until the country you want appears on the display, and then press to save the setting. 11 Raise the scanner unit. 1 1 2 12 Press down on the cartridge carrier levers to raise the cartridge carrier lids. 13 Remove the tape from the print cartridges. 1 2 14
Using the control panel of the printer, press or repeatedly until the country you want appears on the display, and then press to save the setting. 11 Raise the scanner unit. 1 1 2 12 Press down on the cartridge carrier levers to raise the cartridge carrier lids. 13 Remove the tape from the print cartridges. 1 2 14
Getting Started
Page 15
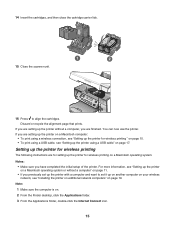
...carrier lids. 15 Close the scanner unit. 16 Press to set it up the printer without a computer" on a Macintosh operating system. You can now use the printer. If you are setting up the printer on a Macintosh computer: • To print using a wireless connection, see "Setting up...Notes: • Make sure you previously set up the printer with a computer and want to align the cartridges. Setting up the printer for wireless printing The following instructions are finished. For more information, see "Installing the printer on additional network computers" on . 2 From the Finder ...
...carrier lids. 15 Close the scanner unit. 16 Press to set it up the printer without a computer" on a Macintosh operating system. You can now use the printer. If you are setting up the printer on a Macintosh computer: • To print using a wireless connection, see "Setting up...Notes: • Make sure you previously set up the printer with a computer and want to align the cartridges. Setting up the printer for wireless printing The following instructions are finished. For more information, see "Installing the printer on additional network computers" on . 2 From the Finder ...
Getting Started
Page 25
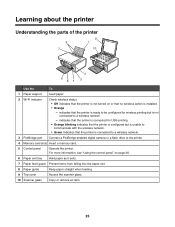
...9 Top cover Access the scanner glass. 10 Scanner glass Copy or remove an item. 25 For more information, see "Using the control panel" on or that no wireless option is not connected to a wireless network - indicates that the printer is connected to a wireless network. 3 PictBridge port Connect...indicates that the printer is configured but is installed. • Orange - indicates that the printer is connected for wireless printing but is unable to communicate with the wireless network. • Green indicates that the printer is ready to the printer. 4 Memory card slots Insert a ...
...9 Top cover Access the scanner glass. 10 Scanner glass Copy or remove an item. 25 For more information, see "Using the control panel" on or that no wireless option is not connected to a wireless network - indicates that the printer is connected to a wireless network. 3 PictBridge port Connect...indicates that the printer is configured but is installed. • Orange - indicates that the printer is connected for wireless printing but is unable to communicate with the wireless network. • Green indicates that the printer is ready to the printer. 4 Memory card slots Insert a ...
Getting Started
Page 26
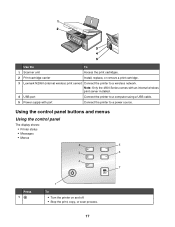
Using the control panel buttons and menus Using the control panel The display shows: • Printer status • Messages • Menus 26 Use the To 1 Scanner unit Access the print cartridges. 2 Print cartridge carrier Install, replace, or remove a print cartridge. 3 Lexmark N2050 (internal wireless print server) Connect the printer to a power source. Note: Only the 4500 Series comes with an internal wireless print server installed. 4 USB port Connect the printer to a computer using a USB cable. 5 Power supply with port Connect the printer to a wireless network.
Using the control panel buttons and menus Using the control panel The display shows: • Printer status • Messages • Menus 26 Use the To 1 Scanner unit Access the print cartridges. 2 Print cartridge carrier Install, replace, or remove a print cartridge. 3 Lexmark N2050 (internal wireless print server) Connect the printer to a power source. Note: Only the 4500 Series comes with an internal wireless print server installed. 4 USB port Connect the printer to a computer using a USB cable. 5 Power supply with port Connect the printer to a wireless network.
Getting Started
Page 43
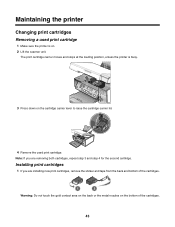
... is on the bottom of the cartridges. 1 2 Warning: Do not touch the gold contact area on the back or the metal nozzles on . 2 Lift the scanner unit.
... is on the bottom of the cartridges. 1 2 Warning: Do not touch the gold contact area on the back or the metal nozzles on . 2 Lift the scanner unit.
Getting Started
Page 44
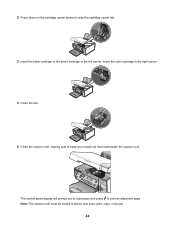
The control panel display will prompt you to load paper and press to start a new scan, print, copy, or fax job. 44 Note: The scanner unit must be closed to print an alignment page. Insert the color cartridge in the right carrier. 4 Close the lids. 5 Close the scanner unit, making sure to raise the cartridge carrier lids. 3 Insert the black cartridge or the photo cartridge in the left carrier. 2 Press down on the cartridge carrier levers to keep your hands out from underneath the scanner unit.
The control panel display will prompt you to load paper and press to start a new scan, print, copy, or fax job. 44 Note: The scanner unit must be closed to print an alignment page. Insert the color cartridge in the right carrier. 4 Close the lids. 5 Close the scanner unit, making sure to raise the cartridge carrier lids. 3 Insert the black cartridge or the photo cartridge in the left carrier. 2 Press down on the cartridge carrier levers to keep your hands out from underneath the scanner unit.
User's Guide
Page 3
... Networking the printer 14 Installing the printer on a network...14 Installing an internal wireless print server 14 Finding your MAC address...15 Learning about the printer 16 Understanding ... panel...17 Using the Copy menu ...19 Using the Scan menu ...20 Using the Photo Card menu ...21 Using the PictBridge menu ...22 Using the Settings menu ...23 Saving... settings ...25 Learning about the software 27 Using the printer software...27 Using the Lexmark Imaging Studio...27 Using the Solution Center...28 Using Printing Preferences...30 Opening Printing Preferences... on the scanner glass 37 3
... Networking the printer 14 Installing the printer on a network...14 Installing an internal wireless print server 14 Finding your MAC address...15 Learning about the printer 16 Understanding ... panel...17 Using the Copy menu ...19 Using the Scan menu ...20 Using the Photo Card menu ...21 Using the PictBridge menu ...22 Using the Settings menu ...23 Saving... settings ...25 Learning about the software 27 Using the printer software...27 Using the Lexmark Imaging Studio...27 Using the Solution Center...28 Using Printing Preferences...30 Opening Printing Preferences... on the scanner glass 37 3
User's Guide
Page 5
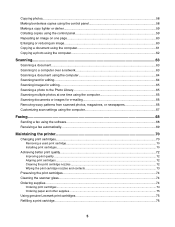
... 59 Repeating an image on one page...60 Enlarging or reducing an image...60 Copying a document using the computer 61 Copying a photo using the computer 62 Scanning.........64 Scanning images for editing...65 Scanning a photo to the Photo Library 65 Scanning multiple photos at one time using the computer 65 Scanning documents or images for... e-mailing 66 Removing wavy patterns from scanned photos, magazines...74 Cleaning the scanner glass...74 Ordering supplies...74 Ordering print cartridges...74 Ordering paper ...
... 59 Repeating an image on one page...60 Enlarging or reducing an image...60 Copying a document using the computer 61 Copying a photo using the computer 62 Scanning.........64 Scanning images for editing...65 Scanning a photo to the Photo Library 65 Scanning multiple photos at one time using the computer 65 Scanning documents or images for... e-mailing 66 Removing wavy patterns from scanned photos, magazines...74 Cleaning the scanner glass...74 Ordering supplies...74 Ordering print cartridges...74 Ordering paper ...
User's Guide
Page 6
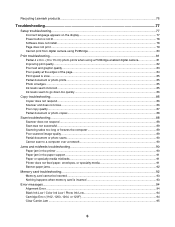
...Lexmark products...76 Troubleshooting...77 Setup troubleshooting...77 Incorrect language appears on the display 77 Power button is not lit ...78 Software does not install ...78 Page does not print ...79 Cannot print from digital camera using PictBridge 80 Print troubleshooting...81 Partial 4 x 6 in. (10 x 15 cm) photo...down too quickly ...86 Copy troubleshooting...86 Copier does not respond ...86 Scanner unit does not close ...86 Poor copy quality ...87 Partial document or photo copies ...88 Scan troubleshooting...88 Scanner does not respond ...88 Scan was not successful ...89 Scanning takes ...
...Lexmark products...76 Troubleshooting...77 Setup troubleshooting...77 Incorrect language appears on the display 77 Power button is not lit ...78 Software does not install ...78 Page does not print ...79 Cannot print from digital camera using PictBridge 80 Print troubleshooting...81 Partial 4 x 6 in. (10 x 15 cm) photo...down too quickly ...86 Copy troubleshooting...86 Copier does not respond ...86 Scanner unit does not close ...86 Poor copy quality ...87 Partial document or photo copies ...88 Scan troubleshooting...88 Scanner does not respond ...88 Scan was not successful ...89 Scanning takes ...
User's Guide
Page 16
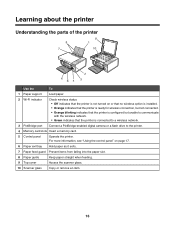
... panel Operate the printer. Learning about the printer Understanding the parts of the printer Use the To 1 Paper support Load paper. 2 Wi-Fi indicator Check wireless status: • Off indicates that the printer is not turned on page 17. 6 Paper exit tray Hold paper as it exits. 7 Paper feed guard Prevent... items from falling into the paper slot. 8 Paper guide Keep paper straight when feeding. 9 Top cover Access the scanner glass. 10 Scanner glass Copy or remove an item. 16
... panel Operate the printer. Learning about the printer Understanding the parts of the printer Use the To 1 Paper support Load paper. 2 Wi-Fi indicator Check wireless status: • Off indicates that the printer is not turned on page 17. 6 Paper exit tray Hold paper as it exits. 7 Paper feed guard Prevent... items from falling into the paper slot. 8 Paper guide Keep paper straight when feeding. 9 Top cover Access the scanner glass. 10 Scanner glass Copy or remove an item. 16
User's Guide
Page 17
... Series comes with an internal wireless print server installed. 4 USB port Connect the printer to a computer using a USB cable. 5 Power supply with port Connect the printer to a wireless network. Use the To 1 Scanner unit Access the print cartridges. 2 Print cartridge carrier Install, replace, or remove a print cartridge. 3 Lexmark N2050 (internal wireless print server) Connect the...
... Series comes with an internal wireless print server installed. 4 USB port Connect the printer to a computer using a USB cable. 5 Power supply with port Connect the printer to a wireless network. Use the To 1 Scanner unit Access the print cartridges. 2 Print cartridge carrier Install, replace, or remove a print cartridge. 3 Lexmark N2050 (internal wireless print server) Connect the...
User's Guide
Page 37
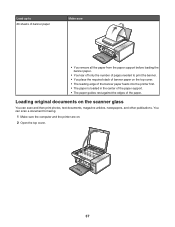
You can scan and then print photos, text documents, magazine articles, newspapers, and other publications. Load up to 20 sheets of banner paper Make sure • You remove all the paper from ... needed to print the banner. • You place the required stack of banner paper on . 2 Open the top cover. 37 Loading original documents on the scanner glass You can scan a document for faxing. 1 Make sure the computer and the printer are on the top cover. • The leading edge of the...
You can scan and then print photos, text documents, magazine articles, newspapers, and other publications. Load up to 20 sheets of banner paper Make sure • You remove all the paper from ... needed to print the banner. • You place the required stack of banner paper on . 2 Open the top cover. 37 Loading original documents on the scanner glass You can scan a document for faxing. 1 Make sure the computer and the printer are on the top cover. • The leading edge of the...

User's Guide
Page 38
3 Place the original document or item facedown on the scanner glass in the upper left corner. 4 Close the top cover to avoid dark edges on the scanned image. 38
3 Place the original document or item facedown on the scanner glass in the upper left corner. 4 Close the top cover to avoid dark edges on the scanned image. 38

User's Guide
Page 49
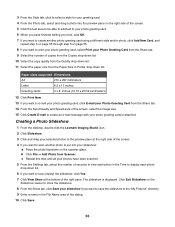
...repeatedly until Scan Proof Sheet appears. 13 Press . 14 Press Start Color or Start Black to print. Notes: • If photos on the memory card were taken on more than one date, selections will include Last Date and Date Range. • To choose a date range, press and then press or repeatedly.... • If the computer is also connected, you want to scan the proof sheet. 49 For more information, see "Loading original documents on the scanner glass" on the proof sheet to select which category of copies, red eye reduction, page layout, print options, and paper size. You can print a...
...repeatedly until Scan Proof Sheet appears. 13 Press . 14 Press Start Color or Start Black to print. Notes: • If photos on the memory card were taken on more than one date, selections will include Last Date and Date Range. • To choose a date range, press and then press or repeatedly.... • If the computer is also connected, you want to scan the proof sheet. 49 For more information, see "Loading original documents on the scanner glass" on the proof sheet to select which category of copies, red eye reduction, page layout, print options, and paper size. You can print a...
User's Guide
Page 55
... Speed area of the screen, select the image size. 15 Click Create E-mail to create an e-mail message with your photo greeting card(s) attached. Click Exit Slideshow on the scanner glass. The slideshow is displayed. c Repeat this step until all your slideshow if you want to save the slideshow to... Paper Size in the File Name area of the dialog. 10 Click Save. 55 Creating a Photo Slideshow 1 From the desktop, double-click the Lexmark Imaging Studio icon. 2 Click Slideshow. 3 Click and drag your selected photos to the preview pane at the bottom of the right pane. 3 From the Style tab, ...
... Speed area of the screen, select the image size. 15 Click Create E-mail to create an e-mail message with your photo greeting card(s) attached. Click Exit Slideshow on the scanner glass. The slideshow is displayed. c Repeat this step until all your slideshow if you want to save the slideshow to... Paper Size in the File Name area of the dialog. 10 Click Save. 55 Creating a Photo Slideshow 1 From the desktop, double-click the Lexmark Imaging Studio icon. 2 Click Slideshow. 3 Click and drag your selected photos to the preview pane at the bottom of the right pane. 3 From the Style tab, ...

User's Guide
Page 56
... want in the table. Printing an image as a multiple-page poster 1 Load paper. 2 From the desktop, double-click the Lexmark Imaging Studio icon. 3 From the Printing Creative Tasks area of a photo, or to view and select other than 4 x 6 in. (10 x 15 cm), select the options you are not scanning... a new item, open the folder that it fits better on the scanner glass. b Click File ΠAdd Photo from Scanner. 5 If you are scanning a photo: a Place the photo facedown on the printed pages, click Rotate 90 degrees. 12 Click Print Now in the last column to...
... want in the table. Printing an image as a multiple-page poster 1 Load paper. 2 From the desktop, double-click the Lexmark Imaging Studio icon. 3 From the Printing Creative Tasks area of a photo, or to view and select other than 4 x 6 in. (10 x 15 cm), select the options you are not scanning... a new item, open the folder that it fits better on the scanner glass. b Click File ΠAdd Photo from Scanner. 5 If you are scanning a photo: a Place the photo facedown on the printed pages, click Rotate 90 degrees. 12 Click Print Now in the last column to...

User's Guide
Page 57
... for the copy job. the higher the dpi count, the higher the resolution and copy quality. 1 Load paper. 2 Load an original document facedown on the scanner glass. 3 If necessary, press Copy Mode. 4 Press . 5 Press or repeatedly until Quality appears. 6 Press . 7 Press or repeatedly until the quality you want appears. 8 Press . 9 Press... paper. 2 Load an original document facedown on page 19. Copying Note: If you want to customize copy settings, see "Using the Copy menu" on the scanner glass. 3 From the control panel, press Copy Mode. 4 Press Start Color or Start Black.
... for the copy job. the higher the dpi count, the higher the resolution and copy quality. 1 Load paper. 2 Load an original document facedown on the scanner glass. 3 If necessary, press Copy Mode. 4 Press . 5 Press or repeatedly until Quality appears. 6 Press . 7 Press or repeatedly until the quality you want appears. 8 Press . 9 Press... paper. 2 Load an original document facedown on page 19. Copying Note: If you want to customize copy settings, see "Using the Copy menu" on the scanner glass. 3 From the control panel, press Copy Mode. 4 Press Start Color or Start Black.
User's Guide
Page 58
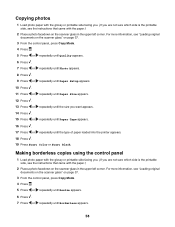
... copies using the control panel 1 Load photo paper with the glossy or printable side facing you. (If you are not sure which side is the printable side, see the instructions that came with the paper.) 2 Place a photo facedown on the scanner glass in the upper left corner. For... more information, see "Loading original documents on the scanner glass" on page 37. 3 From the control panel, press Copy Mode. 4 Press . ...
... copies using the control panel 1 Load photo paper with the glossy or printable side facing you. (If you are not sure which side is the printable side, see the instructions that came with the paper.) 2 Place a photo facedown on the scanner glass in the upper left corner. For... more information, see "Loading original documents on the scanner glass" on page 37. 3 From the control panel, press Copy Mode. 4 Press . ...

User's Guide
Page 59
...: If you are copying photos, use photo or heavyweight matte paper, with the glossy or printable side facing you. (If you are not sure which side is the printable side, see the instructions that came with the paper.) 2 Load an original document facedown on the scanner glass. 59 Collated Not ...darker If you want appears. 14 Press . 15 Press or repeatedly until Paper Type appears. 16 Press . 17 Press or repeatedly until either Automatic or Photo appears. 18 Press . 19 Press Start Color or Start Black. 8 Press . 9 Press or repeatedly until Paper Setup appears. 10 Press . 11 ...
...: If you are copying photos, use photo or heavyweight matte paper, with the glossy or printable side facing you. (If you are not sure which side is the printable side, see the instructions that came with the paper.) 2 Load an original document facedown on the scanner glass. 59 Collated Not ...darker If you want appears. 14 Press . 15 Press or repeatedly until Paper Type appears. 16 Press . 17 Press or repeatedly until either Automatic or Photo appears. 18 Press . 19 Press Start Color or Start Black. 8 Press . 9 Press or repeatedly until Paper Setup appears. 10 Press . 11 ...
User's Guide
Page 60
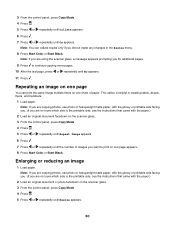
... heavyweight matte paper, with the glossy or printable side facing you. (If you are copying photos, use photo or heavyweight matte paper, with the paper.) 2 Load an original document or photo facedown on the scanner glass. 3 From the control panel, press Copy Mode. 4 Press . 5 Press or repeatedly until ...Repeat Image appears. 6 Press . 7 Press or repeatedly until No appears. 11 Press . Note: You can print the same image multiple times on one sheet of images...
... heavyweight matte paper, with the glossy or printable side facing you. (If you are copying photos, use photo or heavyweight matte paper, with the paper.) 2 Load an original document or photo facedown on the scanner glass. 3 From the control panel, press Copy Mode. 4 Press . 5 Press or repeatedly until ...Repeat Image appears. 6 Press . 7 Press or repeatedly until No appears. 11 Press . Note: You can print the same image multiple times on one sheet of images...


